What is a core heated floor?
Rod infrared heated floors are also called carbon, since carbon rods fixed to a thermal mat act as heating elements.
Peculiarities
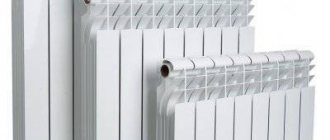
Unlike standard radiators (find out which is better - heated floors or radiators), which cannot heat the room evenly, a carbon infrared floor provides uniform heating.
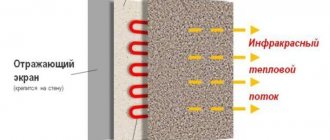
In addition, the heat is not spent on warming the air, but directly warms the objects in the room. This distribution of the thermal resource is the main difference between this model and other electric heated floors.
Another positive aspect of this floor is the self-regulation of the heat generated taking into account the temperature, that is, the system does not overheat, which means its service life is extended.
Different manufacturers produce almost the same product in terms of characteristics; they differ only in the length of the mats, power and distance between the rods.
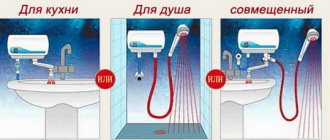
Application
Rod infrared heated floors have high performance characteristics and are combined with basic floor coverings, therefore they have a wide range of applications:
- residential and public premises;
- gyms;
- warehouses and technical rooms.
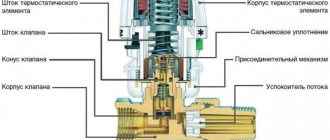
Design
Rod-type infrared heated floors are a heating mat made of two copper current-carrying wires, which are located in parallel. In the design, heating parts - rods - are laid in increments of 10 cm.
Each includes a large number of thin carbon fiber threads coated with polyester, which increases the strength of the product and increases its resistance to mechanical stress. The gap between the spiral and the shell is filled with a material with an increased degree of heat transfer - magnesium oxide.
The rods are connected to each other in parallel with a multi-core cable, which has a cross-section of 2.5 mm and a sheath thickness of 3 mm. This method, if one section breaks down, will not lead to failure of the entire device.
The standard width of the product is 830 mm. The entire structure can reach 25 meters in length. Power consumption is 140 W/m2, working power is 105 W/m2. The degree of maximum heating of the rod is 60 degrees. The range of infrared waves ranges from 8 to 12 microns.
The system is equipped with:
- elements for connection;
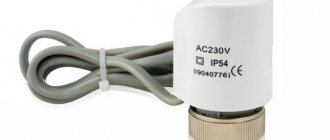
- corrugated tube - for mounting a temperature sensor;
- end kit.
The mats are sold in rolls; when laying, the mats are secured with fasteners, which are sold as a set. Scotch tape is used as an additional method of fastening.
Principle of operation
The operating principle of a rod-based warm infrared floor is similar to a film floor. That is, when the rods interact with current, heat is released in the form of infrared waves.
The floor warms up quickly due to the electrical energy entering the rods. Then the heat penetrates through the finishing coating and warms people and furniture, while the heat resource is not wasted on warming the air.
A rod-type heating device, like all electric heated floors (cable or infrared), must be equipped with a thermostat and temperature sensor. It is possible to operate the floor without these devices, but the power will always be the same, and therefore no savings will be achieved.
To warm up 1 m2 of canvas, you will need from 21 to 160 W, this depends on the number of rods in the structure.
Rod electric heated floor: myths from manufacturers
Among other things, manufacturers indicate many points as advantages of infrared rod floor heating that, to put it mildly, do not correspond to the truth - this is in addition to what has already been said above. They are designed for the common man - so to speak, ignorant of banal physical laws and other things.
- Air ionization. This cannot happen simply because the heating elements are isolated from the air, and tiles or decorative flooring cannot do this even when heated.
- Neutralization of foreign odors. Any floor begins to emit its own personal smell when heated. But that’s not even the point – all present odors are simply removed due to air convection. This effect is observed with all types of heated floors.
- Does not dry out the air. Any heat causes a certain amount of liquid to evaporate.
Rod infrared heated floor photo - To summarize, we can only say one thing - this is an unremarkable system. Moreover, all its indicators indicate that this is a simple type of cable heated floor, the main difference of which lies in the principle of connecting this cable. And that's not all - carbon-carbon tubes, despite the declared service life, as a rule, do not last even a small part of this life. After a year and a half, they begin to fail en masse. Take an interest in the reviews of people who have already encountered this miracle of Korean technology - by and large, it is not worth a damn, not to mention the money that is asked for it.
There is only one verdict - the core heated floor in the form in which it is offered to us is another imposition of bourgeois imperialism, which is trying to sell people even clean air, which we should all breathe freely, and not inhale the urban smog poisoned by industry.
Author of the article Alexander Kulikov
Advantages and disadvantages
Warm infrared floors of the rod type have many advantages, and this is no coincidence, because during their development all the shortcomings of other heating devices were taken into account, although there are still disadvantages.
We suggest you read the article where the advantages of all types of heated floors and their disadvantages are revealed in detail.
Watch the video
Caleo Unimat rod heated floor
pros
The main advantages of core floors are:
- fire safety - do not overheat and can withstand temperatures up to 60 degrees;
- moisture resistance - can be installed in a bathtub or on loggias;
- environmentally friendly - all components included in the structure are made from environmentally friendly materials;
- compatibility with various floor coverings - can be combined with tiles, linoleum, laminate;
- economical in terms of energy consumption - the power of carbon devices is 87 watts per 1 linear meter, which provides energy savings of up to 30%;
- have self-regulating properties - this allows you to set the desired temperature;
- ease of installation - even a non-professional can handle it;
- safety - do not affect human health, since there is no electromagnetic radiation;
- have a low weight - create a small load on the floors;
- are not subject to corrosion.
In addition, infrared carbon floors are suitable for installation in rooms with complex layouts and under heavy furniture.
Minuses
Disadvantages of rod structures:
- Before installing carbon fiber floors, it is necessary to dismantle the concrete base;
- Foil backing is prohibited, since aluminum is destroyed under the influence of alkali, and this will lead to malfunction;
- short service life - about 10 years;
- high price compared to other heating floors;
- the difficulty of carrying out repair work, since installation is carried out in a screed or with glue.
As you can see, carbon floors have negative sides, and they should be taken into account when choosing a model and installing it.
Features of operation
If the underfloor heating is installed correctly, there should be no problems when using it. But still, in order to ensure the safe operation of such a heating system and extend its service life, some points should be taken into account:
- It is recommended that only qualified electricians connect the equipment to the power supply.
- wire connections must be made according to the diagram indicated in the instructions for the system;
- installation of mats with rods should only be carried out in a screed or in a tile adhesive mortar;
- The equipment may only be connected to an electrical network whose voltage corresponds to the values specified in the instructions;
- installation of mats from the wall should be carried out at a distance of at least thirty centimeters;
- do not allow the system to overheat by exceeding the power indicated on the thermostat;
- in the area where the mats are placed, you cannot drive nails or drill holes into the floor;
- the thickness of the carpets laid on top of the heated floor should not exceed ten millimeters;
- During the summer, the thermostat should be turned off.
Connection features and operating points for each type of underfloor heating system are always indicated by the manufacturer in the instructions supplied with the equipment.
The rod system is a common floor heating option. Due to its high technical characteristics and the absence of electromagnetic radiation, equipment of this type is often installed in living rooms. Proper organization of the installation of an electrical rod device will create a comfortable microclimate in any room in winter.
Manufacturers (Unimat, Kaleo)
Today, among the manufacturers of carbon core heated floors, the leading Korean companies are Unimat and Kaleo.
Video
Rod carbon heated floor gtmat Caleo – installation from Master Tiler
Unimat
Unimat specializes in the production of warm electric floors. Two types of rod heating devices are produced under this brand:
- Rail Unimat - has a simple design, the width of which is 830 mm. The product has a power of 120 W. Installation under tiles using adhesive or a small layer of screed is recommended.
Important! The floor covering layer must have a thickness of at least 2 cm.
- Unimat Boost is a distinctive feature of this model, the presence of a smaller pitch (9 cm). Model power 160 W. It is capable of heating a large area.
All models include mats, fasteners, wires, corrugated pipe, and the “End” kit. In addition, there is a warranty card, manufacturer’s instructions and a video with a step-by-step installation process that will help you do the floor yourself.
Kaleo
Kaleo is a leading manufacturer producing these heating devices. The company's products are high quality, long service life, reliability, and affordable price.
The products are manufactured using high-tech methods, which ensure fire safety and prevent overheating during operation.
Kaleo systems are characterized by quick installation. You can build such a floor with your own hands, without the help of specialists, within 2 hours.
There are models from this manufacturer that have increased functionality; they are also called “Smart Floors”. They are recommended for heating large areas in order to save money (cottages, offices).
Infrared heated floor – what is it?
Let me remind you that I already have an article on the website dedicated to electric heated floors. There is approximately the same principle, but the difference is that the floor is heated by a cable that has a certain resistance, which does not depend on anything. That is, the floor is cable.
And in this case, our gender is self-regulating. Of course, this is said loudly, and the heating temperature can and should still be changed using a thermostat. Self-regulation means that when heated, the floor increases its electrical resistance, thereby reducing the current. The result is negative feedback on temperature - the more, the less.
Heating of the floor can occur not only due to the flow of current. It can be heated, for example, using an industrial hair dryer (it will also be discussed in the article) - the effect will be the same, the resistance will decrease.
This floor is also called a rod floor, it is made in the form of a mat in which several carbon heating rods are arranged in series, connected electrically in parallel.
Unimat heating mat – rolled
Such floors also come in the form of films; the principle of operation is the same, only the design is different.
Marketers divide electric floors into infrared and convection. I don't understand at all. Infrared means they emit heat. Convection means the air is heated from the floor and rises. What is there to share?
Installation Features
Rod infrared floors are a multi-layer structure, which can be installed in two ways.
Laying on screed
On a screed - this means pouring a subfloor from a concrete solution that expands during the heating process. A layer of heat and waterproofing, mats, and reinforcing mesh are placed on it, on top of which a thin screed is poured and the floor covering is installed.
For your information! Carbon fiber floors without screed can only be installed on a smooth surface.
On a wooden floor
The essence of installation on a wooden floor, the method is also called laying, is to construct a “pie” consisting of an insulating substrate with a foil layer, a wooden log, a reinforcing mesh to which the heating elements will be fixed, and a finishing coating.
For your information! Do not allow the IR floor to come into contact with metal or foil coating,
Installation of rod heated floors
Installing an infrared rod floor is not difficult, and anyone can do it. Let's consider installing this model on a screed as a more labor-intensive method.
Work should begin by determining the location where the thermostat is attached; it should be located accessible to make it easier to extend the cable from the mat and the sensor to it. Ideally, next to the switch. When installing the floor in wet rooms, the device is taken to another room.
For your information! The construction of a rod-based heated floor, unlike other floor heating systems, does not require drawing up a mat placement diagram, since interior items of any weight can be installed on them.
If desired, you can make a schematic drawing, this will simplify the work. In addition, although this is not prohibited, there is no need to lay mats under the furniture; you can save money on this.
Material and tools
Having decided to install a rod floor, you need to buy the selected model, which includes all the components for arranging the structure.
In addition, you need to purchase:
- substrate;
- heat shrink tubes;
- thermostat;
- sleeves;
- wire for connection having double insulation.
From the tool, you should use scissors, wire cutters, a knife, a screwdriver, and tape. You will also need a hair dryer to warm up the heat-shrinkable pipes.
Preparatory work
The first stage of work is to prepare the subfloor, which must be level. If there is a cement surface, it should be cleaned and leveled, otherwise it is necessary to pour a concrete screed.
After the solution has hardened, a polyethylene film (for waterproofing) and insulation material are laid. The heat insulator should not have a foil layer, so isolon with a reflective side made of polypropylene or lavsan would be ideal.
Important! To reduce heat loss, damper tape should be glued along the walls.
System installation
Mats, pre-cut to the required length, are spread on a layer of thermal insulation, at a distance of 15 cm from the walls. They should not overlap one another; a small indentation should be made between them.
The product is fixed to the heat-insulating material using tape. The canvases are connected to each other with a special wire, it is included in the kit.
Important! For better adhesion of glue or concrete mortar with a rough base, small windows are made into the insulation in a checkerboard pattern.
Connection
Connecting a device consists of several stages:
- Installing the thermostat at the planned location.
- Electrical diagram connection:
- stripping the cable at the cut points by 1 cm;
- installing the contact (it is included in the kit) on the stripped end of the cable; it should be clamped well with pliers;
- connection to the second contact - is made by passing the wire through a heat-shrinkable tube, and bringing and fixing it to the terminal; the insulation is first removed from the cable;
- heating the heat-shrinkable tube with a hairdryer;
Thus, the entire system is assembled.
- Placement of the temperature sensor - it is better to install it in a corrugated pipe. To do this, a recess is made in the insulation layer into which a corrugation with a sensor inside is placed. A cable is pulled from the device and connected to the thermostat.
- Connection mat. The wires coming from the core floor are connected to the thermostat terminals.
At this point, the connection of the rod-heated floor is completed, and you should check its operation. The system turns on for several hours; it is possible to leave the floor on for a day.
Finish coating
The most common finish for this type of floor is tile, although linoleum or wood can be installed. To install it, it is necessary to cover the surface of the mat with a screed - this is a cement or epoxy mixture with additives.
The thickness of its layer, plus the tile adhesive, must be at least 2 cm. To add strength, it is recommended to lay a reinforcing mesh on the heating structure, on top of which the solution is poured. The system turns on only after the solution has completely dried.
For your information! Ceramic or natural stone tiles are suitable for installation on carbon heated floors. The optimal size is 30 by 30 cm, and the adhesive layer should be 6-8 mm.
The design of the carbon heated floor is convenient during installation and operation. The main thing is to choose the right floor covering that would be combined with this system.