Recently, issues of saving in various areas of our lives have become increasingly relevant.
We will tell you about the possible causes of heat loss in a country house and about those simple techniques that will allow you to significantly reduce leaks, and therefore save on energy and heating costs.
First, let's list the most obvious things that lie literally on the surface.
EVERYTHING YOU NEED FOR THIS ARTICLE IS HERE >>>
It happens that you don’t get around to it or there simply isn’t enough time to eliminate the obvious causes of heat loss. Show your will and character - and you will feel that your home has become more comfortable and warmer. So, let's get to work!
Leaks in the attic
To find heat leaks in the attic, place a compact room fan in a window so that air is blown in, and close the remaining windows and doors. Tape the cardboard around the fan to cover the window opening. When you turn on the fan at high speed, the house will! air is pumped in and the pressure increases, like in an inflated balloon.
And just as you can tell where the air is coming out of a leaky balloon, you can spot air leaks in your attic simply by feeling the movement of the air with your palm.
No. 1. An example of a thermal imaging inspection of a Ministry of Health building
Thermal imaging inspection of the Ministry of Health building
On November 22, 2021, we conducted a thermal imaging inspection of the building of the Russian Ministry of Health.
We used the equipment:
- thermal imager "Testo 871",
- thermohygrometer "Testo 622",
- heat flux and temperature density meter ITP-MG4.03 “PO-TOK”,
- Thermal anemometer "Testo 405".
Thermal imaging examination from RUB 15,000.
Find out in detail
We conducted surveys under the following conditions:
- air temperature -1 °C, external relative humidity 83%,
- measurements were carried out in the absence of sunlight for 12 hours before thermography,
- the average thermal pressure was 21 °C,
- the emissivity of the test object was more than 0.7,
- thermal control was carried out in the absence of precipitation and fog at a wind speed of 1.6 m/s.
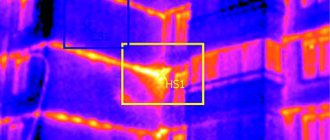
Here are some thermograms from this survey.
The thermogram shows a violation of the thermal insulation properties of the walls in the basement area.
A violation of the thermal insulation of the walls in the area of the building's basement was revealed.
Heat loss through the walls in the basement area was recorded, and the thermal insulation of the enclosing structures was damaged.
No thermal anomalies were identified, standard heat loss through the windows.
Heat loss through wall junctions was recorded.
Heat loss through the junction of the walls in the basement area, the thermal insulation is damaged.
Heat loss in the area where the walls adjoin.
Thermal imaging inspection of buildings from RUB 15,000.
Find out in detail
Holes around sockets
Gaps around electrical outlets in exterior walls also conduct heat. If the gap between the electrical outlet and the drywall is less than 0.6 cm, simply fill it with latex caulk. If the gap is larger and slopes to one side, use foam for doors and window frames.
Turn off the power, remove the lid, apply foam around the box. Cut off the excess, place a foam pad and put the lid in place. Do the same around the ventilation grille opening on the inside of the walls.
No. 3. Example. Thermal imaging inspection of houses in Moscow
Example: Thermal imaging survey of a home
On November 18, 2021, we carried out a thermal imaging inspection of the house.
We used the equipment:
- thermal imager "Testo 871",
- thermohygrometer "Testo 622",
- heat flux and temperature density meter ITP-MG4.03 “PO-TOK”,
- Thermal anemometer "Testo 405".
We conducted surveys under the following conditions:
- air temperature 2 °C, external relative humidity 73%,
- measurements were carried out in the absence of sunlight for 12 hours before thermography,
- the average thermal pressure was 18 °C,
- the emissivity of the test object was more than 0.7,
- thermal control was carried out in the absence of precipitation and fog at a wind speed of 2 m/s.
These are good conditions for conducting a survey.
The following results were obtained:
The thermogram shows no defects in thermal insulation, air infiltration, or uneven temperature distribution.
Good result! Let's see further.
We also found no defects on this side of the building.
The thermogram showed no heat leaks.
Heat loss through windows meets the standards.
Learn about thermal imaging inspection of windows.
The thermogram of the façade section with a large glazing area shows no defects (heat leaks).
Heat loss through the glazing is normal.
And here is an excellent result. We have not recorded a single defect.
The thermogram shows no thermal insulation defects or air infiltration.
6.Cracks in the attic
Warm air rises, so ceiling leaks cause greater losses than wall leaks. Get into the attic and peel back the insulating sheeting. Most leaks occur where pipes or electrical wires pass through the ceiling. Seal gaps with fireproof foam or sealant.
Link on topic: Warm energy-efficient house - wall installation
No. 4. An example of a thermal imaging inspection of a private house.
Example: Thermal imaging inspection of a private house
On April 14, 2021, we carried out a thermal imaging inspection of a private home.
We conducted surveys under the following conditions:
- air temperature 4 °C, external relative humidity 72%,
- measurements were carried out in the absence of sunlight for 12 hours before thermography,
- the average thermal pressure was 16 °C,
- the emissivity of the test object was more than 0.7,
- thermal control was carried out in the absence of precipitation and fog at a wind speed of 2 m/s.
We used the equipment:
- thermal imager "Testo 871",
- thermohygrometer "Testo 622",
- heat flux and temperature density meter ITP-MG4.03 “PO-TOK”,
- Thermal anemometer "Testo 405".
The reason for petition:
Find the cause of ice formation on the roof of a private house.
Let's look at a few thermograms from this survey.
No thermal insulation defects were found in the roof area.
There are no thermal insulation defects on this section of the roof.
The roof and roof window have no thermal insulation defects
Thermographic survey inside the attic did not reveal any defects in the thermal insulation of the roof of a private house.
The places where the walls adjoin the roof overhang have no thermal insulation defects.
Heat loss through the window is standard.
The areas where the roof overhang meets the walls have no thermal insulation defects.
There are no thermal insulation defects in the balcony area.
Large glazing area and standard heat loss through translucent structures.
Sealing and closing air conditioners
If you have a window air conditioner, the best solution is to remove it for the winter to prevent cold air from flowing through it into the room.
If you decide to leave the equipment in place, indoors, apply removable caulk around the air conditioner where it is attached to the wall or window.
Cover the outside of the air conditioner with insulation.
Making your own thermal imager
Nothing prevents the owner from purchasing a personal device and using it whenever he wants - the thermal insulation must be checked regularly and promptly changed, so the device is not intended for a one-time use. However, the exorbitant cost makes a construction thermal imager unaffordable to purchase - the average price for a device is well over 100 thousand rubles. Naturally, the decision arises to make your own device, especially since with the development of the Internet, few things remain impossible. So:
- To assemble a thermal imager with your own hands, for the future design you will need an infrared thermometer, a set of flashlight LEDs, a webcam or a camera with a function of multiple frames at regular intervals.
- The infrared thermometer is connected to the LEDs via a special board - radio amateurs will understand. Now the radiation from the LEDs will become different colors depending on the temperature of the thermometer. Warmth emits shades of red, cold – blue. You can also detect dampness - it is green, acidic in color. I managed to make a thermal imager at home.
- All that remains is to pick up a homemade thermal imager and a recording device - a webcam configured for slow motion or a camera that films what is happening every few seconds. Slowly walking around areas of your own home, it is not difficult to achieve good results.
As you can see from the instructions, a thermal imager from a webcam or camera will require minimal costs and knowledge - they have already been described. This will save owners an impressive amount. It is important to remember that the readings of a professional device are still more accurate than a homemade one, and if we are talking about an expensive cottage, then it is better to take care of its long life in advance and in full.
- LiveJournal
- Blogger
Thermal imagers are expensive devices
Sealing the windows
Method A
Fill the cracks in the windows with removable sealant.
Apply it to the cracks between the moving (sash) and fixed (jamb) parts of the window and between two sashes. Remove the seal in spring. Remove residues with white spirit.
Method B
Place double-sided tape on the window frame. Cut the plastic film to fit the window, leaving a few extra inches on each side. Starting at the top corner, tape the film around the perimeter of the window. Use a hairdryer to remove wrinkles. When winter is over, remove the plastic and tape.
No. 2. An example of a thermal imaging inspection of an apartment building
Example: thermal imaging inspection of an apartment building
On October 30, 2021, we carried out a thermal imaging inspection of an apartment building.
We conducted surveys under the following conditions:
- air temperature 4 °C, external relative humidity 83%,
- measurements were carried out in the absence of sunlight for 12 hours before thermography,
- the average thermal pressure was 16 °C,
- the emissivity of the test object was more than 0.7,
- thermal control was carried out in the absence of precipitation and fog at a wind speed of 2 m/s.
We used the equipment:
- thermal imager "Testo 871",
- thermohygrometer "Testo 622",
- heat flux and temperature density meter ITP-MG4.03 “PO-TOK”,
- Thermal anemometer "Testo 405".
We got the following results.
No defects are observed on the thermogram, but structural cold bridges are recorded (along the floors).
There are no defects, everything is fine.
We discovered structural cold bridges along the floors.
Air infiltration was detected through the seals around the perimeter of the entrance door.
No defects were identified, except for structural cold bridges.
We discovered large heat losses and air infiltration through the entrance door.
The seal of the door of this entrance revealed air infiltration, a significant defect.
The next entrance door has a significant defect - air infiltration.
The external entrance door is not airtight, the seal is broken or missing.
Infiltration of outside air and large heat losses were recorded.
