Water heating in a modern home is a complex system that must work reliably and uninterruptedly. However, there are a number of reasons why a failure occurs, such as installation errors, equipment wear and tear over time, etc. All these factors can affect the tightness of the circuits and cause malfunctions. To find the damaged area, a pressure test of the entire water heating system is required. How is this manipulation performed in a private (country) house and is it possible to do it with your own strength and hands? What level of pressure should it be? You can read about all this and watch the video.
Pressure testing - what is it?
Pressure testing of a finished water heating system is a test of tightness and assembly quality.
Whether the system can be put into operation or not depends entirely on the results of such a check. This is the first procedure that needs to be carried out after installation and before turning on the heating. At its core, it is control without destruction. Air or water is pumped into the system, thereby creating increased pressure. If there are no leaks, you can safely put the system into operation.
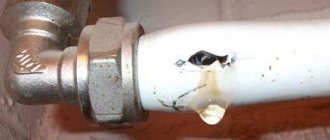
Pressure testing is also carried out when checking an already operating system. After all, leaks often appear at the places where parts are connected using fittings, soldering or welding. The pipes themselves may also suffer, for example, from mechanical stress or corrosion. High temperature and pressure also cause gradual wear of pipes and parts of the water heating system. To detect and eliminate the location of the flaw, crimping is required.
This is a set of measures through which not only the heating system, but also the hot water supply, sewage system, and pipes in the water well can be checked in a private home.
Pressure testing of a heated floor system
The crimping procedure includes:
- pipeline testing and flushing;
- checking and, if necessary, replacing parts;
- restoration of damaged insulation.
The following are tested under high pressure:
- strength of housings, as well as walls of pipes, radiators, heat exchangers and fittings;
- fastening when connecting the elements that make up the system;
- maintenance of taps, pressure gauges, as well as gate valves.
Existing methods for pressure testing a heating system
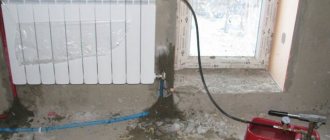
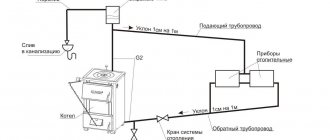
Pressure testing with water . With this method, a hose running from the water supply is connected to a tap located on the collector or boiler. After filling the system with water, the pressure level should reach operating figures - 1.5 atm.
Pressure testing with air . With this method, a pressure tester is connected to the system - a compressor that pumps air. The pressure in the area being tested should become greater than the working pressure, which is usually 1.5 - 2 atm. In this case, an adapter is installed in place of the Mayevsky tap, designed to connect a compressor.
Advice. In order not to specifically purchase an expensive pressure tester, when carrying out independent work to check a small area, you can use a car pump with a pressure gauge.
Air pressure testing is carried out when it is not possible to connect to a water supply system, as well as in winter, when there is a possibility of water remaining in the pipes with subsequent freezing. When working with air, the integrity of the system is determined using pressure gauge readings. If the discharge pressure is kept at the same level, there are no leaks. To visually detect fistulas, a soap solution is applied to the suspected areas.
Pressure test pump for heating system
Pneumatic test
Pneumatic test diagram.
The pneumatic method is tested if the ambient temperature drops below 5°C. In this case, the pressure in the pipes should not drop below 10 kPa. This method is excellent for a system of polymer pipes where there are plastic connecting parts.
Related article: Wallpaper for a girl's room
The conditions for conducting a pneumatic test of the heating system are:
- in the absence of liquid in the volume required for testing;
- at ambient temperatures below plus five degrees (some experts indicate below zero);
- if for technical reasons it is impossible to use the working fluid.
This method is rarely used. This is due to the fact that it is more difficult to find leaks and leaky connections than during hydraulic tests.
How does the crimping process work?
- Preparing the system before pressure testing. If the system is autonomous, then the heat generator is turned off first. If not, then taps are used to close off the area where inspection is required. The coolant must be drained.
- The system circuit is filled with water having a temperature of no higher than 45 C. The air is gradually released.
- The compressor is connected and air begins to flow into the pipes.
- At the beginning of the procedure, the pressure is brought to the working level and the area is visually inspected for violations. Then the pressure is gradually increased to the test level - this is maintained for at least 10 minutes.
- The area or the entire system is inspected for leaks at the connections. It is mandatory to visually inspect fittings, radiators and the entire length of pipe walls for fistulas. If deviations are detected, all defects and shifts are recorded. The operation of taps and valves is checked.
- Using pressure gauge readings, the drop in pressure level is determined. If it has not decreased, the system is in normal operating condition.
- Based on the results of the inspection, a report is drawn up.
Pressure in pipes during crimping process
The test pressure level, as recommended by building codes and regulations (SNiP), should be 1.5 times higher than the working pressure, but not lower than 0.6 MPa. According to the rules of technical operation of heating networks - 1.25 times higher than the working one and not lower than 0.2 MPa.
In a private house with up to three floors, the pressure usually does not exceed 2 atm. When it is exceeded, a special valve is activated and a reset occurs. In five-story buildings the pressure is 3-6 atm; in buildings from 8 floors - 7-10 atm. The maximum test pressure level depends on the characteristics of the constituent elements of the system: pipes, radiators, fittings, etc.
What pressure in the heating system of a private home is considered normal?
First of all, you need to know that the pressure in any heating system should not exceed the strength threshold of its weakest component.
Typically these are boiler heat exchangers.
The most durable of them can withstand pressures of up to 3 atmospheres or bar.
Pressure is often indicated in MPa (megapascal). The correspondence of the values is as follows: 1 atm = 0.1 MPa.
Fittings and radiators are generally more durable. For example, a cast iron radiator can withstand a pressure of 6 atm.
The answer to the question of what pressure can be considered normal for a particular heating system will depend on its type. The simplest type is systems with natural circulation of coolant, also called thermosiphon. In such a circuit, the coolant moves only due to convection. This phenomenon is caused by gravity, which is why such systems are also called gravitational.
The pressure in a thermosiphon system depends only on the height of the water column, that is, on the difference in height between the lowest and highest points. This pressure is called static. A height difference of 10.34 m creates a pressure of 1 atm at the lowest point. Thus, a boiler tank designed for 3 atm can only collapse if the system rises 10.34 x 3 = 31.02 m above it.
Heating system with expansion tank
Once again, we draw the reader’s attention to the fact that the static pressure in the heating system is maximum only at the lowest point. In the direction from bottom to top, it gradually decreases and at the top point it becomes equal to zero.
The actual pressure at the top point of the liquid volume is equal to atmospheric pressure, but we are interested in the so-called excess pressure - it is precisely this that is equal to zero.
Since there is no excess pressure at the top point of the circuit, the expansion tank installed here can look like a simple open container. Therefore, such systems are also called open.
If the heating system is equipped with a circulation pump that pumps coolant, it must be made closed.
Crimping: how to do it yourself
Often, when building a private house, the heating system is installed before the water is connected. Therefore, a large water container and a submersible pump are used to pump water into the pipes. During the manipulation, you need to constantly monitor the pressure using a pressure gauge and control the water level in the container, gradually adding it if necessary.
Checking the heating system before starting
When the pressure readings rise to 2-2.5 atm, the pump is turned off, and the remaining air is gradually released from the system using Mayevsky taps. Further, after the mark on the pressure gauge drops below 1 atm, filling with water continues. This is done until the water completely displaces the air and the pressure reaches a level of 1.2-1.5 atm.
If no leaks are detected, you can connect the boiler and start the system.
Advice. To perform the procedure yourself, inexpensive submersible pumps are suitable, and you can easily adapt a barrel, bucket or basin as a water container.
For such an important event as crimping, it is better to hire a team that has the appropriate license. These people are fully responsible for the actions performed. In this case, the customer receives all the necessary documents about the work performed.
Attention! The report on the pressure testing carried out must include the time during which the system was under test pressure and indicate its level.
Pressure testing of a heating system is a matter that requires a serious approach. This operation should be carried out with your own hands only in extreme cases.
Why thermal imaging?
- Accuracy. A professional device not only records a violation, it calculates the temperature difference, puts marks directly on the thermograms, and analyzes the data obtained.
- Rapidity. The process itself takes from an hour (in a studio) to 2-3 hours (in large rooms). We can leave on the day of your order. Immediately after, we will give oral recommendations, and the report will be ready within 3 days.
- No preparation. You, as the owner, do not need to have tools or prepare in any way for the inspection. Unless to clear the passage for our specialist - to the corners and window sill.
- Safety. This method is non-contact - the device does not interact with the finish in any way and does not damage it in any way.
- Efficiency. A tool that shows temperature differences is the most accurate way to find the causes of heat loss.
How is the apartment inspection carried out?
- You leave a request on the website or call us by phone.
- During the conversation, we collect primary information about the property (address, number of rooms, area, list of problems, purpose of the survey, whether the report should be used in court).
- We agree on a date and conditions.
- We come to you and shoot inside the apartment (often also outside, depending on the number of floors and the presence of a balcony).
- Immediately after, we answer not all questions verbally and give the most urgent recommendations.
- Within three days, we analyze the results obtained and prepare a detailed report with recommendations from construction experts with an engineering education.
Random review about us:
I rented an apartment with the master Evgeniy in the residential complex on Simonovsky. Great job! Where I didn’t notice anything, the thermal imager saw everything that needed to be fixed! I read the reviews and was afraid to choose the right receiver - my fears were in vain, everything worked out. Now I have no idea how to rent an apartment on my own)
Thermal imaging inspection - as a way to control contractors
Have you ordered installation of double-glazed windows? Or new radiators? Or are you welcoming your long-awaited loved one into a new building? Are you renovating with thermal insulation? And at first glance everything seems to be fine. The doors and flaps close, it seems that there is no breeze, and the radiators are not very cold. Or, after all, they do not receive enough coolant?
Our advice: before accepting work, ask for inspection. This can save you a decent amount in the future.
Why do we recommend ordering from us?
Because thermal imaging inspections of apartments are our specialty. We have extensive experience and carry them out very quickly and very effectively: identifying 99.9% of defects.
- Our employees have engineering education and certification in Rostekhnadzor;
- The average employee experience is about 8 years;
- We use professional equipment with a 320×240 matrix;
- The report contains not just pictures, but detailed recommendations for troubleshooting;
- Upon agreement, we prepare a version of the report that can be used in court and legal proceedings;
- There is access to work that affects the safety of objects.
