The performance of water underfloor heating depends on the layout and pitch of pipe laying. Therefore, to design a system, it is not enough just to buy components; you also need to calculate the heat transfer, choose the optimal arrangement of rings or turns of the pipeline.
Agree, no one is attracted by the prospect of investing money and not getting the intended effect. You will learn everything about the design of underfloor heating and the schemes according to which underfloor heating pipes are laid from the article we presented.
Familiarization with the information we have verified and systematized will help you create a perfectly functioning heated floor. The basis for the information we offer is the requirements of construction regulatory reference books.
We have outlined in detail the principle of operation of floor heating circuits, described the design options and technologies for their implementation. Informative photos and video tutorials clearly confirm the presented data and make the process easier to understand.
Water heated floor system
A distinctive feature of heated floors is that they do not have external heating structures, and the system itself accumulates and radiates the resulting heat.
With proper heat distribution over the surface of the flooring, you can save 30% or more on coolant consumption.
The floor heating system can be represented by one of the following types: water, electric, film, rod or electric water. The latter is considered an innovation, but due to a wide range of advantages, it has already managed to win many fans
To rationally use the floor heating system, let's consider additional ways to help save:
- The length of the liquid circuit does not exceed 70 m. When choosing the optimal pitch for laying pipes, the coolant is transported with virtually no losses.
- Mixing hot and cold flows. The use of return water makes it possible to waste less energy from the boiler.
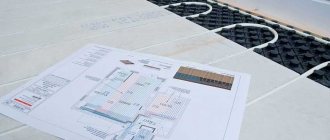
- Drawing up a detailed layout of the circuit with precise calculation of the step. Preliminary distribution of furniture positions will allow you to save on consumables, and, accordingly, on the circuit itself.
- When the system reaches maximum temperature, reduce the temperature by 20 °C. This action will help save 13% of the coolant.
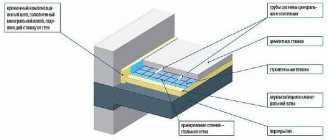
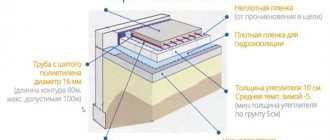
In order to get the best result, you must strictly adhere to the installation technology. The heating mechanism of such a system consists of several layers, each of them has its own function.
The installation of a heating system using underfloor heating is carried out in stages. Work on each of them will take a certain time, for example, after pouring, subsequent work can only begin after 2-4 weeks
High-quality heating of the room by laying liquid heated floors is organized in several stages:
- Waterproofing . This layer eliminates the appearance of products resulting from condensation. Even polyethylene film can be used for the substrate.
- Thermal insulation . The main task is to eliminate heat leakage into the lower part. In most cases, sheet insulation is used. The thickness should be selected based on the conditions of the room - whether there is a basement or ground floor in the house. The colder the climate, the thicker the insulation.
- Foil or heat-reflecting element. Foil film that promotes maximum redirection of heat flow to the top. Laying this material allows you to save up to 5% on coolant consumption.
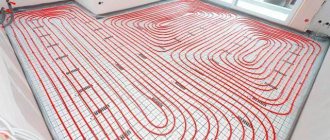
- Pipe installation . The main structure of the entire mechanism. Heated liquid moves through the pipes. If, when laying a heated floor, you choose the correct pitch between the turns of pipes, this will enable efficient heating with the least amount of heat resources.
- Screed . Provided that all previous layers were laid on a flat surface, the thickness of the screed will be minimal - 3.5 cm. A fill of ordinary cement-sand mixture, 50 mm thick, is often used. The thermal conductivity of such a material is 0.4 W/(m*K).
- Flooring . The liquid floor allows the installation of any material. Nevertheless, ceramic tiles have the best characteristics, namely thermal conductivity and maximum efficiency.
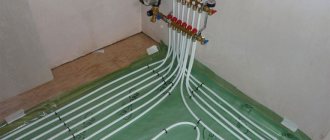
The installation technology involves the initial arrangement of the collector unit. Only after this can you begin laying the individual layers of the system.
Mounting rails
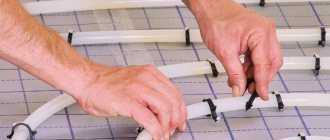
The liquid line circuit can be strengthened using mounting bars. They represent a single system of anchor brackets. The material is produced in the form of tapes.
- The tires are placed on the surface of the insulation in increments of 1 m.
- They are attached to the concrete surface using dowels.
- They are installed on the thermal insulation material using mounting brackets.
- The locks are connected in increments of 5 cm. The size is chosen according to the pipe diameter of 16 mm or 20 mm.
We recommend: How to install an electric heated floor?
Installation of the circuit using tires is quick. Among the disadvantages of this fastener for heated floors is the insecurity of the pipe bend. To fix the contour at the turning points, contours are laid or reinforced mesh is used.
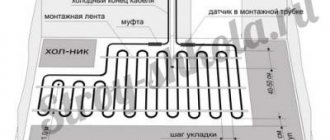
Before installing the floor line, a design is carried out. It determines the pipeline laying step. In places where household appliances or furniture are supposed to be installed, the distance between the hinges will be greater.
On the active area, the recommended step is 15 cm. To determine the distance between turns, it is necessary to calculate the power of the heating system and the number of pipes. Calculations can be performed using an on-line calculator.
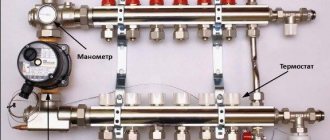
The role of the collector unit
Not everyone knows that heated floors with a water circuit can function normally without a collector. But even less people know what this looks like in practice.
Manufacturers recommend using pipes with a length of no more than 70 m. If the coils are arranged with a maximum pitch gap, then this length will be enough for only 7 m2, which will ensure the arrangement of three circuits in a room with an average area
However, in most cases, a heated floor system is installed in several rooms. In this case, without a collector unit it is impossible to ensure uniform distribution of the coolant.
Installing floor heating without a collector has a number of disadvantages: the coolant can only be supplied at the same temperature as in a general heating system, automatic air outlet is not possible, the same applies to pressure regulation.
Choosing a heated floor for tiles
Despite the fact that we are focusing only on a warm field powered by an electrical network, the list of different solutions remains wide.
Any construction, including heated floors, begins with the purchase of tools and materials. First of all, you need to select components for the underfloor heating system, which can be sold in ready-made kits. Buying a ready-made set is one of the best solutions, because you don’t have to worry about the compatibility of components and other subtleties.
Electric floors are different: separate cables laid on a substrate, infrared systems, but if you came here with a question about how to install a heated floor under tiles, then electric mats will be the best solution for you.
Collector connection diagram
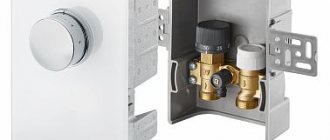
The choice of a ready-made mechanical or automatic collector model depends on the characteristics of the heating system.
The first type of control module is recommended to be installed for heated floors without a radiator, the second can be used in all other cases.
Valtec collector groups are the most popular. The manufacturer provides a 7-year warranty on its products. The installation diagram for the liquid circuit manifold is already included in the package of the finished mixing unit
According to the diagram, the assembly of the distribution comb for heated floors is carried out as follows:
- Installation of the frame. The following can be selected as the installation area for the collector: a prepared niche in the wall or a collector cabinet. It is also possible to mount directly to the wall. However, the location must be strictly horizontal.
- Connection to the boiler. The supply pipeline is located at the bottom, the return pipeline is located at the top. Ball valves must be installed in front of the frame. They will be followed by a pump group.
- Installation of a bypass valve with a temperature limiter. After this, the collector is installed.
- Hydraulic test of the system. Check by connecting to a pump, which helps build up pressure in the heating system.
In a mixing unit, one of the required elements is a two- or three-way valve. This device mixes water flows of different temperatures and redistributes the trajectory of their movement.
Shut-off valves and fittings are installed on both pipelines, return and supply, connected to the manifold installation, designed to balance the volume of the coolant, as well as to block any of the circuits
If servo drives are used to control the manifold thermostats, then the mixing unit equipment is expanded with a bypass and bypass valve.
Velcro
suggests using the Rautherm Speed system as a fastener for the floor water line. It consists of a covering on which there are small loops and a tape with hooks on it. The system works on the Velcro principle. Purchase the fastening system from dealers in Moscow and St. Petersburg.
A tape is wound around the pipe and placed on mats with loops. The hooks fit into the loops and fix the contour in a certain place. If necessary, the location of the highway can be adjusted.
The mats have a thickness of 3 mm. They are an additional thermal insulation material for the floor and prevent noise from entering the room.
On the outside they have a sticky surface, which is protected with tape. When laying the mats, the tape is disconnected and the roll is rolled out over the floor surface. The material is designed for pipes with a diameter of 14-20 mm. Withstands pressure 6 bar, temperature 95 0C. The installed system is filled with concrete screed.
A variety of devices are used to secure the floor water main pipeline. Methods are selected based on installation efficiency and product cost. Small costs will be required to lay the highway using reinforced mesh and mounting tape.
YouTube responded with an error: The request cannot be completed because you have exceeded your quota.
- Related Posts
- What kind of base can be used for a heated floor?
- How to install damper tape for heated floors?
- How can you make warm floors?
- How to choose tile adhesive for underfloor heating?
- What is the diagram of a heated floor mixing unit?
- What are the advantages of Heat plus underfloor heating?
Rules for calculating pipe footage
You can calculate the footage of elements for assembling heated floors after drawing up a diagram of the entire system.
When calculating, the following nuances are taken into account:
- Pipes are not laid in places where furniture, large floor equipment, and household appliances are placed.
- The length of contours with different cross-sectional sizes must comply with the following parameters: for 16 mm it should not exceed 70 m, for 20 mm - no more than 120 m. The location of each circuit corresponds to an area of 15 m2. If you do not follow these recommendations, the pressure in the heating network will be low.
- The discrepancy between the length of the lines is no more than 15 m. For a large room, several heating branches are installed.
- Provided that effective heat-insulating materials are used, the optimal pipe spacing is 15 cm. If the house is located in an area with harsh climatic conditions, where the temperature drops below -15°C, the distance should be reduced to 10 cm.
- If the installation option was chosen in 15 cm increments, the material costs are 6.7 m per 1 m2. Laying pipes at intervals of 10 cm - 10 m per 1 m2.
Warm floors can only be equipped with a solid pipe. Depending on the footage, several or one coil with pipes for the water circuit is purchased. Then it is divided into the required number of lines.
When laying pipes, it is necessary to take into account hydraulic losses, which increase with each subsequent turn. It is considered that contours exceeding 70 m should not be used
Work on installing heated water floors always begins on the coldest side of the room. The issue of choosing the optimal route for the coolant is very important - the water temperature decreases closer to the end of the circuit.
Reinforcement mesh
The most inexpensive element for attaching a floor water line is reinforcing mesh. Select a material with a cell of a certain size. It depends on the step length with which the pipeline is laid: 10*10 cm, 15*15 cm.
Among the advantages of this fastener, the reliability of the fittings is noted. It serves as additional reinforcement for the concrete screed, which is formed for the water-heated floor.
- The pipes are secured using staples or tape. The brackets are made of heat-resistant plastic. They have spines pointing downward; securely hold the pipe in place.
- The staples are installed in a certain order on the entire surface of the reinforcing mesh. They have hooks on the underside. With their help, fastening to the fittings is made. The step between staples is 30-40 cm.
- In places where the pipe bends, it is necessary to place 3 staples. One is designed to hold the pipe in the center, the others provide a certain bending radius.
- The outline is drawn with a snake; push the pipe into the fastener with your foot. Use soft shoes.
Instead of staples, the line is reinforced with plastic tape. It has teeth on the inside. There is a loop at the end. The tape is wrapped around the pipe and inserted into a loop. In this case, the teeth are held by the edges of the loop, securely fixing the contour.
We recommend: How to connect a warm water floor in a house from a gas boiler?
The work is more labor intensive. In this case, the plastic comes into contact with the reinforcing mesh. When using staples, the product is placed on a slight elevation. The grid remains at the bottom.
The nuances of choosing the optimal step
The degree of efficiency and cost of the entire circuit depends on the correct choice of the pitch between the laid heated floor pipes.
However, its calculation depends on many factors. The standard distance between contours is 100-200 mm.
Variable or constant pitch is also possible:
- If the heating load is less than 50 W per 1 m2, the circuit pitch will be constant and equal to 200 mm.
- With an increased heating load of 80 W per 1 m2 or more, the distance will be 150 mm.
- In other cases, it is necessary to use a variable step. For example, along the perimeter of one or two external walls, the water circuit will be laid in a smallest increment of 100 mm. Moving to the center of the room, the gaps will gradually increase to 200 mm.
In practice, if you plan to heat underfloor heating economically, a step of 150 mm is used. This indicator is optimal in almost any conditions.
If the heat loss of a building exceeds the heat transfer, it is worth thinking about its effective insulation - in this case, reducing the pitch will not solve the problem.
A detailed algorithm for calculating pipes for heated floors is described in this article.
Perforated plates
The liquid line is laid on perforated plates. They are made of polystyrene foam and have a contoured surface with fixing elements or without special devices. What are the characteristics of the slabs?
- The thickness of the mat is 1-3 cm.
- Outline height 2.5 cm.
- The distance between the contours is 2-5 cm.
- The material can withstand high temperatures and changes in thermal conditions.
- Expanded polystyrene does not deform under the influence of a deep concrete screed.
- The mats will serve as additional thermal insulation and noise protection.
The pipeline is removed using a snail or snake. If the contour is located at a distance of 16-20 mm, then it reliably holds the line. The bosses fit around the pipes on the sides. There is no need for additional fastenings. If the distance between the circuits is greater than the outer diameter of the pipe, then it is necessary to take care of the mounting elements. Holes are provided in the bosses for staples.
The perforated surface may not have bosses that rise on the surface of the mat, but grooves. Their width corresponds to the diameter of the water circuit pipe. In order for the loop to turn without loads and to correspond to the bending radius, the mats are provided with perforations in the form of a loop.
If a reflective screen is not provided for the heated floor, then mats with a foil surface are chosen. The material has only one drawback, which is associated with the high cost of the product.
We recommend: How to install heated floors on a balcony?
Water circuit installation diagrams
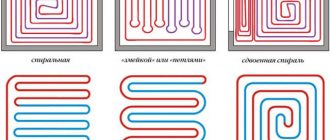
Schematically, laying pipes for arranging a liquid circuit can be done in one of the following ways:
- coil;
- double coil;
- snail.
Coil . The method of laying such a contour is the simplest and is performed in loops. This option will be optimal for a room divided into zones with different purposes, for which it will be convenient to use different temperature conditions.
The first loop is installed around the perimeter of the room, then a single snake is inserted inside. Thus, a maximally heated coolant will circulate in one half of the room, while a cooled one will circulate in the other, and accordingly the temperature will be different.
The coil turns can be spaced evenly, but the bends of the water circuits in this case will have strong creases.
The serpentine pipe placement method is ideal for rooms with little heat loss. They are used not only for apartments and private houses, but also for industrial facilities where there is a need to heat all year round
Double coil . In this case, the supply and return circuits are located next to each other throughout the room.
Angle coil . It is used exclusively for corner rooms where there are two external walls.
The advantages of the serpentine shape include simple planning and installation. Disadvantages: temperature changes in one room, pipe bends are quite sharp, so you cannot use a small pitch - this can cause a pipe break.
When laying the contour in the edge zones of the room (floor areas where external walls, windows, doors are located), the pitch should be smaller in comparison with other turns - 100-150 mm
Snail . Using this arrangement, supply and return pipes are installed throughout the room. They are placed parallel to each other and installed starting from the perimeter of the walls and moving to the center of the room.
The supply line in the middle of the room ends in a loop. Next, parallel to it, a return line is installed, which is laid from the center of the room and along its perimeter, moving towards the collector.
The presence of an external wall in the room may require double laying of pipes along it.
Due to the alternation of two lines when laying using the snail method, temperature fluctuations in the supply and return lines can be up to 10 °C
The advantages of this method include: uniform heating of the room; due to smooth bends, the system has little hydraulic resistance, and savings in consumables can reach 15% compared to the serpentine method. However, there are also disadvantages - complex design and installation.
Which way is better?
The choice of the best method is influenced by the quality of fastening and the price of the issue. For professional craftsmen who perform large volumes, convenience and speed of installation play an important role.
Fastening to reinforcing mesh has been used for a long time, its advantages are ease of installation and minimal costs. However, it is difficult to call the method convenient: you have to work all the time bent over, tying nylon ties with your hands. And the use of a grid does not cause unanimous approval. There is an opinion that it gradually cuts the plastic and over time the pipes begin to leak.
More and more craftsmen are resorting to working with a tucker, which allows them to produce large volumes of work in a short time. At the same time, the quality does not suffer compared to other methods.
The same can be said about the use of polystyrene foam mats with fixation. Time will tell which method will become the most common.
This video shows common installation methods
Basic methods of pipe installation
There are only two methods of laying pipes for arranging a heated floor - flooring and concrete. In the first method, ready-made materials are used for the base: polystyrene insulation and modular or slatted panels. There are no wet jobs that require a long drying time, so installation is quick.
When using the second option, the heating network is walled up with a screed. Depending on the thickness of the concrete, the time it takes for it to dry completely is calculated. It will take 28 days to harden and only after that is it possible to install the selected floor covering. This is the most labor-intensive and financially expensive method.
#1: Laying on profile thermal insulation boards
Arranging a warm floor system using this method is the simplest. Polystyrene insulation mats are used as the basis here.
The standard parameters of such slabs are 30*100*3 cm. They have grooves and low posts on which the finishing material is laid.
Polystyrene mats are not hygroscopic, so they do not lose their original characteristics when exposed to moisture. Even though this material is a polymer, it does not contain any components harmful to health.
In this case, pouring a concrete screed is not necessary. If tiles or linoleum are used for flooring, gypsum fiber sheets will initially be laid on the base. The thickness of such plates should be at least 2 cm.
#2: Device using modular and rack panels
In most cases, such panels are used in houses built from wood. Fastening of pipes for arranging a heated floor is carried out on a rough foundation.
The modular system is equipped with chipboard panels 2.2 cm thick, on which the heating lines are laid. These modules are equipped with channels to accommodate aluminum fixing plates. With this installation method, the insulation layer will be located in the wooden floor.
All strips are placed with a distance of 2 cm. Based on the applied pitch between the pipes, strips of the appropriate length (15–30 cm) and width (13–28 cm) are used.
To reduce heat loss, pipe latches are installed on the plates. If linoleum was chosen for the final floor covering, one layer of gypsum fiber boards is laid on the pipes; if laminate or parquet boards are used, they are dispensed with.
The installation of a modular floor is carried out using ready-made elements, which are chipboards. They are equipped with grooves for fixing coolant pipes
The slatted flooring system is almost identical to the modular one, however, it does not use panels, but strips, the minimum width of which is 2.8 cm.
Laying is done directly on the logs in increments of 40-60 cm, and the distance between the slats is at least 2 cm. For thermal insulation, extruded polystyrene foam or fibrous mineral wool is chosen.
Laying of heat-conducting lines is carried out by placing pipes in intermediate holes between chipboard sheets on aluminum plates equipped with grooves
Both methods are more suitable for wooden floors. In other cases, a more complex option with a concrete screed is chosen.
#3: Installation of pipeline with screed
Despite the labor-intensive process, installation of a heating network with a concrete screed is the most popular.
The process consists of the following steps:
- First of all, the base is prepared. Irregularities in the subfloor are eliminated using a hammer drill.
- The first layer is waterproofing material. It is spread in strips so that the edges overlap each other by 20–30 cm. The film should also extend to the base of the walls by 15 cm. The joints are glued with construction tape.
- Thermal insulation is laid over it.
- A damper tape is glued between the future fill and the walls. This action is required to compensate for the expansion of the screed when the floors are heated.
- Laying reinforcing mesh. It helps to increase the strength of the screed.
- Pipes are attached to the fittings according to the chosen pattern using plastic ties.
- A control check of the heated floor system is carried out by filling it with liquid and pressing it.
- Next, the guide beacons are installed.
- The final stage is pouring the cement screed.
For rooms with a large area, the sector division method should be used, with cells no more than 30 m2. For each of them it is necessary to arrange an individual circuit.
If the lower floor is heated, then polystyrene foam with a thickness of 20–50 mm is used as insulation. When there is an unheated basement floor or basement below, the thickness of the thermal insulation should be 50-100 mm. Pouring heated floors with a concrete-sand mixture can be done with or without a reinforcing mesh.
If polystyrene foam boards with connectors for the contours act as insulation, the use of a mesh is not necessary.
When standard thermal insulation material is used, a thin polymer or metal mesh is used to fix the heat-conducting line.
On our website there is a series of articles devoted to the design, installation and connection of water heated floors.
We advise you to read:
- How to make a water heated floor with your own hands: a step-by-step guide from design to assembly
- Connection diagram for water heated floor: design options and device manual
Types of heated floors
Today there are three main types of underfloor heating systems:
- water;
- electric;
- infrared.
A water heated floor operates on the basis of water pipes, which are laid directly under the finished floor covering. The source of the coolant is hot water from the heating system (less often, from a separate heating device - boiler and boiler). For installation and connection of pipes, metal-plastic and plastic pipes are used, which are connected to the heating outlet pipeline.
Electric underfloor heating is based on the so-called. heating cable. By passing current through itself, the wire converts its energy into heat due to the high resistivity of the conductor. Any cable is not suitable for installing an electric heated floor - you need a special wire with a conductor of the required thickness, as well as with good insulation.
Infrared heated floors are the rarest variety. It is installed on the basis of special roll films, in which special heating elements are built-in. When exposed to current, they produce infrared radiation, generating heat.
Attention! The most popular and widespread type of underfloor heating system is water. It differs from other varieties in its maximum power and heating temperature range and ease of use. Using devices for automating work - temperature sensors, thermostats - you can flexibly set the temperature regime of the system.
Next, we will talk specifically about the water type of heated floor, which is most often preferred, because... it is much easier to connect pipes to an existing heating system in a house or apartment.
We recommend that you read: Self-installation of a samovar-type heat exchanger on a chimney pipe
Step-by-step installation of a single-core thermomat
If you are planning to install a heated floor with your own hands and have chosen a single-core thermomat as the base electrical system, then it is worth keeping in mind that it is installed in strict accordance with a technological cycle that has a very specific sequence:
First of all, you will need to draw up an installation plan or installation plan, as experts say. And you shouldn’t listen to those who call this operation unnecessary. Then the distribution/installation boxes are installed, and (according to the pre-installation plan drawn up) the tubes for the temperature sensor are installed. It will also be necessary to provide high-quality warm floor screed. And you can use: a rigid thermal insulation board 2-3 cm thick; Styrofoam; hard plugs; or polystyrene foam.
The resistance of the electric mat is checked, and then its cutting is done. The fiberglass mesh will need to be cut to suit the features of the existing layout. This is very simple to do, because the material has neither a face nor a backside, it is only important not to interrupt the cable
Therefore, when laying a heated floor using thermomats, they rarely use sharp or cutting tools (except for the moment when they cut the mat itself with extreme caution), they try to work in shoes with soft soles and carefully ensure that they do not step on the cables or interrupt them with construction materials. garbage. The mat is placed on a completely finished screed, which at this stage is the working surface. Fiberglass mesh, equipped with a thin cable system, is laid out on the floor so that the distance from the walls is at least 10, or even 15 cm. You will have to retreat from the batteries by 15-20 cm.
And you need to spread the thermomat in such a way that both of its cold ends lead to the power supply
As mentioned above, electromatte heated floors work with a thermostat. And it’s better (to save energy) if such a regulator is equipped with a special “floor sensor” that shows its current temperature, but also in a number of models automatically turns off the heating when the readings exceed the designated control point on the temperature scale.
The floor sensor is placed in a corrugation, which is then located in a canvas specially grooved for it and between the cable branches. After all, it reacts exclusively to temperature changes in this situation.
The end of the corrugation must be plugged so that not a drop of solution or, for example, glue gets on the floor sensor. Next, the cold ends (pre-shortened to the required size) and the floor sensor are connected to the thermostatic device. A qualified tiler can begin laying the tiles immediately (after checking the resistance of the mat again). But if we are talking about an amateur who has decided to equip a heated floor on his own (and in general, if you adhere exactly to the letter of the technology), then it is first recommended to fill the laid cable mats with tile adhesive. This is done in order to avoid damage to the heated floors when laying the tiled flooring. However, no glue is used, but only special adhesives based on epoxy resin that can withstand high temperatures. When heated, such adhesives become elastic and do not crack at all.
The glue used to fill thin-cable single-core thermomats is diluted to a “sour cream” consistency, and then thickly applied with a spatula directly over the laid fiberglass mesh equipped with a cable pattern. So that there are no voids left and no air gaps. But the thickness of such an adhesive coating should not exceed 2.5-5 mm.
Then you will need to wait until the adhesive layer dries completely.
And only then start actually laying the tiles on the floor.
Thermomats with a single-core cable have a number of advantages over the same two-core cables. They:
- cheaper;
- thinner;
- have greater linear power, and therefore a higher heating rate.
But for mats with a two-core cable that do not have a second cold end, there is no need to necessarily lead it to the first. This means that there are no special requirements for cutting and laying such mats.
The advantages of mats with a two-core cable are described in the video review:
Liquid Electric Floor XL Pipe
This type of underfloor heating consists of one long, thick-walled tube with a diameter of 2 cm, which is made of a special type of polyethylene. This element is a “container” for the coolant, which is a certain brand of antifreeze. A seven-core Teflon-lined cable made of chromium-nickel metal is laid inside the pipe. The pipe is sealed at both ends, due to which there is no circulation of coolant, which, in turn, eliminates the need to purchase any other equipment.
Liquid Electric Floor XL Pipe
Heating due to the liquid system occurs quickly and evenly, allowing for heating of the entire surface of the finishing coating. At the same time, such a floor cools down for a very long time. The advantages of a liquid floor include the fact that it is not afraid of pressure from outside, that is, you can safely place furniture on the finishing coating where such a system is located - it will not cause any harm to the heating.
Water heated floor XL PIPE
Installation of XL Pipe is carried out inside the screed, or rather, the laid system is filled with cement mortar about 4-5 cm thick. The pipes are laid according to a specific pattern. For installation you will also need a thermostat and a temperature sensor. At the same time, there are no special installation features for these elements - they are mounted in exactly the same way as when installing other types of heating. Unless you have to purchase a specific thermostat designed specifically for liquid electric floors. A mounting box 12x12x14 cm is also useful.
Installation of heated floor XL Pipe
The XL Pipe system is reliability, safety and environmental friendliness in one type of equipment. The warranty period is 10 years, but in general the system can be used for about 50 years if installed correctly.
Main stages of installation
Daewoo Enerpia XLPIPE-060
pros
This floor heating system has certain advantages:
- it is not a source of electromagnetic radiation;
- practically does not require installation of additional equipment;
- does not overheat and does not have a negative effect on the finishing coating;
- allows you to place furniture on top of you;
- repairable;
- economical (electricity costs are on average 20-30% lower than when using electric floor heating);
- relatively simple installation.
Minuses
high price.
Liquid-electric heated floor. Combined heating system XL PIPE
DIY XL Pipe installation
Step 1. The base of the subfloor is prepared - cleared of debris, all cracks and irregularities are corrected. Next, 5 cm thick extruded polystyrene foam boards are laid on the surface for thermal insulation.
Laying extruded polystyrene foam boards
Step 2. The plates are secured with special “umbrellas”. First, holes are made in the slabs for fastening material, then umbrella dowels are inserted into them.
Fixing the slabs
Step 3. A reinforcing mesh with a cell size of 10-20 cm is laid on top of the polystyrene foam boards.
Laying reinforcing mesh
Step 4. The individual parts of the mesh are connected to each other with knitting wire.
Wire connection example
Step 5. The heating cable is unpacked and checked for resistance.
Checking the heating cable for resistance compliance
Step 6. The XL Pipe is laid out on the floor surface from the mounting box according to the selected pattern in increments of 20-30 cm. The pipe is fixed using plastic clamps on the reinforcing mesh.
Floor heating pipe layout
Another photo of the process
Step 7. A power cable is connected from the thermostat to the distribution box.
Power cable connection
Cable is connected
Step 8. The wires coming from the pipe are connected to the power cable. The wires can be connected with special terminals.
Connecting wires to the power cable
Connection point
Step 9. The ground wire is connected to the reinforcing mesh.
Grounding the reinforcing mesh
Step 10. A temperature sensor is attached at a distance of 5 cm from the system tube.
Fixing the temperature sensor
Step 11. The installation box is closed with a lid, the seams of which are sealed with sealant. That's it, laying and installation are complete, all that remains is to fill the system with a cement screed and wait for it to dry.
The installation box is closed with a lid