Content
- Normative base
- Types of hot water boilers using solid fuels
- Connection diagrams for solid fuel boilers
- Open circuit with natural circulation
- Combined circuit with expansion tank and circulation pump
- Closed circuit with forced circulation
- Scheme with artificial circulation and hydraulic separator
- Results
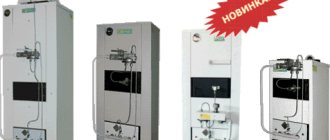
Solid fuel water heating boilers of low and medium power are designed for heating residential, public and industrial premises. They generate heat by burning solid fuel: firewood, briquetted sawdust or peat. The main advantages of such units are versatility of use, autonomous operation (no connection to gas supply networks is required), and affordable fuel. Modern heating devices are economical, safe and easy to operate, but you need to know how to properly connect a solid fuel boiler to the heating system.
How does the water circuit work?
Before choosing and installing a heating system for your home with your own hands, you need to understand how a wood-burning stove with a water circuit works.
- Heating of water occurs only when wood masonry or other type of solid fuel is burned inside the firebox;
- Mostly, a wood stove uses coal or wood;
- One load provides combustion for 3-4 hours;
- To ensure longer combustion, you should choose a gas generator type stove for your home;
- Savings on heat production are achieved by using a high-quality heating stove. Also, efficiency is affected by the efficiency of heat exchange processes and precise control of coolant temperature;
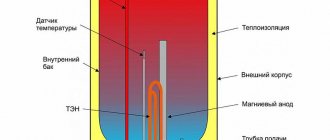
- The wall where the water jacket is provided accumulates thermal energy;
- This ensures rapid heating of water and its maintenance in a given temperature range for a long period;
- In practice, it has been proven that a solid fuel stove with a water circuit functions equally effectively with two types of circulation - forced and natural.
Advantages and disadvantages
By choosing a solid fuel stove for your home, which is additionally equipped with a water circuit, you get efficient heating and water heating equipment with a wide range of advantages.
The main positive aspects include:
- Cheap fuel. This is the most affordable fuel that can be used for heating boilers;
- Availability of equipment. The home oven itself costs quite a bit. Some build them with their own hands. Although here it is recommended to give preference to products from a trusted manufacturer;
- High reliability indicators. A solid fuel stove equipped with a water circuit demonstrates excellent reliability indicators, which has been proven by a multi-million user audience;
- Long service life. Reliability results in excellent durability;
- Rare service intervals. Although the stove uses solid fuel, the equipment does not require complex maintenance. The most important point is to remove the ash from the ash pan;
- The benefits of ash. Ash, which is formed as a result of the combustion of solid fuel, can be easily removed with your own hands. However, you should not throw it in the trash. Since such a stove is the prerogative of private houses, you probably have a plot of land. Ash acts as a highly effective fertilizer;
- Possibility of refurbishment. The beauty of a solid fuel boiler is that, if necessary, the stove can be re-equipped by adapting the equipment to operate on gas, diesel fuel, etc.
But besides the obvious advantages, such heating systems for wood-burning houses have disadvantages.
- Relatively low efficiency. With an impressive consumption of wood, the efficiency of the boiler will be no more than 70-80 percent.
- The need for regular loading of the firebox. You have to regularly add wood to the stove yourself. Although today there is an oven with automatic feeding on sale. You will need to make one download. Next, the automatic wood-burning stove will independently add the required amount of firewood to maintain the specified parameters. As a result, one download lasts for several days. The disadvantage of automatic feeding lies in certain requirements for the wood or coal used.
Normative base
A heating boiler operating on solid fuel is subject to increased safety requirements. Equipment installation standards are given in SNiP II-35-76 Boiler installations (current edition SP 89.13330.2011).
According to the standard, hot water solid fuel boilers for public, administrative and residential buildings with a water heating temperature at the outlet of up to 115 °C can be placed in built-in and attached boiler rooms (placement on the roof is not allowed). In multi-apartment residential buildings they can only be installed in attached premises. Heating equipment must be factory-made, with built-in automation.
The maximum total thermal power of solid fuel boilers for a built-in boiler room should not exceed 1.5 MW. For an attached room this figure is not limited.
Requirements for the design of a chimney for the removal of combustion products, the installation of ventilation and water heating are regulated by the standard SP 31-106-2002 Design and construction of engineering systems of single-apartment residential buildings. It also stipulates the conditions for correct installation of the device (distance from the walls, boiler room finishing material), they must be taken into account together with the boiler operating manual.
Rules for cleaning and maintaining the boiler and chimney
If the heat transfer of the TTK decreases, its condition should be checked. Perhaps the cause was contamination with soot. To clean, you need to wait until the entire structure has cooled completely, open the grates and the ash pan, and use a metal poker to clean off any buildup from the walls.
The soot settles on the remaining fuel, which must also be removed to reload the chamber. Cleaning a chimney yourself is difficult, especially if there are several bends. Soot and condensation accumulate on its walls, resulting in worse traction and an increased risk of fire.
liquid thermal insulation
Types of hot water boilers using solid fuels
To connect a solid fuel boiler, you need to understand the principle of its operation. The heat released during combustion is transferred to water, which circulates in the cavities of the boiler furnace and convective heating surfaces at the flue gas outlet. Hot water leaves the boiler and enters the supply pipe of the circulation heating circuit. The coolant then flows to the heating radiators, where it gives off heat to the air in the rooms, and returns through the return pipeline to the boiler. Based on the combustion method, the following types of heating devices are distinguished:
- Conventional solid fuel boilers with bottom combustion air supply.
- Long-burning boilers (with top air supply) are gas generators with afterburning of pyrolysis gas released during the combustion of the main fuel.
Boilers are also divided into domestic (for country houses or private houses) and industrial (for large public premises). The equipment varies in size and volume of the furnace, duration of fuel burning, heat output, and water volume in the system.
Design features
At the moment, several types of water heating equipment are produced, each of which has its own design. Establishing the differences between them will allow you to correctly evaluate the technology and choose the appropriate model.
Fire tube
These types of heaters are equipped with a pressurized gas-tight firebox. For their operation, automated burner devices equipped with blower fans are used. This feature allows the equipment to work without smoke exhausters, while all the necessary parameters are easily adjustable. As a result, the device is highly efficient and has an efficiency level of 92–95%.
Almost all fire tube boilers are internally equipped with a cylindrical firebox and smoke tubes. Depending on the layout, two- and three-way models are distinguished. This equipment was used back in the 19th century and has undergone many changes since then. These boilers are in demand today as they are easy to use and do not require much maintenance.
Considering the features of the equipment, first of all it is worth noting that fire tube boilers can be classified as gas appliances. Special pipes are installed on their surface through which the coolant moves.
There are two types of fire tube boilers:
- Steam. The coolant is heated by water steam, so the inside of the boiler is equipped with a special container.
- Hot water. The entire body is heated using the liquid.
The principle of operation is as follows: gas or fuel is supplied to the burner located on the front of the body, which is burned. The role of the firebox is played by pipes located in the water, where all combustible material burns.
Despite their relatively compact size, such devices are highly powerful and safe to use. In addition, they can operate in autonomous mode, but for this you will need to purchase special equipment in the form of a pressure gauge, water pressure sensor, and so on.
Water tube
In such models, water is heated by passing inside metal pipes. The working pipes located outside are heated by fuel combustion products. Due to the design features, it is possible to increase the heating surface, for which a larger number of water pipes are used.
Thanks to the convection flow in such systems, the movement of water accelerates, which means the heat transfer coefficient also increases. The upper limit of the temperature of the exiting steam reaches +550 °C.
Water tube models are more compact than fire tube models. This is a complete piece of equipment housed in a rugged housing. The operating principle of water pipe technology is natural circulation of water.
Number of circuits
At the moment, the market offers a wide variety of heating equipment. First of all, you need to understand for what purpose the boiler is being purchased: only for heating or also for preparing hot water. To solve the first problem, a single-circuit model is sufficient - they are more affordable and do not consume fuel as intensively.
To solve the second problem, you should choose a dual-circuit device. These models, in addition to being able to heat water using a running method, are additionally equipped with a built-in boiler, the volume of which varies from 150 to 180 liters. Flowing heating is optimal if you need to wash dishes or take a shower in the country.
Connection diagrams for solid fuel boilers
Long-burning solid fuel boilers are universal equipment that can operate with both open and closed circulation circuits. Let's consider the most popular connection options using the example of the thermal diagram of the Suvorov-M household heating unit.
Open circuit with natural circulation
With natural circulation, the movement of water in the thermal circuit occurs due to the expansion and contraction of the coolant as it heats up/cools. An increase in water volume leads to the creation of excess pressure without the use of injection pumps. The gravity flow circuit necessarily contains an atmospheric expansion tank filled with liquid.
Figure 1 Open circuit with natural circulation
The scheme works as follows. The water heated in the boiler (1) enters the supply pipeline, which rises vertically and is then distributed overhead throughout the heated rooms. The supply pipeline is laid at a slight angle to ensure spontaneous drainage of the coolant. From the pressure network, water descends to the radiators, gives off heat and returns to the boiler through the return pipeline, which is also laid downhill.
An expansion tank (5) is installed at the top point of the system and is connected to the pressure pipeline. Excess coolant enters the expansion tank when it overheats - for example, if the water in the pipes boils. Make-up water can be filled through the expansion tank; a tap (6) is provided for this. There is also an overflow valve installed here to drain excess water.
The expansion tank acts as a water seal and dampens hydraulic vibrations of the system. It also cuts off the water circuit from the atmosphere and prevents it from becoming airy.
To control the parameters of the coolant, thermometers are connected at the inlet/outlet of the boiler: at the supply (4) and at the return (9). Also installed on the return pipeline is a shut-off valve (8), which disconnects the boiler from the heating network, and a drain (7) for draining water.
The natural circulation scheme has certain advantages:
- reliability of operation - there is nothing to break here;
- ease of system maintenance;
- lack of expensive equipment;
- independence from the availability of electricity.
But there are also quite serious disadvantages. Due to the low water pressure, in order to overcome the hydraulic resistance of the system, it is necessary to significantly increase the diameters of the pipelines, which significantly increases the cost of the design. Also, if additional pressure losses occur (for example, when installing additional radiators or reducing the useful cross-section of pipelines due to scale deposits), circulation disturbances are possible, which leads to overheating of the heating surfaces in the furnace. Now gravity-fed open systems are practically not used.
Combined circuit with expansion tank and circulation pump
With this option, the classic open circuit is complemented by a circulation pump. It builds up pressure in network pipelines, eliminating disruption of coolant circulation along the thermal circuit.
Figure 2 Combined circuit
The scheme is in many ways similar to the previous one. Additionally, there is a unit with a circulation pump (16), it is installed on the bypass on the return. A filter (16) is provided in front of the pump to purify water from mechanical impurities (rust, sand, debris). Valves (14) are installed on the bypass pipeline to allow removal of the pump and filter. A bypass valve (13) is also installed on the main return pipeline to switch the flow direction.
In addition, install a valve on the supply (6), after connecting the expansion tank (7) and cut a pipe with an air valve (11) into the supply pipeline to bleed air from the system. To control the pressure in the supply network, a pressure gauge (8) is installed.
With such a scheme, it is quite difficult to select the operating pressure at the outlet of the pump. Here it is necessary, on the one hand, to ensure reliable circulation, and on the other hand, to prevent excessive overflow of water through the expansion tank. In practice, this is almost impossible.
Closed circuit with forced circulation
In such a system, coolant circulation is carried out due to the operation of the pump. It creates an excess pressure of the order of 0.06-0.2 MPa (0.6-2.0 bar). There is also a tank here, but it is of a membrane type and is not connected to the atmosphere.
Figure 2 Closed circuit with forced circulation
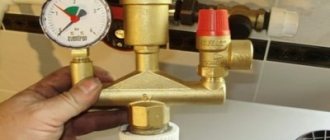
Principle of operation. The heated coolant flows from the boiler into the supply pipeline, its temperature is controlled using a thermometer (4). On the supply side, a safety group (7) is installed at the top point, which includes a relief valve, a pressure gauge and a valve. The safety group is activated if the coolant pressure exceeds the permissible value. Also, a supply shut-off valve (8) and a drain valve (15) are installed on the supply line to bleed air trapped in the system.
Due to the excess water pressure in closed circuits, the supply does not have to be laid under the ceiling. Therefore, all heating pipes can be laid hidden in the floor.
The supply pipe distributes water throughout the heating system. After heat transfer, the coolant is conveyed to the boiler via the return line. The following are installed in series on the return pipeline: high-pressure expansion tank (14); bypass line with filter (10), pump (9) and bypass valves (13, 11); bypass valve (12); return thermometer (6); shut-off valve on the return pipeline (5). Between the shut-off valve and the boiler, a make-up pipeline with shut-off valves (8) is cut into the return line. There is also provision for draining water through a drain valve (9) for periodic inspection.
The advantages of a closed scheme include:
- stable operation without the risk of circulation disruption;
- small diameters of network pipelines;
- economical due to the small volume of water in the system;
- absence of a massive atmospheric tank;
- Possibility of laying all pipes at the bottom.
Among the disadvantages are energy dependence (in the absence of light, the pumps do not work), the need for periodic inspection of the filter and pump, the presence of additional equipment - a pump, a safety group, a membrane expander. But all these disadvantages are offset by the advantages of the scheme.
Scheme with artificial circulation and hydraulic separator
This system is a modified, improved version of the previous scheme. It provides an additional mounting unit - a hydraulic separator. With its help, a small circuit is created connecting the inlet and outlet of the boiler.
Circulation through the small circuit is carried out during the startup period of the boiler, until the supply water is heated to operating levels. After reaching the specified modes, part of the hot water will begin to flow into the heating system.
Mixing hot water from the supply to the return does not allow the temperature of the return coolant to drop below 40 °C. This eliminates the risk of condensation appearing in the furnace, which affects the technical characteristics of the unit and increases the adhesion of ash to the pipe screens.
Figure 3 Scheme with artificial circulation and hydraulic separator
The hydraulic separator can be made in the form of a large-diameter pipe into which the inlet and outlet of the supply and return pipelines are embedded. A more modern and convenient design of the separator is a jumper with a three-way valve installed at the return connection point.
Connection conditions
There are certain requirements for installing and connecting the boiler. Compliance with them will extend its service life and make operation comfortable and safe. The unit must be positioned in the room so that the distance from its back to the wall reaches 25 cm, and from the side walls - 10 centimeters. Periodically during repairs you will need to approach the rear surface, so leave 400 mm between one side and the wall. You need to leave a space of 1 m² in front of the boiler, which will allow you to easily add new fuel and clean the ash pan.
The boiler must be installed on a floor finished with heat-resistant materials or on a special pedestal. All flammable substances and fuel are located at a distance of no closer than 40 cm from the structure. Clean water without any impurities is poured into the heating system, since hard liquid leaves scale and shortens the service life of the boiler and the system itself. KChM is suitable for heating with natural and forced circulation.
Installation of the boiler must begin by installing it on a plinth or stand. It is then connected to the heating system and chimney. After this, you can add water and check all pipes for leaks. When heating for the first time, it is necessary to monitor the operation of the boiler.
This is interesting: a do-it-yourself chimney.
Results
You can install the heating system of a hot water boiler yourself. But for this you need to correctly select and calculate its parameters. Initially, a connection diagram for a solid fuel boiler is selected that is optimal for a particular facility. Then you need to select radiators, calculate the hydraulic resistance of the network, determine the diameters of the network pipelines, calculate the volume of water in the system, and select the power of the equipment. To avoid annoying mistakes, it is better to entrust this work to specialists - the calculation of the heating system is carried out at the design stage in terms of air conditioning.
Step-by-step boiler installation instructions
The selection and arrangement of equipment is not yet a guarantee of trouble-free operation of the system, because its elements still need to be installed correctly. And you should start with arranging the boiler room, in which all this should be located
A small instruction in pictures will tell you what you need to pay special attention to
Table 2. Correct step-by-step installation.
Steps, photo Description
Step 1. Arrangement of the boiler room
The boiler is installed after repairs have been completed in the room where it will be installed.
It is important that: non-combustible materials are used in the finishing; the foundation for the boiler was prepared; there must be an air flow in the room; An exit for the chimney pipe must be provided in advance in the wall or ceiling.
Step 2. Choosing a location for the boiler
When choosing a place for installation, you need to keep in mind that there must be a minimum of 700 mm between the walls and the rear and side surfaces of the boiler body
On the front side, this distance must be at least 1250 mm (if the unit is top-loading). If loading is done from the front, you must also add the width of the door to this distance.
Step 3. Aligning the body position
It is very important that the position of the boiler does not deviate from the vertical, so during installation you need to use a level. Place it on the firebox with the lid folded back.
Step 4. Preparing components
According to the boiler passport, check its equipment, which may vary depending on the manufacturer. Purchase all other elements necessary for installation in advance in accordance with the selected scheme.
Step 5. Preparing tools
Naturally, you will need tools: adjustable, gas, socket and open-end wrenches, as well as screwdrivers of different sizes, a square and an angle grinder.
Step 6. Installing the combustion regulator
FUM tape is wound onto the regulator rod, and it is installed in its regular place. Tighten the nut, set the desired temperature and fix it in this position with a screw.
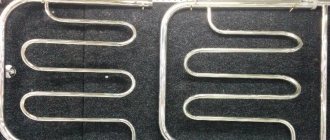
Step 7. Installation of the heating element thermostat
A little further than the combustion regulator there is a hole for installing the heating element regulator. If you don’t plan to install it, then simply screw a plug in there.
Step 8. Installation of the heating element
Next, the heating element itself is mounted - or a plug instead.
Step 9. Install the faucet
For ease of operation or routine maintenance of the system, taps are installed at the inlet and outlet of the coolant from the boiler.
Step 10. Assembling the security group
You assemble a pressure gauge, an air valve and a safety valve into one unit, which ensure the safe operation of the boiler and come with it. The group is placed in front of the shut-off valves.
Step 11. Pipeline connection to the boiler
To connect the supply and discharge pipelines to the boiler, you need to make rotary pipes. It is better if the connections are welded rather than detachable.
Step 12. Sealing the chimney landing site
To ensure that the chimney pipe fits tightly and does not allow combustion products to enter the room, its landing site and all other connections are treated with sealant.
Step 13. Water connection
Install a flexible tube onto the faucet installed at the very beginning, through which the hydraulic part of the boiler will be filled with water. Open all taps, raise the pressure to 1.3 atm, and check the tightness of the system. There shouldn't be any leaks anywhere.
Step 14. Heat the boiler
Now, in accordance with the instructions, you can load the firebox with wood and light it.
The installation process is presented only in general terms, since each boiler model has its own nuances, and the connection diagram may be different.
Some tips for proper boiler operation
In order for your boiler to be as efficient as possible, it must be operated correctly
Here are the points you need to pay attention to so that the firewood burns longer:
- When igniting the fuel, the damper on the boiler must be completely open;
- The long burning mode is set only after heating to +600 degrees;
- The coolant at the outlet must have a temperature of 65 degrees or more;
- If the boiler design does not provide for the laying of raw firewood, its humidity should not exceed 20%;
Dependence of heat production on wood type
- To avoid resin settling on the walls of the firebox and chimney, heat the boiler with hardwood firewood - acacia, birch, alder, aspen. And, by the way, the breed has a great influence on the amount of heat received;
- Do not chop the firewood - the larger the pieces, and the closer to each other they are laid in the firebox, the longer they will burn;
- To prevent logs from hanging, they should not be too long. The ideal size is the length of the combustion chamber minus 5 cm.
Two examples of wood heating boilers
General installation instructions
Before purchasing a heating unit, you need to determine where it will be installed. The furnace room is designed for this, but often there is not enough free space in it, since it is occupied by an existing gas or other heater. Then the installation of a solid fuel boiler in a private house can be done behind the wall of the furnace room, in an extension. A frame made of metal structures is installed and covered with sandwich panels or profiled sheets with insulation. This option is convenient for those who plan to burn with coal; there will be no dirt inside the house.
All inexpensive solid fuel boilers for low-power homes can be placed directly on the rough floor screed. They are light in weight and do not exert vibration loads on the base, since they are not equipped with a fan or screw conveyor for feeding pellets. For units with a power of over 50 kW, it is recommended to build a concrete foundation, which should rest on the ground and compacted crushed stone bedding. The foundation is made 80-100 mm above the level of the screed, and it should not be connected to it. Foundation devices also require long-burning boilers, which have a mechanism for lifting and lowering heavy loads.
Projects for private houses usually provide for the installation of a chimney shaft in the thickness of the wall with a pipe exiting through the roof. If the shaft is missing or occupied by an existing gas heater, you will need to install a chimney for a solid fuel boiler. To do this, it is better to use metal double-walled chimneys with insulation. They are lightweight, assembled from sections of the required length and are easily attached to the wall of the house. For turns and branches, the same double-walled tees and bends are made. Methods for installing chimneys with and without an exhaust shaft can be seen in the figure.
Chimney installation
The furnace room must have natural exhaust ventilation. When heating boilers are installed in a private house, the exhaust is provided through a shaft in the wall. The shaft is parallel to the chimney, only with a smaller cross-section. If it is not available, a transfer grille is installed in the outer wall; it should be located under the ceiling of the room. The role of the hood is as follows:
- A vacuum is created in the furnace room, as a result of which fresh air from other rooms is sucked in and used for combustion. Boiler systems with a power of 50 kW and above require the organization of separate supply ventilation.
- Removing combustion products that accidentally entered the room.
The approximate layout of the equipment and the installation diagram of a solid fuel heating boiler are shown in the figure.
Solid fuel boiler installation diagram
Often in boiler rooms of country houses there is no sewerage outlet. This is not entirely correct, since sometimes it is necessary to empty the system or the water jacket of the boiler. The safety valve discharge is directed into the same drain.
Installation procedure
To perform the work, the following instructions for installing solid fuel boilers are proposed:
- Release the product from its original packaging.
- If there is not enough space in the furnace room, then it is better to assemble the product outside. Install all doors and ash pan drawer, as well as other elements supplied separately. There is no need to install a fan and automation devices; this is done after installing the boiler.
- Move the unit indoors and install it on the foundation or floor so that the gas outlet pipe is on the same axis with the chimney pipe. At home, installing a solid fuel boiler yourself must be done with an assistant; the weight of the equipment is rarely less than 50 kg.
- Secure the boiler to the foundation or screed so that there are no distortions.
- Connect the chimney, install a fan with a control unit and a safety group.
- Connect the boiler to the heating system according to the selected scheme.