Advantages of stove heating
Wood burning stoves heat up quickly and distribute heat over a long period of time. The brick emits radiant energy, which is good for health. A house where a stove is installed is always comfortable and warm. Thanks to draft, natural ventilation is created in the room. The designs often have a hob on which food can be prepared. In addition, such a stove can be used to dry clothes, shoes and food.
A combination oven is a device that has several functions. This includes a fireplace stove, a heating and cooking stove and a Russian stove.
The only significant drawback is poor heating of remote rooms. That is why they try to install the entire structure in the center of the house for uniform heat transfer. In large houses, it is advisable to install several stoves that have a combined chimney. The hob is usually installed towards the kitchen.
Heating equipment differs in appearance and design.
Usually the stove is installed between several adjacent rooms so that they all heat up evenly Source pechnoy.guru
When should you choose a wood-burning stove for your home?
Stove heating can hardly be called the best heating option. If it is possible to connect to a gas main, then heating with solid fuel is convenient only as an additional or alternative option. However, in some cases, choosing a wood-burning stove for your home or cottage turns out to be the only correct one.
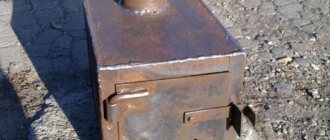
Homemade multifunctional stove-fireplace
Solid fuel systems are beneficial in non-gasified settlements. Their operation is cheaper than servicing liquid fuel and, especially, electric boilers. If you buy a modern, economical stove and properly design the heating, you can heat even a very large house quite cheaply.
An important advantage is the availability of fuel. It can be purchased in any region, and in wooded areas you can prepare it yourself. If you have the desire and certain skills, you can make a wood-burning stove for your home with your own hands. Brick and metal are used as materials.
The “monumental” brick structure, of course, will take up a lot of space, but it can be used for heating, cooking, and baking. If a fireplace is provided during construction, the inhabitants of the house will receive an additional benefit - a feeling of special spiritual comfort. And a bed on a Russian stove can replace a physiotherapist, because... Helps cure sore joints and colds.
Industrially manufactured metal stoves often look like works of art. You can find very beautiful multifunctional models. Brick structures fit perfectly into interiors decorated in a “rustic” style. The main thing is to think through the design in advance, decide on your preferences, and find the right option for a specific room.
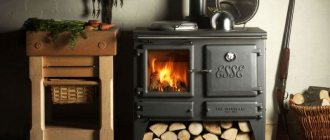
Stove-fireplace in the interior
Several disadvantages of wood heating
Brick wood stoves have a drawback: they take quite a long time to warm up the room. This is compensated by the long time during which they maintain temperature. This type of heating is only suitable for rooms where people live permanently or for a long time. It will turn out to be inconvenient for a dacha, where they spend half a day. You will have to choose either a steel stove or even electric heating.
A brick wood stove for a home takes up a lot of space, so it would be a poor choice if space is limited. At the same time, it may not be able to cope with heating an overly spacious home. It is worth carefully developing a heating scheme at the design stage of the building so that problems do not arise in the future. Otherwise, in frosty winters you will need to use an additional heating system. When calculating, take into account the area and the fact that 1 sq.m. the stove produces 500-550 kcal of heat per hour.
When thinking over a heating system, pay attention to the degree of fire danger. When installing a wood-burning stove for a wooden house, you must especially carefully follow all building codes and regulations. It would be useful to treat wood with fire retardants. The structure itself is installed on a prepared base, the floor and walls are protected with metal sheets, and elements subject to strong heating are insulated with non-combustible materials. These are additional costs, but they are necessary to protect people and property.
Diagram of a brick stove
Dutch oven
The design is one of the most popular. Some models are equipped with a hob and oven, which solves the problem of cooking, but the classic “Dutch” is used only for heating.
The duct-type firebox heats the walls perfectly. The smoke is discharged through a vertical channel, in which almost all of it burns. Although brick stoves for wood-burning homes are usually large in size, the same cannot be said about the Dutch stove, so it is optimally suited for comfortable heating of a private house - one or two floors. Outwardly, the Dutch woman resembles a column. The shape of the structure can be round, square or rectangular.
Advantages of a Dutch woman:
- After long breaks, you can start firing the stove at full power.
- A small structure can heat a house of 70 square meters. m.
- Economical. Low material consumption. The installation price is lower, as well as saving space.
- The design has thin walls, so it warms up quickly.
Classic “Dutch” stoves take up less space, but they are used only for heating the house Source ar.decoratex.biz
Disadvantages:
- The efficiency is no more than 40%.
- You should not forget about cleaning the stove from ash, as well as soot for normal draft.
- The most effective mode is smoldering. This design is often called a long-burning furnace.
- After heating, you need to close the view, otherwise the stove will quickly cool down.
This equipment can be used to heat small houses that have 2 floors or an attic floor.
Russian stove
It is large in size and multifunctional, and also has smoke channels and an open firebox. It is sometimes closed with a flap. The equipment may have a hob.
In addition to heating the room, this design allows you to cook food and dry clothes.
The efficiency is maximum 60%. In winter, the stove must not be allowed to cool down, so it should be fired regularly. If the structure cools down, condensation may occur. The brick becomes saturated with moisture, and upon subsequent cooling it freezes and cracks.
In summer, you can use the oven in summer mode for cooking. In this case, the smoke is directed directly into the chimney using a damper, and the body of the structure does not heat up.
Modern Russian stove with a stove bench in a wooden house Source yandex.ru
Advantages:
- With timely heating, a comfortable microclimate and temperature are created in the house.
- Multifunctional design.
- A brick stove for a summer house decorates the room.
Flaws:
- High installation cost due to the large volume of bricks.
- Due to the large weight and size, it is necessary to build a solid foundation.
- Low efficiency.
- The ducts and chimney must be cleaned regularly.
Such equipment is suitable for year-round use.
See also: Contacts of construction companies that offer installation services for fireplaces and stoves.
Swedish oven
The stove has a universal design and is designed primarily for efficient operation in small areas. The standard “Swedish” is equipped with an oven, hob, and niches for drying things. Some Swedes have a couch and a fireplace.
The principle of operation of a Swedish stove is approximately the same as that of a bell-type stove - combustion of flue gases occurs under the arch of the firebox.
Design advantages:
- The room heats up very quickly.
- Possibility of cooking both on the hob and in the oven.
- Almost complete combustion of fuel.
- Thanks to the design of the channels, the lower part of the equipment is heated, and, consequently, the floors are slightly heated.
- A heat exchanger can be installed in the design to heat water.
The Swedish brick stove has its own characteristics, but it copes well with heating the house Source mauro-gianvanni.ru
Cons:
- To prevent heat loss through the floor, it is necessary to install high-quality thermal insulation.
- For the installation of heated elements, fireclay bricks are used, which have a higher cost.
- Experts recommend leaving the stove always warm in winter. Firing a cold stove can lead to deterioration of the masonry.
Bell furnace
One of the modern designs is such a stove. The equipment heats up well and retains heat for a long time. The design does not have small winding channels, therefore, they are not so susceptible to soot settling.
The principle of operation of a bell-type furnace: smoke rises from the firebox, then remains there until it cools. And then it begins to descend along the walls of the chimney, thus heating it. Such designs are effective because they can have several caps.
Advantages:
- Low cost of material and installation. Simplicity of design.
- You can install a heat exchanger and a hob.
- Heats up quickly even after completely cooling.
- The gas view prevents reverse draft. This is why the oven cannot cool down when the damper is open.
Modern hand-made stoves provide the ability to heat several rooms in the house at once Source mauro-gianvanni.ru
Such a stove can have several hoods, and, therefore, it will be possible to heat 2 floors and several rooms. It is difficult to identify any shortcomings, which is why the bell-type model is popular among homeowners.
Wood-burning stove for a sauna
The positive healing effect of the Russian bath has been known to the world since ancient times.
Initially, a sauna stove (heater stove) was simply a pile of stones heated by fire from a fire. Over the entire period of their development, wood-burning stoves have changed their design, but their functionality has not changed.
Until now, the basis of any stove for a bath, they are also metal stoves for a bath or a wood-burning sauna, is live fire and bath stones.
Wood-burning stoves for Russian baths are especially popular in use, since steaming in a Russian bath involves soft, wet steam, which can be easily achieved by pouring water over heated stones.
Any wood-burning stove can provide the best and correct conditions in the bathhouse. Therefore, no one has any doubts about which sauna stoves to buy.
After all, wood-burning stoves for baths can create not only warmth, but also a feeling of comfort and harmony with nature. Wood-burning stoves are also universal in functionality.
Wood-burning stoves have long been considered a familiar element in Russian bathhouses.
By installing such a unit in your steam room, you can improve your health and continue centuries-old bath traditions. There should be no open fire in the bathhouse. This is why the stones are placed in a kiln, where they heat up and can produce steam.
There are some requirements that a sauna stove must meet. The air should be heated to at least 80°C near the ceiling and up to 45°C near the floor. When water is poured onto the stones, the room should be filled with steam as much as possible.
The best ones will be those that consume the least amount of fuel.
If you buy a wood-burning stove, you must correctly calculate the required power of the heat source. You need to select a unit taking into account the volume and design of the room where it will be installed.
Installation of such stoves is easy. By installing them in your bathhouse, you will be able to experience the maximum healing effect.
You need to know that home wood stoves love wood from deciduous trees. It is not recommended to use firewood from coniferous trees, as it can form soot on the stones.
The main thing is that the stoves are safe to use, easy to use, and serve for many years. It is best to make the design in such a way that the firebox and vent are located in the dressing room, and not in the steam room itself.
If it is not possible to heat the stove from the dressing room, you need to provide sufficient ventilation in the steam room.
Wood-burning sauna stoves are a classic way to heat a steam room. True connoisseurs of “light” steam believe that only wood-burning heaters can create the atmosphere of a real Russian bath in a steam room.
This opinion is not without foundation.
First, wood-burning stoves do not dry out the air. It is believed that with such a heater it is easy to breathe in the steam room even at high temperatures.
Secondly, in the steam room you can hear the characteristic crackling of burning wood, like in a good old Russian bathhouse.
Thirdly, many models of wood-burning stoves have a firebox with a transparent door, which allows you to observe the live fire.
Thus, wood-burning heaters truly convey the comfortable atmosphere of a Russian bathhouse as fully as possible.
Certain difficulties arise from the fact that wood-burning stoves require a chimney. However, this nuance is more than offset by the pleasure of visiting a bathhouse equipped with a wood-burning heater.
Wood burning stove for sauna
Today, wood-burning heaters are produced in different capacities, and everyone has the opportunity to choose a model for a steam room of any size. The design of the stoves is also varied and elegant. Modern wood-burning stoves will be a worthy decoration for the interior of a steam room.
In order for a wood-burning heater to heat up the steam compartment well, to retain heat for a long time and to meet your requirements, you need to know what you need to pay attention to first.
The heat output of the heater must fully correspond to the volume of the steam room.
Installing a wood-burning stove in a bathhouse that has low power and a large room volume will lead to the heater starting to overheat and function at the limit of its capabilities.
Consequently, its service life will be significantly reduced, and bath procedures will take place at too low temperatures. When you install a more powerful stove than necessary, the room will overheat, in addition, stones may crack and this circumstance will cause a fire.
To calculate the required furnace power, first find out the volume of the steam room. To do this, you need to multiply its length, width and height. Without all the side factors, 1 kW of furnace power warms up a room volume of 1 m³.
Further, if the room has non-insulated surfaces: windows, glass doors, ceramic tiles, or a brick wall, this must be taken into account when calculating.
It is recommended to add each uninsulated square meter of the steam room to its total volume. When the walls of the steam room are not thermally insulated, it is necessary to enter a special coefficient into the calculations. Manufacturers usually indicate it in the documentation for their products.
It is worth noting that when choosing wood-burning stoves for a bath, it is extremely important to purchase a unit that has a 20/30% power reserve.
Wood-fired heaters can be closed or open.
The first option means that the stones in the stove are covered with a lid. Such units are a very recent development of Finnish manufacturers. It makes it possible to maintain the temperature in the steam room for a longer period of time.
In addition, such wood-burning stoves for Russian baths provide so-called “light”, that is, moist and soft steam at comfortably low air temperatures.
An open heater heats up the steam room faster and provides high temperatures and low humidity levels.
Wood-burning heaters also differ in the type of firebox, which can be remote or built-in. Remote fireboxes make it possible to heat the steam room from outside it.
Some models are equipped with doors made of heat-resistant glass. Thanks to this design, you can admire the fire (it has long been proven that such a sight perfectly relaxes and calms the nerves) while sitting in the relaxation room or dressing room.
There are models of wood-burning sauna stoves equipped with a tank for heating water. This is convenient when the steam room does not have hot water supply.
The material from which the heater is made is of great importance.
Almost all industrial wood stoves have a multi-layer metal body. This prevents burns from accidental contact with the heater. This circumstance is especially important for small steam rooms, in which every free centimeter is worth its weight in gold.
Models are also produced that are lined with natural stone or ceramic tiles. Then wood-burning sauna stoves heat the rooms more evenly, while they themselves remain comfortably warm. However, the cost of such cladding is quite high.
Some of the stoves are structurally just a firebox and a three-dimensional mesh, which is filled with stones. They quickly warm up the air and retain the generated heat for a long time. The stones serve as an additional decoration for the interior of the steam room.
Pay attention to the volume of stones that the stove can accommodate. The more there are, the longer the heat in the steam room will last, which means the fuel consumption will be less.
The manufacturer of the heater is also important. The best of them produce more efficient and functional stoves made from high-quality materials.
One more nuance. In recent years, a persistent stereotype has developed that wood-burning stoves for baths must have a grate in their design. It arose when industrial metal heaters appeared and the grate bars needed in coal-fired steel or cast iron stoves were mechanically transferred to them.
Of course, if the heater is heated with coal, this element is needed. However, in traditional Russian wood-burning heaters, a grate was never made. If you are planning to buy a stove that will be fired exclusively with wood, you can easily purchase a model that does not have a grate.
As a result, you will no longer have to clean it after each visit to the steam room. The ash that forms after burning wood can be removed once every 15/20 fires. The fuel will burn completely, which will make it possible to save up to 15%.
And one last thing. To fully enjoy a steam bath, you must heat the heater correctly.
The best fuel for a wood-burning stove for a sauna is birch logs, as well as wood from some other deciduous varieties. It is undesirable to use coniferous firewood, because the resins in which they are extremely rich contribute to the formation of soot during combustion.
When you have no other choice, and you have to heat the heater with pine logs, throw a few aspen dies into the firebox at the end. The flame of this wood will burn out the fumes and soot in the stove.
In addition to the actual power characteristics, good wood-burning sauna stoves must also meet the following requirements:
- You must have a high-quality steam generator, as well as a heat accumulator, which are needed in order to create a specific mode inside the steam room, if necessary. This allows owners to turn a Russian bath into a sauna and vice versa.
- The oven design must also include means to regulate convection. The structure must be made in such a way that there are no surfaces with temperatures above 150 degrees.
- As for the size of the sauna stove and its firebox, it all depends on how large the area needs to be heated.
Is it possible to build long-burning brick stoves?
Every homeowner wants to install heating that does not require much labor. Arranging this in a long-burning wood-burning home stove made of brick is quite problematic. Industrial furnaces made of metal that operate on this principle produce carbon monoxide. A long burning mode can be arranged in a Russian or Dutch oven. But this method is not 100% effective. Therefore, it is recommended to install a standard brick stove, which retains heat for a long time.
Rocket stove (jet)
These designs of stoves for the home are very original, yet simple to implement, requiring minimal costs and skills, and the principle of pyrolysis is used, that is, fuel energy is used to the maximum. They are also called reactive. They were invented a long time ago in northern China and Korea, then modernized and adapted. Today it is a very popular heating solution for ecological homes all over the world. These stoves are very compact and uncomplicated; there are already quite a large number of different modifications, and all because these small-sized heating stoves are easy and quick to make with your own hands. So people model, changing the basic design to suit their own needs.
Design and principle of operation of a rocket stove
That's the point. The design is shown in the figure. There are two fireboxes, both vertical, connected by a horizontal smoke channel. From the second firebox there is a long horizontal chimney under the floor. Firewood is inserted vertically into the primary combustion chamber and ignited from below. Combustion products enter the second chamber and heat it up. When sufficient thermal energy is accumulated, the gases contained in it flare up (gas afterburning) and release a large amount of heat (their combustion temperature is very high). The heated gases, expanding, fill the horizontal chimney, transferring a significant part of the thermal energy to its walls. The smoke comes out almost cold, and if everything is built correctly, then it contains only water vapor and a certain amount of carbon dioxide.
One of the rocket stove options
Very simple and very effective. And building a rocket stove with your own hands takes only 1.5-2 days, and few materials are needed. And it heats no worse than the traditional one, and the floor is warm from it. Unusual? Yes! Interesting? Still would! Such a stove can also look no less presentable than the best designer jewelry. Here are several options in different designs.
This is also a rocket stove, but in a completely different style. Firebox on the right
It seems that they have already come up with all the stoves that can be, and there simply cannot be anything new or interesting. But no. Maybe. The proof is two miracle stoves that are truly amazing. One is electricity generating, and the second is heating water. And both miracle stoves can probably be made with your own hands.
Basic masonry techniques
In production, heat-resistant and fire-resistant materials for the firebox, as well as hardened bricks, are used. It is not recommended to build a stove yourself. It is necessary to contact specialists for high-quality and safe masonry.
Specialists carry out work in compliance with all safety standards and regulations. For laying bricks, cement mortar is used, which is diluted with sand in a ratio of 1 to 3.
For binding material, many craftsmen use clay and sand.
Each row of bricks is laid out in a certain way to form a stove for a given project. Source pechki.net.ru
Design and principle of operation of the stove
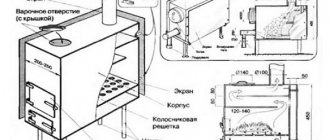
There are many modifications of wood-burning stoves for home use, but their design and operating principles are similar. Typically the structure consists of a firebox, grate, ash pan, and chimney. When wood burns, gases are released in the fuel chamber. They pass through the furnace channels, warming them up. The walls of the structure heat up and release heat into the room. Depending on the device, the stove can heat from one to three rooms or be connected to a water heating system.
Based on the type of movement of hot gases, smoke circulation and ductless (bell-type) structures are distinguished. If in smoke-circulating stoves gases pass through vertical or horizontal channels, then in bell-type stoves they enter special chambers (hoods), where they heat the walls, which in turn heat the air in the room. Designs may differ in the design and materials used to manufacture the firebox. Their service life largely depends on this.
Scheme: operating principle of a pyrolysis furnace
What you need to purchase to build a stove
First you need to purchase masonry mortar and bricks. The amount of material will be calculated by a specialist. Do not forget about constructing a separate foundation for installing the furnace. The equipment will require cast iron elements: a door for the firebox, a blower (ash pan door), rings for the burner, a chimney valve, a grate and a hob.
In addition, it is necessary to purchase steel elements: a hot water tank and an oven. When building a structure, you will need strips made of metal of different widths and lengths. A corner made of metal of standard size 0.5 x 0.5 cm. Annealed steel wire with a diameter of 0.2 - 0.3 cm. A sheet of steel must be placed before the firebox.
Some designs may require roofing iron to cover the cooking chamber.
The required amount of material is calculated by a specialist based on the size and type of oven.
Long-burning wood-burning brick stoves for homes are built from fireclay and red bricks, clay and sand. To build the foundation you will need sand and cement, crushed stone, roofing felt, as well as boards for formwork.
Doors and gratings (grids) are mounted along the masonry of the main structure Source extracraft.ru
Do-it-yourself brick oven for a home: masonry process with photos
The question of how to build a brick stove for a home with your own hands continues to be relevant today, since comfort and warmth have always remained important conditions for a person to have a good rest after a busy day at work. Therefore, recently more and more city residents are moving from panel high-rise buildings to private houses, where it is possible to create a comfortable environment at any time of the year.
Do-it-yourself brick oven for your home
Due to the demand for various models of furnaces, engineers continue to develop new options suitable for buildings with different areas. It should be noted that even when all the “blessings of civilization” are present in the house, a small cozy stove will never be superfluous and will help out in various situations. For example, it can be heated on cold spring or autumn evenings, when it is humid or raining outside, without starting the heating system. Such a structure will help create an optimal balance of temperature and humidity in the house, which will be comfortable for a person. In addition, the oven will be an excellent assistant in cooking or drying vegetables, herbs and fruits.
Since there are a large number of different models of heating structures, you should choose stoves with the most accessible, easy-to-read diagrams for DIY installation, especially if you have little or even no experience in this craft. Naturally, it is necessary to take into account other factors that directly affect the efficiency of the stove - its power, dimensional parameters, functionality, and also the aesthetic appearance is also important. And in order to choose the right stove model, you need to consider the criteria that you need to focus on when determining the desired option.
How to choose the best oven option?
Choosing a furnace installation location
In order for the furnace to be fireproof, efficient, and its power to be used to the maximum extent possible, this structure must be installed correctly, taking into account some nuances.
- Firstly, it is decided how much area can be allocated for installing the stove.
- Then, you need to decide on a specific location:
— the stove is installed in the center of the room, dividing it into separate zones;
— built into the walls, between two or three rooms;
- erected near the wall, with a distance of 250÷300 mm from it, if you need to heat only one room. However, it must be taken into account that this option is the most losing, since most of the heat generated by the rear walls will not be fully used.
Several options for placing the stove in the house
- Having chosen an approximate location, you need to immediately mark it, starting from the ceiling, using a plumb line, since the chimney pipe must pass through the attic floor between the beams and rafters, and at a distance from them of at least 120÷150 mm.
- When allocating an area for the furnace, it is taken into account that for its foundation it is necessary to provide more space than its base, by 100–150 mm on each of its sides.
- To avoid any problems with regulatory organizations, when choosing an installation location, you need to take into account not only the recommendations presented above, but also the standards developed by specialists and specified in SNiP 41-01-2003.
Calculation of the required power and assessment of firewood consumption
A furnace will not be efficient and will not be able to heat your home if it is not powerful enough for a particular area. This also takes into account the winter temperatures of the region where the heated building is located, the number of windows and doors in it, the level of insulation of walls and floors, ceiling height and many other conditions.
For example, the higher the ceiling, the larger the volume of air will have to be heated, and the larger the glass area, the faster the heat will leave the house, which means you will have to choose a stove with increased power. Typically, for buildings with non-standard glazing and other parameters that do not fall under the average statistical level, calculations must be made by a specialist individually, based on the specific characteristics of the house.
But in general, you can rely on average values. Thus, for well-insulated houses with conventional glazing, with an area of 50 to 100 m², with a ceiling height of 2.5 to 2.7 m, the following thermal power standards per unit area (Wsp) are acceptable:
| Region of Russia in which construction is taking place | The specific power of the heating system, Wsp (W/m²) |
| Southern regions of the country (North Caucasus, Caspian, Azov, Black Sea regions | 70 ÷ 90 |
| Central Black Earth Region, Southern Volga Region | 100 ÷ 120 |
| Central regions of the European part, Primorye | 120÷ 150 |
| Northern regions of the European part, Urals, Siberia | 160 ÷ 200 |
This value can be found out more accurately from your local construction organization. And for those who like to do their own calculations, we can recommend a more detailed and fairly accurate algorithm.
How to accurately calculate the required thermal power?
Each room is unique in its own way, and heating two seemingly equal rooms may require different amounts of thermal energy. The methodology for calculating the power of heating equipment is set out in a special publication on our portal dedicated to the selection of heating boilers .
Having data for a specific region and the size of the heated area (S), the furnace power for it is calculated using the formula:
Wsum = S (m²) × Wsp (kW/m²)
For example, we can consider the power of a furnace for a brick house located in the central part of Russia and having an area of 75 m² .
Wsum = 75 × 0.14 = 10.5 kW
Typically, stove developers immediately indicate the thermal power of their designs. True, other units of measurement are often found - kilocalories per hour or megajoules. It’s not scary - they can be easily converted into watts and kilowatts:
| W | kcal | MJ | |
| 1 W | 1 | 0.859845227859 ≈ 0,86 | 0,036 |
| 1 kcal | 1.163 | 1 | 0,042 |
| 1 MJ | 277.77 | 238.85 | 1 |
In our case, for example, the calculated power in kilocalories will be equal to:
10500 × 0.86 = 9030 kcal/hour
Now you can calculate the efficiency of the future stove, which largely depends on the quality and type of wood used as fuel. At the same time, we must not forget that usually brick wood-burning stoves are not characterized by high efficiency. It is usually estimated at around 70%. If there is data for a specific oven model, then a specific value is substituted.
Each type of solid fuel has its own calorific value - the amount of thermal energy that is released when burning 1 kilogram. It is clear that only bulk fuels - coal or briquettes - are usually measured in kilograms and tons, and firewood is usually measured in storage cubic meters. This indicator thus depends on the specific density of a particular type of wood. Indicators of the energy potential (based on mass and storage volume) of the main types of solid fuel are shown in the table.
| Wood type | Average calorific value of dry firewood by mass, Qm (kW/kg) | Average calorific value of dry firewood by storage volume, Qv (kW/m³) (for coal and briquettes - kW/t) | The same applies to damp wood (which has not undergone at least a one-year drying cycle) |
| Firewood: | |||
| Beech | 4.2 | 2200 | 1930 |
| Oak | 4.2 | 2100 | 1850 |
| Ash | 4.2 | 2100 | 1850 |
| Rowan | 4.2 | 2100 | 1850 |
| Birch | 4.3 | 1900 | 1670 |
| Elm | 4.1 | 1900 | 1670 |
| Maple | 4.1 | 1900 | 1670 |
| Aspen | 4.1 | 1750 | 1400 |
| Alder | 4.1 | 1500 | 1300 |
| Willow (willow) | 4.1 | 1400 | 1230 |
| Poplar | 4.1 | 1400 | 1230 |
| Pine | 4.4 | 1700 | 1500 |
| Larch | 4.4 | 1700 | 1500 |
| Fir | 4.4 | 1600 | 1400 |
| Spruce | 4.3 | 1400 | 1200 |
| Coal and briquettes: | |||
| Anthracite | 8.1 | 8100 | — |
| Charcoal | 8.6 | 8600 | — |
| Coal | 6.2 | 6200 | — |
| Brown coal | 4.2 | 4200 | — |
| Fuel briquettes | 5.6 | 5600 | — |
| Peat briquettes | 3.4 | 3400 | — |
The calorific value of undried firewood is shown for contrast - how much generated power is lost. Naturally, you should still rely on firewood that has gone through the necessary drying cycle.
Preparing firewood is a serious matter!
In order for the stove to live up to its purpose and serve as long as possible, it should be “fed” with the right fuel. About which firewood is better , about its main characteristics, rules for harvesting, drying and storage - in a special publication on our portal.
The average daily weight consumption of fuel to ensure the necessary heat transfer is determined by the formula:
V(kg)= (Wsum / Qm) × 24 hours
To calculate the volume, everything is the same, but instead of the calorific value by mass Qm, Qv is substituted .
Knowing the daily consumption, it is easy to determine the weekly, monthly and even for the entire expected heating period - in order to have an idea of the upcoming costs of purchasing or procuring the required amount of firewood.
To facilitate independent calculations, below is a convenient calculator, which already contains the necessary ratios. The calculation is carried out for dried wood.
Calculator for calculating the estimated consumption of solid fuel
Go to calculations
Don’t be afraid of too high values - consumption can be significantly lower, since it is designed for the most unfavorable conditions. In fact, on fine, windless days or during thaw periods, significantly less fuel will be consumed. But you need to be ready for anything!
Types of brick wood stoves
Of course, you also need to decide on the type of stove - this criterion is selected depending on what the home owners would like to get from the structure being built, that is, on the desired functionality.
Heating brick stoves for the home are divided into the following types:
- Multifunctional heating and cooking stoves can be called the most popular. Depending on the capabilities implemented in the design, such stoves are used for heating a house, cooking, baking bread, heating water, drying fruits, vegetables and medicinal herbs.
Multifunctional heating and cooking stove
Designs have been developed equipped with a bed, which can easily serve as an additional heated sleeping place.
Heating and cooking models are usually built into the wall between the kitchen and living space. Thus, two problems are solved at once - heating two rooms and providing cooking.
- Stoves intended only for heating are not chosen so often. A pure heating model is often equipped with a water circuit, to which the water heating of the house is connected. Since this structure has a single function, aimed only at heating, they usually try to install it between two, three or even four rooms. The size and power of the structure are selected based on how many rooms are planned to be heated with one stove.
A typical example of a heating stove
It must be said that this version of the stove, if equipped with a large combustion door with transparent glass, can also be used as a real fireplace, since its design allows you to enjoy the play of fire through the glass or open doors of the firebox.
- Cooking stoves are usually compact in size and consist of a cooking section, which includes a stove and oven, and a chimney. One way or another, such a structure gives off heat to one or two rooms, depending on the location, but such a stove is not capable of heating a large area. Most often, such models are installed in small country houses used in the warm season, when even such a compact stove is quite sufficient for heating on cool days or nights.
The main purpose of such a stove is cooking.
The advantage of such models is its simple design, the diagram of which can be understood even by a beginner in the stove craft.
It should be noted that this small stove will not be superfluous not only at the dacha, but also in an ordinary private house, even if it has a gas supply.
Having decided on a stove model that will meet all the necessary parameters, you need to choose the right material for its construction.
Basics of masonry stove construction
Basic materials for laying the furnace
In order for the stove to have a respectable appearance and last as long as possible, you should purchase high-quality material for its construction, and it is unwise to save on this. The main materials are brick and mortar.
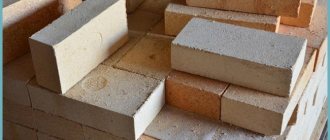
- For the main masonry you will need red solid brick. Its quantity is always indicated in the design of a specific furnace model. If finishing with any decorative materials is not intended, then it is necessary to purchase bricks with perfectly even shapes without chips on the edges.
High-quality red brick
For laying surfaces in contact with open fire, fire-resistant fireclay bricks are used, which can withstand temperatures reaching up to 1500 degrees. When heated, this material retains a high temperature for a long time, and thanks to this quality, the oven remains hot for a long time.
Heat-resistant fireclay brick
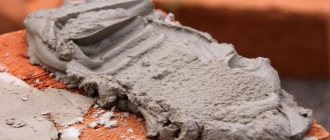
- It is equally important to choose the right mortar for laying bricks, since the strength, durability, and safety of the stove building depend on it. The traditional method for constructing stoves is clay mortar, which is often made independently.
Ready-made stove mortar in the form of a dry mixture can be purchased in a store.
Nowadays, in specialized stores you can find ready-made dry mixtures intended for the construction of heating structures. This composition contains all the necessary ingredients in the right proportions, and therefore the mixture is easy to use. However, the price of such compositions is quite high, and in order to save money, many craftsmen prefer to extract and purify the necessary components for the solution themselves.
The main ingredient of heat-resistant masonry mortar is clay.
How to find, select and prepare clay for laying stoves , and then make a high-quality solution, is described in detail in a special publication on our portal.
Foundation for the stove
A few words need to be said about the basis for the structure of the furnace, since the reliability and durability of the structure primarily depends on it.
The foundation can be made of different materials and according to different schemes, but in any case, its construction requires a pit that goes deep into the ground by at least 500 mm.
The second condition that must be met is that the base for the stove should never be combined with the foundation of the house.
The stove foundation can be a reinforced concrete structure, which is formed using formwork and reinforcement lattice, and then filled with concrete mortar.
Diagram of one of the furnace foundation options
Another base option consists of concrete, rubble stone and brick. By equipping this foundation, you can save on concrete mortar, since it will be required much less than in the first option. This base consists of the following layers:
1 – In a dug pit, waterproofing is installed on the bottom and walls - a clay castle. The clay layer should be 50÷70 mm.
2 – A sand cushion is poured onto the clay base and compacted well. Its compacted thickness must be at least 100 mm.
3 – The next layer is rubble concrete. To do this, rubble stone is laid in layers on a sand bed, which is poured with concrete mortar. It is very important to ensure that all cavities between the stones are filled with mortar. This way the entire pit is filled to the top.
The foundation must be raised above the ground surface by 150÷200 mm. To do this, formwork made of boards is installed along the edge of the pit. Then, a stone is placed in it and, in the same way, it is filled to the top with concrete, which is leveled using the rule and left to harden. The process of hardening and gaining brand strength is quite long and will take about 20–28 days, depending on the ambient temperature.
4 – After the foundation hardens, a waterproofing material is laid on top of it - roofing felt in two or three layers.
5 – The next stage is masonry from any type of brick or stone - from them walls are raised that are 80÷100 mm smaller than the perimeter of the poured foundation. The size of this part of the base should be equal to the base of the oven.
The internal space between the walls is filled layer by layer with rubble stone, and each layer is also poured with concrete mortar. This process is carried out until the brick formwork is filled to the very top. Then the surface of the solution is leveled and left to dry.
Two more layers of roofing material are laid on top of the finished foundation.
6 – It is recommended to lay the next layer 4÷5 mm thick with felt soaked in a clay solution, which will ensure a tight fit of the first row of the stove masonry to the base.
The foundation is left for 7-10 days to dry and shrink, and only then the furnace is laid.
Pre-laying the oven dry
It is recommended to lay the entire structure of the furnace dry, that is, without mortar, in order to understand the specifics of installing the bricks of each row and gain at least minimal experience in this work, especially if it is being carried out for the first time.
When building a stove without mortar, you need to take into account the thickness of the vertical joints and strictly follow the order. To maintain the thickness of horizontal seams, plastic or wooden calibration strips with a thickness of 5–6 mm are often used.
When making dry masonry, you need to immediately understand the configuration of the internal channels through which combustion products will be directed into the chimney. If a mistake is made in their location, you will have to disassemble the entire folded structure, since there will be no proper draft and smoke will enter the premises.
Having erected the entire furnace dry up to the chimney, the structure is dismantled. If desired, each of the rows can be numbered and stacked in separate piles, immediately adjusting the individual bricks to size and shape.
Such preparatory work will significantly speed up the process of laying the mortar, and in order not to waste time, it can be done during the period when the foundation is gaining strength.
Installation of cast iron stove elements
One cannot fail to mention the correct installation of cast iron stove elements. It is especially important to properly install parts that will come into contact with an open fire - this is the combustion door, hob and sometimes the oven.
Read the review of models of wood-burning cast iron stoves for summer cottages, as well as the characteristics and advantages, from our new article.
As you know, when heated, metal expands significantly, so for cast iron elements it is necessary to provide a seat size 5 mm larger than the size of the part itself in each direction.
Before installing the hob, asbestos strips are laid at the place where it is laid, which will create the necessary conditions for its operation.
Heat-resistant gasket under the hob
Before installation, the furnace door is wrapped around the contour with an asbestos cord, which will also create a thermal gap for the expansion of the metal when it is heated. In order to protect the steel box of an oven or hot water tank from burning, it is also wrapped with asbestos cord.
Installation of doors and metal chambers
The doors are fastened using annealed steel wire, which is fixed to special “ears” located on the back of the door frame, and the ends are embedded in the seam between the bricks. Temporarily, until the door is fixed with masonry, it is supported with stacks of bricks for stability.
Project of a multifunctional two-bell furnace with ordering
General characteristics of the model
This project, available for implementation, is perfect for installation in a small house. The design of this stove is quite simple and is equipped with several functions, such as a hob and a drying chamber, instead of which it is quite possible to install a water heating tank. Those who decide to install a stove in their home are most often interested in compact, multifunctional designs that can heat as many rooms as possible.
If we compile a list of requirements for furnaces in modern conditions, the following criteria come to the fore:
- The stove must have several functions, that is, it must work not only to heat the house, but also have a hob.
- Compact structure is one of the main requirements for stoves installed today in small private houses. This is especially true for buildings on summer cottages. Therefore, the optimal oven size is 4.5 × 3.5 bricks.
- The heated area for which the structure is designed must be no less than 30 square meters. m.
- Basically, all owners like stoves with arched elements, as they have the most aesthetic and comfortable appearance.
- Simplicity of design is also important, especially for those who are doing this work for the first time.
- The presence of summer and winter operating modes is necessary so that you can economically use the oven for cooking during the warm season.
- It is desirable to have a drying chamber or hot water tank.
- The depth of the combustion chamber should be at least 500 mm, as this is the optimal length of firewood logs.
The presented furnace design meets all the listed requirements, and is based on the design of a two-bell furnace operating on the principle of free circulation of gases.
Diagram of gas movement in a two-bell furnace
This heating and cooking two-bell stove has dimensions of 1140×890 mm, with a height of 2024 mm, and has a heat output of at least 3800÷4000 kcal/hour - suitable for heating an area of 30÷35 m². The efficiency of such a two-bell design reaches 75 ÷ 80%, which is a very good indicator for brick kilns.
The depth of the combustion chamber of this stove model is 600 mm. It has walls lined with fireclay refractory bricks installed on a “spoon”. The heating structure is equipped with a standard size two-burner hob installed in a cooking chamber with an arched ceiling.
It is the arch that gives the stove an aesthetically pleasing appearance, although it somewhat complicates the work of the master
There is a drying chamber above the arched opening, instead of which some craftsmen prefer to install a water heating tank. An oven is not suitable for installation in this area of the oven, as it will not heat up properly.
It should be noted right away that if someone finds the masonry of the arched structure difficult, then it can be completely replaced with a flat horizontal ceiling of the cooking chamber. To do this you will need to cover it with metal strips and corners.
The stove design has a direct “summer” stroke, which allows it to be used in cooking mode without fully heating the stove, and, accordingly, the entire room, which is very convenient in the summer. In addition, the “summer” valve, depending on its position, increases or decreases the intensity of fuel combustion.
The advantage of this design is its uniform heating, which is very important for the durability and quality of the stove. All ceilings in the oven, except for the cooking chamber, are made without the use of metal elements.
Left-hand and right-hand oven options
The stove is presented in two versions with different locations of the chimney, respectively, and a mirror design, so you can choose from them the one that is more suitable for the specific layout of the house.
Sections of the furnace must be studied in order to have an idea of the configuration of the channels and the location of the hoods in this design
Find out how to build a Russian stove with your own hands with detailed instructions and video instructions from our new article.
Necessary materials
To obtain the desired result, both aesthetically and in terms of the efficiency of the structure, it is recommended to use high-quality bricks with rounded corners for the construction of some elements of the furnace. If for some reason it is not possible to purchase such material, then the corner brick can be processed independently.
So, to build this furnace, excluding masonry mortar, you will need the following materials:
| Name of materials and elements | Amount | Dimensions of elements, mm |
| Red brick M-200 (excluding pipe laying) | 722-725 | 120×250×65 |
| - of which with rounded corners (curly) | 172 | — |
| Fire-resistant fireclay brick, grade Ш-8 | 26-28 | 120×250×65 |
| Fire door | 1 | 210×250 |
| Doors for cleaning channels | 4 | 140×140 |
| Blower door | 1 | 140×250 |
| Summer damper for chimney | 1 | 130×250 |
| Fire valve | 1 | 130×250 |
| Stove valve | 1 | 130×130 |
| Grate | 1 | 250×300 |
| Single burner hob | 1 | 410×710 |
| Steel corner | 2 | 5×50×50×750 |
| Pre-furnace sheet | 1 | 500×700 |
Order and description of masonry work
| Illustration | Brief description of the operation performed |
| The first row is 31½ red bricks. The row is laid out continuous, and it must be perfectly even, as it sets the direction for further laying of the furnace walls. | |
| The second row is 31½ red bricks. This row is also continuous and is laid out in a dressing with the first row. | |
| The third row is 31½ red bricks. This row is also continuous, and the configuration of its masonry is identical to the first row. | |
| Fourth row - 22 red bricks. On this row, the blower chamber and the base of the lower hood begin to form. | |
| The fourth row is a continuation. On the same row, one ash door (140×250 mm) and two cleaning doors (140×140 mm) are installed. | |
| Fifth row - 22½ red bricks. The row is laid out according to the indicated pattern. | |
| Sixth row - 24½ red bricks. On this row, two bricks located above the ash chamber are cut diagonally from above - this is necessary to cover the front part of the ash chamber and its door. In the drawing, the brick sections are shown in orange. | |
| The sixth row is a continuation. Two bricks are laid, cut diagonally on the lower right side. These bricks completely cover the upper part of the ash chamber and its door. | |
| Seventh row - 19 red and 5½ fireclay bricks. The bottom of the combustion chamber is lined with fireclay bricks. Between the red and fireclay bricks, a layer of corrugated cardboard is made, 4–6 mm thick; the height of this material should be equal to the height of the entire fuel chamber. The cardboard burns out during the initial firing of the kiln, and a thermal gap remains between the bricks, which is necessary for the expansion of the fireclay brick when it is heated. After this, a cast iron grate measuring 250x300 mm is installed. The gap between this element and the fireclay brick should be at least 5 mm along its entire perimeter, also for thermal expansion. Two bricks from the back and front sides of the grate are cut obliquely, forming a ramp for combustion products and more intense combustion of fuel. A vertical channel is being formed, which will serve as an exit for smoke from the lower hood to the upper one. | |
| Eighth row - 15 red and 7 fireclay bricks. Fireclay bricks along the edges of the combustion chamber are installed on a spoon (rib). | |
| The eighth row is a continuation. A combustion door measuring 210×250 mm is installed on the same row. | |
| Ninth row - 18½ red bricks. The row is laid out completely according to the indicated pattern. | |
| Tenth row - 18 red and 7 fireclay bricks. The fireclay brick of this row around the fuel chamber is also installed on the edge. | |
| 11th row – 19½ red bricks. In this row, the fuel chamber door begins to close. For this purpose, two bricks are used, cut diagonally from the top - they are laid on both sides of the fire door. In the drawing, the sections are shown in orange. Previously laid fireclay bricks are crossed out with a diagonal stripe. For the passage of smoke in the fuel chamber, a passage leading to the lower hood is left. | |
| 11th row – continuation. The fuel door is closed with a brick cut from the bottom on both sides. | |
| 12th row – 19 red and 6 fireclay bricks. The row is laid out according to the diagram. The walls of the fuel chamber are lined with fireclay bricks installed on a spoon. A passage is left in the wall into the lower cap. | |
| 13th row – 22 red bricks. On this row, the formation of the cooking chamber takes place. The bricks that line the entrance to the cooking chamber are moved forward by 40 mm. Above the fuel chamber along its entire perimeter, a cutout or seat is made in the red bricks for mounting the hob. There must be a gap of 5 mm between the stove and the brick, intended for thermal expansion of the cast iron panel when it is heated. | |
| Row 13 – continuation. On the same row, along the entire perimeter of the area for the hob, asbestos cord or strips impregnated with clay mortar are placed in the cutouts, on which the hob will be mounted. | |
| 14th row – 19 red bricks. The walls of the cooking chamber are being formed. Their bricks will be placed on the hob and between them you need to create a gap of 5 mm by laying strips of asbestos. To prepare for blocking the exit from the fuel chamber, the brick is cut diagonally on one side from above. In the drawing, the slice is shown in orange. | |
| Row 14 – continuation. A brick cut from the bottom blocks the passage from the fuel chamber to the hood located on the left rear side of the hob. | |
| 15th row – 18 red bricks. The walls of the cooking chamber and vertical channels continue to rise. The work is carried out according to the presented scheme. | |
| 16th row – 18½ red bricks. The masonry is carried out in accordance with the order. | |
| 17th row - 16½ red bricks. First, this row is also laid out according to the diagram shown. | |
| 17th row - continuation. You will need 16 red bricks. Next, on the same row, an arched ceiling of the entrance to the cooking chamber is formed. In order to carry out this work accurately, a template is made from plywood with the dimensions indicated in the schematic drawing (radius - 259 mm). The bricks for the arch are cut into a truncated pyramid, the lower part of which should be 44 mm. Arched bricks are installed on edge and move forward relative to the oven walls by 40 mm, just like the bricks in the lower part of the cooking chamber on the 13th row. It should be noted that you don’t have to cut the bricks into a pyramid, but in this case, the seams between them may turn out to be too wide, uneven and sloppy. After the solution has hardened, the template is removed from under the arch. | |
| 18th row – 21½ red bricks. At this stage, the lower cap is closed (only the vertical channel is not closed) and an outlet is formed from the upper part of the lower cap. Along the perimeter of the exit hole, a seat is cut out in the bricks for installing a “summer” direct stroke valve. On the bricks adjacent to the arch, cuts are made diagonally from below so that they fit tightly together and create an even masonry seam. | |
| Row 18 – continuation. Next, a valve measuring 130x250 mm is installed on the same row. Its frame is placed on a clay mortar, while preventing the mortar from accidentally getting into the guide grooves. | |
| 19th row – 15 red bricks. At this stage, the base of the upper furnace hood is formed. The bricks laid along the arch are also trimmed - this procedure is carried out in each row until the arch is completely covered. | |
| 20th row – 16 red bricks. On this row, two sections of the masonry are left open - they are intended for installing cleaning doors at the base of the upper cap of the structure. | |
| Row 20 – continuation. Next, two cleaning doors measuring 140x140 mm are mounted on the same row. | |
| 21st row – 16½ red bricks. The work is carried out according to the presented scheme. | |
| 22nd row – 19 red bricks. On this row, the cleaning doors are blocked with bricks. The covering of the arch is completed - the bricks for this are hewn from below. | |
| Row 22 – continuation. On the same row, in the middle of the space above the cooking chamber, two metal corners measuring 50x50x750 mm are installed - they are pressed against each other with their back walls. They will become the basis for laying the next row of bricks. | |
| 23rd row – 27 red bricks. At this stage, the cooking chamber is closed. Only a hole is left for arranging the exhaust from the chamber. A vertical channel is formed above the “summer” valve. | |
| 24th row – 20½ red bricks. The walls of the drying chamber are formed. The brick adjacent to the exhaust duct is cut from above at an angle of 45 degrees (the cut is shown in orange in the drawing). | |
| 25th row – 20 red bricks. In this row, the brick adjacent to the exhaust duct is cut from above at an angle of 45 degrees and becomes a continuation of the slope of the brick of the previous row. | |
| 26th row – 20 red bricks. The slope of the exhaust hole must be continued, so the brick is also cut at an angle of 45 degrees. The rest of the masonry is done according to the scheme. | |
| 27th row – 20 red bricks. Above the exhaust and vertical ducts, along the entire perimeter, cutouts are made in the bricks to create a seat for mounting the exhaust valves from the cooking chamber and chimney - 130x130 and 130x250 mm. | |
| Row 27 – continuation. Valves are installed - their frames are mounted on a layer of clay mortar. | |
| 28th row – 21 red bricks. The opening of the exhaust duct moves towards the main chimney - for this, the brick installed in the front part of the hood is cut obliquely from below, and the rear brick is cut from above. That is, a passage is formed, located at an angle. | |
| 29th row – 20 red bricks. At this stage, the exhaust duct and chimney are combined. The brick adjacent to the exhaust duct is cut diagonally at an angle of 45 degrees from below. | |
| 30th row – 34 red bricks. The upper hood of the furnace is covered. The bricks are laid with an outward shift, relative to the main masonry, by 40 mm. The brick laid on the brick cut in the previous row is also cut at an angle of 45 degrees, forming a passage on a slope. Two bricks, laid on both sides of the entrance to the drying chamber, are cut at an angle from above and form a place for the middle brick, which will complete the covering of the entrance. | |
| Row 30 – continuation. A middle brick, pre-cut from both sides from below, is installed to cover the drying chamber. | |
| Row 31 – 32½ red bricks. The masonry of this row moves inward by 40 mm, and the perimeter of this row is equal to the main size of the stove. The bricks laid on the sides of the drying chamber are cut diagonally from the top. In this way, the basis for covering the space is prepared. | |
| Row 31 – continuation. Next, three bricks are prepared, on which cuts are made from below on both sides, as shown in the drawing. Then, these bricks cover the drying chamber. | |
| 32nd row – 23 red bricks. This row covers the area of the stove near the chimney duct with another layer. On the front side of the kiln, the bricks of the row are moved inward by 80 mm, and on the left side - by 1⅓ bricks. | |
| 33rd row – 5 red bricks. The chimney pipe channel is laid. | |
| 34th row - 5 red bricks are placed in a bandage to the previous row. This row becomes the basis for further laying of the mounted chimney pipe. |
The work of a stove maker these days is not cheap. So, after carefully studying the project and the order of masonry, you can try to carry out this process yourself. In addition to the fact that a decent amount will be saved, a certain skill in the stove business will appear, which will not be superfluous for any owner of a private home.
At the end of the publication, there is a video lesson from a professional with tips on how to properly lay a brick oven:
Video: laying a two-bell furnace - part 1.
Video: laying a two-bell furnace - part 2.
Brick pyrolysis stove
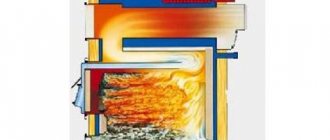
Such heating equipment can be classified as long-burning. Solid fuel burns without oxygen. With the help of wood, volatile gases are saturated, and then burned at a temperature of more than 450 ° C, and they are mixed with the remaining air in the 2nd chamber.
This design has a high efficiency, which can reach up to 95%.
You can install the equipment in a country house, garage or small country house. The pyrolysis furnace consumes little fuel at maximum operation. All solid material burns almost completely. Soot practically does not settle, since coals and gas are burned.
All pyrolysis models work on this principle, but different designs differ in characteristics and appearance.
A pyrolysis oven may not be very different from classic brick ovens Source stop-othod.ru
Pros and cons of iron stoves
An iron stove can be a small potbelly stove in the garage or a powerful long-burning stove that will heat rooms with an increased area. It can also be made entirely of metal or just have a steel combustion chamber.
The iron heating device has many good qualities. Having dealt with them, you can see why this method of heating is popular:
- Compactness. Each iron or cast iron stove will take up significantly less space compared to a brick one.
- Strength. When compared with other materials, the iron version of the heating device will last longer.
- Price. Prices for this type of combustion chamber are quite affordable. The savings also lie in the fact that you do not need to pay for the services of a specialist for installation and extraordinary costs for materials, as is necessary for bricklaying.
- Resistant to temperature changes. This point is so important for heating in a house outside the city, where time is rarely spent. He arrived, lit the fire, and after a short period of time the house was warm without any hot spots.
- Simplicity of the installation process. Anyone can install such a heating device. Installation does not require any special tools or devices, or much knowledge.
- Mobility. You can install it in any place without thinking about how to install a chimney. There is also no need for foundation equipment. In iron stoves, it is possible to remove the chimney through the wall, and this solves a lot of problems: you do not need to take into account the location of beams and rafter systems, or make fire-resistant insulation.
There are no beautiful things in the world. And iron heating systems have their own disadvantages. There are only a few of them, but they are present:
- Low heat capacity. After heating, home heat is not retained for a long time, so you have to keep the fire going all the time. Actually, due to the large use of firewood, such heating devices received the name “potbelly stove”. However, thanks to new technologies, this figure has decreased slightly, and long-burning furnaces have emerged. They are filled with wood once every 6–8 hours.
- Burnout of the bottom of the combustion chamber. As a result of operation, the metal bottom burns out. But this problem can easily be corrected by replacing or welding on a new bottom.
- Drying the air. This is also easy to remove, you just need to humidify the air. To do this, do not purchase specialized humidifiers; just place a cup of water on the stove.
When installing the stove, you must remember to take safety precautions. Because the heat radiation of such devices is too strong, fire safety rules must be followed.
How does a brick wood stove work?
Brick stoves collect heat and gradually distribute heat throughout the room. A small house is heated from 15 to 24 hours. Smoke escapes through the chimney due to natural draft. The room in which heating equipment is installed should be regularly ventilated. The valve on the main pipe closes to stop the draft.
It is optimal to use dry firewood for the firebox. It is necessary to clean the ash in the receiving compartment. There are usually no problems when using the equipment.
It is not recommended to use various household waste or building materials that are harmful to health as fuel.
Brick structures have some disadvantages:
- Cleaning the chimney about 2 times a year;
- You need to add firewood manually;
It is necessary to build a furnace only from high-quality materials that meet all standards. Otherwise, the equipment may not heat the room well or the smell of smoke may appear in the house.
If the stove is being built from 450 bricks or more, then it is necessary to build a foundation. Heating equipment can be installed on the base of the house if it is made in the form of a whole slab. A separate foundation is arranged without reference to the base.
Basically, the foundation for a brick kiln is made according to a standard scheme Source nastroike.com
According to the house plan, a place is selected for installing the heating structure during the construction of the house. In a house that is already in use, the arrangement of the equipment is designed so that the chimney is located between the floor beams. It should be at a distance of 1 meter from the rafters.
The chimney pipe must be at least 0.5 m higher than the roof. The closer the pipe is to the ridge, the higher it should be.
How does a wood-burning brick oven work?
The design of a wood-burning stove necessarily includes a firebox with a door, a ash pan (ash pit) also with a door, a grate, an ash pan, a chimney and a damper that closes it. Additional smoke circulation utilizes the heat of exhaust gases, and cleaning will help save on the services of a chimney sweep. The firebox is the heart of the stove, in which fuel combustion occurs. It must accommodate a sufficient amount of firewood, its lining must withstand high temperatures - during combustion, the temperature in a wood-burning stove can rise above 1000 degrees.
In brick kilns, the firebox should be made of refractory fireclay bricks or well-burnt red bricks. The size of the firebox determines the amount of heat transfer from the hearth; it is recommended to make its length more than 30 cm so that the firewood burns in a lying position. The grate is built into the firebox, from below, air comes from the ash pan, blowing the firewood and ensuring its combustion. The ash formed as the fuel burns falls into the ash pit. The blower, through which oxygen enters the grate from below, is equipped with a door, the degree of opening of which regulates the intensity of combustion of wood. The standard height of the ash pan is three bricks, which is enough for easy cleaning. In order not to remove the ash with a brush, you can place a flat tray at the bottom of the blower.
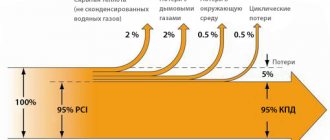
The chimney can be simple, when combustion products go directly from the firebox into a vertical section and are removed through a hole in the roof. In this case, the efficiency of the furnace will be approximately 50%. Another, economical option is that the vertical pipe can be preceded by vertical or horizontal smoke circuits, the walls of which are heated when smoke passes through them, improving efficiency by up to 85%.
Construction of a wood heating stove
Gas generator structures in the spotlight
Gas-generating heating furnaces and boilers are especially popular. They are compact, economical, have high efficiency (80%), and are well suited for constant use in a private home. The disadvantages include the need to carefully select fuel. However, this inconvenience more than pays off.
The firebox has a specific design. It consists of two chambers. In the first, the wood burns slowly, and in the second, the pyrolysis gas released during combustion is burned. The air is supplied not from below, as in conventional solid fuel stoves, but from above. A side effect is higher aerodynamic resistance, which is why you have to pay a lot of attention to the design and quality of installation of the chimney.
Compact gas generator stove
Video: operating principle of long-burning furnaces
TOP 3 most popular models
- "Buleryan." This was originally an invention of Canadians who were looking for a cheap and reliable way to heat homes in harsh climatic conditions. Now there are many analogues that work on the same principle. The peculiarity of “Buleryan” is the absence of an ash pit and the presence of air ducts, thanks to which it is possible to heat nearby rooms. The models are economical, capable of working on one portion of firewood for 10-12 hours.
- "Breneran." This is the most successful domestic analogue of the same “Buleryan”. There are several popular modifications of the stove. When installing Aqua-Breneran, you can connect a water heating system, but you must be prepared for condensation to enter the room.
"Breneran"
- "Professor Butakov." The model is efficient and looks very attractive. It is designed so that condensate enters the oven and burns. The firebox is equipped with grates, which is why the combustion time of one load of firewood is less than that of “Breneran” and “Buleryan”.
"Professor Butakov"