Pros and cons of a garage furnace using waste oil
Among the main advantages of mining furnaces, it is worth highlighting:
- ensuring efficient heating of a garage or household building in a short period of time;
- independence of the device from the presence of gas or electricity;
- ease of operation;
- unique design features of the unit, which allow not only to heat the room, but also to cook food;
- no open flame;
- reliability of the design due to the use of metal products connected by welding in the manufacturing process of the furnace;
- absence of a large amount of burning and soot when the stove is used correctly;
- light weight, allowing the heating device to be easily transported;
- the possibility of using scrap metal in the furnace manufacturing process;
- During operation of the device, oil and its vapors are burned;
- By installing the tank at the top of the stove, you can combine the device with a water heating system.
In addition to the advantages, the exhaust stove has some disadvantages, namely:
- high probability of clogging of the supply tube with spent fuel;
- the need to install a chimney whose length exceeds 4 m;
- hotness of exposed surfaces;
- the need for weekly cleaning of the chimney and oil container from waste accumulation;
- a high percentage of the likelihood of clothing becoming contaminated during contact with fuel;
- unpleasant aroma that comes from used oil;
- the need to place the container with fuel in a well-heated room;
- improper operation increases the risk of fire;
- extinguishing the flame in the device is possible only after the fuel has completely burned out;
- the presence of a humming noise that occurs during the operation of the heating device;
- the occurrence of fuel combustion if it is heated to its flash point.
Important! A working furnace allows you to quickly heat a garage space. Before adding fuel to the system, it must be filtered. A homemade stove can be equipped with a drip fuel supply
Features of heating structures during testing
The devices described in this article are often referred to as miracle stoves, because they use used oils (motor, transmission), which cost very little. Thanks to this, the operation of this type of furnace is cheap. The other miracle stoves that interest us will not operate on gasoline, diesel fuel, kerosene and other highly flammable mixtures.
“Exhaust” devices heat rooms by directly heating the air in them. From a constructive point of view, such a unit consists of two combustion compartments. In compartment No1, the used oil is burned, resulting in the formation of flammable vapors. After this, the vapors are fed into compartment No. 2, where they are mixed with air and, having a sufficiently high temperature, quickly burn, which is why large volumes of thermal energy are released.
Note! The design described above will work correctly only when air is constantly supplied to both compartments of the unit. Moreover, compartment No. 1 must be equipped with a special damper designed to regulate the volume of air entering the chamber.
In most cases, both compartments are connected to each other using a pipe. It is important that holes with a diameter of about 10 millimeters are drilled in the latter - through them air will flow into compartment No. 2 for mixing with flammable vapors.
Below are the main advantages of “working off” units.
- They are quite safe, since in this case it is the oil vapor that burns, and not the used oil itself.
- It is quite possible to make such a stove with your own hands, using cheap and affordable materials.
- Finally, such devices are easy to install and use, which is good news.
But there are also some disadvantages that anyone who plans to make a miracle stove on their own should know about.
- Only a warm room should be used to store used oil. At sub-zero temperatures it will simply freeze and lose all its properties.
- In addition, this oil must be specially filtered. It is prohibited to use simple contaminated waste from car services. It is almost impossible to clean contaminated oil at home.
On a note! It is also impossible to heat living rooms with the help of such units. Yes, this is an ideal option for a garage, but it is not suitable for a room where people are always present.
Video - How to work with a furnace during “working out”
Types of homemade stoves in development for the garage
According to the type of design, there are several options for homemade furnaces for mining:
- a unit that is made of metal sheets or a gas cylinder;
- supercharged device;
- drip type stove being used in a garage.
The first type is the simplest device that any garage owner who knows how to use a welding machine can make. For this purpose you will need to prepare:
- metal sheets;
- metal pipes.
To reduce the manufacturing time of the structure, you can use a gas cylinder. When cutting off its upper part, you should be careful, because a small part of the gas may remain in the metal vessel. An explosion is possible, which can be prevented by filling the cylinder with water. Now you can start dismantling.
During the manufacturing process of a supercharged stove, a fan is installed. In this case, it is important to ensure that the main air flow is directed to the second chamber, which will ensure high-quality combustion of the fuel. The resulting heat will spread quickly and evenly throughout the garage.
Depending on what type of structure will be manufactured, you can give preference to installing conventional convection, an air heat exchanger, or heating water in a boiler.
A stove using a gas cylinder can keep the garage warm even in severe frosts
Important! Industrial furnaces are compact in size, safe, and affordable. However, self-made devices are no less effective at heating a garage space.
What you will need to make your own waste oil furnace
- To make two containers, you will need sheets of metal four millimeters thick.
- To make the lid, a sheet of metal six millimeters thick.
- The pipe from which the chimney will be made has a diameter of ten centimeters.
- Small diameter tubes or angles for making legs.
In order to connect all the parts of the waste oil furnace into one structure, you will need a welding machine. To supply air to the furnace, you will need to drill holes in the pipe using a drill. You will also need an angle grinder, a grinder, and a tape measure with a level for taking measurements. You can do without the tools listed above if you make a stove from a gas cylinder.
What you need to make a homemade furnace for the garage
In almost any private yard you can find a large number of metal parts, cast iron plates, steel sheets and pipes. After inspecting the area, you should collect the materials that will be required to make a homemade stove.
In order to build a simple model of a stove for testing, you need to stock up on:
- an old sheet of steel, the thickness of which reaches 3.5 mm;
- a piece of steel pipe, the wall thickness of which reaches 4.5 mm;
- a tin pipe for the chimney, the diameter of which is within 11 cm.
You should also prepare a welding machine with electrodes, a circular saw with discs for grinding and cutting, pliers with a hammer and glasses for welding.
How to make a stove for working in a garage
It’s quite simple to build a waste oil stove to heat your garage. Below is a step-by-step guide that will help you avoid making mistakes during the manufacturing process.
Using a stove during testing requires compliance with safety precautions, which will make it possible to avoid a fire.
Furnace using a gas cylinder
A natural gas cylinder can be used to make a waste furnace. The product has an acceptable shape. Sufficiently dense metal allows the device to be used for a long time.
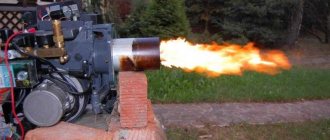
The stove, which was made from a standard cylinder, is capable of heating a garage of 80-85 square meters. m. The design allows not to install a turbo burner. Used oil can flow into the furnace by gravity.
To manufacture a heating unit, you need to visit the store to purchase:
- gas cylinder, the volume of which reaches 50 l;
- metal sheets for making a waste oil container;
- chimney pipe (wall thickness should reach 2-3 mm);
- pipes that will be needed to install the burner;
- steel corners.
It is also worth arming yourself with a welding machine, a drill, an angle grinder, an angle grinder, and a building level.
Every 7-10 days, the waste container should be cleaned, removing carbon deposits
Step-by-step process for making a stove:
- The first step is to start preparing the gas cylinder. To eliminate the unpleasant aroma and get rid of gas residues, it is necessary to drain the accumulated condensate from the container. Rinse the container with water. The procedure is carried out outdoors.
- The cylinder is placed in a vertical position and filled completely with water.
- To achieve the most even cut possible, you need to make marks in the area of the top of the container.
- It is recommended to cut the top of the cylinder using a grinder. Water will begin to flow out of the container. As soon as the liquid has flowed out to the cutting level, you can begin to completely cut off the top of the metal vessel.
- The cut part of the cylinder can later be used as a container lid. The lower area of the metal vessel is used to heat the room. The water is completely drained from the container.
- The legs are welded to the bottom of the cylinder. For this purpose, you can use steel angles.
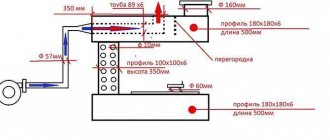
- The cut metal vessel can be placed on legs. Having retreated 75 mm from the top part, it is necessary to cut a round hole intended for the smoke exhaust. The diameter of the hole must be identical to the diameter of the pipe prepared for this purpose, the length of which reaches 40 cm.
- The pipe is installed and welded to the cut hole. It is important that the weld seam is tight and even.
- It is necessary to weld a vertical section to the horizontal pipe, the height of which is in the range of 350-400 cm (using a bend, the transition to the vertical is made). Bring the chimney pipe outside.
- In the lower area of the cylinder, cut a square hole that serves as a blower. Install a door on it, which will make it possible to regulate the amount of supplied air mass.
- Using a piece of pipe, the height of which reaches 80-100 mm, and the diameter does not exceed 14 cm, you can make a container for mining, which is advisable to install at the bottom of the cylinder. This pipe is welded at the bottom.
- Cut a lid from a piece of metal. For this purpose, a hole should be made in the center of the sheet, the diameter of which reaches 11 cm. A pipe of identical size can be welded to it. The second hole must be cut closer to the outermost area of the circle. A cover (movable) is fixed to it. Used oil will flow through this hole and the air supply will be adjusted.
- In a pipe whose height is identical to the size of the cylinder, one end must be welded with a round metal blank. The lower part of the pipe must be welded into the waste container. The outline of the resulting structure resembles a barbell.
- After this, it is necessary to drill 5 rows, each of which contains 7 holes (each size is 10 mm). The holes are distributed over 40 cm of the height of the lower area of the pipe. The structure can be installed in the inside of the prepared cylinder. The lid located on top must be welded to the walls.
- The lower container is filled with used oil. The stove can be moved outside for experimental activation. If everything goes well, you can install the heating unit in the garage.
A metal gas container can be used to make a stove
Do-it-yourself stove manufacturing process
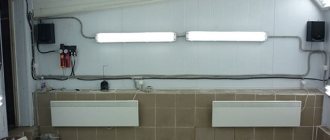
First of all, you need to think about the place in the room where the stove will be located. It is important to properly prepare this area of the building, taking into account all fire safety standards. The area where the stove is located, the walls around it and the floor, should be covered with heat-insulating material. This could be brick or stone masonry, sheets of iron or asbestos.
Next, drawings and diagrams are made with precise measurements of each part according to which the stove will be assembled.
Blueprints
Blueprints
It is better to start working by making two main furnace containers - upper and lower. Pre-marked parts for tanks are cut with a grinder from a sheet of metal 4 mm thick. Markings should be made by referring to the drawing. Usually these containers are made round, but it is quite possible to make them square, it’s a matter of taste.
The parts of the stove are connected using a welding machine.
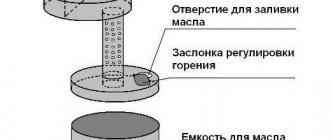
A hole is cut in the cover for the lower tank (3), in which a damper (6) is provided. It is necessary to pour fuel into the stove, and with the help of the damper the air supply and, accordingly, the combustion force will be controlled.
The cover is cut out of a sheet of metal six millimeters thick. The lid should “fit” onto the lower container very tightly; cracks and gaps should not be allowed to appear. A hole is cut in the center of the lid for a pipe connecting the upper and lower containers, and the pipe is welded with a welding machine. The length of the pipe must be at least thirty-five centimeters with a diameter of ten centimeters. Using a drill, holes with a diameter of about one centimeter are drilled along the entire length of the pipe; it is enough to make several such rows along. Their approximate number is fifty pieces.
Just like the first container, we make the second, upper one. This is the future combustion chamber of the furnace using waste oil from the pipe. The same material is used for the lid, a sheet of metal six centimeters thick. It is necessary to cut a hole in this cover for the chimney. A partition is cut out of the same six-centimeter-thick sheet of metal and, using a welding machine, welded to the lid, closer to the hole for the chimney. Now the upper reservoir, the future combustion chamber, is welded to the burner pipe. Again, it is important that this lid fits very tightly. Gaps and cracks between the lid and the tank are not allowed.
So, the stove itself is ready and the next step is to make a chimney. It is desirable that its design be removable, since there is a need to regularly remove combustion products from the chimney pipe. The chimney can be ceramic, steel or galvanized sheet.
The parts of the stove connected using a welding machine must be thoroughly sanded and checked for leaks.
A homemade stove can heat even a residential building. To make a water circuit for the furnace, it is enough to install an iron tank filled with water on top and distribute pipes around the room. There is nothing complicated in this oven design.
Water circuit
How to use a homemade stove in a garage during working hours
It is important to use the stove correctly to heat your garage. Below are instructions for using a homemade unit:
- 1 liter of waste engine oil is poured into the waste tank.
- A small percentage of gasoline is poured on top. Using a torch, the liquid is set on fire. To do this, simply wrap a cloth that has been previously soaked in gasoline around the tip of the welding electrode.
- Until the waste oil garage heater is completely warmed up, the throttle must be open.
- When the fire goes out, it is necessary to use pyrolysis to maintain the combustion process.
- An intensification of the flame and an increase in draft through the fill hole indicates that the furnace is approaching operating mode. The oil begins to boil. The throttle is closed.
Important! Servicing the stove is quite simple. The most important thing is to systematically remove the cap from the oil tank and remove non-flammable sediment using a metal scoop.
Structural elements
When making a garage stove, the principle of direct ignition of oil is most often used. Its design usually includes the following basic elements:
- Lower oil combustion chamber. This part of the furnace is considered low-temperature and is combined with a waste oil tank. Oil is poured through this tank, which enters a chamber equipped with holes for air supply. A desirable condition is the ability to regulate the air flow, achieved by adjusting the opening of the holes.
- Medium chamber. In this zone, flammable gases are enriched with oxygen from the air, and the mixture is ignited. The most characteristic form of this chamber is pipes with numerous holes for air access.
- Upper combustion chamber. The final combustion of the gas mixture takes place in the upper part of the furnace. Here smoke is formed, which is discharged through the chimney.
- The chimney, as in any stove, plays an important role in creating draft, i.e. the speed of gas movement in the upper direction. It must have a length of at least 3.5 m, and without horizontal sections. It should be borne in mind that burning contaminated oil can create significant carbon deposits, and additional joints and horizontal zones provide the opportunity for soot to accumulate and, thus, block the channel. Inside the garage, the chimney can be installed with a slope (angle of at least 50º), and above the garage roof it is installed strictly vertically. The upper end must be covered with a cap to prevent precipitation from getting inside.
A garage furnace using waste oil is usually made of sheet steel, and it is necessary to choose a structural heat-resistant variety. A steel sheet with a thickness of at least 4 mm is used. The greatest heating occurs in the upper chamber (more than 750º), which determines the use of sheets of maximum thickness in this area. Often, when making a homemade oil furnace, steel pipes of different diameters are used.
Safety precautions
Improper handling of the stove can cause a fire. To avoid such trouble, it is recommended:
- do not allow the use of other types of oils, except for used engine fuel;
- do not start up faulty equipment;
- do not allow the unit to be installed in a garage that does not have a ventilation system;
- do not leave the room if the stove is working;
- do not allow fires to start if there is no smoke exhaust duct;
- the hole to the burner must not be blocked;
- Oil should not splash onto a hot surface.
Important! The stove can only be used by adults. Children and animals should not come close to the unit.
Ignoring safety precautions may cause a fire.
The video of making a stove during testing for a garage provides additional information on the construction of a heating unit: