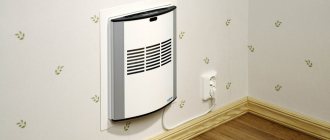
Supply ventilation device
Ventilation is a method of ventilating a confined space , which helps:
- fill the room with fresh air;
- create a special microclimate;
- prevent the appearance of mold and mildew on the walls and ceiling.
Supply ventilation with a built-in heating element is a system that fills the room with fresh air, heated to a comfortable temperature, and warms rooms in cold weather (supply ventilation is described in detail here). Modern ventilation devices are equipped with a number of useful functions :
- temperature control;
- adjusting the air flow power, etc.
Ventilation devices are compact and fit into the residential interior. Heated ventilation devices consist of a heating element, a filter grille that cleans the incoming air masses from debris, dirt, dust, and additional elements that not all systems are equipped with (humidifiers, antibacterial filters).
Attention
A high-quality ventilation system regularly fills the room with fresh, warm, purified, humidified air.
Supply ventilation device with air heating
There are two types of units for supply ventilation:
- Monoblock - they are made up of one block, which is installed at the inlet of the air duct. This block contains all the necessary devices, without exception, that ensure high-quality and reliable service of the ventilation structure. This type of device is often installed in the wall or in window frames. This method is considered the simplest and least expensive. But in practice it is quite ineffective, since the placement of its intake fans does not make it possible to cover many areas of the building.
- Installation - these supply ventilation systems are powerful enough to cover high-rise buildings, large industrial premises, and apartment buildings.
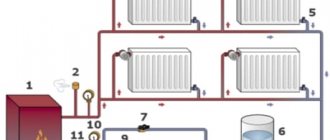
Supply ventilation schemes
The simplest type of installation:
- Air filter,
- blower fan,
- A heating element.
Standard scheme of supply and exhaust ventilation with heating
How to heat supply air using a recuperator?
Recuperators are divided into 2 types:
- Rotary - work using electricity. They have a cylindrical body in which a rotor element is mounted. It constantly rotates between the “incoming” and “exhaust” air valves. Quite a large item. Efficiency – up to 87%.
- Lamellar . Such recuperators consist of united plates. Supply and “exhaust” air move towards each other through different valves. This helps prevent recirculation. Such recuperators are usually small in size.
Main design features
The system consists of several elements:
- Plastic grill. This decorative decoration of the structure filters out large debris that can get in with air masses.
- Valve or baffle. The function of the valve is to block the flow of air when the device is turned off.
- Filters. Filters trap small debris and dust. These filters must be replaced every few months.
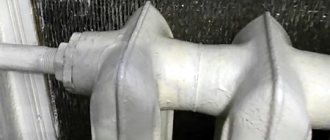
- The heating element is a heater (water or electric).
For small rooms or houses it is better to use an electric heating element, and for large areas - a water one.
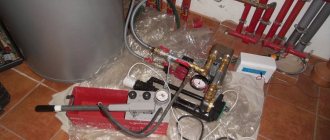
What will you need to create?
A new supply valve costs at least 1200-1500 rubles. Higher quality models will cost about 3-4 thousand. Let's calculate how much it will cost to make a homemade ventilator.
We will need:
- Plastic pipe.
- Lattice.
- Insulation.
- Filter.
- Housing with valve.
Below we will look in more detail at how to choose the right parts to create a supply valve with your own hands.
The pipe will play the role of an air duct. The length of the plastic pipe is selected according to the thickness of the wall. If the thickness is unknown, you can take a meter piece with a reserve, and already in the process of work, cut off the required piece.
The diameter of the air duct is up to 100-120 mm. More is not recommended: too much air will not have time to heat up. In addition, a hole in the wall of a large diameter can lead to serious disruption of the indoor microclimate.
To create a wall inlet with your own hands, a regular non-pressure PVC pipe will do. Price – 150-250 rubles (per meter).
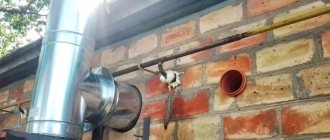
Installation of a wall supply valve
The grille will be placed on the outside of the pipe and protect it from various debris and precipitation. The product should be plastic, ideally have an internal protective mesh. The shape doesn't matter.
The size of the grille should cover the diameter of the pipe (that is, if the air duct is 100 mm in diameter, the grille should be at least 120 x 120 mm). Cost – about 150-250 rubles.
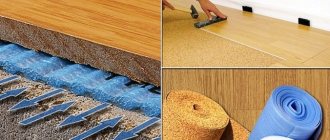
Insulation - inserted inside the pipe. Thanks to thermal insulation, the wall around the valve will not freeze in winter. The insulation can be made from polystyrene foam, extruded polystyrene foam, polyurethane foam or mineral wool.
Any pipe insulation that is suitable in diameter will do (that is, for an inlet with a diameter of 100 mm, you need to take a “shell” of the same diameter). The length does not have to be taken according to the length of the pipe - it will be enough to insulate the third of the air duct located closer to the room. The thickness of the insulation will be 20 mm. You can get by with 200 rubles.
Filter – inserted inside the valve body. Serves to retain dust and pollen. You can make a filter from a porous material called polyf or from ordinary foam rubber. A small piece is needed, approximately 110 x 110 mm in size (to cover the pipe). It will cost up to 50 rubles.
Valve body – installed inside the room. It’s not easy to make it yourself, so the most convenient option is to purchase a ready-made ventilator head. These, for example, are produced by Vents and are sold in ventilation equipment stores. Cost - about 300-450 rubles.
As an option, the inner casing can be replaced with a ventilation grille that has adjustable blinds. This way it will be possible to change the amount of incoming air, or completely block the flow.
Vents valve head
Let's calculate the total amount:
- Air duct – up to 200.
- Lattice – up to 200.
- Insulation – up to 200.
- Filter – 50.
- Head – up to 450.
In total - 1100 rubles. This is an average figure: in fact, it is possible to make a wall inlet valve cheaper.
How to improve the device: fan or heating
You can supplement a homemade supply valve by installing a fan in it. A regular duct will do, the main thing is that it matches the diameter of the air duct pipe. It is connected to the network and controlled through a switch placed on the wall.
There are two ways to install the fan: towards the room or towards the street. Air can be either forced into the room or, vice versa, removed. In the second case, the valve will work as a passive supply, and when the fan is turned on, as an exhaust.
Cost: an axial duct fan with a diameter of 104 mm, which has a humidity sensor and a shutdown timer, will cost approximately 1200-1400 rubles. The air capacity of such a model (for example, Vents 100 VKO) is about 100 m³/h.
Another option is a heated air supply. Such a device is especially relevant in our climate: even if the valve is installed in the wall near the battery, at -10º or less the air will no longer have time to heat up.
To make a heated air vent, you will need a spiral heating element in the form of a wire. When choosing it, you should clarify its power and the temperature created. PVC melts at a temperature of +150º, and begins to deform already at +70º.
Therefore, when using a heating wire, it is recommended to replace the plastic duct with a metal one.
Installing an inlet into a wall using the example of a Domvent valve (video)
How much air will it let through?
It is difficult to calculate exactly how much air such a homemade ventilator (without a fan) will let through.
If you take into account how much air the KPV-125 passes through: about 36 m³/h with a pipe diameter of 133 mm, you can roughly estimate the productivity of a homemade air intake. This means that at 10 Pa pressure difference between the street and the room (the average statistical indicator relevant for normally operating exhaust ventilation), the valve (with an air duct with a diameter of 100 mm) will flow about 25 m³/h (without a working fan).
Necessary tools and materials for work
In addition to the parts mentioned above, to create and install a fresh air ventilation valve with your own hands you will need:
- Hacksaw (cut a piece of pipe to size).
- Bolts or glue (for fastening the outer grille and inner cap).
- Polyurethane foam (for sealing the gap between the ventilator pipe and the wall).
To better insulate the supply wall valve, the outside of the pipe can be covered with thermal insulation film.
Related article: How to improve the sound insulation of walls in an apartment
In what cases is it used?
A heated ventilation device uses oxygen-enriched air from outside, unlike air conditioning systems that circulate exhaust air through themselves. Such systems are used in private homes and offices, where it is necessary to regularly maintain the microclimate, where fresh air at a comfortable temperature is constantly needed.
The carefully thought-out design of the device does not allow fresh air, enriched with oxygen and heated to the required temperature, to mix with exhaust air. This ensures a regular flow of oxygen into the enclosed space.
Attention
Such a ventilation system is in demand in rooms where plastic windows are installed, which are hermetically sealed and prevent the flow of fresh air, and in those where it is impossible to regularly ventilate the space: in basements, boiler rooms without windows.
Types of systems
The supply ventilation unit with air heating is available in several types. This can be central ventilation, which will heat a large industrial premises, or an office center, or it can be individual, for example, in an apartment or in a private house.
In addition, all heated ventilation systems are divided into the following types:
- With recovery. Essentially, this is a heat exchange system when incoming masses come into contact with outgoing masses and exchange heat. This option is suitable only for regions with not very cold winters. These systems belong to passive ventilation schemes. It is best to place them near radiators.
- Mermen. This heated air supply operates either from a boiler or from a central heating battery. Its main advantage is energy savings. Supply ventilation with water-heated air is especially popular among consumers.
- Electrical. They require quite significant electricity consumption. According to the principle of operation, it is a simple electric heating element that heats the air with its constant movement.
Before choosing one specific model, it is recommended to sit down and calculate how much electricity you will have to spend to heat your apartment or private house.
Supply ventilation may also differ in the method of pumping air into the room. There are natural options, and there are forced ones, when air is taken in using fans. The types of ventilation also differ according to the type of control. These can be manual models or automatic ones, which are controlled using a remote control or from a special application on the phone.
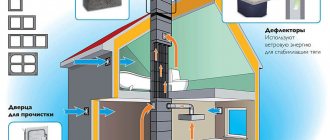
Principle of operation
The device has a simple operating principle:
- Air passes through the air intake from the street. Thanks to the grille, large debris that can be carried by the wind, fluff, and insects are retained and do not fall inside the pipe.
- The air passes through a hole in the wall called a duct. This is a pipe with walls made of heat and sound insulating material. All joints between the pipe and the wall are filled with sealant to prevent drafts. Moving through the pipe, the air passes through several filters that help clean it completely.
- Once the air reaches the end of the pipe, it encounters an automatic damper, which separates the duct from the housing of the ventilation unit. If you turn it off, the damper or valve will automatically close to prevent cold air from outside from entering the room. The valve also closes when the incoming air becomes colder than the owner's setting.
- A heater is installed in the case, which helps to achieve the set temperature thanks to the climate control function.
As air masses pass through the system, purified heated air enters the enclosed space. Modern devices are organized in such a way that you can control the temperature and power of the air flow using a control panel.
Correct calculation is the key to stable operation
The project can be created both during the construction of the structure and after its commissioning. It should be remembered that the project must take into account all the features of the building, the purpose of each room and their area. It must also contain precise indications of the installation locations of equipment and air ducts, as well as calculations of the required air exchange.
Calculation of the supply and exhaust ventilation system includes:
- Ventilation performance.
- Required power and number of blower fans.
- The maximum possible noise level, according to SNIP, and the speed of air flow through the air ducts.
- The required cross-section, area and material from which the air ducts must be made.
- Type and power of additional equipment: recuperators, air heaters, etc.
How to heat air using recirculation?
The principle of operation of the device due to recycling:
- The air flow comes from outside into the duct. Part of it, using a special system, is removed back outside the room, and the remainder ends up in the mixing compartment (read separately about the specifics of installing ventilation outlets that lead the air flow outside).
- In the compartment, fresh air enriched with oxygen is mixed with exhaust air, that is, that which was already in the room. Mixing, the air masses are warmed up and sent to the heater or air conditioner, and then into the room.
What is forced air ventilation with air heating?
Ventilation with an influx of air masses differs from standard air conditioning systems. The principle of its operation is to draw air from the outside. Thus, in addition to cooling and heating, such ventilation enriches the room with oxygen, while conventional air conditioning systems simply circulate the air in the room.
The supply air is heated in the ventilation unit. The heated supply ventilation unit has high heat transfer. Therefore, even during severe frosts, ventilation continuously supplies masses of fresh hot air.
Ventilation with heating is carried out through air exchange. Circulation and heating of the influx of air masses is carried out in supply and exhaust units with a recuperator. Air drawn from outside is heated in the recuperator due to the temperature of the exhaust air masses. The recuperator prevents the mixing of “exhaust” and supply fresh air.
Another way to heat the supply ventilation is through recirculation. With this heating method, fresh air masses are mixed with “spent” ones. The influx of air from the street is heated to the desired temperature and supplied to the room.
Connection diagram
There are many schemes and methods for placing equipment and organizing air exchange. The choice of a specific scheme depends on the type of room (apartment, private house, office), the dimensions of the system, and its equipment (read about the arrangement of ventilation in an apartment here).
For example, when organizing ventilation in a private house, the simplest scheme with an air supply device in the corridor or hallway is often used. In houses and apartments, the hallway communicates with almost all rooms, so heated, purified air can be supplied into it, which will be distributed throughout all rooms.
Before you begin to develop or apply a circuit, you need to carefully calculate the air flow.
Attention
If the calculation is made for private housing construction, then the air flow for the operation of the boiler room is added to the result obtained using the standard formula. If the house has local exhaust devices (pipes, hoods), then their performance values will have to be included in the calculation.
Supply system device with heating function
Technically, the design of the supply air unit is not a high-tech device. True, the latest developments in this area, aimed at providing specialized areas of the national economy with air supply machines, have stepped far forward.
Industrial structures are equipped in accordance with the latest technology:
- control controllers;
- electric motor speed regulators;
- control and analysis sensor systems;
- effective filters and recuperators;
- air heating (cooling) modules;
- channel cut-off mechanisms.
As a result, the treatment of outside air is achieved at a truly high level, which contributes to the creation of a favorable atmosphere inside the work premises.
Industrial high-tech system for the supply and processing of external air, equipped with full automation, capable of stable operation with the support of periodic maintenance
Perhaps, for a single-family private house, such air treatment is quite acceptable.
But for implementation in a city apartment, this is already a difficult task. The complexity of the task for a city dweller is determined by various nuances - both technical and economic.
Design features of the heated “inlet”
To better understand the complexity of the task, let’s consider the classic design of an air supply unit with functions for additional processing of street air.
First of all, the purely installation factor should be taken into account. After all, an air treatment system is a rather large installation that requires the allocation of part of the room area.
Relatively small-sized branded supply and exhaust systems are produced, designed for sub-ceiling installation. For cases with private houses, this approach can be considered
The default “inlet” design contains:
- electric motor;
- impeller;
- air capture diffuser;
- air injection diffuser;
- duct shut-off valves;
- filters;
- air channel system.
In order to ensure stable heating of the air flow forced by the fan impeller, a heating system is installed after the discharge diffuser.
Types of heating systems for ventilation
Technologically, in conjunction with forced ventilation, use a water or electric heating system. Or it is possible to use two heating options simultaneously, which, although rare, occurs when operating industrial supply air processing machines.
Implementing a water option in a domestic environment (in an apartment) for arranging ventilation with heated air with your own hands is an extremely difficult task, especially if you plan to operate the supply system in winter conditions.
Execution of the air handling unit, where a water heater is used as an air flow heater. This option, however, is extremely problematic to implement for urban conditions, but is possible for a private single-family home
Water heating requires reliable control and mandatory protection against “defrosting” of the water circuit. To achieve high heating efficiency, the water circuit must be made with a multi-pass, multi-row design. Such a heating device must be removable. We recommend that you familiarize yourself with the types of water heaters for supply air and their operating principles.
The introduction of an electric heater into the design of a home air supply system promises to result in somewhat less difficulties. However, in this case, electricity consumption will inevitably increase, and, accordingly, monthly costs.
To ensure heating of the supply air electrically, it will be necessary to install powerful electric heaters (TEH).
An example of an apartment project with heating
The modern market for technological equipment, in particular, fans and electric heating elements of various designs, theoretically makes it possible to implement a home “warm air supply” project. For example, it is quite possible to consider a design based on a duct fan.
This is what the design of a duct axial fan looks like - a device theoretically suitable for the manufacture of a heated home air-handling unit
The design of an axial fan, for example, is well suited for an apartment project. This device is small-sized, lightweight, low-noise. The equipment is distinguished by relatively low energy consumption with fairly high productivity. Supports step-by-step speed control, which is also relevant for home “air-fitting” when making it yourself.
However, in addition to the axial duct fan, you will need to select an electric heater (TEH), a design that would ensure full heating of the air mass passed by the fan.
That is, it is necessary to calculate the power of the heating element sufficient for maximum performance of the Dospel device.
For calculations you can use the following formula:
Qt = L * 0.36 * (Tv – Tn),
where: Qt – heating element power; L – duct fan performance; Tv and Tn – air temperature inside and outside.
Supply ventilation in different types of premises: requirements
In various types of premises, depending on their functional purpose, appropriate ventilation parameters must be observed
In the apartment
For residential apartments and houses, sometimes passive ventilation is sufficient. Modular systems include units with a capacity of up to 100 m3/hour for every 5-7 m2 of area. How to make ventilation in the bathroom and toilet? More details at the link.
Standard heated ventilation system in the apartment
For a standard three-room apartment with an area of 60 m2 in a panel house, an installation with a capacity of 350 m3/hour is sufficient.
In the welding shop
Supply ventilation of welding shops should neutralize dust and gas that form convective currents as a result of the operation of welding machines. Sanitary standards establish that air must be supplied to the work area.
External view of the welding shop ventilation system
In such rooms, ducted supply ventilation with heating is installed in two planes:
- air channels directing air down are located at a level of 6 m from the floor;
- air intakes for horizontal or inclined air movement are located at a level of 4 m.
In the paint booth
A specific feature of spray booths is the release of large amounts of solvent and paint vapors. For such premises, exchange supply and exhaust ventilation with mandatory filter hoods is used. Filter hoods are most often installed in the floor, recessing the base a few centimeters. Nozzles with filters are installed in these trenches, and the structure is covered with a grill.
Ventilation device in the painting booth
Operating modes of ventilation in the painting booth:
- start of work - active air circulation to clean the room from dust and harmful microparticles;
- painting process - continuous movement of air with a temperature of up to 30 ° C, supplied to the working area, and its output without filtration;
- drying – supply of clean filtered air heated to 60°C.
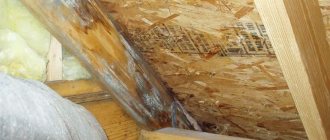
In the boiler room
The operation of fuel boilers is accompanied by the use of oxygen from the air. In order to avoid backdraft, the boiler room ventilation system must be connected to the ventilation ducts in the house. The room itself must have natural exhaust.
The simplest way to organize ventilation in a boiler room
The diameter of the ventilation hole is calculated based on the area of the room, the height of the ceiling and the prevailing air flow rate. It is quite difficult to carry out calculations on your own, so it is better to entrust this work to designers.
Step-by-step instruction
Diagrams and pictures
Before installation, craftsmen recommend sketching the future ventilation system on paper . The drawing should include all dimensions and directions to make it more convenient to install the finished system and make calculations. The valves are marked with grilles and flaps.
Any scheme takes into account:
- The air flow should go from clean rooms to contaminated ones: from the bedroom, children's room, hallway to the kitchen and bathroom (how to install ventilation in the kitchen and bathroom?).
- A heated supply ventilation valve must be located in all rooms and spaces not equipped with an exhaust hood (how to install an exhaust hood?).
- The exhaust ducts must be the same size everywhere, without expansions or contractions.
Diagram of heated ventilation ducts in a private house:
Supply ventilation to the wall with heating and a supply valve in section:
A simple drawing of ventilation with check valves on air ducts:
Drawing of the location of air ducts in the apartment:
Calculations
In order for the system to work properly, it is necessary to calculate its power as accurately as possible. To do this, you will need all the parameters of the room through which the flow will move. Take into account:
- number of floors in the house;
- area of rooms;
- room layout;
- number of people living in the total area;
- availability of household appliances (computers, televisions, machines).
Calculation of the ventilation system begins with determining the air capacity , measured in cubic meters per hour. For calculations, you need a plan of the house or apartment, where the rooms and their areas are indicated.
For each, the amount of air supplied is determined.
Important
The calculation is usually carried out in accordance with the requirements of SNiP.
For example:
- for residential premises where windows do not open, the flow rate should be at least 60 m³/h per person;
- for a bedroom - at least 30 m³/h per person.
When calculating, only those people who are in the premises regularly (permanent residents or employees) are taken into account.
The next stage is the calculation of air exchange by multiplicity. This parameter shows how many times in one hour the air in the room is completely changed. It is important to provide at least one air exchange.
Installation
To install the equipment you will need the following tools:
- Hammer or diamond drill.
- Hammer or sledgehammer, screwdriver or screwdriver.
- Wrenches of different sizes and a ratchet wrench.
Stages:
- Prepare a plane for the through hole.
- Choose its dimensions, mark out the space.
- Drill a through hole with a diamond drill or hammer drill. Prime the walls of the hole.
- Insert the air duct pipe into the through hole. A housing and a fan are mounted to it.
- After installing the duct, fill all cracks around the pipe with sealant.
- Lay channels for wiring to automate the operation of the device.
- Install all remaining parts: filters, sound absorbers, temperature sensors, grille.
- Check the system for functionality.
More details about the stages of installing a ventilation structure in different types of premises, about the essential and significant nuances of ventilation installation work are described in a separate publication.
You can do fresh air ventilation with an air heating function yourself , even if you have no experience working with ventilation devices.
The main thing is to act step by step, carefully prepare for work by drawing the necessary diagrams and making the correct calculations.
Air heating control methods
Automatic supply ventilation with heating
You can control the air heating system within any type of supply ventilation in manual or automatic mode. Most modern devices are equipped with automation, but some of them are controlled manually according to the standard principle.
Manual mode
With manual control, any heating device has a set of buttons with which you can adjust the temperature, turn the device on and off, and adjust program settings to specific parameters. This control is intended for those who plan to use only the basic options of the ventilation system without the need to connect a working application to it.
Auto mode
You can control the settings through an application on your smartphone.
If desired, the device can be connected to a smart climate system called MagicAir and run in automatic heating and control mode. The smartphone on which the application is installed is used as a control center. It can be used to measure microclimate parameters, including air humidity and temperature, as well as the carbon dioxide content in it.
All necessary settings are set and changed directly from the device through the application. It helps normalize the content of carbon dioxide and other substances in the room atmosphere, and also optimizes the operation of the ventilation system. The user only needs to master the interface and select the ideal parameters for his supply ventilation that correspond to the specific room. Afterwards, the base station with the application will independently transmit commands to the device, switch its speeds, control heating, turn it on and off as needed.
It is easier to control the air supply system, which has a built-in air heater, in remote mode. The application helps save time on manual control and reduce energy costs.
DIY wall valve installation
It is very simple to build a homemade supply valve - just follow our recommendations in this section. To work you will need the following tools:
- high power hammer drill;
- drill rod with a nozzle for bricks of the required diameter;
- construction tapes and a level to determine the location of the future hole on the wall;
- sealant;
- screwdriver for installing grilles.
Before you start working with a hammer drill, you should make markings on the wall. Its diameter should be about thirty centimeters (depending on the dimensions of the pipe). You should not choose a pipe that is too large - otherwise you will have to obtain special permission to drill the outer wall. And a small ventilation duct will do an excellent job of ventilating the entire apartment. It is recommended to make the hole with a slight slope towards the outside. The slope is made to prevent drops of rain and snow from entering the valve.
A ventilation pipe is inserted into the resulting hole, which must be wrapped with insulation. On the street side, the pipe should be installed flush with the wall, and inside the room it should protrude slightly. Any gaps left after installing the pipe and grilles should be filled with a layer of sealant.
After installing the pipe, it must be covered with gratings on the outside of the house. The grille should be rotated so that raindrops flow down it without falling into the ventilation duct. On the inside of the wall, the pipe is equipped with a special nozzle that filters the air and regulates the volume of its intake.
Types of supply valves for apartments
Today you can find many types of supply air valves on sale - with heating, filters, fans and other functions. However, the main difference between devices of this type is the installation features. According to this feature, supply ventilation valves are:
- window – installed inside the double-glazed window frame;
- wall - mounted in a special hole in the wall.
Related article: How to hang pictures on the wall options
Both of these types have their advantages and disadvantages. In this section, we will analyze their differences in detail and try to make it easier for our readers to choose the right model.
Window models of ventilation valves
There are ventilation valves that are mounted on plastic windows. This provides good ventilation even in winter, when opening the window is problematic due to the excessively cold air outside.
The window inlet valve has excellent aesthetic characteristics; it is almost invisible on the double-glazed window frame. At first glance, this design seems to be the most suitable for any home, but it has a number of disadvantages:
- high cost compared to wall analogues (sometimes the price of the valve reaches 50% of the price of the double-glazed window itself);
- the valve is installed before or during the installation of a plastic window; it cannot be placed in a closed window opening;
- installation is carried out only by professional craftsmen;
- window valves, as a rule, are not equipped with filters and heating.
Wall ventilation valves
A supply valve installed in the wall is a simple and inexpensive, but very functional device. It is a plastic sleeve in which a filter and noise protection are installed. On the outside, the ventilation valve in the wall is equipped with a mesh and protection from precipitation, and on the inside - a decorative grille in which a damper is mounted.
The wall supply valve compares favorably with window analogues and natural ventilation in the following parameters:
- low price, no need to buy the device together with the window;
- better protection against noise and dirt;
- works great in winter;
- possibility of automatic or mechanical control;
- Provides ventilation throughout the apartment.
The main disadvantage of the wall model is that to install it you will have to make a hole in the wall of the house. This process is quite labor-intensive, but not complicated; from a technical point of view, anyone familiar with repair work can handle it. From an aesthetic point of view, installing the valve on the wall will not cause any particular trouble - both in the apartment and on the outside of the wall, decorative dampers will make the device almost invisible.
Construction stores offer customers a large selection of supply ventilation valves to the wall. The design of the device is quite simple, so devices from different companies do not have serious external differences. The main one is the length and material of the ventilation duct pipe. All valves are equipped with a damper that regulates the air flow into the room. Up to 40 m³/hour of air masses can pass through the device, this is quite enough to completely ventilate the apartment.
Developers provide supply valves with a whole range of additional functions. The first of these is the ability to control the air flow regulator. This makes it possible to provide inflow in conditions where ventilation of the room is especially necessary, for example, if wet laundry is being dried in the room or food is being prepared.
Control can take place in automatic or mechanical mode. In the first case, the device itself monitors the temperature and humidity of the air in the room and regulates the level of the pipe barrier. In the second, the device is configured manually by the owners.
Automatic valves are more expensive than their analogues, but they do not always correlate well with weather conditions. If in winter the automatic control function is very important, then in summer, with the same temperature outside and inside the premises, it practically loses its significance.
Preparing to install a wall valve
With some repair skills, you can install a supply valve into the wall with your own hands. This will require a little preparation and calculation.
The best place to install a wall valve for fresh air ventilation is the space under the window sill above the radiator. In this case, the air from the street will be additionally heated by the radiator and there will be no drafts in the room during the cold season.
In addition, under the window sill the valve will be less noticeable, especially if there are light curtains on the windows. Another plus is that the wall under the radiator always has a niche for a window opening, which means that in this place it will be thinner and it will take less effort and time to create holes.
If for some reason this location option is not suitable for implementation, the valve can be installed anywhere on the wall facing the street. The main thing is to choose such an arrangement so that the device looks appropriate in the interior and its installation does not cause major problems. The issue of air heating in winter can be solved by purchasing a device model with this function.
It is worth taking care of the outflow of incoming air from the room. If the interior doors do not have a gap above the floor, the air from the valve will not pass into other rooms and will not be drawn into the ventilation duct. Therefore, it is worth replacing the door or installing small holes with decorative flaps directly in the door leaf.
Required tools and materials
Of all the individual technological processes of assembling and installing the device, the most labor-intensive is making a hole in the outer wall.
In general, you can assemble and install the valve yourself; for this you will need:
- perforator;
- drill;
- a set of long drills for concrete or stone;
- set of drills;
- knife;
- metal saw;
- screwdriver;
- pliers.
Silicone sealant can be used for sealing.
The outer grille is attached to the wall with dowels and screws. A sewer pipe in a hole in a panel or brickwork requires reliable fixation, for this purpose polyurethane foam is used.
Related article: Plastering walls from OSB boards