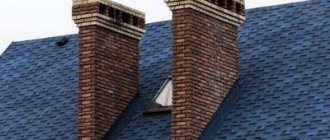
Bet on a chimney in the form of a steel pipe
Why steel? Before examining the features of such a chimney, it is useful to briefly consider all types of thematic design:
- Brick chimneys retain heat for a long time, remove smoke well, but require a stable foundation and are difficult to build;
- Ceramic chimneys are quite reliable, but are expensive due to the use of fire-resistant profile ceramics and asbestos-cement or polymer pipes;
- Metal chimneys are easy to construct, durable and easy to use.
Therefore, when thinking about how to build a brick chimney with your own hands, you need to take into account the costs of organizing an additional foundation, transporting bricks, etc.
Materials for production
There are many options for what you can make a chimney out of. Each of them has its own positive features and some disadvantages. Before designing, it is worth taking a closer look at each:
- Brick is considered the most common. It is predominantly used due to its great durability and powerful thermal inertia. A properly designed chimney immediately creates impressive draft and quickly adapts to the operation of the stove. Among the disadvantages: they are absolutely not suitable for heating boilers and can cause flame failure, which will lead to an accident. Due to the peculiarities of the shape, only a rectangular chimney can be created, and this is the reason for the uneven flow of gases. Much more soot and combustion products settle on the brick.
- Pipes are better suited for building a chimney than brick. There are many materials from which pipes are made. So, the asbestos-cement option is very light, and its cost will not greatly affect the family budget. Such pipes are very easy to install. But they have several significant disadvantages: asbestos cement has very low heat resistance, bends very poorly, and using rubber couplings for connections is a bad solution. Asbestos is a porous material, which means it will quickly become covered with soot.
- A ceramic chimney consists of two parts: the chimney itself and fire-resistant ceramics. Such pipes will serve for a long time. The smooth structure prevents soot and combustion products from quickly clogging the chimney. The design is very easy to install in place and is suitable for any heating structures. The disadvantages are the same as those of asbestos-cement, in addition, ceramics can hit the family budget hard.
- Glass has an excellent set of positive characteristics. The pipes have a smooth structure that is superior even to ceramics, and its chemical composition is neutral to its surroundings. A huge disadvantage is the price, which is tens of times higher than steel pipes. Glass is a material that needs to be worked with extremely carefully. It is impossible to make a crooked structure out of it.
- Polymer materials are only suitable for sleeves, i.e. restoration of old brick and other chimneys, when a new polymer liner is placed in the old pipe. This option is very durable and lightweight, but has rather low resistance to fire and high temperatures.
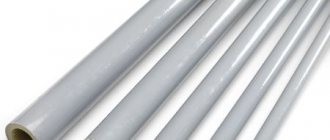
- For the construction of a chimney, the best option is to use steel pipes. They offer the best combination of price and quality; in addition, they have an impressive service life and are very easy to install.
To make such a chimney you will need at least a brick
Steel chimney - advantages
Pipes designed specifically for smoke removal undergo treatment that increases their resistance to high temperatures and oxidation.
Steel itself is a durable material by default. Chimneys created from it:
- They are light in weight compared to brick;
- Easily installed by welding or cutting one section of pipe into another;
- They have a smooth surface on which combustion products do not accumulate;
- Withstands temperature, chemical and mechanical loads.
In addition to its operational advantages, a steel chimney pleases with its traditional metal design, which is welcomed when the roof is tiled and decorated with a weather vane.
Chimney insulation
Natural draft is formed due to the fact that hot flue gases have a lower density compared to the colder surrounding air. Therefore, care must be taken to ensure that they cool down as little as possible while traveling through the chimney, for which purpose the latter is insulated. Today there are many effective thermal insulators, but the fact that the pipe wall is very hot imposes some restrictions on their use.
It is not recommended to use polymer insulation (foam), even if they have a relatively high melting point: in such materials, already at a temperature of 90 degrees, the process of thermal decomposition begins, leading to the release of toxic volatile substances. It is better to use mineral or basalt wool, and you need to choose brands that use acrylic or another safe substance as a binder instead of formaldehyde.
Having wrapped the pipe with cotton wool, the latter must be secured with wire, and then a protective casing made of tin or galvanized steel must be mounted on the chimney. Having rolled the steel into a cylinder, its edges are connected with a fold and then with rivets. The casing must be installed, and this is not only about protecting the insulation from mechanical influences.
The protective casing not only protects the insulation from mechanical influences, but also protects against fine dust emitted by it, which is harmful to human health.
An important disadvantage of all types of mineral wool is the ability to form fine, caustic dust, which, if it gets into the eyes, mucous membranes and especially the lungs, can cause serious complications. Especially a lot of it is formed during installation, so you need to work with cotton wool with gloves, goggles and a respirator, and it is better to throw away your clothes after installation is completed.
On the outside, the protective casing must be mounted in such a way as to prevent water from entering the cotton wool - the insulation absorbs it well, thereby losing its heat-insulating properties.
Steel chimney - cons
When choosing a thematic design, you need to pay attention to some disadvantages:
- Accelerated heating of the metal, which causes the materials in contact with it to heat up;
- Accumulation of condensate if the pipe does not have a horizontal outlet.
Obviously, the drawings of a metal chimney require a heat-resistant insulator to be laid between the pipe and adjacent building materials. Also, the finishing adjacent to the steel chimney must be heat-resistant.
As for condensation, it accumulates over time. To drain it, an inspection bottom must be provided in the design. The level of soot depends on the quality of the chimney coating. The optimal schedule for cleaning the canal is two to three times a year.
Carrying a chimney through a wall and ceiling with your own hands
The chimney can only be brought outside through the roof or wall, and each method has its own characteristics.
If the pipe will pass through the wall, you need to cut an opening under it with a slightly larger cross-section than the pipe parameters. This gap will allow you to additionally insert a protective sleeve into the wall, which will prevent the destruction of the wall due to overheating.
For reliability, a chimney that is too long will need to be fixed to the wall with brackets, not only from the inside, but also from the outside. This will allow it not to sag from gusts of wind and intense precipitation.
And in cases where the chimney will pass through the ceilings and roof, first of all you should think about their thermal insulation. This is very important, since the initial section of the chimney adjacent to the stove or boiler gets very hot. Moreover, in the case of a sauna stove, this phenomenon is periodic, but in a residential building in winter the boiler is constantly in use.
Therefore, a large hole should be cut in the ceiling and the beams should be sheathed with galvanized sheets with a layer of thermal insulation. In this case, the insulation will protect the ceiling from overheating (which is especially important for wooden buildings), and galvanized steel will reflect heat (pro
Steel chimney - choice of metal and design
Metal pipes for smoke removal differ from each other in the type of steel and design. The first point affects operation:
- Uncoated black steel is affordable, but not resistant to corrosion;
- Low-alloy steel is relatively resistant to chemical reactions, so it rarely rusts;
- Stainless steel is durable, but expensive;
- Corrugated steel – accumulates soot, which causes it to clog quickly.
The design of a steel chimney is:
Note!
Do-it-yourself vegetable garden: new interesting garden crafts for the street at your summer cottage (photo/video review)
DIY ceiling installation: step-by-step description of how to make a ceiling. Review of modern structures and ideas for their design (105 photos)
Do-it-yourself garage doors - a detailed description of the construction of various types of garage doors (120 photos)
- Typical single-walled - is a pipe that must be insulated during installation to prevent fire;
- Single-wall sleeved - located inside the brickwork, which makes the structure safe;
- Multi-level like a sandwich system - presented in the form of two pipes (internal and external) with pre-provided insulation and channels for condensate exit.
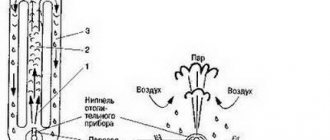
Often, installing a chimney with your own hands involves immersing one pipe into another.
Such designs are called coaxial. In them, the inner pipe removes smoke, and the outer pipe serves as a channel for air to enter to promote draft.
Frequent mistakes and problems when installing chimneys
Let's look at the most common problems that arise after installation. By the way, some of them arise not only when installing a chimney yourself, but also from experienced craftsmen.
- Traction overturning. This is a phenomenon in which flue gases flow back into the firebox, and through it into the room. There can be two reasons for the problem: incorrectly chosen pipe height or strong wind. In both the first and second cases, installing a deflector can help. This simplest device is installed at the upper end of the chimney and creates additional vacuum. If installing the deflector does not help, you will have to lengthen the pipe.
- Loosening of chimney pipes. This problem is especially common when installing it yourself. As mentioned earlier, any chimney needs at least 2 brackets. But some craftsmen believe that one in the room is enough, because the pipe is small. This leads to loosening of the outer part of the chimney, which can lead to damage to the entire chimney. The solution to the problem is obvious: install an additional bracket.
- Condensation on the chimney and nearby surfaces. This problem is especially relevant for the chimney section in the attic space, where the appearance of additional moisture threatens damage to the roof. In order to solve this issue, it is enough to arrange additional thermal insulation.
There is nothing mystical about installing a chimney. If you wish, you can save significant money by making all the consumables yourself. The main thing is to do everything efficiently and follow a clear sequence of actions.
Steel chimney - selection of cross-section and height
In order for the draft of the chimney to always be good, the pipe must rise above the level of the fireplace by at least 5 meters.
It is also necessary to take into account the distance between the roof and the end of the pipe protruding outward:
- If the roof is flat, then the minimum distance should be 50 cm;
- A roof with a slope requires that you be guided by the ridge - a 1.5-meter gap between the ridge and the pipe welcomes a 0.5-meter elevation of the chimney above the highest point of the roof, a 1.5-meter gap - the cap goes horizontally relative to the ridge, a 3-meter gap - the pipe mounted below the ridge, provided that the angle between the latter and the cap is 10°.
The cross-section of the steel pipe deserves special attention. Here it turns out that the chimney for the boiler is selected with your own hands depending on the power of the latter.
- Units with a power of up to 3500 W welcome pipes with a cross-section of 140x140-140x200 mm;
- With a power of 3500-5000 W, it is worth focusing on a cross-section of 140x200-140x270 mm;
- Extra-powerful boilers with a power of 5000-7000 W require a chimney with a cross-section of 140x270 mm.
Note!
Insulate the foundation with your own hands - a step-by-step description of the use of the best materials and technologies (90 photos)
- Do-it-yourself pergola on a summer cottage: step-by-step instructions with photos and descriptions
Laying laminate flooring with your own hands: a detailed description of how to lay laminate flooring. Laminate calculation, step-by-step description and installation secrets (105 photos and videos)
The creation of a heating system welcomes the selection of a chimney based on the power of the boiler, and not vice versa.
Design features
There are two main types of chimneys. They are divided according to their location relative to the axis of the heating element. To understand which option to use, you need to become thoroughly familiar with each of them. How are they different?
Direct option
This type is mounted directly above the heating device. Such chimneys pass through the ceilings and roofing. Very often this option is used for stoves. Advantages of direct chimneys:
- The amount of acid condensate is reduced to a minimum. Through such a pipe, gas will escape much more easily.
- This structure leaves very little residue in the form of soot, and it is easy to clean, which makes the structure less fire hazardous.
- High-quality work without a draft regulator - gate.
- Aesthetics - only one pipe will be visible above the house, which makes the building more attractive.
Such chimneys have a number of disadvantages.
But straight chimneys have several disadvantages. The main ones:
- Difficult to install. It is much easier to mount the structure into the wall than to go through the ceilings and roof.
- Uneven thrust and the appearance of reverse thrust in strong winds.
Side tie-downs
The chimney is mounted so that the axis of the structure does not coincide with the axis of the heating element. Has excellent positive aspects:
- Easy to install. The side chimney is very easy to install, since it is mounted in the wall and does not pass through the roof and ceilings.
- Condensation does not enter the heating structure, since a container is provided to collect it.
- It works well even in strong winds, and if a deflector is installed, stable traction will always be ensured.
- Ability to adjust traction.
These chimneys are difficult to clean.
Side chimneys also have significant disadvantages that can discourage use. The main ones:
- There is a possibility that in the cold the container with condensate may burst due to expansion of the liquid. This forces the container to be installed only in a warm place in the house.
- The place where the chimney is installed will accumulate temperature stress in winter, which can create a significant crack in the wall.
- Difficult to clean due to the curvature of the structure.
Side internal chimneys can be located not only in the external part of the building, but also inside the house. They can also be installed in the wall, but it is worth remembering that in this case you will have to touch the roof.
Steel chimney - installation
Installing a themed product does not require any special skills. However, you will have to observe some points:
- Firstly, the pipe must be wrapped in a heat-resistant layer so that the surrounding materials do not heat up;
- Secondly, the steel chimney must be located as far as possible from the electrical network and gas pipe;
- Thirdly, the depth of insertion of one pipe section into another must be equal to the radius of the outer section of the product;
- Fourthly, the finished chimney must flow evenly, i.e. without narrowing.
Also, at the bottom of the chimney there must be an inspection window in the form of a removable nozzle. This opening serves to drain condensate.
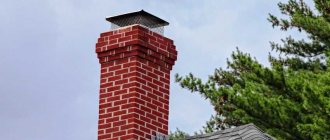
The top of the pipe must have a cap to extinguish sparks. A cone is required to protect the hole from precipitation.
Steel chimney - cleaning
The simplicity and durability of the operation of a steel pipe is guaranteed with its regular maintenance:
Note!
Do-it-yourself dressing room: arrangement ideas, drawings, diagrams, projects and dressing room design options (125 photos)
Installing a window sill with your own hands - detailed instructions and step-by-step video description of how to install a window sill (85 photos)
Do-it-yourself brick stove - secrets of simple and practical masonry, construction schemes and a review of the best stoves (95 photos + video)
- Firstly, during combustion it is necessary to add special agents to the firebox that release gases to dissolve the soot;
- Secondly, condensate must be drained periodically through the inspection window;
- Thirdly, once a season you should clean the thematic channel with a brush.
It is better to do the last operation with safety glasses and a mask, having previously disconnected the pipe from the boiler. This way, cleaning the chimney with your own hands will not ruin the unit, which costs a lot of money.
When a steel pipe is used for a long time, it rusts. Therefore, the thematic highway must be partially or completely replaced with a new “rental”.
How to make a chimney from a steel pipe with your own hands
The chimney is an important part of heating systems, including heating devices using gas, solid, and liquid fuels. Heating efficiency and user safety depend on the choice of material and size of the chimney pipe, compliance with technological rules of manufacture and installation.
Errors in the organization of the chimney lead to reverse draft, causing smoke in the room, damage to the roofing material, and the occurrence of fire hazards. In the manufacture of chimneys, bricks, ceramics, even glass are used, but the most common option is steel pipes made of black galvanized metal and corrosion-resistant steels.
DIY chimney photo
Please repost
1+