Construction and insulation - we work outside the barn
Rural residents hardly need to be explained what pets are and how to care for them. But for yesterday’s “city dwellers” who decided to move closer to nature, everything is new! As a rule, chickens are the first on the list of pets, not counting dogs and cats. In spring and summer, caring for them is not at all difficult, the main thing is to provide high-quality food and a shelter where they can hide from the sun. But in winter, the question is different - you can’t invite a chicken “gang” led by a pugnacious rooster into your house for the whole winter, and in the tool shed the animals will simply freeze.
The issue should be resolved quickly and effectively. And, as everyone thought at that moment, preferably inexpensive. Even a leaky tool shed can be turned into a warm room for the winter with your own hands. The simplest option is to knock down a wooden frame from boards, hollow inside.
The second method is cladding with shingles.
How to insulate a shed if money is tight? The walls need to be covered with shingles, it needs to be nailed diagonally, starting work from the corner. Do the work in one direction, then in the other, until the shingles cross. It can be replaced with goat willow branches, then the clay can be applied thicker.
Start preparing the clay solution by adding sawdust to it. The clay needs to be soaked and diluted with water to the consistency of liquid sour cream. Sawdust should be added a little at a time, achieving the required thickness of the solution. For cooking, it is better to take larger dishes so as not to knead several times. The finished solution should stand for a while.
Apply the solution to the lower part of the wall in large quantities and level it with a spatula. Its layer should be at least 3-5 centimeters. Apply the solution evenly, paying special attention to the corners of the room. They can even be rounded and made even warmer. After finishing plastering, let the walls dry for several days. During this time, cracks form, which must be rubbed with a solution of clay and sand in a ratio of 1 to 2. The walls must be whitewashed with lime. Take granulated lime and dilute it in half a bucket of water. Within a minute, the reaction with water will begin, the solution will become very hot. When the reaction is over, fill the bucket with water to the top, add a spoonful of table salt.
Insulate the barn ceiling. At a level of 15 cm from the roof along the perimeter, secure the bars. The length of the boards should allow them to lie on the bars and fit snugly against the walls. Fill the boards with a solution of clay and sawdust, 10 cm thick, after opening the roof. Again, special attention should be paid to the corners.
The process of insulating a shed in this way is quite labor-intensive, but it is the cheapest and very reliable. Now your animals will definitely not freeze!
05/26/2013 at 16:05
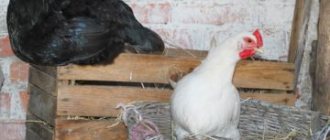
How to insulate a poultry shed so that the chickens lay eggs?
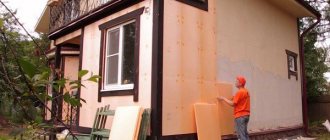
How to insulate a shed from the outside with your own hands - step-by-step diagram
Step 1: Create a frame for the walls
The back wall of the frame will be the existing wall surface, and we will put together the front wall from boards. Even those that are not quite even will come in handy. What about the cracks? There is one proven technique - the boards are nailed with an overlap! First, two boards are nailed to the bars, leaving space between them for the third. The middle one is inserted so that the upper part fits under the first board, and the lower part covers the second board on top. You will get a “Christmas tree” through which no wind will break through. The advantage of this design is that it is protected from drying out, because if we simply nailed the boards together, sooner or later large gaps would form between them.
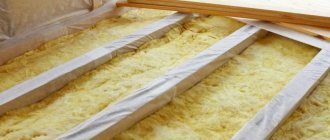
Step 2: Fill the frame with insulation
The space between parallel walls can be insulated with your own hands in different ways.
If funds allow, buy mineral wool or fill the voids with polyurethane foam. However, initially we agreed to save money, which means it’s time to remember the methods of insulation for the winter that our grandparents used. What could be simpler than sawdust! The material is almost free - at the nearest sawmill there is at least heaps of this stuff, you can bargain with the watchman for a bottle of something stronger. It is advisable to take sawdust that is dry and small. To prevent rodents from infesting them, it is enough to mix the wood with fluff lime - 1 part of lime is enough for 25 parts of sawdust. When insulating with sawdust, the space between parallel walls should be at least 25 cm. The prepared material is covered in layers, constantly tamping. Over the next two weeks, the insulation will still shrink - do not forget to add more sawdust after some time.
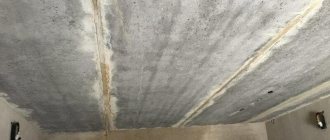
Step 3: Insulate the ceiling
In the case of the ceiling, the same frame is created. But unlike walls, a layer of high-quality waterproofing is also laid on top of the thermal insulation. Simply covering with slate or tiles is not enough; between them there must be a layer of roofing felt or plastic film. The most important thing at all stages is to prevent moisture from penetrating into the sawdust. To prevent this from happening, many people pack sawdust in plastic bags and then carefully place it in the space between the walls.
Step 4: Insulate the floor
To insulate the floor with your own hands, it is important to make a mound of soil at least 10 cm high on top of the main level. Then clay is poured and compacted. The disadvantage of this method is the dirt that will always be inside the barn. If you want to make a clean and durable heated floor, it is recommended that instead of an embankment of soil, make an embankment of expanded clay and pour a cement-sand screed on top of it. Just do this in advance, in the warm season.
How to insulate doors and windows
Most heat leaves the room through doors and windows
Based on this, door and window openings need to be given the greatest attention. How to properly insulate a chicken coop? Thermal insulation is very important
If there are windows, it is necessary to install a second glass. Another effective way to insulate window openings is to use plastic film, which is attached to the strips at a distance of 1.5 cm from the glass.
Window insulation film
It is imperative to use a sealant; it is necessary to seal all existing cracks in the frames and windows. Additional insulation will be required on the side of the window hinges. For this purpose, you can use either self-adhesive store-bought insulation or a felt strip that is nailed to the frame.
Insulation of the loop circuit
If the chicken coop is in the design process, make sure in advance that the windows are small in size - the larger the glass area, the more intense the heat loss. One small window on the sunny side is enough - on the east or south wall. For the winter, you can install double frames, and in the summer, replace them with a regular mosquito net or one layer of glass. To insulate a barn for chickens with the onset of cold weather, the windows must be insulated with a special plastic film, which will subsequently prevent them from freezing in the winter. The film does not in any way prevent the penetration of sunlight into the chicken coop.
The window in the chicken coop should not be too large
It is also better to place the door in the south, so even in winter it can be opened slightly to ventilate the chicken coop. The doorway, like the window, should not be too large.
The door to the chicken coop should be small but convenient
However, keep in mind that it should be convenient for you to carry out all the necessary work to care for the birds and maintain the chicken coop in proper condition - changing the bedding on the floor, cleaning, removing manure, etc.
The door must be insulated. In severe frosts, the doorway is additionally covered with a rug or an old carpet. The doorway can be insulated using dense film insulation.
Shingling - an environmentally friendly way
Clay and straw are another budget option for do-it-yourself insulation, which, moreover, is absolutely safe from an environmental point of view. To this day, clay and straw are used to make adobe (lampach, roller, clay block) - clay bricks that combine both insulation and the basis for the walls of a barn. Straw mixed with clay acts as a reinforcing material, so the clay does not crack or crumble.
Under a layer of plaster, adobe can last for many decades. So if you intend to build a shed for the winter from scratch, consider this budget option. In the villages, clay bricks used to be made by all relatives - it would be a reason to get together. If the barn has already been built, the option with clay and straw is still relevant. Do-it-yourself insulation of the barn should be done from the inside - a mixture of materials is applied to pre-prepared shingles.
Shingles are wooden planks stuffed from the inside of a room. First, one layer of planks is packed diagonally, and then a second layer in the opposite direction. To prepare the solution, first soak the clay (the consistency of sour cream) and add straw in portions. The resulting solution should be thick enough so that it does not slide off the surface. Let the mixture sit for a while before starting to work.
The clay mixture is applied to the walls with your own hands from bottom to top. The layer thickness is at least 3 cm. Use a spatula to make leveling easier. At the corners, the thickness of the layer can be increased to 5 cm by rounding them. When drying, cracks may appear - this is not a problem. They should be covered with a solution of clay and sand (1:2). The final stage is whitewashing the walls with lime.
The best option for insulating a shed.
If you are building a barn for animals, you need to think about how to insulate the barn. The best solution to this issue would be to insulate the shed during construction. In this case, two rows of walls are laid out, and any thermal insulation material is placed in the resulting space. To install the roof, boards are fixed at the top of the walls, and they need to be screwed from the inside. The insulation should be laid on the joists and covered with boards. To prevent moisture from retaining on the shed, the roof should be sloping. For the floor, you can take pallets and cover them with straw. Such a shed will not cost much if you use available materials and do all the work yourself.
Possible options.
If the shed was built a long time ago, and you decided to insulate it only now, due to a change in its purpose or for any other reason, you have several options.
How to insulate a shed - we work from the inside
Shingling, although a budget option, will take you a lot of time. If you value time, then instead of budget options you can use more expensive ones, but also more effective in terms of speed of work. These include the option of insulation with mineral wool and polystyrene foam. There is no point in talking about the advantages of materials - we have already talked about this more than once in articles devoted to these heat insulators. Let us remind you of the disadvantages - mineral wool is easily saturated with moisture, as a result of which it loses its thermal insulation qualities and also cakes over time.
Polystyrene foam does not have these disadvantages, but it has little strength and needs additional protection from curious animals.
When insulating with mineral wool, nails are hammered onto the walls in a checkerboard pattern to create a reinforcing mesh. Rolls of mineral insulation are unwound and laid on the walls, while a reinforcing mesh is created using rope to hold the wool in the desired position. There is no need for mesh if you use rigid or semi-rigid slabs instead of soft rolls. But in this case, you will need to make a sheathing of boards with your own hands.
The distance between the boards should correspond to the width of the slabs, and even be a couple of millimeters smaller so that the slabs fit tightly into the space. How to insulate a shed with mineral wool for the winter? The secret is to prevent the material from getting wet due to condensation . Therefore, a layer of vapor barrier is placed on top of the insulation - glassine or more modern versions of membranes.
Insulating foam inside a shed is even easier. If the base is strong, you can glue the insulation boards with your own hands using any available glue, even regular PVA. Both polyurethane foam and liquid nails are suitable. For greater strength, you can fasten the slabs together with the adhesive base using special dowels. In any case, after this, be sure to protect the material from mechanical damage. Any sheet materials will do. In a chicken coop this could be flat slate, and in a small horned shed it could be sheets of plywood.
Nests
In the process of arranging a bird’s home, it is extremely important to make nests and fix them on the wall. During this work, it is necessary to adhere to certain recommendations:
the number of nests directly depends on how many laying hens will be housed in the house
There should be at least one such structure for every five laying hens; The nest should be about 30 cm wide, 40 cm deep, and 35 cm high; it is allowed to combine nests along one line, but they must be fixed exclusively in the dark part of the room at a height of only 0.5 m; It is extremely important that the entrance to the nest is wide (at least 25 cm in width and height). It should be raised from the bottom of the nest by at least 5 cm
Thanks to such a small threshold, the eggs will not roll out onto the floor; You need to fix a shelf next to the nest, from which it will be convenient for the birds to take off; The slope of the roof on the nest should be about 45 degrees. Thanks to this special design, laying hens will not be able to sit on it, and accordingly the nest will not be contaminated with bird excrement; Be sure to put hay or straw in the nest.
In order to attract laying hens to the nest, it is recommended to place a dummy egg in it. Experienced poultry farmers have noted that in the presence of this simple element, birds begin to lay eggs much more willingly.
It often happens that chickens begin to shit in the nests and stay overnight in them. To avoid this, they should not be placed on the floor, but rather placed on the farthest wall. Closer to nightfall, the nests can also be covered, since chickens do not lay eggs at night.
You also need to make sure that the birds have containers in the barn for drinking, eating and taking ash and sand baths. There are many variations of such designs that can be made with your own hands without much effort. For those poultry farmers who were able to build a barn on their own, manufacturing these necessary elements will clearly no longer be a problem. Having equipped the bird's home with everything necessary, it will be possible to immediately move birds into it.
Heating is a radical way to make the barn warm
If winter has caught you suddenly, and the barns with animals turned out to be poorly insulated, a radical way to increase the temperature inside the premises is to provide heating for the winter. Heating can be electric or wood-burning. In the first case, heaters are used, in the second, a stove is built. Heaters are a temporary solution to the problem, but the stove should be installed even in insulated rooms.
The fact is that thermal insulation does not warm, but only prevents heat from leaving the barn. The stove will allow you to quickly and at no extra cost heat the air for a comfortable life for your pets. What to make the stove from is up to you. Just keep in mind that brick structures take a long time to heat up, but then take a long time to cool down. Metal stoves heat up almost instantly, but then cool down just as quickly.
Insulated doors will help conserve heat inside the barn. It is best if the door leaf consists of two independent halves. To let animals out into the yard or into an enclosure for walking, all you need to do is open the bottom door. Warm air accumulated from above will not be able to leave the room. And in the summer, the upper half will make it easier for you to clean the barn - through it you can throw fresh manure outside.
- Author: Mikhail Malofeev
Rate this article:
- 5
- 4
- 3
- 2
- 1
(2 votes, average: 4.5 out of 5)
Share with your friends!
How to insulate a wooden door. Tips, methods, photos.
The first autumn cold has arrived unnoticed, and if your apartment or country house has become uncomfortable like autumn, you should take a close look at the front door and windows - most likely, you will have to start insulating them. We won’t touch the windows now, let’s talk about the door, since this is where the most problems occur. Especially if the door is wooden and has served for many years.
Insulating a wooden front door is not as difficult as it might seem at first glance: having a simple tool and more or less stable handling skills, your personal desire and our advice will help correct the situation and meet the cold winter with dignity.
So, there are, by and large, only two ways to insulate the front door:
- Sealing the door frame in the areas where the door leaf adjoins;
- Insulation of the door leaf using thermal insulating materials.
Door seal
To seal the doorway, you will need to purchase a special rubber seal. This sealant, in the form of a tape rolled into a roll, is widely available and inexpensive, and has an adhesive base on one side, which greatly simplifies its installation.
Before going to a hardware store or market, you should measure your door along the perimeter, the length of which will correspond to the length of the insulation you are purchasing. Pay attention to the width of the folds: folds are the place where the door leaf adjoins the frame, and it is obvious that the width of the insulation should be similar or slightly smaller. Try to determine the width of the slot gaps - the sealing tape, due to its thickness when compressed, should completely cover the gap.
Having the results of simple measurements in hand, you can choose the right rubber seal, which is very easy to install. We seal the doorway in parts - the upper part along the width of the door, having previously cut off the corresponding piece of tape, then the vertical sections along the height of the door and, finally, the lower part. To glue a strip of insulation, you need to carefully press its adhesive side to the folded part, gradually removing the protective paper strip. Make sure that the seal lies evenly, without distortions, along its entire length.
As, frankly speaking, a dubious alternative to a special rubber seal, if it is not possible to purchase one, they use the “old-fashioned” method in the form of a strip of leatherette folded in several layers, which is carefully nailed down with nails every 10-15 cm.
Insulating the floor in a barn
When building a barn, it is important not only to know how to make a floor in a barn, but also how to properly insulate it so that during the cold season the inside of the room does not freeze and a constant temperature is maintained in it (Figure 3).
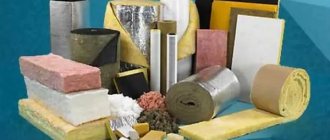
The modern market provides a wide selection of insulating materials, so you can easily choose the right one in terms of price and quality. Let's take a closer look at the features of the most popular insulation materials.
Insulation materials
Most often, polystyrene foam or mineral wool are used to insulate floors, and less often polyurethane foam.
How to fill a barn floor with your own hands
The most popular type of barn floors is concrete. This filling allows you to get a smooth surface that is resistant to moisture and rodents.
Figure 1. Technology for pouring concrete pavement
Concrete pouring begins with an assessment of the original surface (Figure 1). If it is a reinforced concrete slab, then it is enough to clean it of dust and debris, but if the surface is unpaved, it needs to be leveled. In most cases, the floor covering in such rooms is precisely ground, so let’s take a closer look at the scheme for filling it.
First of all, the ground covering must be compacted and a sand bedding 15-20 cm thick must be made on it.
Note: The sand bedding is laid in layers, compacting and moistening each layer.
For concrete pouring you will need cement (grade 400 or 500), clean sand, gravel and crushed stone. It is advisable to lay reinforcing mesh on the surface for strengthening, but this condition is not mandatory. A layer of waterproofing material (for example, roofing felt) is placed on the mesh. Wooden marks are installed along the entire perimeter, since the surfaces are filled in parts. Having prepared the concrete mixture, it is poured onto the selected area and leveled. After this, you need to wait until the mixture hardens. If pouring is carried out in the warm season, the concrete must be periodically moistened with water so that it does not become cracked.
How to make a wooden floor in a barn
A wooden floor in a barn also has its advantages. Unlike concrete, it retains heat, so this design is more suitable for rooms where animals will be kept.
It should be borne in mind that the installation of a wooden covering is more difficult, and the material itself easily absorbs moisture and gradually begins to rot, so some boards will have to be replaced periodically.
Figure 2. The process of laying a wooden covering in a barn
Before installation, you need to level the ground surface with a cement screed (Figure 2). After this, logs made of wooden beams are laid out over the surface area. They should be secured using corners and self-tapping screws, and installed at the same level. Boards are attached to the joists. To speed up the process, they do not need to be connected to each other, but only attached to the joists using self-tapping screws. But, if you want to get a more reliable structure and prevent the formation of gaps between the boards, it is better to fix the boards together using nails or self-tapping screws screwed into the side walls.
The video shows how to properly make a wooden floor with your own hands.
What kind of wood to make a barn floor from?
Since the wooden floor in a barn quickly absorbs moisture and can rot under the influence of physiological secretions of animals, the type of wood for covering should be carefully selected.
For this purpose, it is better to choose hard wood beards (for example, oak), but boards made from resinous trees (spruce or pine) are also suitable.