The issue of water supply will probably always be relevant, especially in rural areas. And often the problem of water supply is solved by erecting a well that performs a direct function (in other words, providing the area with water), but at the same time it must be reliable and durable. To prevent it from freezing in winter, it should be properly insulated even before the onset of cold weather. There are many different insulating materials suitable for this purpose. You just need to know how to properly insulate a well for the winter.
- 1 In what cases is insulation required?
- 2 Method one. Cover insulation
- 3 Method two. We thermally insulate the upper ring of the structure 3.1 We use polystyrene foam for the “under the fur coat” ring
- 3.2 We use polyurethane foam for the ring “under a fur coat”
- 4.1 Video – House installation
- 7.1 Video - Insulating a well
In what cases is insulation required?
If the well was built according to ancient traditions (read: made of wood), then, of course, it does not need any thermal insulation. There are exceptions - for example, a well cover needs insulation. In this case, it is necessary to make an additional cover from wood and fix it inside the structure itself. This cover will protect the country well from:
- snowfall;
- temperature changes;
- ingress of dry leaves and other debris.
Note that almost all modern wells are constructed using reinforced concrete rings. Such wells have numerous advantages, including:
- strength;
- reliability;
- durability;
- ease of installation and further maintenance.
Despite this, they have one significant drawback: they need to be insulated for the winter.
On a note! If the water in the structure is located below the soil freezing level, then the structure itself will not freeze. But if it’s higher, then installation of insulating material is required!
There are three thermal insulation technologies:
- insulation of the structure cover;
- thermal insulation of the upper ring;
- construction of a decorative house.
Let's take a closer look at each of the possible methods.
Reasons for freezing wells
In the old days, when constructing a log house from wood, well builders simultaneously provided thermal insulation for the internal space of the well. In the northern regions, the neck was additionally closed, installing hatches and houses on the head of the structure. Wood has a fairly low thermal conductivity and reliably retains heat without the use of additional means.
Types of insulation of concrete wells
Now the most common option for lining a well shaft is concrete rings. Even a thick concrete wall can freeze severely when the temperature drops below -10°C. The rings, apart from the ability to quickly transfer heat to the surrounding frozen soil, are not very thick.
The walls of the well lining are about 10 cm thick and almost do not protect the shaft from frost above the ground and at the depth of soil freezing (1-1.5 m or more).
Because of this, an ice plug may form in a well that is not prepared for winter, and if the water supply is laid shallowly (for example, in a summer cottage), the pipes may also freeze.
Method one. Cover insulation
This technology is not complicated and consists of installing an additional cover inside the structure itself at ground level. We remind you that water from a well can be obtained in two ways - the old fashioned way, that is, using buckets, and using an electric pump. This article discusses exclusively the modern method.
You should start by preparing everything you need. Prepare for work:
- plywood sheet;
- glue;
- wire;
- a plastic pipe, which is necessary for ventilation;
- insulation, the thickness of which will be at least 5 centimeters (foam is ideal for this);
- polyurethane foam.
After this, proceed directly to the construction process.
Step one. Take a plywood sheet and cut out a couple of even circles with a diameter similar to the diameter of the structure itself. Make two holes in each circle - one for the hose and the other for ventilation.
On a note! Ventilation in this case is mandatory, since without it the water will soon begin to smell unpleasant, and its taste will noticeably deteriorate.
The diameter of the drilled holes is insignificant - no more than 6 centimeters, otherwise frosty air will be able to penetrate through the resulting cracks. It is more convenient to drill holes at one edge. Next, make 4 more holes for the wire around the perimeter of the second circle.
Step two. We continue to insulate the well for the winter. Cut a third circle of the same diameter, but this time from foam. Glue it to the bottom circle using high-quality wood glue, and fix the third circle on top. Once the glue has dried, place the ventilation pipe into the prepared hole. You can use polyurethane foam to seal joints.
Step three. The work is almost finished, all that remains is to make a special ring from the wire. To do this, take it and wrap it around the first ring, thereby fixing its circumference. After this, attach the wire to the ring, fixed in the four holes of the lower ring. Pass the hose into the required hole, and then lower the finished “sandwich” onto the ground line. The lid will be held in place with a wire, the well will be properly ventilated, but the water will not freeze.
Insulation materials
If major insulation of a well is required, the following materials can be used for this purpose:
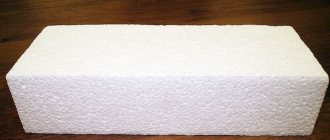
- Using polystyrene foam. This material has an affordable price. He is not afraid of moisture. Foam plastic does not have the ability to deform. Today, the industry has launched the production of polystyrene foam half-rings. They are very easy to use. It is possible to use a similar material - penoplex.
- Option with extruded polystyrene foam. Compared to polystyrene foam, it has better characteristics, but is also more expensive. It is available in the form of slabs. The joints between the plates are sealed using polyurethane foam.
- Polymer insulation with cells. A good example is the use of isolon. Such material is sold to the consumer in rolls. This circumstance makes it easy to use. Izolon is simply wound on rings. Fixation is carried out with glue for external use. However, there are also self-adhesive versions of the material.
- Polyurethane foam. This insulation has the highest reliability. It has the highest price compared to other materials. It can be applied to the well ring using the spraying method. Keep in mind, this technology will require the use of special equipment. The material can be used for a very long time without requiring mandatory waterproofing.
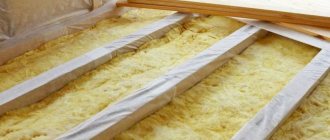
Separately, it is necessary to say about mineral wool. Despite the fact that this is an excellent insulation, it cannot be used for wells. High humidity causes it to simply lose its properties. At the same time, it is useless to use as insulation. Anyone who, for some reason, decided to use mineral wool for insulation should know that it will have to be buried in the ground. In such a situation, no waterproofing can protect it. In this case, the consumer will only incur additional useless expenses.
Method two. We thermally insulate the upper ring of the structure
Every specialist will tell you that in order to prevent freezing of a well, you need to reduce the thermal conductivity of its upper ring. This method of thermal insulation is performed in two ways:
- by means of polystyrene foam;
- using polyurethane foam.
Let's look at the first method first.
We use polystyrene foam for the ring “under a fur coat”
Here you should prepare the following consumables for work:
- polyurethane foam;
- paint;
- plaster;
- insulating blocks made of polystyrene foam, which are connected using a tongue-and-groove system.
On a note! According to this technology, the first ring on top will be completely insulated, while the second only partially. Now to work!
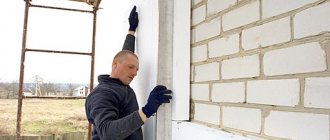
Step one. Work should begin with preparatory activities. Dig a pit 20 centimeters wide and approximately 0.5 meters deep around the ring. Then thoroughly clean the surfaces from dirt and install the first “fur coat” ball. At this time, make sure that the density of all connections is maximum! Blow out the joints with foam to seal them. Having finished with the first level, proceed to assembling the second and gluing it to the ring. Blow out the gaps that have formed between the layers with foam.
Step two. Next, begin plastering the surface of the rings. This will protect the foam from the negative effects of the sun's rays, which, as we know, worsen the thermal insulation properties of this material. After the plaster has completely dried, apply paint to it - this will prevent the finish from getting wet.
Step three. All that remains is to fill the pit and thoroughly compact the earth.
Penoplex, we insulate the foundation reliably and correctly
We recommend that you read our article on insulating the foundation yourself. You can find out more here
We use polyurethane foam for the ring “under a fur coat”
If you chose polyurethane foam as insulation, then follow these steps. First, dig a similar pit (as in the previous method of insulating a well for the winter), and then build a wooden frame around the first ring. But this is in general terms; let’s analyze the procedure in more detail. Prepare the following materials for work:
- paint;
- dowels;
- polyurethane foam sprayer;
- collapsible metal formwork;
- plaster;
- a piece of plastic film;
- wooden bars.
Step one. Traditionally, start by digging a pit, but narrower (maximum 10 centimeters). After this, install bars around the first ring in increments of approximately 40 centimeters. Cover the edges of the trench with formwork made of thin sheet steel, which will exactly follow all the contours. Cover the formwork with the prepared film. For what? This is explained by the fact that the adhesion of foam plastic is very significant, and therefore dismantling the formwork is impossible.
Step two. Having finished building the formwork, you will notice that a void has formed between it and the ring - this is what needs to be filled with insulation. Upon completion of pouring, the polyurethane foam will increase in volume, and the trench will therefore be filled as densely as possible.
After this, you need to wait until the material is completely dry. As soon as this happens, dismantle the formwork. Plaster the finished surface and apply a layer of paint to it. Fill the void left after formwork with earth and compact it thoroughly.
On a note! It is also advisable to cover the well with a lid, which was described in one of the previous paragraphs of the article.
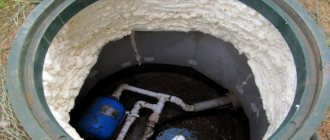
How to insulate a well made of concrete rings
Water supply and treatment wells are most often made of reinforced concrete rings, which do not have thermal insulation capabilities. In order to prevent the water from freezing in them, it is necessary to insulate the mine. It can be applied to a depth up to the freezing level or cover only the upper ring.
Insulation work begins with digging a pit around a well 25-30 cm wide. The depth of the pit is 1.2-2 m if the entire mine shaft is insulated, or 50-60 cm if only the upper ring needs to be insulated. In areas with a temperate climate, the second option is sufficient.
The most common methods of insulating wells made of reinforced concrete rings are:
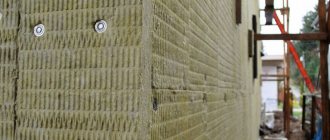
- Covering the rings with tile or rolled foam (expanded polystyrene) or “Penoplex”. Thermal insulation is tightly laid on the cleaned concrete surface from the outside, and the seams are sealed with polyurethane foam. After installation is completed, the gap between the polymer layer and the soil is filled with compacted soil. A blind area is formed in the area where the shaft exits to the surface.
- Insulation of a well with polystyrene foam (penoizol) or polyurethane foam - insulation of well rings can be made by pouring a liquid foam mixture with a hardener. Formwork is pre-installed to form a cavity for thermal insulation. The mixture is poured using special equipment or from cylinders with a ready-made composition. 4-5 hours after pouring, the mass hardens, after which the formwork can be removed and the foundation pit can be filled. Work on applying thermal insulation should be carried out at an air temperature of +18…+20ºС.
- Insulation for wells “shell”. To simplify the installation of thermal insulation, foam plastic (expanded polystyrene) blocks are produced in the shape of a semicircle - “shell”. Such elements cover well rings, and to connect them together, a special profile is made at the ends (tongue-and-groove system).
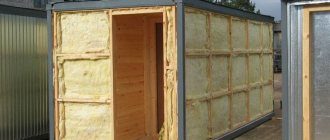
Method three. Construction of a wooden house
If your site is located in an area where the temperature in winter is not too low, you can build a protective wooden frame over the shaft. To do this, prepare:
- wire;
- nails;
- waterproof film;
- logs;
- plywood sheets;
- expanded polystyrene.
Step one. First of all, cover the inside of the top ring with a pre-prepared film. Next, take the foam and cut out six rectangles from it. Make the dimensions of the latter such that as a result of lining the ring, an even hexagon is formed. This little trick will significantly increase the adhesion density of the foam.
Step two. Then you need to secure the foam. To do this, wrap it with ordinary wire in at least three rings. It is advisable to use aluminum wire for this, since it does not rust and is quite soft. As a result, it will be easy to manipulate, and there will be no corrosion on the surface of the insulating layer.
Step three. After this, build a log house from small-sized logs. The height of the log house must be level with the well itself, and its shape must be hexagonal. Place a cover consisting of several layers on top of the finished house (as described in the first insulation method). Then you can paint the structure so that it is not only functional, but also aesthetic.
Video - House installation
For a more detailed introduction to the technology, we recommend watching the thematic video material.
Insulation of a sewer well
Finally, a few words about the sewer well, which often also needs insulation. In accordance with sanitary standards, such a well must be sealed - in other words, its bottom and walls must be tightly filled with concrete. But in reality, a variety of materials are used in the construction of sewer wells, including bricks, Eurocubes or even car tires.
On a note! Experts still advise using exclusively reinforced concrete rings for this.
Regardless of what materials were used in the construction of the sewage facility, insulation of the well for the winter is mandatory. To reliably protect the structure from exposure to low temperatures, you need to perform a set of procedures that are described below.
Step one. Start by protecting the top of your septic tank. First of all, insulate the well cover, and then proceed to thermal insulation of the sewer pipes through which waste is supplied to the structure from the house.
Step two. Then proceed to install the thermal insulator around the well itself. This procedure, frankly, is no different from the methods of insulating a conventional well described above. Therefore, we will not dwell on it.
Well cover and wooden house
To prevent the penetration of cold air from above, through the neck of the shaft, a well made of concrete rings is insulated for the winter by installing a lid made of a wooden panel. In the northern regions, internal and external covers are made for insulation.
The first is lowered into the well below ground level. It will be held on by brackets driven into the wall of the shaft. The second, upper one, is placed on the edges of the head. It can be placed on the well in the summer to protect the water from debris and rainwater.
Sometimes, instead of an outer cover, a more aesthetic structure is made - a house. Its size can be minimal and cover only the head. To make it easier to collect water in winter, a small caisson is erected around the well, into which an adult can enter.
Depending on the overall design of the site, the house is given the desired appearance. They finish it with siding, other cladding, or immediately make it in the form of a fabulous log hut. The material for the walls can be boards, logs, sandwich panels, etc.
If the house is designed only to protect the head, then its roof traditionally serves as a hatch for lifting the bucket. It is convenient to install a gate inside the space formed by the slopes, bringing the lever to the street. In a large barn house that covers part of the area around the water source, you can install a traditional well with a collar above its neck.
Preventing the well from freezing
To prevent the well structure from freezing with the onset of winter, thermal insulation should be taken care of during its construction. If the suburban area will be visited occasionally (for example, only on weekends), then, in principle, there is no need to insulate the well. In such cases, it is only necessary to clean it and treat it with some kind of disinfectant (such as chloramine) before leaving.
After this, pump out the water completely and close the structure with a lid. Lay a polyethylene film over the lid and cover it all with leaves. Now you can go to the city with a clear conscience, because with the onset of warmth, the well will again provide clean water.
But if the well is used regularly, then the measures should be more serious. For example, pipes to the house must be located below the soil freezing line, the structure itself must be protected by the house described above, or by other available means.
Bringing the well back to life
After a forced vacation, life needs to be breathed into the well again. First, the external condition of the structure is assessed and how it has changed during conservation. Then all additional insulating and protective materials are removed, the water level and its quality are assessed. If a high level is observed, then the waterproofing has been damaged and water and precipitation have leaked inside. The decrease in the amount of water can be explained by clogging of the bottom and blocking of inflow channels.
First, diagnostics, cleaning, and repair work are carried out, and only after this the well is connected to the water supply. The decision to disinfect is made based on the composition of bottom sediments and the condition of the water. If the well retires in good condition, then returning it to production is not difficult. Sometimes it is enough to pump it out 3-4 times to replace the water and allow the feeding ducts to recover.
Drinking water flows into the house from the well, and domestic waste water comes out and goes into septic tanks. This is not the most pleasant moment of comfortable living conditions, but it requires a lot of attention. Not only wells, but also septic tanks and local treatment facilities are preserved for seasonal downtime. The issue of properly disconnecting the septic tank will be discussed in one of the following articles in our information section.
What if the well still freezes?
If the winter is especially cold or you have not insulated the well, it may freeze. And if this happens, you need to follow these steps.
- First, assess the degree of freezing. Sometimes it happens that only the surface layer freezes (an ice crust appears), while the water underneath remains in a liquid state and still enters the house. In such cases, you can do nothing at all. If you wish, you can remove the ice crust using any suitable tool (for example, a crowbar). Pierce the crust with a crowbar and slightly detail it. After this, be sure to cover the structure with a lid.
- If the water is frozen completely, then all that remains is to wait for warming. As soon as this happens, dig up the well and, using a heat insulator, insulate its walls (as described in one of the methods). Soon the water will slowly but surely begin to melt.
- If the water is not frozen, but for some reason is not supplied to the house, then warm up the pipeline using a hair dryer and insulate it thoroughly. Water supply must be restored.
On a note! At low temperatures, uninsulated pipes can burst and thereby destroy the entire water supply system.
Summing up
It turned out that insulating a well for the winter is often necessary. This will protect the water in the mine from freezing even at the lowest temperature. But you need to remember about the insulation of the pipes leading into the house, as this is also extremely important.
That's all. Good luck with your work and have a warm winter!
Materials and work for insulating a well
Insulating a well before winter is much easier and cheaper than repairing it, eliminating waterproofing defects, and sometimes replacing the rings. The use of modern materials makes the task not only easily feasible, but also accessible for independent solution.
Before carrying out thermal insulation work around the head, it is necessary to remove part of the soil - dig a trench, cleaning the walls of the shaft. The depth of the pit is the sum of the freezing depth and an additional 0.5-1 m for reliable insulation.
Insulation: polystyrene foam
Among the main advantages of polystyrene foam are low price and ease of installation. In addition, the material has the following characteristics:
- conducts heat poorly;
- is not subject to corrosion and rotting, does not decompose in the soil;
- has a low moisture absorption coefficient;
- does not deform under pressure.
To insulate a well, large hardware stores offer semi-cylindrical parts equipped with grooves and projections. When using such a shell, the insulation process will take only a few hours. If it is not possible to buy ready-made parts, then insulation is carried out with foam plastic boards, cutting them into strips of the required width.
Along with polystyrene foam, it is advisable to purchase glue for facade work, as well as a vapor barrier membrane (polyethylene or special materials).
At the first stage, you need to go deeper to the 2nd ring.
If necessary, it is necessary to coat cracks and chips with cement mortar.
The first layer should be a waterproofing film, then polystyrene foam + foam, preferably tied with a dense material on top.
Preparing for the blind area.
The work is carried out in the following order:
- thoroughly clean the concrete from soil residues and other dirt;
- façade glue is applied to the inner surface of the half-rings or cut slabs (you can use liquid nails, instant installation, etc.);
- pressing the foam tightly to the surface, cover all the walls from the outside, from the bottom of the dug pit to the edge of the head;
- when using half rings, the parts of the locks are combined on the sides, and the plates are placed as close to each other as possible.
When using a foam board, the joints of adjacent parts will not be tight. The gaps must be filled with foam. Further work is carried out after it has dried.
When the insulating lining is completed and the protruding parts of the foam are cut off, all that remains is to make an outer vapor barrier layer of film. Wrap the material around the shaft covered with foam and secure with glue. Fill the excavated pit with the excavated soil, compacting it as the hole is filled.
Insulation: extruded polystyrene foam
Insulating a well with polystyrene foam is not too different from thermal insulation with polystyrene foam. EPS is also produced in the form of slabs or shells for large-diameter pipelines.
Preparatory work.
Insulation of well walls
preparation for blind area and insulation
Reinforced blind area
The insulating material differs from polystyrene foam only in its increased strength and resistance to external influences. It is little damaged by rodents or insects, and has an almost zero moisture absorption coefficient.
EPPS is produced by Russian companies that produce thermal insulation materials. It is as easy to buy this type of thermal insulation as foam plastic, but the cost of penoplex and similar EPS will be 20-30% higher.
Insulation: cellular polymer materials
To insulate a well with your own hands, you can also use rolled polymer materials with a porous structure (isolon, tillite, penolin, etc.). A number of offered brands have an adhesive layer and do not require the use of other materials for installation on the outer surface of the rings.
To save money, it is recommended to use non-foil materials, since the function of foil is to reflect heat indoors, and will not be needed when constructing a well.
The peculiarity of cellular coatings is their plasticity. You can simply wrap a strip of material around a prepared pipe made of reinforced concrete rings, gluing the isolon to the surface. Knowing the technology of how to properly install an insulating layer will help you do everything quickly and efficiently:
- clean the concrete surface;
- cover it with a primer (for example, under adhesive for facade tiles);
- if the rolled material does not have an adhesive surface, apply liquid nails or another composition to the inside;
- pressing over the entire surface, glue a strip of material;
- glue the joint with tape;
- fill up the pit.
Insulation: polyurethane foam
You can also insulate wells for the winter with your own hands using special mixtures based on polyurethane. You can buy the material in the form of a dry powder, diluted with water before use, and as a ready-made composition in a spray bottle.
The second method is better suited for independent work, since it does not require searching for special equipment for spraying.
According to the method of application, treatment with polyurethane is similar to working with polyurethane foam, only you will not have to fill the cracks, but spray the composition onto the surface of the pipe.
Preparation and insulation are carried out as follows:
- clean concrete from contamination;
- primed with a primer for polyurethane;
- apply an even layer of foam;
- leave until completely cured (4-5 hours, unless otherwise indicated in the instructions);
- paint the surface of the polyurethane foam with paint for exterior use and dry it;
- dig a trench.
The head above the ground can be sheathed with a sheet of tin, as builders do when insulating the pipes of a heating plant. This will protect the shell surface from mechanical stress and ultraviolet radiation.
Why can't you use mineral wool?
The main disadvantage of mineral wool is its ability to absorb moisture from the environment.
The head and underground parts of the pipe are affected by precipitation, groundwater, and liquid spilled from a bucket. It will not be possible to protect a porous material from becoming saturated with moisture even with the help of waterproof membranes. Wet mineral wool loses its thermal insulation properties.