How to properly disassemble a water heater
Before you begin disassembling the water heater, you must:
- turn off the water supply, then drain the remaining water from the heat exchanger by opening the hot tap;
- shut off the gas supply;
- disconnect the pipe from the chimney;
- disconnect the device from the power supply.
Now you can carefully disconnect the speaker from the communications. To disassemble, the device can be completely removed from the wall, or only the housing and the problem unit can be removed.
If disassembling the gas column is needed only to flush the circuit, then the procedure is carried out in three stages:
- Removing the handles located on the front panel of the device. They can be easily removed by simply pulling them towards you or prying them with a screwdriver.
- Removing the housing - the panel is secured with screws. Their position differs depending on the model. The screws can be on the top, bottom or back. They are found and twisted. After this, the panel is removed. In some cases, the body is additionally secured with hooks. Then you will have to pull the panel a little so that it comes out of the hinges.
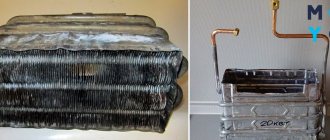
- Dismantling the heat exchanger - it is usually attached to the pipes, gas burner and hood with screws. They should be unscrewed and the element carefully removed without touching the wires and contacts.
To carry out all the manipulations, you only need a screwdriver. When removing the screws, you need to collect them in one small jar or box so as not to lose them. After dismantling, you can begin washing the heat exchanger.
Replacing gaskets
One of the reasons for column leakage may be gasket wear. Also, one of the reasons for gas leakage from the heater is wear of the gasket.
Step-by-step instruction
Replacing gaskets consists of the following steps.
- It is necessary to shut off the gas and water supply to the heater.
- Burn out the remaining gas and drain the water.
- Unscrew the heat exchanger from the water supply pipes and remove the old gaskets. Then install new gaskets and screw the radiator in the reverse order.
- Afterwards, you need to unscrew the column of the gas line, remove the old gaskets, install new ones and screw the heater back on.
It is not recommended to use homemade pads made from improvised materials, as this can lead to bad consequences. It is better to purchase gaskets in specialized stores and of good quality.
Necessary documentation for installing a gas water heater
Before installing a gas water heater, you should prepare a package of documents:
- act on the technical condition of the existing chimney (a special service is engaged in drawing up such acts);
- technical passport for a new gas water heater or the name of the model you are going to buy (it is necessary for submission to GorGaz for drawing up a project);
- project for installing new equipment;
- application from the apartment owner for the installation of new gas equipment;
- application for work.
The replacement itself can be done either by professional craftsmen or with your own hands if you have the necessary experience and skills. What should you remember when replacing a column? When installing gas equipment, you should remember that there are special standards regulating the work. Installation of a gas water heater is possible in the following cases:
Diagram of the internal structure of a gas water heater.
- the volume of the room where the equipment will be located should be from 7.5 cubic meters;
- there must be ventilation (a window with opening sashes, a window, etc.);
- the ceiling height should be from 2 meters;
- a chimney is required, the diameter of which must be from 120 mm. It is provided for by the general design in those houses where the installation of such equipment is permitted;
- the pressure in the connected water supply should not be less than one tenth of an atmosphere;
- speakers for apartments can only be installed in the kitchen; their placement in bathrooms is prohibited;
- Gas equipment cannot be placed above the stove or at a distance closer than 10 cm. The wall on which the column is hung must be made of non-combustible materials.
Typical geyser breakdowns and their elimination
A geyser is a fairly complex piece of equipment that, with proper care and compliance with basic operating rules, can serve its owners for quite a long time. However, any equipment breaks down sooner or later, and geysers are no exception. In accordance with the rules of safe operation, malfunctions of gas equipment should be eliminated exclusively by professional gas workers, however, there are a number of typical reasons (most often related to the fact that the gas water heater worked normally and caught fire, but suddenly stopped lighting) that can be identified and corrected independently. Knowing certain subtleties, it is quite possible to repair a gas water heater without the involvement of third-party specialists.
Diagram of a gas water heater without a chimney.
The gas water heater does not light up: possible reasons
The most common reason that a gas water heater, which previously worked normally, now does not light up, can be the usual lack of draft in the ventilation well.
It is possible that some foreign object has entered your chimney. In addition, it can simply become clogged with soot that has accumulated during operation of the unit. In such situations, a special protective system is activated, which is installed inside the unit, and the gas supply is automatically shut off in the device itself.
Check the draft in the chimney. This is quite simple to do: you need to light a match and bring it to the well. If the flame deviates towards the well, then everything is fine, there are no problems with draft. It is enough just to eliminate the cause, after which the gas water heater will light up again and work normally, that is, either clean the well with your own hands, or call the appropriate technician for this.
Diagram of the gas water heater.
Another common reason why a gas water heater won't light up could be that the batteries are low. However, this is only true for equipment with an automatic ignition system. It is noteworthy that, contrary to the assurances of manufacturing companies, which for the most part claim that the service life of replaceable batteries is 1 year, they have to be changed much more often. In order for a gas water heater to light up, in this case it is necessary, of course, to change the batteries.
If none of the above cases apply to yours and you are wondering why the column is not working as it should, check the water pressure. Very often the geyser does not light up due to insufficient water pressure. This can be checked quite simply: open the cold water tap and watch the pressure. If it is small, then the reason may not be in the column itself, but in the entire water supply system or some separate section of it.
If the cold water pressure is stronger than the pressure in the hot tap, then the reason may lie directly in the water unit of the gas water heater, for example, if the membrane is deformed or the filters are clogged. Quite often, coarse filters additionally included in the system are the cause.
To fix this problem, you first need to call the utility service to find out why there is no normal water pressure. After this, it is necessary to rinse the cleaning filters or replace them in the mixer. You can submit a request to the utility service to flush your water pipes. The column must be cleaned of soot and other combustion products. It may be necessary to replace the membrane of the water unit of the unit.
Quite often it happens that the gas water heater lights up, but does not work, and immediately goes out. In this situation, it is necessary to adjust the supply of cold and hot water. Remember not to try to dilute hot water with cold water, as this will cause the flame to go out quickly. Among other things, such actions violate the rules for operating a gas water heater.
How to flush a gas water heater?
Table of capacities of a chimneyless gas water heater.
Sometimes, in order to understand why the gas water heater no longer lights up, you need to disassemble it, and, if the reason for the malfunction of the equipment is accumulated scale, wash it. Prepare the tools needed for the job:
- Pipe wrench.
- Adjustable wrench.
- Flathead and Phillips screwdrivers.
- Set of spare paronite gaskets.
- Rubber hose (usually ½ inch) with a metal clamp.
- Descaling agent.
- Basin.
First, you need to remove the fittings (handles, etc.) from the gas water heater, and then remove the casing. Then you need to decide on the water supply pipes. Be careful at this stage so as not to accidentally touch the gas. Next, it is most often advised to remove the heat exchanger and wash it outside the column. However, you can do it differently.
Article on the topic: How to properly connect the installation to the sewer?
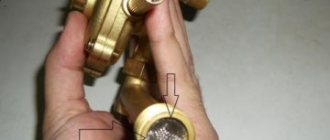
After the casing is removed from the gas water heater, it is necessary to shut off the water supply at the inlet and open any of the hot water taps, preferably the one installed closest to the column. Next, you need to unscrew the supply tube from the water heater heat exchanger and move it slightly to the side. The heat exchanger is made of copper, and the tube will allow you to do this without any extra effort. As soon as the nut is unscrewed from the heat exchanger, water will begin to flow out of it - the tap is open. You don’t need to drain very much water, about 1 liter. You will find more accurate values in the instructions for your unit.
Further actions are as follows: a hose is put on the inlet of the heat exchanger, raised higher than the column, a funnel is inserted into the hose, and the prepared descaling solution is gradually poured into it in a thin stream. Pour the solution gradually, as otherwise a reaction may begin that will push the solution back. The solution contains hydrochloric acid, which can cause burns if handled carelessly. You especially need to protect your eyes.
The descaling solution must be left in the heat exchanger for about 2 hours (the exact time is indicated in the instructions for the product). If the gas has not been turned off, and it was not said that this needs to be done, you can carefully try to heat the solution on a burning igniter. As a result, the reaction will go faster and less time will be needed for cleaning.
Water consumption table for a chimneyless geyser.
You should place some kind of basin or bucket under the tap, after which you can open the water supply to the gas water heater, just do it slowly. See what comes out of the hose. If a lot of sludge comes out and the pressure increases after flushing, then everything went fine. If not, you will have to repeat washing the column again. However, if you use modern high-quality products, you most likely will not have to do this. If you have not found a suitable remedy, you can prepare its analogue yourself, for example, by mixing 100 g of citric acid and 500 ml of water.
The catch in this case is that the gas water heater contains not only a heat exchanger, but also a number of other parts. The heat exchanger itself is made of copper, and, by and large, nothing will happen to it, but the so-called. The gearbox is usually made of aluminum and can be damaged. Therefore, if you fail to find a cleaning agent specifically designed for washing and use a homemade one instead, it is better to remove the heat exchanger and wash it separately.
Of course, if you completely disassemble the heat exchanger of a gas water heater, you will have to do a lot of extra work, but this way you will be sure that you will not damage it. You can wash the flow part of a gas column that does not ignite due to blockage using other means, but you need to be careful during any experiments.
Why won't the main burner light? It also happens that the main burner of the column does not ignite, although the pilot burner is working normally. This can be caused by several factors. It is necessary to consider these causes in order of likelihood of their occurrence.
Diagram of a column burner without a chimney.
Incorrectly executed water supply. If the main burner does not ignite during the first start after installing a gas water heater, the reason for this is most likely due to incorrect connection of the pipes. To eliminate this defect, it is necessary to correctly connect the water pipes.
Damage or complete failure of the membrane. This defect can be eliminated by simply replacing the rubber membrane.
Clogging of the filter in the hydraulic group (water fittings) or clogging of the mixer screens. The problem is solved by cleaning the mixer screens or filters of the hydraulic group.
Inlet water pressure is not high enough. To eliminate this defect, it is necessary to increase the inlet pressure. You can try adjusting the water heater by setting it with the pressure regulator to minimum. After this, the column should work normally.
Article on the topic: Tikkuril paint - selecting the paint color for the facade
The water flow is less than the minimum allowable. To solve the problem, you need to increase the water flow.
The gas pressure in the system is less than the minimum. Solving the problem will require increasing the gas pressure. Few people know that flexible gas supply hoses significantly reduce gas pressure on the device. So, it is better not to install flexible gas hoses longer than 3 m.
The geyser goes out after a few minutes of operation
Gas water heater connection diagram.
A fairly common defect is when the geyser turns off a few minutes after it is turned on. It is characteristic that, as a rule, the ignition and main burners turn off just a few minutes after startup. So why does the gas water heater go out? The only option is an emergency operation of the flue gas sensor, which, in fact, opens the thermocouple. Another option, but extremely unlikely, is that the sensor itself breaks down, but if its resistance is infinity, then everything is fine with the sensor.
If the gas heater goes out, you need to check the chimney. The emergency operation of the previously mentioned flue gas sensor indicates that gases are removed very poorly or not removed at all. And this is fraught with carbon monoxide poisoning. The damage is quite serious. The first thing you need to do is check the chimney. Moreover, it is better if specialists do this. However, until a specialist from the relevant organization arrives, you can check on your own whether one of your neighbors has installed a satellite dish on the chimney, because This equipment may interfere with the normal operation of the chimney. The installation of satellite dishes on chimneys is prohibited.
The flue gas sensor can also be triggered if a high-power hood is installed in the same room as the gas water heater, which forces the flue gases to be removed in a manner not intended, i.e. through the chimney, but directly into the room. It is strictly prohibited to install geysers and hoods in the same room.
The geyser goes out after releasing the ignition button during switching on
The principle of operation of a gas water heater.
If the gas heater goes out (the pilot flame goes out), then the reason, first of all, may be that you did not hold the ignition button long enough. The ignition button must be held for about 20 seconds.
The column may also go out due to a breakdown of the exhaust gas sensor. To check the functionality of the flue gas sensor, you need to disconnect the wire terminals of this sensor and ring it. The resistance of a normally operating sensor should be equal to infinity. If this is not the case, the sensor should be replaced.
The pilot burner may also go out due to a broken thermocouple. To determine whether the thermocouple is faulty, disconnect the sensor terminals and measure the thermocouple voltage with the igniter pressed. The voltage should not exceed 10 mV.
The pilot burner flame may also go out due to a breakdown of the solenoid valve, the work of which is best left to a qualified specialist.
Why doesn't the pilot burner flame light up?
Water pressure diagram.
If it is not possible to ignite the flame of the pilot burner when the column turns off without starting, there may be many reasons for this. The following will list the possible causes of such a breakdown in order of increasing likelihood of their occurrence.
The cause of such a defect may be a closed gas valve. To fix the defect, you just need to open it.
The next reason is that the gas fittings of the column and the gas pipeline are air-filled. A characteristic sign of this malfunction is a whistle from the pilot burner nozzle. To eliminate the defect, unscrew the nut securing the pilot gas tube to the fitting. After this, press the ignition button on the gas valve, then bleed the air until the characteristic smell of gas appears. After supplying gas, the tube must be tightened.
Another possible cause is flame separation. A sign of this defect is a characteristic whistle from the burner nozzle. In this case, you need to try to adjust the gas pressure on the burner using the screw. In addition, the cause of flame separation may be the installation of an incorrect nozzle that is not designed for this type of gas. The problem can be solved by replacing the injector.
And another possible reason is the entry of dirt or a foreign object into the gas supply path from the fittings to the pilot burner. A sign of this defect may be the absence of a whistle. To eliminate the defect, it is necessary to clean the nozzle or gas burner. If cleaning is impossible, the defect can be eliminated by replacing the gas fittings.
Related article: Do-it-yourself self-leveling self-leveling floor: preparing and pouring the solution
Lost Spark: Causes and Possible Solutions Loss of spark is one of the most common causes of gas water heater failure. If a spark does not appear when you press the button, the causes of this malfunction may lie in the lack of contact between the current-carrying wire and the piezoelectric element. If contact is present, then the fault must be looked for directly in the piezo ignition button. You can verify that this button is working properly by bringing the opposite end of the current-carrying wire closer to the speaker body. If after a click a spark appears on the body, the piezo ignition button works normally.
If a spark is present, but not at the igniter, then the cause of this defect may be a malfunction of the current-carrying wire. If necessary, the wire should be changed. Such a malfunction can also be caused by damage to the ignition electrode.
Other common malfunctions A malfunction such as lack of ignition is often accompanied or is a consequence/cause of other malfunctions that you also need to be aware of.
For example, pops and micro-explosions that accompany the switching on of the equipment can occur due to insufficient draft in the ventilation duct due to a clogged nozzle or other elements of the water heater, due to the discharge of the ignition batteries of the equipment, or due to too strong an influx of gas. To eliminate this malfunction, you need to clean the chimney, for which you should call the utility service and call a chimney sweep, or replace the batteries. In all other cases, it is better to contact specialists to solve problems.
Remember also that when you turn on the gas water heater, you should not hear the characteristic smell of gas. If there is one, you must immediately turn off the gas valve and ventilate the room very thoroughly, after which you must call the gas service. Under no circumstances should you try to fix such a breakdown yourself.
When the gas water heater turns on, a characteristic sound must be heard. So, if the unit simply does not want to ignite, listen and try to understand whether gas is flowing. If there is no characteristic sound, we can conclude that gas is not flowing. This defect can be resolved by calling the gas utility or utility service. You need to ask if any repair work is currently being carried out on your site. If no work is carried out, you must call a gas technician.
And the last common malfunction may be that the equipment lights up, but does not heat the water or heats it very poorly. There may be several reasons for this. First of all, the situation may develop this way due to the low power of the equipment, to clarify which you should refer to the passport of the unit installed in your home, study its technical characteristics, etc.
In addition, the water may not heat up well enough due to the usual blockage of the water heater, a sign of which is a change in the color of the flame and the appearance of soot under the column during operation.
The water will not heat up well even if the gas supply pressure is low (insufficient).
To solve this problem, you need to try adjusting the hot water tap. If this does not make any difference, you will need to call a technician, call the gas service, or try to clean the column yourself. Cleaning instructions have been provided above.
This is the entire list of possible typical geyser failures that you can fix yourself. However, if you are not completely confident in your own knowledge regarding the design of this unit, or if you do not have the appropriate tools to repair the geyser yourself, it is better to address this issue to professional, experienced and qualified craftsmen.
The best posts
- How and from what to make a coffee table with your own hands (50 photos)
- How to use interior stickers? [2021 ideas]
- Installing a pedestal sink
- Pine from beads: master class with photos of weaving patterns
- How to securely attach a cornice to a wall?
- Soundproofing plaster is a great way to get rid of extraneous noise
- What to plant near the fence at the dacha (20 photos)
- How to reupholster a sofa with your own hands
How to remove scale without removing the radiator
To perform this procedure, simply remove the front panel of the water heater and disconnect the heat exchanger tubes from the water unit. Do not ignore the second step and do not rinse the coil together with the “frog”! You don’t know how the detergent will affect the membrane and other parts of the water valve, so it’s better not to take risks so as not to repair the unit later.
There are 3 ways to internally flush a heat exchange device:
- Connect hoses to the heat exchanger pipes and pour the cleaner manually through a funnel.
- Remove the gas heater from the wall, turn it upside down and place it on the floor. Periodically pour a solution of citric acid into the coil and wash away the scale with water through the hoses.
- Make a booster from a heating circulation pump - a device for pumping liquid through a heat exchanger. The scheme is simple: a pump, connecting hoses and an open container with detergent.
The burner and the chamber of the gas water heater will have to be cleaned with a brush with long soft bristles. Use a household vacuum cleaner to remove dust.
Cleaning with complete disassembly
Do not be afraid to disassemble the water heating installation, the procedure is not that complicated. You will need the most common tools - screwdrivers, pliers, standard wrenches.
What to do before starting work:
- Close the taps of the cold water, hot water and gas supply pipelines. Unplug the turbocharged dispenser from the outlet.
- Substituting the container , unscrew the union nuts (American) on the connection of the water pipes. Disconnect the connections from the unit without losing the rubber gaskets.
- For convenience, it is recommended to remove the gas heater from the wall. It is not easy to disassemble and clean a unit that is hung too high or installed in a narrow niche.
- To dismantle the water heater, disconnect the gas line and the chimney pipe. Remove the unit from the hooks.
Lay the hot water column on a horizontal surface and proceed to further work, the order of which is outlined in our instructions.
How to remove the heat exchanger and column burner?
We will show the disassembly sequence using the example of a cheap Chinese Novatek water heater.
We present step-by-step instructions with photos:
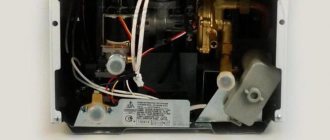
- Remove the control handles mounted on the front panel. Unscrew 2 screws (or 2 plastic clips) and remove the device casing.
- The next step is to remove the smoke collector. To do this, disconnect the wires from the draft sensor and unscrew the screws holding the diffuser box.
- Disconnect the heat exchanger tube from the water unit by disassembling the connection with the union nut. The second pipe must be freed from the lock washer, pressed with 2 screws.
- Disconnect the burner from the gas valve by unscrewing the 2 screws on the flange. Having moved the radiator upward, carefully remove the burner device (pull towards you) and move it to the side.
- Unscrew all screws connecting the heat exchanger to the rear panel of the water heating unit.
- Pull out the radiator completely and remove the burner, disconnecting the wires along with the ignition electrodes.
Note. While removing the heat exchanger, disconnect the wires from the temperature sensor.
Disassembly of geysers from other manufacturers may differ, but not fundamentally. The order of work remains unchanged.
Let's list some important points:
- in a chimneyless turbo column, the fan will have to be removed;
- in units of the Italian brands Ariston (Ariston) and some others, the pipes are connected not with nuts, but with self-clamps;
- If the water heater is equipped with an igniter, then before removing the burner it is necessary to disconnect the gas tube connected to the wick.
Important! Be careful not to lose any rubber or other gaskets discovered during disassembly. Before assembling and installing the column, it is advisable to replace these seals with new ones.
Flushing procedure
This operation is very simple compared to disassembly - cleaning the gas water heater begins by immersing the heat exchanger in a container with washing liquid.
The procedure is as follows:
- Take a bucket or deep basin, fill it with water and prepare a cleaning solution according to the recipe on the package. The concentration of citric acid is 50-70 grams per 1 liter of liquid.
- Immerse the heat exchanger in the container with the radiator down and the pipes up.
- Using a watering can, fill the coil with detergent. Rinse it periodically by adding new solution.
- Flush the heat exchanger until clean liquid comes out of the tubes without scale flakes. Then run tap water through the coil to remove any remaining product or impurities.
Advice. Using citric acid, heat the solution to a temperature of 50-60 °C. The reaction will be more intense and end faster.
The removed burner can be cleaned from the outside and purged or washed with a solution of citric acid (no more than 50 grams per liter of water). Finally, rinse the element with running water, blow with compressed air and dry thoroughly.
Do not ignore other parts of the gas water heater - the mesh filter, smoke collector and combustion chamber, remove soot and other contaminants from them.
After washing and drying, put the heat exchanger back in place, connect the burner and follow the remaining steps to reassemble the water heater.
It is important to achieve tight connections: when installing old gaskets, treat them with high-temperature sealant. Check the joints for tightness using water pressure (4-6 bar).
It wouldn’t hurt to blow out the inside of the burner with compressed air at a pressure of 4-6 bar
For reference. The duration of washing depends on the thickness of the scale layer inside the column heat exchanger and ranges from 2-3 hours (prevention) to 2 days.
The structure of the stove gas tap
Gas valve (Fig. 1) Let's start with the valve body 6, which is rigidly screwed with a clamp to the gas pipeline of the stove. At the bottom of the tap there is a hole 4, which leads gas to the stove burner. There is a small nipple in the faucet opening that connects the pipe and the faucet. To burn gas, air and gas are mixed (injected) in a Venturi tube in certain proportions. Also in the gas valve, it is equipped with an idle speed adjustment screw.
Inside the tap there is a bronze plug 5 of conical shape, which, when turned, regulates the gas supply to the thermostat of the stove, and then to the burner. In order for our plug to be reliable and fixed in the valve body, a pressure spring is installed, which rests against the plug, preventing it from jumping out from the gas pressure. There is a groove in the housing cover that guides the plug during rotation.
Faucet not working? We diagnose over the phone, so the cost of this service for you is
We will charge 500 rubles for the call if the repair is refused, but this service costs
The cost of the repair work performed without the cost of the required spare parts in our company varies
Before leaving, our employees will issue a guarantee from our company for the work done for a period of
Preparing tools
Depending on how complex the job will be, some tools will be needed. Among them are:
- adjustable wrench;
- perforator;
- tow;
- sealant;
- open-end wrenches.
The hammer drill should come with a set of chisels and drills. You will need a drill with a drill bit that is designed for working with ceramic tiles.
Sources of danger
There are, in fact, only two of them.
The fact is that independent work related to opening the gas pipeline will inevitably lead to a gas leak.
- At a certain concentration of natural gas or propane-butane mixture in the air, it will become unbreathable.
- Long before this, the gas-air mixture will become explosive. The slightest spark when turning on an electrical appliance, triggering any relay (for example, a convector thermostat) or clicking a light switch will lead to exactly the consequences that we tried to warn the reader against in the first section of the article.
The rules that will help avoid negative consequences are quite obvious.
- All work is carried out with windows wide open throughout the entire apartment or house. Yes, yes, regardless of the time of year. Don’t be afraid that your favorite cactus will freeze: if everything goes well, forced ventilation will last no more than 10 minutes.
- The room must be completely de-energized. What the instructions relate to is, I think, clear from the previous explanation. Take it seriously: as already mentioned, the cost of a mistake can be the highest.
Let's get started
Tools
What should you prepare before opening a gas pipeline?
- We have already mentioned a pair of gas keys. Precisely a pair - because in most apartments of the old building, the supply to the stove is made of rigid pipes; To unscrew the locknut and coupling, you need to hold the drive in a stationary position, not allowing it to turn the valve.
- To seal gas threads, FUM tape or synthetic thread with Tangit Unilok sealant can be used. Linen with paint is also suitable, but the paint takes a relatively long time to apply to the threads and winding, and in our case, seconds will count.
- When repairing a tap, a special graphite lubricant for gas taps or regular grease can be used. The graphite base is more practical: it retains its properties longer.
- In addition, when repairing the valve, you will need a 1/2-inch female plug and a flathead screwdriver.
Audit
So, what to do if the gas tap smells like gas and replacing it is not in your plans?
- We close the valve by turning its handle perpendicular to the pipe.
- We use one of the gas keys to fix the outlet after the valve and then hold it in a stationary position.
- Using the second wrench, we tighten the locknut and coupling onto the long thread of the drive.
- We partially unscrew the valve with a key until it starts to rotate by hand.
- We completely unscrew the valve and immediately attach a plug to the thread. Do not be afraid that excess pressure will interfere with you: it is only 3 - 5% higher than atmospheric pressure.
- We wind the thread under the plug and tighten it by hand until the end.
- We unscrew the valve from the surge.
- We unscrew the plug with a groove for a screwdriver on the back side of the valve and remove the spring hidden under it; then we push the conical plug out of the body.
- We clean the body and plug from the remnants of the old lubricant and apply a thick layer of new one.
- Reassemble the valve in reverse order.
- We put it in place of the plug, not forgetting to replace the thread winding.
- We screw in the drive and, having re-winded the threads, we drive the coupling and locknut into the working position.
Replacement
What to do if the gas tap in the kitchen is leaking and you want to replace it with a new one?
If the new valve is the same length as the old one, the actions are completely similar to those described above - with the difference that manipulations with the plug are, for obvious reasons, made unnecessary.
How to change a gas tap in an apartment if its length does not match the length of the old one?
- The drive with the coupling and locknut is thrown out.
- The short thread after the drive is equipped with a short extension with internal and external threads. This will allow the union nut to press the gasket against the smooth, wide edge of the extension rather than against the jagged end of the pipe.
A special case
How to change the tap on a gas cylinder if it cannot be opened with a regular key? Heat the valve with a hair dryer - and its expansion will make the force required to unscrew it quite feasible.
Dismantling the old unit
Before replacing the gas water heater with a new one, you must remove the outdated or broken unit from the wall:
- You should start by turning off the gas supply to the device by closing the corresponding valve. After this, using an open-end or adjustable wrench, unscrew the nut on the pipe or hose through which gas is supplied to the device. If the nut on the pipe cannot be easily unscrewed because it has been painted over for a long time, then you should use a special solvent to remove it. After this, you need to hold the gas pipe with one adjustable wrench and unscrew the nut with the other.
- The next step is to disconnect the device from the water supply. If, near the previously installed unit, there was no tap installed to shut off the water, then it will have to be turned off with the main tap in the entire apartment. But before you connect water to the new column, do not forget to install 2 taps (one at the inlet to the unit, and the other at the outlet pipe). This will greatly facilitate the maintenance of the water heater in the future.
- At the next stage, you will need to remove the pipe connecting the column to the chimney and unscrew all the fasteners holding the device to the wall.
Areas of responsibility
The first and main thing that the reader should pay attention to is that the inlet valve in the apartment falls under the responsibility of GorGaz or a similar organization operating in the area where you live. Both the repair and replacement of valves, and their periodic inspection, and the connection of gas equipment (stoves, boilers, convectors, hobs) should be carried out by mechanics of this organization
- you have quite a lot of experience in locksmith work; in particular, you have had to change valves and valves under pressure;
- you know where the power is cut off in your apartment, and you have access to the switchboard and the machines in it;
- the gas pipe in front of your valve has no visible signs of corrosion;
- at your disposal are plumbing tools (at least two gas wrenches No. 1 and/or No. 2), sealing material for threads and grease or graphite lubricant -
the following text will help you replace or repair the gas stove tap yourself.
Installation of a new water heater: preparation of materials
Before starting installation, ensure that you have the following materials:
- galvanized pipe;
- rings for entering the chimney;
- asbestos or metal chimney.
Galvanized pipe can be replaced with corrugated pipe. If this item is included in the kit, you won’t have to spend money. Otherwise, you need to determine the diameter of the outlet hole or look at this parameter in the instructions.
When replacing a gas water heater in a house, you will need a pipe made of metal or asbestos. Its diameter should be 120 mm. This value can be increased. The length should be 2 m. By increasing this parameter you can improve traction.
You will also need a standard gas hose. Its size will depend on specific conditions. For example, the step from the end of the gas pipe to the entry into the device. It is important to consider the type of thread at the entrance to the unit. The hose end must fit and match the thread type. The water supply connection point is prepared in advance.
You will need two connecting hoses. This work can be carried out using a metal-plastic pipe. In the latter case, you should decide whether a coupling is needed so that the dimensions of the pipe and the connection point fit together. When replacing a gas water heater in an apartment, you will also need dowels, which will allow you to mount the device on the wall. If there is no coarse filter in the house, it is necessary to install one. The service life of the unit will depend on the quality of the water.
Why does the gas water heater not work?
There are several common reasons why a gas water heater does not work. You can detect and correct them yourself.
Lack of traction
Any geyser has a function that controls the presence of draft. If there is a shortage of it, the gas is automatically shut off and the ignition on the gas water heater does not work.
It is very easy to check the presence of traction yourself. You need to bring the match to the vent or chimney. If the flame burns evenly, it means there is no draft. If the fire is drawn into the hole, then the chimney is working correctly. It happens that backdraft occurs, and then the air flow blows out the fire in the burner.
If there is no traction, then it is necessary to determine the reason for this. Most likely, there is a blockage in the ventilation or pipe that needs to be removed.
The batteries are low
In an automatic gas water heater, the cause of the problem is often dead batteries. They give a spark when ignited. Basically, the batteries last for 7-15 months of operation.
In this case, the problem can be solved very simply by replacing the old batteries with new ones.
Insufficient water pressure
Each geyser operates only at a certain water pressure in the main. There are models that can heat water only at 0.2 or 0.3 bar. If the pressure is lower, the device will not work.
After detecting low pressure in the line, it is necessary to find out the cause and eliminate it:
- If the pressure has decreased throughout the water supply network, then you need to call the utility service and report the problem.
- Sometimes the cause of a drop in pressure is a clogged pipe or filter. It is recommended to check the filter and clean it if necessary.
Note! If a drop in water pressure in your main is not uncommon, then you can improve the situation by installing a pump that will increase the water pressure or replace the device with another one that can operate at 0.1-0.15 bar
Gas burner clogged
Most often, the piezoelectric element in a gas column does not work due to a clogged burner. If it is clogged with soot and soot, it is necessary to disassemble the structure and thoroughly clean each of its elements. Then you should collect all the parts and try to light the column again.
No gas supply
Usually, when you turn on the column, you can hear the sound of incoming gas and smell it slightly. If there is neither one nor the other, then fuel is not supplied. This is one of the reasons why the ignition of the gas water heater does not work.
If gas does not flow, it is recommended to first check whether the gas filter is clogged. If so, the filter is cleared of blockages. In other cases, you need to call the gas service and find out the reason for the lack of fuel.
Note! If there is a gas leak and you smell it in the room, then you cannot turn on the gas water heater. Call a gas specialist immediately
Problems in the water unit
After 3-4 years of intensive use, the membrane of the column water unit gradually loses its elasticity and may even break. If this happens, the device will not be able to work.
To check the membrane, you need to remove the device body and unscrew the bolts that hold the assembly. Then remove the cover of the water block and inspect the membrane. If it is damaged, replace it with a new one. It is better to purchase an element made from silicone. This membrane will last longer.
Replacing the elements of the water unit should only be carried out if you are confident in your abilities and have the skills to repair such devices.
If you cannot identify the reason why the geyser does not work when turned on, call a specialist. He will quickly figure out what's wrong and fix the problem.
VESKO-TRANS.RU
Content
How to repair a gas water heater |
- How to understand a gas water heater
- If gas escapes into the igniter
- If the geyser goes out working hours
- Heat exchanger repair
Regardless of the manufacturer, the operating mechanism of any gas column is similar. The water passes through a heat exchanger, which is heated by a gas burner. If there is no water pressure or no traction, the automation will turn off the gas supply. After a breakdown, the question arises of how to disassemble the gas water heater without outside help. With the right approach, at least some homeowners can solve this problem.
Scheme for regulating pressure in a gas nozzle.
How to understand a gas water heater
To dismantle and clean the gas water heater, the following tools are required:
a gas water heater is , the time comes and it breaks. You can try to fix common problems yourself.
Before starting routine repairs of the gas column, it is necessary to turn off the gas supply.
Then unscrew the screws that secure the body, remove the adjustment knobs, and then remove the body of the gas water heater.
If gas escapes into the igniter
Gas column installation diagram.
This malfunction occurs in dispensers with an automatic security system. It includes a solenoid valve, thermocouple and fuse. If these elements work or are faulty, the gas supply is stopped and the column is turned off.
If there is sufficient air flow and good draft, it makes sense to check the fuse. If the hood is turned on in the kitchen and the window is closed, it means that the gas heater and will overheat even with good draft, since there is no air flow, the thermal fuse will turn off the gas supply to protect the person from carbon monoxide and the heater from overheating.