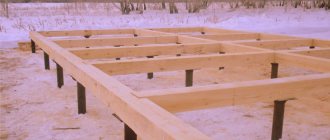
Floors on the ground are a universal way to create a warm and reliable foundation in the house. And they can be done at any groundwater level and type of foundation. The only limitation is the house is on stilts. In this article we will describe in detail all the layers of the “floor pie” and show how to organize it with your own hands.
Concrete floors on the ground imply the absence of basements or gaps for ventilation in the underground.
At its core, it is a multi-layer cake. Where the lowest layer is the soil, and the topmost is the floor covering. At the same time, the layers have their own purpose and strict sequence.
There are no objective restrictions for organizing the floor on the ground. High groundwater is not an obstacle to this. Their only weak point is production time and financial costs. But on such floors you can put brick or block walls, and even heavy equipment.
Correct “floor pie” on the ground
The classic floor pie on the ground implies the presence of 9 layers:
- Prepared clay;
- Sand cushion;
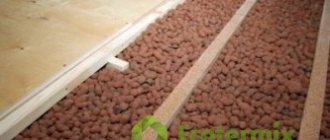
- Crushed stone;
- Polyethylene film;
- Rough concreting;
- Waterproofing;
- Insulation;
- Finish screed;
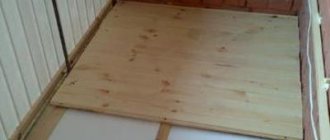
- Flooring.
We deliberately did not indicate the thickness of each layer, so as not to set any strict restrictions. Below, approximate values and influencing factors will be indicated. But first we would like to note a very important point: the groundwater level can change very seriously in a fairly short period of time.
In our practice, there have been cases when, within 5-7 years, dry semi-basements and cellars in private houses had to be filled up, because groundwater completely flooded the underground premises. Moreover, this phenomenon was observed not in one individual house, but in an entire block of private buildings (40-60 houses).
Experts explain such phenomena by improper drilling of water wells. Such actions lead to mixing of aquifer lenses, rupture of layers and changes in aquifers. Moreover, they can drill a well quite far from your home. So pay close attention to the purpose of each layer of the floor pie on the ground and do not think that there are unnecessary elements here.
- Prepared clay. The purpose of this layer is to stop groundwater. In general, the three bottom layers of the floor pie are intended for exactly this. Of course, if, while removing the fertile layer, you have reached the clay layer, then you do not need to bring it and fill it up, only a little preparation is required. But more on that in due time.
- Sand. There are no special requirements for sand. You can use any, for example, quarry or even unwashed.
- Crushed stone. Large, fraction 40-60 mm.
These three layers are responsible for cutting off the capillary rise of water. A layer of clay cuts off the main access, sand weakens the capillary rise of water and weakens the pressure of the upper layers, and crushed stone does not allow water to rise at all. At the same time, each layer must be compacted. The thickness of each layer is at least 10 cm. Otherwise, there is no point in filling it up. But the maximum height needs to be explained in more detail. The fact is that tamping is most often done with homemade devices. The weight of such instruments is 3-5 pounds.
It has already been empirically proven that it is impossible to compact a layer of crushed stone, sand or clay more than 20 cm with hand tools. Therefore, the thickness of one of the first three layers is maximum 20 cm. But, if you need to make the floor pie higher, then tamping can be carried out in two stages. First, 15-20 cm of sand is poured and compacted well. Then another layer of the same thickness is poured and compacted again.
The order of occurrence of the clay-sand-crushed stone layers cannot be changed. The reason here lies in the fact that if sand is poured on top of crushed stone, then after some time it will seep through it. Which in turn will lead to subsidence and destruction of the concrete layer, and then deformation of the entire floor.
- Polyethylene film. Be sure to take the film with your sleeve and lay it without cutting. That is, there will actually be two layers of polyethylene. It is intended solely to prevent the flow of concrete solution into the crushed stone.
- Rough concreting. The minimum layer thickness is 8 cm. Sand can be taken from a quarry, but it must be washed. But crushed stone is required with a fraction of 10-20 mm. This layer will be the basis for the final part of the floor on the ground. Dispersed steel fiber reinforcement is recommended.
- Waterproofing. If the preliminary work is carried out correctly, ordinary roofing material without powder can handle waterproofing. If in doubt, you can lay roofing felt in two layers.
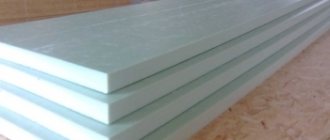
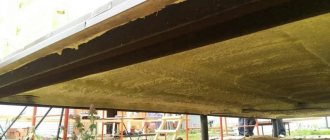
- Thermal insulation. Here it is recommended to use only Extruded Polystyrene Foam (EPS). Thickness should be determined depending on the region and climatic conditions. But we do not recommend using EPS with a thickness of less than 50 mm.
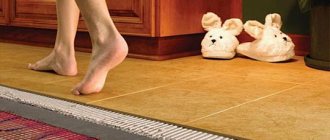
- Finish screed. Depending on the project, water heated floor pipes or electric floor heating cables can be integrated into it. Only river sand is used. This layer must be reinforced. Dispersed reinforcement with steel fiber is possible. The thickness of the screed is at least 50 mm.
- Flooring. Concrete floors on the ground, organized in a private house in this way, have no restrictions on the use of floor coverings.
You may be interested in: Review of the most popular floor insulation materials.
Video description
How to properly create a floor pie for pouring a concrete screed can be seen in the video:
See also: Catalog of companies that specialize in finishing materials and installation of stoves and fireplaces.
Work must be carried out under certain conditions:
- Filling is done at temperatures above +5 degrees.
- The construction site or room must have a roof or canopy that protects from direct sunlight.
Sequence of work:
- Step 1 . First, a sand cushion with a thickness of 20 to 60 cm is poured. The layer is leveled and compacted to the maximum possible density. The backfill is filled and compacted using heavy rollers.
- Step 2 . Crushed stone is poured on top of the sand. Ideally, the layer thickness should be about 20 cm. By tamping the crushed stone, the density of the sand cushion increases.
- Step 3 . The backfill is covered with geotextile. The strips of fabric are laid overlapping by 15–20 cm. An overlap is made on the walls from the side of the foundation strip. A damping tape is installed around the entire perimeter. It provides a decoupling between the floor and the foundation strip.
- Step 4 . A metal reinforcing mesh is placed on top of the fabric and filled with concrete mixture. The rough screed must harden thoroughly. Work cannot be continued until the material has acquired sufficient strength.
- Step 5. Double roofing material is used for waterproofing. The material is laid on a rough screed, then treated with bitumen mastic.
Laying penoplex for insulating a concrete floor Source altpol.ru
- Step 6 . The insulation layer is created from penoplex. Choose brands intended for the foundation. This insulating material is characterized by increased density, resistance to moisture, temperature changes, and the effects of bacterial and fungal infections.
- Step 7 . The next layer is a vapor-waterproofing film placed on the penoplex. The material is laid so that there is an overlap along the entire perimeter over the damping tape on the walls. Its height should be 18-22 cm. The film strips are positioned so that they overlap each other. The sides are taped with construction tape.
- Step 8. A reinforcing fiberglass mesh is laid under the finishing screed. Concrete is poured on top of this material. The thickness of the last layer can be from 5 to 10 cm.
If a warm floor is created on the ground, then before pouring the finishing screed, the system is installed and pipes are laid. Concrete is poured after all commissioning work has been carried out.
Reinforcing mesh with damper tape around the perimeter Source vse-postroim-sami.ru
Installing a floor on the ground with your own hands
Before starting work, calculate the excavation depth. The calculation is carried out in reverse order. That is, the threshold of the front door is taken as zero. Then they begin to add up the thickness of each layer. For example:
- Linoleum – 1 cm;
- Finish screed – 5 cm;
- Insulation – 6 cm;
- Rough screed – 8 cm;
- Crushed stone – 15 cm;
- Sand – 15 cm;
- Prepared clay – 10 cm.
The total depth turned out to be 60 cm. But keep in mind that we took the minimum values. And each building is individual. Important: add 5 cm of depth to the result obtained for you.
Excavation is carried out to the calculated depth. Of course, the fertile layer will be removed, but clay may not always be below. Therefore, we will describe the process of organizing a floor pie on the ground in full.
Before filling the layers, draw level marks with chalk in 5 cm increments on all corners of the foundation. They will make the task of leveling each layer easier.
Soil compaction
Any clay will do for these purposes. It is scattered in an even layer, and before compacting it is generously moistened with an aqueous solution of liquid glass. The proportions of the solution are 1 part liquid glass and 4 parts water.
To compact the first three layers, you can use a one and a half meter piece of timber 200x200. But the process will be of better quality if you make a special device. To do this, a piece of channel is welded to a one and a half meter piece of metal pipe in a T-shape. The lower part of the channel should not have an area of more than 600 cm2 (20 by 30 cm). To make the tamper heavier, sand is poured into the pipe.
The compacted layer of prepared clay is well moistened with cement laitance. To prepare it, 2 kg of cement is dissolved in 10 liters of water. Make sure that no puddles form on the surface of the clay. That is, it should be fairly even.
Almost immediately after the cement comes into contact with liquid glass, the chemical process of crystallization begins. It goes away quite quickly, but during the day you should not disturb the crystal formation in any way. Therefore, do not walk on clay, but rather leave the work for a day for a technological break.
The main layers of the “floor pie”
Sand. After a day, you should start filling the sand. At the same time, try not to walk on the first layer. Pour sand and step on it. Chemical processes between liquid glass and cement will continue for another week and a half. But air access is no longer needed for this, and water is present in the clay. Having poured a layer of 15 cm, feel free to step on it and compact it.
Crushed stone. It is scattered in an even layer over the surface of the sand and also compacted. Pay attention to the corners. It is very important that after compacting the surface is as smooth as possible.
Polyethylene film. It is laid with a 10 cm overlap and taped. A small, 2-3 cm bend on the walls is allowed. You can walk on the film in soft shoes with extreme caution. Remember that polyethylene film is not floor waterproofing, but only a technological layer to prevent laitance from flowing into the crushed stone.
Rough concreting. “Lean concrete” is prepared in the following proportion: M500 cement – 1 hour + sand 3 hours + crushed stone 4 hours. For dispersed reinforcement, steel fiber should be added at the rate of 1 kg. fiber per 1 cubic meter of concrete. Try to level the freshly poured solution, following the corner marks. On a flatter surface, it will subsequently be more convenient to lay layers of waterproofing and insulation.
48 hours after pouring, the concrete must be reinforced. To do this, you will need a solution of liquid glass in water (1:10) and cement. First, the solution is passed over the entire surface. You can use a roller, or you can use a spray bottle. Then they dust the concrete with a thin layer and immediately begin to rub the cement into the surface. The most convenient way to do this is by grouting.
This procedure increases the strength of concrete by an order of magnitude, and in combination with liquid glass makes it as waterproof as possible. The concrete will mature within a month and a half, but work can begin on the next stage in just a week.
Insulation and waterproofing
To create a waterproofing layer, the floor surface is cleaned and treated with liquid bitumen. Ruberoid is laid overlapping, with an allowance of 3-5 cm. The joints are carefully soldered using a construction hair dryer. The allowance for the walls is 5 cm. IMPORTANT: Make sure that the roofing material adheres to the corners, do not leave voids. The second layer of roofing felt is laid offset by half the width of the roll. During waterproofing work, it is best to walk on the surface in shoes with soft soles (sneakers, galoshes).
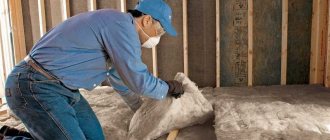
For thermal insulation, the best option is extruded polystyrene foam. A 5 cm thick EPS layer replaces 70 cm of expanded clay. And in addition, EPS has a practically zero water absorption coefficient and quite high compressive strength. We recommend laying 3 cm thick EPS in two layers. In this case, the top layer is laid with an offset. This method guarantees the absence of cold bridges and increases the thermal insulation properties of the floor pie. The joints between the EPS boards are glued with special tape.
Proper thermal insulation of the floor pie is an extremely important component for the energy efficiency of the entire house as a whole. Up to 35% of heat escapes through the floors! Even if the floors do not produce heat themselves (warm floors), they should be thermally insulated as much as possible. This will allow you to save quite impressive amounts on heating in the future.
Floor screed
A damper tape with a thickness of 15-20 mm is glued along the room. In this case, the lower part must be glued to the EPS boards. To reinforce the floor on the ground in residential premises, use a masonry mesh with cells of 100x100 mm. Wire thickness 3 mm. The mesh must be placed on supports so that it is approximately in the middle of the screed layer. To do this, it is placed on special stands. But you can use regular PET bottle caps.
Installation of beacons is possible, but in combination with reinforcing mesh, this will create a rather bulky and extremely fragile structure. After all, if you rigidly fasten the mesh, this will require additional costs for fastening and will require violating the integrity of the EPS. And if the fittings are not fixed, then it can easily change the levels of the beacons. Therefore, it will be more convenient to fill this layer and then level it with a self-leveling screed.
For the finishing screed, the solution is diluted in the proportion of 1 part M500 cement + 3 parts river sand. The work is carried out promptly. To roughly level the surface, you can focus on the corner marks.
After pouring the finishing screed, it should be allowed to gain strength for 3-5 days. With a thickness of 5 cm, the ripening period of this layer will be 4-5 weeks. During this time, regular wetting of the surface with water is required.
Read more: do-it-yourself floor screed - detailed instructions with Video.
Acceleration of the cement hydration process is unacceptable! After about a month, you can check the degree of readiness. To do this, in the evening, take a roll of dry toilet paper, place it on the floor and cover it with a saucepan on top. If in the morning the toilet paper is dry or slightly damp, then the layer is already ready. You can level the floor with a self-leveling screed.
The self-leveling screed is diluted according to the manufacturer's instructions and poured onto the surface of the concrete floor. When the work is carried out scrupulously, height differences do not exceed 8-10 mm. Therefore, a minimal amount of self-leveling screed is required. It dries quite quickly. And after 1-2 days the floor pie on the ground will be completely ready for laying the floor covering.
Useful article? Add to your bookmarks!
THIS MAY BE INTERESTING MORE FROM THE AUTHOR
Floor insulation
Choosing floor coverings for water heated floors
Concrete floor
Mosaic polished floors are the best solution for business!
Floor insulation
Izolon: features, types and common areas of application of the material
Floor insulation
Floor insulation with expanded clay
Concrete floor
Filled floor
Floor insulation
Installation of heated floors - instructions
Layer options
Insulation of the ground floor is done in two ways: they are distinguished by the option of making the underlying layer. The main indicator for choosing the number of layers when insulating a floor is the composition of the soil and the level of soil water. If there is a probable possibility of raising the latter to the heat-insulating layer, it is necessary to take into account additional waterproofing measures. In each case, the floor insulation device must comply with a specific scheme.
A similar floor insulation pie can be considered key. The design of this flooring option includes the following layers.
- Compacted. Often the soil that was removed when digging the foundation, of course, in addition to black soil and peat, is filled back in. Moreover, they tamp it down every 200 mm. This is one of the measures that allows you to remove or at least reduce the risk of cracks in the future floor.
- Compacting with crushed stone. Moistened crushed stone of fraction 20-60 mm is covered with a layer of 70 mm, leveled and compacted with a tamper. Its main function is to further compact the soil.
- Underlying concrete. It would be more accurate to think of lean concrete as an innovation layer rather than a structural layer of the cake. It is arranged as a basis for waterproofing. A good thickness of the underlying layer is approximately 60–70 mm. Concrete M100 is used for its production. The concrete is laid evenly, without strong differences, because this may determine the density of the thermal insulation and waterproofing.
Note: After laying the heat insulator, the height difference should not be more than three to five millimeters per 2-meter plank.
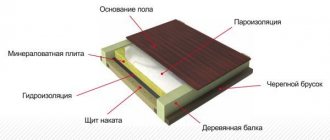
- Water protection. The material used for waterproofing work is mainly fused rolled roofing material, polymer-bitumen or PVC membrane fabric or primitive polyethylene film laid in 2 layers. Thermal insulator. The key heat insulator is placed mainly in a horizontal position until dry. The quality and integrity of thermal insulation determines the accuracy of the joints between sheets or slabs. Cold bridges may appear on the side of the foundation walls. To eliminate this phenomenon, you need to additionally place a heat insulator 40–50 mm thick and vertically. Attach it with dowels. The upper surface of the main insulation layer should be placed at a level corresponding to the cut-off waterproofing of the foundation. There are several options for selecting a heat insulator.
- Vapor barrier. A very good solution in terms of quality/price ratio is polymer-bitumen membrane fabric based on polyester and fiberglass. PVC membranes are much more durable, they do not rot, however, this material is more expensive. You can make a vapor barrier from a polyethylene film, laid primarily in 2 layers.
Attention: Polyethylene film can be easily damaged during concrete pouring, and it is usually impossible to check its integrity.
- Cement screed. It is made from M100 mortar and reinforced with a wire mesh Ø 4–6 mm, and the cell size is 100 by 100 mm.
Note: When laying the screed, experts advise extending at least 10-15 mm onto the foundation itself. This helps save the floor from large cracks appearing along the perimeter of the walls.
Sand pillow
The difference between such floors is the absence of cement-sand preparation, which is replaced by laying a 150 mm sand cushion. The order of installation of the floor pie is the same. With this method of installing floors on the ground, it is, of course, more difficult to ensure the levelness of the base over the entire surface.
We suggest you read: How to lay tiles on a wooden floor in a bathroom? Installing tiles on a wooden floor in a bathroom