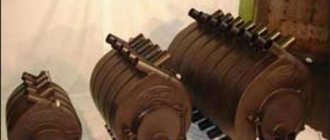
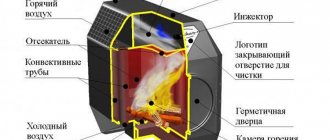
Construction of a long-burning furnace
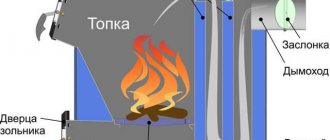
The oven is designed as follows:
- combustion chamber (fuel tank), which has two compartments: one for burning fuel, the other for burning combustion products. The latter is made in the form of a dome;
- chimneys (optimal diameter within 80 - 150 mm), through which combustion products are removed;
- some models are equipped with an air convection system or a water heat exchanger;
- slabs may be included in the design; ovens, etc.
How to make a stove with your own hands
When choosing a room where you can make a long-burning stove with your own hands, you need to keep in mind that for welding work you will need access to 220 V electricity.
The body can be made of stainless steel, cast iron or steel. When you make it yourself using welding, you need to take steel sheets with a thickness of at least 4 mm. The most convenient and stable design will be obtained if the body is shaped like a rectangular parallelepiped. But the main thing is to make it airtight.
However, it is easier and more reliable to choose a ready-made container. For example, even a used fire extinguisher is suitable for a low-power oven.
Important! If a used gas cylinder is used for the housing, special procedures must be followed for safety reasons. An empty cylinder always contains gas vapors, which can lead to an explosion. Therefore, before cutting off the “top” of it, the balloon must be filled to the very top with ordinary water.
Separately, another circle is cut out of a sheet of iron with a diameter 2-2.5 cm larger than the diameter of the body itself. You need to cut a hole in it for a pipe with a diameter of 10 cm. The pipe is immediately welded into place.
The legs are made of metal channel. They will not only support the base, but also “push” the fuel during the combustion process.
The lid is made separately. They also cut a hole in it for a pipe 10 cm in diameter. A “skirt” is provided along the edges for a tighter connection between the lid and the body.
Holes for the firebox and ash pan are cut out on the body. Metal doors are hung on them, to which handles (from a corner or channel) are welded. The firebox and ash pan are separated by a grate on which fuel must be placed.
Operating principle of long-burning furnaces
The operating principle of long-burning furnaces is fundamentally different from the functioning of a conventional heating device. The operation of a long-burning stove is based on the spread of fire from top to bottom. The fuel is ignited at the top thanks to the use of an air supply pipe. When burning, gases are sucked out through the chimney. The air supply is controlled by a damper: the combustion process is transformed into smoldering. This functionality allows for heat dissipation for many hours and even days.
The processes in the furnace are carried out as follows:
- drying of fuel (energy carrier);
- pyrolysis (decomposition); prerequisites - lack of oxygen, temperature about 450ºC;
- combustion of volatile (light) fractions with parallel carbonization (saturation with carbon dioxide) of the fuel;
- decomposition of solid fuel fractions and their transition to a volatile state;
- oxidation reaction (production of hydrogen and carbon monoxide) at a temperature of 400ºC.
The result of oxidation (reduction) is the release of a large amount of heat. Mandatory condition: the temperature should not fall below 250 ºC. Otherwise, hydrogen and carbon monoxide will escape. No heat will be transferred.
We make “bubafonya”
If you are making a stove for heating premises for household or technical purposes, you should pay attention to the stove under the slightly funny name “bubafonya”. It has a simple but original design that provides a lot of thermal energy. It works like this:
- The lid is removed, firewood is loaded (small chips are placed on top);
- Kerosene-soaked rags are placed on top of the firewood and in the spaces between them;
- The rags are set on fire and the wood is set on fire;
- A piston is installed in the oven, the lid is closed - the unit begins to generate heat.
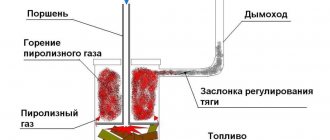
In order to understand the essence of this unusual long-burning stove, you just need to look at its diagram. The unit consists of three main parts - a body, a chimney, a heavy piston and a cover.
This picture clearly demonstrates the scheme and principle of operation of the “bubafoni”.
“Bubafonya” is simple to make; the easiest way is to build it from two whole metal barrels (without holes) with a volume of 150-200 liters. Thick steel is not particularly needed here, since due to the limited supply of oxygen, combustion will be slow and low-temperature. Let's see how to make such a long-burning stove with your own hands. Here are step-by-step instructions:
- We cut off the lid from the main barrel and prepare the combustion chamber;
- We weld a piece of pipe with a diameter of 100-150 mm into the side wall of the combustion chamber (in the upper part, according to the figure) - this will be the chimney;
- We prepare the top cover - we make a hole 40-50 mm wide in it, through which the piston pipe will pass. Bend the edges of the lid outward with gentle blows of the blade, tamp the edges of the barrel (combustion chamber) inward - the lid should fit tightly onto our barrel;
- We are preparing the piston of our long-burning furnace - we take a pipe with a diameter of about 40-50 mm (it should fit into the hole in the lid), weld the lid from the second barrel to it from below, and you cannot weld the pipe itself - air will pass through it. We weld pieces of a thick L-shaped channel to the bottom of the piston cover so that the piston itself is as massive as possible. The diameter of the piston itself must be such that it can be easily inserted into the combustion chamber (there should be gaps about 5 mm wide between the walls and the piston, through which combustion products will escape).
Our self-made long-burning stove is ready - all that remains is to install it on a non-combustible base and test it. How this stove is set on fire is described a little higher.
Some models of these long-burning stoves operate on one load of firewood for up to 20-24 hours or more, generating a large amount of heat.
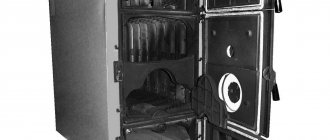
Scheme of long-burning furnaces
Stove layouts differ slightly depending on the model (manufacturer, type of fuel). The design can be represented as follows:
- combustion chamber (fuel tank);
- secondary air intake system;
- grate (grid);
- doors for fuel replenishment;
- doors through which the chamber is cleaned;
- doors through which primary air is supplied and adjusted;
- ash pan;
- system for the release of combustion products into the chimney.
Operation of long-burning furnaces
Operation does not greatly depend on the shape and type of equipment, its size and place of use (residential building, bathhouse, utility premises). The algorithm of actions is the same. The process begins by loading the furnace with fuel. Primary air enters the lower half of the firebox and the fuel is ignited. In this long-burning mode, the stove operates until the temperature in the chamber reaches the required value (usually 400ºC). After this, the primary air is shut off.
Fuel cracking occurs. The gases produced by this process rise to the upper half of the chamber. This is also where secondary air is supplied, which is necessary for afterburning combustion products. The result of the process is the release of a significant amount of heat. The task of a long-burning furnace with high efficiency is to effectively transfer the generated thermal energy to the surrounding air or water circuit fluid with a minimum of losses.
How to increase efficiency
When designing or modifying a wood heating system at home, you should remember the basic rule - all elements must be proportionate, optimal and form a harmonious system. A huge firebox with little heat removal will reduce the level of efficiency, and vice versa, excessive heat removal will lead to operational problems.
The concept of “efficiency” means how much energy released during combustion is transferred in the form of heat to the heated room. This characteristic is influenced by a number of factors:
- Serviceability and cleanliness of the stove.
- Type of fuel burned.
- Fuel burning mode.
- Heat transfer method.
- Heat supply efficiency.
- Availability of additional fuel attachments.
Stove serviceability
A significant decrease in the efficiency of the furnace occurs when it is used incorrectly. There are different ways to burn wood, and if you burn it incorrectly, heat energy will be lost.
The soot deposited on the walls of the heat exchanger is an excellent heat insulator. To increase the efficiency of the furnace, you need to periodically, once every 2 months, clean all important parts from soot.
Attention! Soot in the furnace ducts and chimney can catch fire; do not allow deposits to accumulate in the heating system. Soot combustion is a common cause of fires!
The right fuel for your furnace
It is known that different types of wood produce different amounts of heat. You can increase the efficiency of your stove by using the right fuel. Hard types of wood - oak, acacia, ash - have a greater calorific value. In addition to density, an important characteristic is the moisture content of the firewood. Firewood with a moisture content of 15% is considered optimal, but such indicators can be achieved either by using a drying chamber, or by natural drying under a canopy for 2-3 years in ventilated stacks.
Optimal combustion modes
The fuel combustion mode is also important. There are different ways to burn fuel efficiently:
- In the mode of pyrolysis decomposition and afterburning of gases.
- In optimal fast combustion mode with sufficient oxygen access.
- Layered combustion of fuel from top to bottom.
Pyrolysis mode
When burning fuel in pyrolysis mode, the efficiency of the furnace increases due to the long combustion time. The firebox is divided into two chambers - a smoldering combustion chamber, where in a slow mode the firewood decomposes into pyrolysis combustible gases, and a gas afterburning chamber. Technically it looks like this:
- Firewood is placed in the firebox; initially, combustion occurs in a hot mode with the supply of a large amount of air. This stage is necessary to create a fire cushion on the wood, as well as to warm up the chimney and the secondary afterburning chamber.
- The firebox door closes. The air supply is set to a minimum - so that there is enough for smoldering. Firewood decomposes into smoky pyrolysis gases, which pass through a hot afterburning chamber.
- The second chamber has secondary air ducts. They are aimed at a catalyst - a massive red-hot ceramic or metal object. In some furnaces, the wall of the secondary chamber acts as a catalyst.
- Relatively cold pyrolysis gases, passing through the catalyst, are heated, mixed with air and burned.
This ensures complete combustion of the wood. The efficiency of pyrolysis combustion plants can reach 85 - 90%.
Disadvantages of this method of burning wood:
- Difficulty in realizing optimal combustion.
- Impossibility of altering existing fireboxes.
- Cold gases in the chimney turn into condensation, which floods the chimney.
Advantages of this combustion method:
- Duration of work on one tab. In Buleryan stoves, one bookmark is enough to burn for 5 - 8 hours.
- With the correct design of the firebox, the efficiency is high.
- Constancy of generated energy.
Forced combustion
The rapid combustion of firewood in a firebox with a sufficient amount of air will be optimal only if there is a large heat exchanger that can quickly store and retain a large amount of heat. In this case, it is ideal to use water as a coolant, and a large insulated tank as a heat accumulator.
To burn a large amount of fuel in an optimal manner, you will need an ash chamber and a grate. They can be organized in any existing firebox made of two metal plates or bricks. Installing an ash pan in a ready-made firebox will reduce the volume, but will add combustion efficiency.
How it works:
- A large amount of fuel is immediately placed into the combustion chamber, which will burn throughout the entire mass from the bottom up.
- After kindling, the main door closes, the ash pan door opens, and the combustion is regulated.
- The flame should be smooth, hot, without jerks of detonation or pops. The color of the flame is straw with red or blue streaks.
- In this express mode, combustion continues until coals are formed. The ash pan door is closed, the firebox operates in slow mode.
Features of application:
- An oven with a grate can be converted into a hearth by covering the grate with a sheet of metal.
- Brick channels or a massive bell-shaped structure can provide good heat removal. An incorrect ratio between a powerful firebox and a small heat exchanger will lead to a significant amount of heat being “blown out” onto the street.
- You cannot use this mode if there is poor draft - this will lead to smoke inside the room.
- Not every firebox can withstand the heat of burning dry wood. Plain red brick or thin metal can burn or crumble. If possible, use this mode in fireboxes lined with fireclay bricks.
Gradual combustion of fuel
Fast mode with layer-by-layer combustion of wood can be achieved using special air supply systems. This solution is implemented in Stropuva long-burning boilers, but simple fireboxes are quite suitable for conversion.
One or more air ducts made of pipes are inserted into the firebox. Their purpose is to supply air to the combustion site. Air ducts run from the door to the top of the firebox. Slotted holes are cut in the vertical sections of the air ducts. The firebox works like this:
- Firewood is packed tightly into the firebox and can be sprinkled with sawdust or peat. Kindling made of paper and wood chips is lit on top of the bookmark. Until it flares up, the firebox operates in the mode of a conventional deck oven.
- When the kindling flares up, smoothly close the firebox opening with a sealing metal sheet. The sheet has holes for air ducts. The sheet must fit tightly to prevent air from entering the thickness of the fuel.
- The fuel burns using air from the duct. Combustion is optimal, but produces a small amount of heat.
- The fuel burns gradually, first of all burning out near the air duct. If the fuel is burned far from the tube, the air may not reach the combustion site. It is worthwhile to arrange several air ducts evenly, connected to one intake hole.
This combustion method has only one advantage - a long period of autonomous operation. Increased efficiency is achieved thanks to the gradual combustion mode; even a small heat exchanger is able to capture heat and transfer it to the room. This method is perfect for upgrading potbelly stoves and wood-burning boilers, but it is not suitable for brick stoves. An advantage will also be the ease of retrofitting existing fireboxes - anyone can design and manufacture air ducts and a sealing plate from pipes and sheet metal.
Disadvantages of this method of burning wood:
- Difficulty loading firewood.
- Difficulty of kindling.
- It’s difficult to control the intensity of the flame - you can’t open it and “look” at it. You will have to use indirect methods - a thermometer in the heat exchanger.
- Inability to “throw” firewood.
Efficiency of long-burning furnaces
The nature and method of heat removal depends on the design. The housing of the heating unit can be equipped with a protective screen. This device prevents the ignition of materials located nearby and significantly improves heat transfer. The result is excellent performance indicators. Thus, a long-burning pyrolysis potbelly stove has an efficiency of 90%.
In some cases, the installation of a long-burning stove at home involves a water pipe, which is directly connected to the liquid heating circuit of the house. When installing a long-burning stove, it is necessary to take into account that when it comes into contact with cold liquid, the body will inevitably cool down. Such contact negatively affects the pyrolysis process occurring inside.
To avoid heat loss, it is necessary to increase the performance of the heating element (which is technically difficult to achieve), or to place the water jacket at some distance from the body.
We build a furnace with high efficiency
Let's look at examples of building furnaces from scratch, in which the approach to increasing efficiency was brilliantly implemented.
Kuznetsov brick bell furnace
The efficiency of this furnace is increased by complete and hot combustion of fuel, secondary combustion of pyrolysis gases, free movement of gases, and a large heat exchange area. The large mass of bricks perfectly accumulates and retains heat. The bell-type design is popularly called “greedy” - the temperature of the exhaust gases is lower than that of conventional channel furnaces.
To build such a stove, you need to follow the following steps:
- We are preparing a stove project. Ready-made projects are freely available and can be modified to suit your needs.
- Preparation of tools and materials. A mason's hammer, a trowel, a level, a plumb line, an angle grinder with a diamond blade - you don't need anything else to build a brick kiln. We buy red stove bricks and refractory fireclay for lining the firebox. The temperature in the firebox can rise above 900 degrees, and the red brick may well crumble. It is better to choose cast iron doors, with seals and glass. Clay can be dug up in a nearby quarry and mixed with sand.
- We are preparing the foundation. To do this, we determine a place, dig a pit and fill it with rubble concrete. The upper level of the foundation should be 14-15 cm below the floor level. It is better to place the stove in the center of the house; be sure to calculate the passage of the chimney through the ceilings.
- We lay the first rows of the stove on cement mortar, the rest of the stove is placed on clay. We lay thermal insulation and waterproofing between the brick and the foundation. The first row is the most important; all planes of the oven will be oriented along its corners.
- We tie up the ash pan and side channels. We take into account the size of the doors for cleaning. If they are not there, we lay the brick on its edge, it will be knocked out.
- We cover the ash pan and lay the first row of fireclay. We place a cast iron grate under the firebox, under which a groove is selected in the brick with a gap of 1.5 cm.
- We line the firebox with refractory bricks. We provide a gap between the fireclay and the red brick. It is convenient to lay the packaging cardboard as a template. Fireclay is placed on fireproof mortal clay. When laying fireclay, a dry seam is made at the back wall - masonry without mortar with a gap of 1 cm. It is needed to facilitate kindling and access of secondary air.
- We lay out the walls of the furnace and make the moves. We install the door on anchor plates or wire.
- We close the firebox and form the first cap. We control the level of all horizontal and vertical planes. We rub the seams from the inside with a damp mitten.
- We lay out the second cap, cover it with two rows of bricks - a roof.
- We remove the chimney. It is best to use a straight brick pipe, lined and insulated with perlite.
- We dry the oven for 2 months with the cleaning doors open, and then put it back into operation with frequent but small fires. This is necessary to prevent the oven from cracking.
- To increase the efficiency of the heating system, a heat exchanger made of pipes can be installed in the first cap. The heat in the hood lasts for a long time, so the coolant will heat up inside the massive furnace for a long time and evenly.
Kuznetsov's bell-type stove is a bright representative of the principle of rapid combustion of wood, accumulation of heat in the stove mass and its gradual release from the heated walls by infrared into the room.
The Buleryan furnace is the leader in efficiency among metal furnaces
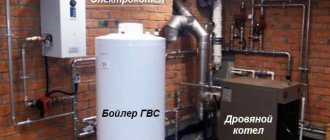
Long-burning metal stove "Buleryan". The high efficiency of this furnace is ensured by the pyrolysis combustion mode; the furnace of this furnace consists of dry pipes. The temperature of the gases leaving the air heaters does not exceed 150 - 200 degrees, the air does not burn out and does not dry out. If Buleryan is heated incorrectly, in a hot mode, its efficiency can be compared with any potbelly stove.
To build Buleryan we will need metalworking skills and the ability to make sealed welds. Accordingly, you will need a welding machine (preferably a semi-automatic MIG), an angle grinder, a plumbing and measuring tool. You will need a pipe bender to bend the pipes, but this can be replaced with a large lever.
- Materials for the stove are not difficult to find - you need 10 - 14 pieces of pipe for the frame, sheet metal, blanks for the door and hinges.
- The first step is to weld the frame from pipes bent according to a template. It turns out to be a kind of “chest”; the spaces between the “ribs” need to be hermetically sealed.
- A shelf of the secondary chamber is installed inside the resulting frame. We measure it using a cardboard template, bend it and weld it. After we weld the last ribs, secondary air tubes are laid.
- We dampen the ends of the resulting cylinder, remove the chimney from the afterburning chamber, and weld a round door at the front end. We seal the door joint with a lock filled with asbestos cord.
- We attach damper regulators to the chimney and air intake.
- The oven is ready for installation. When connecting, it is important to remember that the chimney can become very hot. A slow fire can lead to the formation of condensation, so it is better to use a lined stainless steel chimney.
The Buleryan stove is a prominent representative of long-burning calorific stoves without a heat accumulator, with rapid heat transfer to the air. It needs to be heated in pyrolysis mode, with minimal air supply.
Installation of long-burning stoves
Correct installation of a long-burning stove is associated with its correct operation and compliance with fire safety requirements. To install the stove correctly, the following rules must be observed:
- the distance to any flammable and combustible materials should not be less than 1 m;
- the location of the heating device should be as close as possible to the stationary chimney;
- the free space in front of the firebox must be more than 1.25 m;
How does it all work?
If you decide to build a long-burning boiler with your own hands, then you should not rush to begin work on its creation. First you need to find a drawing for the stove. There are plenty of them on the web. A diagram of the design of such an installation would also be useful. It will make the work of creating a furnace easier. In addition, before starting work, you need to watch a video on how to make a boiler with your own hands.
When creating a long-burning installation, steel pipes should be used as the main material. If they are not available, then you can choose pipes with a diameter of 30-40 cm. In this case, the minimum wall thickness should be 5 mm. If it is less, then during the operation of the metal it will quickly burn out, and then the installation will be unsuitable for further use. The height of the boiler must be at least 1 m.
The created boiler is divided into three parts:
- combustion zone - it is used to remove smoke and smoldering ash;
- combustion zone - it contains smoldering solid fuel;
- loading zone – it decreases in height, which is associated with the gradual burnout of the briquette.
In any scheme of a long-term combustion boiler there is such a component as an air distributor. The duration of combustion depends on it. It limits the area in which the combustion process occurs. The distributor looks like a disk made of sheet steel 4 mm thick. There is a pipe in its middle part. Air enters the combustion chamber through it.
So that as the fuel smolders in the furnace, it can freely fall inside the chamber, its size is made slightly smaller than the combustion chamber. To control the combustion zone, the distributor has an impeller, the height of which is 5 cm. As its height increases, its space will also increase, which will lead to an increase in the rate of firewood burning in the oven chamber.
The pipe through which air will flow must have a diameter of 6 cm. You can use either a solid pipe or a telescopic one. In this case, the holes in the distributor should not be larger than 2 cm. Otherwise, air will enter the oven chamber in large quantities, which will lead to oversaturation with oxygen. A damper should be installed at the top. It will allow you to regulate the draft in the furnace. You can connect a long-burning boiler to heating in one of two ways:
- a water heat exchanger pipe is passed through the combustion chamber. The water in the tank will be heated through a coil that is connected to this pipe;
- a chimney is passed through the remote tank. The smoke passes through it in a hot state, which leads to heating of the coolant.
Comparing these two methods, it should be noted that the first is noticeably simpler in its implementation, and the second provides high efficiency.
How to install long-burning stoves in the house
There are several ways to increase the security of your installation:
- applying plaster (layer up to 25 mm) to nearby objects, which will reduce the distance to them to 0.7 m;
- installation of a protective metal sheet up to 1 mm thick, or protection made of light insulating materials up to 7 mm thick;
- installation of brickwork up to 55 mm thick;
- the surface under the stove is protected either by brickwork (at least one brick) or by a metal sheet laid on a refractory material: the sheet must fit beyond the dimensions of the stove on all sides in plan.
Installation of long-burning stoves
Before installation, you should select a set of pipes for the chimney. There are two main types of installation: external and vertical.
With vertical installation, the sections are mounted inside the building, and the outlet is carried out through the roof. The pipe is aggregated into an existing brick channel. With the external method, the chimney is led along the outside of the building. Output to the street is carried out via a side outlet. In this option, the chimney must be insulated.
The installation of a long-burning stove in a wooden house should be carried out when the main door and window openings are equipped, i.e. after a clear understanding of the direction of cold air flows in the room. If the stove must heat several rooms, then an air duct system must be designed.
In order to properly heat a long-burning stove, it is necessary to take care of the fuel storage location. It is necessary to plan the working space in front of the heating device and think over ways to supply fuel.
Dutch oven
The design is one of the most popular. Some models are equipped with a hob and oven, which solves the problem of cooking, but the classic “Dutch” is used only for heating.
The duct-type firebox heats the walls perfectly. The smoke is discharged through a vertical channel, in which almost all of it burns. Although brick stoves for wood-burning homes are usually large in size, the same cannot be said about the Dutch stove, so it is optimally suited for comfortable heating of a private house - one or two floors. Outwardly, the Dutch woman resembles a column. The shape of the structure can be round, square or rectangular.
Advantages of a Dutch woman:
- After long breaks, you can start firing the stove at full power.
- A small structure can heat a house of 70 square meters. m.
- Economical. Low material consumption. The installation price is lower, as well as saving space.
- The design has thin walls, so it warms up quickly.
Classic “Dutch” stoves take up less space, but they are used only for heating the house Source ar.decoratex.biz
Disadvantages:
- The efficiency is no more than 40%.
- You should not forget about cleaning the stove from ash, as well as soot for normal draft.
- The most effective mode is smoldering. This design is often called a long-burning furnace.
- After heating, you need to close the view, otherwise the stove will quickly cool down.
This equipment can be used to heat small houses that have 2 floors or an attic floor.
Russian stove
It is large in size and multifunctional, and also has smoke channels and an open firebox. It is sometimes closed with a flap. The equipment may have a hob.
In addition to heating the room, this design allows you to cook food and dry clothes.
The efficiency is maximum 60%. In winter, the stove must not be allowed to cool down, so it should be fired regularly. If the structure cools down, condensation may occur. The brick becomes saturated with moisture, and upon subsequent cooling it freezes and cracks.
In summer, you can use the oven in summer mode for cooking. In this case, the smoke is directed directly into the chimney using a damper, and the body of the structure does not heat up.
Modern Russian stove with a stove bench in a wooden house Source yandex.ru
Advantages:
- With timely heating, a comfortable microclimate and temperature are created in the house.
- Multifunctional design.
- A brick stove for a summer house decorates the room.
Flaws:
- High installation cost due to the large volume of bricks.
- Due to the large weight and size, it is necessary to build a solid foundation.
- Low efficiency.
- The ducts and chimney must be cleaned regularly.
Such equipment is suitable for year-round use.
See also: Contacts of construction companies that offer installation services for fireplaces and stoves.
Swedish oven
The stove has a universal design and is designed primarily for efficient operation in small areas. The standard “Swedish” is equipped with an oven, hob, and niches for drying things. Some Swedes have a couch and a fireplace.
The principle of operation of a Swedish stove is approximately the same as that of a bell-type stove - combustion of flue gases occurs under the arch of the firebox.
Design advantages:
- The room heats up very quickly.
- Possibility of cooking both on the hob and in the oven.
- Almost complete combustion of fuel.
- Thanks to the design of the channels, the lower part of the equipment is heated, and, consequently, the floors are slightly heated.
- A heat exchanger can be installed in the design to heat water.
The Swedish brick stove has its own characteristics, but it copes well with heating the house Source mauro-gianvanni.ru
Cons:
- To prevent heat loss through the floor, it is necessary to install high-quality thermal insulation.
- For the installation of heated elements, fireclay bricks are used, which have a higher cost.
- Experts recommend leaving the stove always warm in winter. Firing a cold stove can lead to deterioration of the masonry.
Bell furnace
One of the modern designs is such a stove. The equipment heats up well and retains heat for a long time. The design does not have small winding channels, therefore, they are not so susceptible to soot settling.
The principle of operation of a bell-type furnace: smoke rises from the firebox, then remains there until it cools. And then it begins to descend along the walls of the chimney, thus heating it. Such designs are effective because they can have several caps.
Advantages:
- Low cost of material and installation. Simplicity of design.
- You can install a heat exchanger and a hob.
- Heats up quickly even after completely cooling.
- The gas view prevents reverse draft. This is why the oven cannot cool down when the damper is open.
Modern hand-made stoves provide the ability to heat several rooms in the house at once Source mauro-gianvanni.ru
Such a stove can have several hoods, and, therefore, it will be possible to heat 2 floors and several rooms. It is difficult to identify any shortcomings, which is why the bell-type model is popular among homeowners.
Comparison of long-burning stoves
It does not matter of fundamental importance whether a long-burning stove is installed in the house or a factory-made one. Any device must meet a number of mandatory requirements. The following is fundamental:
- fire safety of the structure;
- The burning time of a long-burning stove should be at least 5-7 hours.
A comparison of long-burning furnaces shows that the design must contain afterburning channels (nozzles) that ensure smoldering of the fuel. The location of the channels is not important. They can be at the bottom, in the middle or at the top of the firebox. Some manufacturers hide the location of the jets.
The next comparison parameter is the volume of the firebox and the dimensions of the firebox door. The larger they are, the greater the amount of fuel that fits into one stash. It is important to have glass in the door. It's always nice to look at the fire.
It is worth considering the availability of design solutions that extend the service life and increase the efficiency of long-burning stoves (for example, a flame arrester protecting the chimney).
What is the advantage of a long-burning stove?
Any person who starts assembling a long-burning stove sets himself the main task: to make with his own hands something that will work efficiently with minimal consumption of materials and fuel. It is worth noting that most ready-made stoves of this type have an efficiency much lower than home-made models.
An ordinary factory stove is distinguished by the fact that the fuel in it burns very quickly, so the room quickly heats up and then quickly cools down if more fuel is not added to it. This is extremely inconvenient and irrational.
There is also an alternative on sale: these are stoves that run on solid fuel, which can delay the combustion process and, accordingly, insulate the room for a longer period. Such designs operate on coal, firewood and all kinds of waste. However, such a finished unit is not cheap and has such disadvantages as:
- low efficiency;
- lack of automatic fuel loading;
- the need for regular bookmarking.
All of the above does not apply to long-burning stoves. Thus, one load of fuel can ensure the operation of the structure for approximately 18 hours due to the fact that in the firebox, over time, combustion is replaced by smoldering, and in this case automatic fuel filling is no longer needed. In addition, the design can be thought out in such a way that sawdust or wood chips can be used as fuel, rather than whole firewood.
What to consider before assembling a long-burning stove
Please note that building a long-burning stove with your own hands is a dusty and noisy job, so think carefully about the place where the work will be done. In addition, ensure that there is a source of electricity at this location, since electric welding will be required
The tools for work should be prepared as follows:
- Metal barrel 200 l.
- Two pieces of steel pipe, one larger, the other smaller.
- Metal channel.
- Hacksaw, steel hammer, axe, mallet.
- Tape measure or answer for measurements.
- High quality red brick (about 50 pieces).
- Reflector (if available).
- A set of electrodes and a welding machine.
- Sheet steel.
- Construction mixture or materials for preparing mortar for laying bricks.
Algorithm for assembling a homemade long-burning stove
The assembly of this unit consists of the following steps:
- Prepare a metal barrel: cut off its top with a grinder and leave it for later. If there is no barrel, you can take a large diameter pipe section.
- Weld a bottom from a piece of round steel sheet to the section.
- We cut out another circle of steel with a diameter slightly smaller than the barrel or pipe, and in it there is another one for a small pipe of about 12 cm. The pipe section is welded to the steel circle.
- Weld channels to the bottom of the circle, measuring them so that they can fit freely in the pipe. These will then be applied to fuel pressure based on burnout.
- The length of the welded pipe must exceed the height of the main part by 10 cm.
- Let's start with the upper part of the structure: take the part of the barrel that was initially cut off and cut a hole in it for a small diameter pipe.
- Cut out the hatch for storing fuel; then a door will be welded to it, which can be purchased ready-made or made yourself. A handle needs to be welded to the door so that it can be opened comfortably.
- Install another smaller door below to make it possible to dispose of fuel waste.
Preparing the foundation and constructing a chimney for the stove
To install a furnace, a solid foundation is required, since the furnace metal will become very hot during operation. It is strictly forbidden to install it on fragile or insufficiently fire-resistant material.
It is not worth doing deepening, since the specific gravity of the structure is not very large. You need to fill the slab, laid next to one brick, with a special solution or mixture.
Now let's move on to the issue of installing a chimney. It is needed so that combustion products quickly evaporate from the room into the atmosphere. To construct it, you can take a metal pipe with a 15-centimeter diameter. It should be welded to the top or sides of the stove structure.
Then it is bent, but not more than 40 degrees. In general, you need to make sure that there are as few knees as possible before leaving the room.
Sometimes it is necessary to install a reflector, especially for small rooms. Thanks to them, heat flows will be redistributed and regulate uniform heating of the entire room.
There is no need to cover the stove with bricks if it is located in a boiler room or other utility room where children do not have access. If it is installed in full view of everyone, then it is better to do the cladding for safety reasons.
Liquid fuel designs
When considering various design options, it is worth remembering about a long-burning furnace that runs on technical oils. The stove operates by burning oil vapor. The burning time is comparable to solid fuel designs and ranges from 12 to 20 hours per refill. It is economically profitable to use such units where there is a large volume of mining. The disadvantages include the need for frequent cleaning of chimneys, or the need to pre-clean the oil.
What is the difference between a homemade stove and a purchased one?
The pyrolysis process is implemented in different designs, and the choice of manufacturing a stove for a greenhouse is a decisive moment that affects its profitability. So, despite all the attractiveness of heating devices made of bricks (they act as energy accumulators, releasing the heat accumulated during the day at night), it is very difficult to build them with your own hands - it is not for nothing that good stove makers have always been valued in villages.
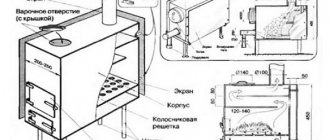
Stoves with metal bodies are much easier to install. For the pyrolysis version of the “potbelly stove”, any round container made of metal with a thickness of 4–6 mm is usually used - it is easy to ensure smooth operation of the gas distributor. However, homemade craftsmen also adapt available materials for their own purposes - old barrels, gas cylinders, rectangular metal boxes, etc.
Heating stove using sawdust from a barrel
In addition to the shell material, long-burning boilers are classified according to the type of fuel used - liquid or solid.
Indeed, there are devices that can even operate on used oil, and their installation is quite simple. But there is a nuance that significantly limits their use, namely, the explosion hazard of such a furnace - the slightest ingress of moisture into the firebox with hot oil will lead to instant ignition.
Waste oil furnace diagram
This is in fact a highly efficient and easy-to-use unit, but from the point of view of manufacturing “on the knee”, its design is complex and requires precise adherence to dimensions and proportions, as well as a large number of welds and the quality of their connection.
And finally, the last of the do-it-yourself long-burning stoves suitable for greenhouses is quite quick, it can be adapted to any fuel, and it burns for a very long time. In addition, there are no strict restrictions on sizes - for assembly you can use what you have on hand.
At first glance, a homemade long-burning stove differs from a purchased one only in price, but in reality everything is more complicated. In factory models, everything is thought out to the smallest detail, so if you do not have experience in this area, it is better not to take risks and purchase a finished product. This way you will protect yourself from possible metal burnout, poor chimney draft and other unpleasant problems that will only complicate the process of operating the finished stove.
Moreover, the parts at hand are not always highly compatible, so you should not count on the fact that different elements of a homemade device will be able to fit together well. However, if you have already prepared the necessary tools and materials, and also have experience in welding, it is worth trying to make a stove yourself, especially since using the diagram of the finished product, there will be no difficulties in inventing a fireplace during testing.
