In a private house, the heating system is different from that installed in apartment buildings. This may sound funny, but systems in private homes are much more complex in design. After all, they can include both heated floors and radiators with a large number of connections. Air pressure testing of the heating system is carried out only after final installation. In order to perform this work, you need to use special equipment - automatic or manual. If one is available, then there will be no difficulties. But when pumping air or liquid into the system, it is necessary to take into account the fact that the time intervals are specified in the standards.
Pressure testing - what is it?
Pressure testing of an air heating system in a private house is necessary in order to check the tightness of all connections. Once you have completed all the installation work, you need to carry out testing and commissioning. But if leaks are detected, the system must not be used. Pressure testing is a test of a heating system by pumping air or liquid into it under pressure that will be approximately twice the operating pressure.
In private households, you need to carefully check all the circuits of radiators, heated floors, as well as connections. It is imperative to pay due attention to boilers, electric pumps, and water heating boilers, if any are included in the system design. The requirements for crimp testing will be discussed later in our article.
Using pressure testing, you can determine the ability of all elements and materials to withstand high pressure for a long time. If the tests are completed successfully, you can begin operating the equipment. If not, then defects are eliminated and diagnostics are repeated.
What is pressure testing of heating and water supply systems?
Heating and water supply are two systems consisting of a large number of varied equipment. As you know, the performance of any multicomponent system is determined by the weakest element - if it fails, it stops completely or partially. To identify all weak points, pressure testing of heating and water supply is carried out. In simple terms, the pressure deliberately rises much higher than the working one, pumping liquid. This is done using special equipment; the pressure is controlled using a pressure gauge. The second name for crimping is hydraulic testing. It's probably clear why.
Heating pressure testing is carried out after any repair or before the heating season
When a heating system is pressure tested, the pressure is increased by 25-80% depending on the type of pipes, radiators, and other equipment. It is clear that such a test reveals all the weak points - everything that does not have a safety margin breaks, leaks appear in worn pipes and unreliable connections. Having eliminated all identified problems, we ensure the functionality of our heating or water supply for some time.
If we are talking about centralized heating, then pressure testing is usually carried out immediately after the end of the season. In this case, there is a decent period of time for repairs. But this is not the only case when such events are held. Pressure testing still takes place after repairs or replacement of any element. In principle, this is understandable - we need to check how reliable the new equipment and connections are. For example, you soldered heating from polypropylene pipes. We need to check how high quality the connections are. This can be done using crimping.
If we talk about autonomous systems in private houses or apartments, then a new or repaired water supply is usually checked simply by turning on the water, although even here a strength test would not hurt. But it is advisable to test the heating “to its fullest”, both before commissioning and after repairs. Keep in mind that those pipelines that are hidden in walls, floors or suspended ceilings must be tested before they are closed. Otherwise, if during testing it turns out that there are leaks there, you will have to disassemble/break everything and fix the problems. Few people will be happy about this.
When is crimping done?
All work is carried out strictly in accordance with SNIP-41-01-2003, which clearly indicates when, and by what methods, pressure testing of the heating system is carried out. In the same document you will find everything about the requirements for ventilation and air conditioning. There are three cases when testing is required:
- Primary crimping - performed immediately after completion of installation work. Diagnostics are carried out before the pipes are sealed into grooves. The underfloor heating system must also be accessible - it cannot be filled before crimping. It should be noted that it is allowed to re-diagnosis all circuits after making the screed and sealing. In this case, you can get rid of troubles.
- Periodic hydrotests must be carried out every year before the start of the heating season and immediately after it. The purpose of the test is to pre-prepare the heating network for operation.
- Extraordinary tests should be carried out after each repair or long equipment downtime. Diagnostics is especially important in cases where water is drained from the system.
In all of the above cases, crimp testing will be a means that will allow you to diagnose the system and identify in advance all problem areas in the equipment. After all, if a leak appears, heating will not be very effective in the cold season.
Work rules
Now let's talk about what requirements exist for the pressure testing procedure for an air heating system. All diagnostic work must be carried out in the warm season. It is possible to test heating at sub-zero temperatures, but only in emergency cases. In this case, the temperature inside the room must be maintained above +5 degrees.
Tests can be considered successful if:
- During the diagnostics, you did not detect any fogging of seams, leaks in radiators, pipes, boilers, fittings, or other devices.
- The pressure drop during 5 minutes of diagnosis is no more than 0.2 bar.
- In the case of panel heating, the pressure reading on the pressure gauge did not drop by more than 0.1 bar in 15 minutes.
- A drop of no more than 0.5 bar per 10 minutes is allowed in hot water systems using metal pipes.
- As for plastic pipes, a fall is allowed within half an hour, but not more than 0.6 bar. Over the next two hours, the drop should not exceed 0.2 bar.
- If tests are carried out with compressed air on panel and steam heating, the pressure must not decrease by more than 0.1 bar in the first 5 minutes.
Carrying out preparatory work before crimping
Each heating system maintains a working pressure that ensures movement along the coolant circuit necessary to heat the pipes and radiators, which, in turn, heat the air in the room surrounding them. The force of the working pressure must be sufficient to raise the coolant to the required height (for more details: “Working pressure in the heating system - standards and tests”). This leads to the conclusion that taller buildings require a higher system pressure.
Before performing pressure testing of the heating system, it should be noted that when pressure testing with air, or pneumatic pressure testing, the operating pressure should exceed the norm by 40-50%. The increase in pressure in the system is associated with the ongoing hydraulic processes on the way of the coolant to the building from the main line.
The procedure for pressure testing a heating system begins with preparatory work, which includes the following steps:
- Checking shut-off valves (for example, valves) in each section of the system
- Checking the tightness, which can be ensured by sealing the required areas with oil seals
- Inspection and, if necessary, repair of elements intended for pipeline insulation
- Disconnecting the building in which the circuit is being pressure tested using a plug from the general heating system
Next, the drain valve, located on the “return”, is prepared for further filling of the pipes with tap water.
When filling the heating system with water, it is necessary to close the valves and taps and leave the vents open. How to perform pressure testing of a collector heating system, detailed video:
Diagnostic methods
In total, according to SNIP-41-01-2003, two methods can be distinguished by which it is allowed to test the heating system:
- Water testing is the main method by which all circuits are tested. In this case, water should be pumped into the lower part of the pipes through a tap. It is possible to pump liquid using both automatic and manual pressure testing pumps. The advantage of this method is that it is very simple to complete all the work, and the efficiency of leak detection is high. The fact is that traces of liquid will immediately appear on the pipes.
- Testing with air is not a very effective method, since it is quite difficult to detect leaks. But it is permissible to use this technique at subzero temperatures – the air will not freeze. A compressor is used to force air into the system. It is connected using an adapter to the pipeline. In order to find the leak, you need to listen. Once you find the approximate location of the leak, use a soap solution.
Test pressure
According to SNIP 3-05-01-85, which was replaced in 2003, pressure testing must be carried out according to the rules. When carrying out work in apartment buildings, it is necessary to:
- The pressure was more than 1 mPa (that's 10 bar) - for hot water supply systems and heating circuits with heaters.
- At least 10 bar for panel and convector heating systems.
- At least 6 bar for circuits in which radiators made of stamped steel or cast iron are installed.
- The pressure for hot water supply must be greater than the working one and another 5 bar on top (but cannot exceed 10 bar).
If panel heating and heat exchangers are used, the pressure should not have a pressure greater than the maximum permissible for the devices. If you are testing air in a steam or panel heating system, you need to check the pipes that fit into the ventilation equipment. The air should have a pressure of 1 bar.
Test procedure
According to the rules for the technical operation of thermal appliances, tests should be carried out in the following sequence:
- The circuit is filled with water using a pressure tester. The temperature of the liquid should be about 45 degrees. The air must be vented through special vents.
- Next, water is pumped under pressure for at least 10 minutes. During this time, you need to visually inspect all seams, pipe joints, connections of all equipment, and fittings.
- Afterwards, the pressure can be brought to maximum pressure and maintained for 10 minutes. If the pipes are made of polymer materials, then the tests should be carried out for at least half an hour.
- If the pressure does not change during the tests, then we can judge that there are completely no defects.
You can complete the tests and begin directly operating the equipment.
Crimping process
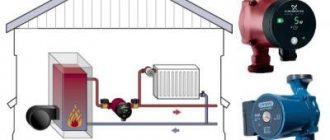
Pressure testing of heating systems in a private home begins with disconnecting the heating boiler, automatic air vents and expansion tank from the system. If there are shut-off valves leading to this equipment, you can close them, but if the valves turn out to be faulty, the expansion tank will definitely fail, and the boiler will fail, depending on the pressure that you apply to it. Therefore, it is better to remove the expansion tank, especially since this is not difficult to do, but in the case of a boiler, you will have to rely on the serviceability of the taps. If there are thermostats on the radiators, it is also advisable to remove them - they are not designed for high pressure.
Sometimes not all heating is tested, but only some part. If possible, it is cut off using shut-off valves or temporary jumpers are installed - surges.
There are two important points: pressure testing can be carried out at an air temperature not lower than +5°C, the system is filled with water with a temperature not higher than +45°C.
The following is the process:
- If the system has been in operation, the coolant is drained.
- A crimping machine is connected to the system. A hose extends from it, ending with a union nut. This hose is connected to the system in any suitable place, even in the place of the removed expansion tank or instead of the drain valve.
- Water is poured into the container of the pressure testing pump and pumped into the system using the pump.
The device is connected to any available input - on the supply or return pipeline - it doesn’t matter
Before increasing the pressure, all air must be removed from the system. To do this, you can bleed the system a little with the drain valve open or drain it through air vents on the radiators (Mayevsky valves). The system is brought to operating pressure and held for at least 10 minutes. During this time, all remaining air is released. The pressure is raised to the test pressure and maintained for a certain period of time (regulated by the Ministry of Energy standards). During the test, all devices and connections are checked. They are inspected for leaks. Moreover, even a slightly damp connection is considered a leak (fogging also needs to be eliminated). During crimping, the pressure level is monitored. If during the test its fall does not exceed the norm (as specified in SNiP), the system is considered to be in good working order. If the pressure drops even slightly below normal, you need to look for a leak, fix it, then start pressure testing again.
As already mentioned, the testing pressure depends on the type of equipment and system being tested (heating or hot water supply). The recommendations of the Ministry of Energy set out in the “Rules for the technical operation of thermal power plants” (clause 9.2.13) are summarized in a table for ease of use.
Type of equipment tested
What testing tool is needed?
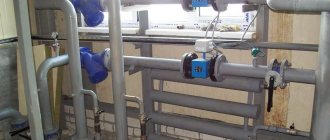
Now let's talk about what crimping equipment is used during the work. To perform hydraulic tests, you need to use specially designed pumps (they are called pressure testers). You can find two modifications - electric and manual.
Hand pumps are a cuvette in the shape of a rectangle; water is poured into it, which is then pumped into the heating system. A plunger-type pump is placed on its side, with a handle on top of it. It is with its help that the pump plunger is driven. There are pressure gauges on the body, with their help the pressure of the liquid pumped into the system is controlled. One shut-off valve allows water to be shut off after pumping into the pipes is completed. The second valve allows liquid to be drained from the tank.
Plunger pumps operate on the same principle as simple piston pumps, which are used to inflate bicycle or car inner tubes. But there is also a difference - the plunger pump design has a cylindrical steel piston that moves in the housing with minimal clearance. It is with this that it is possible to pump liquid into the heating system at a pressure of up to 60 bar.
The main disadvantage of manual mechanisms is that it takes a long time to carry out crimping work. Moreover, the test time depends on the length of the heating circuits. Sometimes it takes several hours to completely fill. Imagine how much strength you will expend to pull the handle.
It is with the aim of reducing costs and automating the process that electric pumps are used by specialists. They work on the same principle as manual ones, only muscle power is replaced by an electric drive. Automatic systems are good because you can set the required level of discharge pressure. Once it is reached, all equipment is turned off.
Automatic devices can pump liquid at a pressure of 40-100 bar. But there are also industrial designs that are capable of creating pressure up to 1000 bar.
Please note that the Ministry of Energy sets requirements according to which it is necessary to use only spring-type pressure gauges for control; their accuracy class must be 1.5. The circumference of the housing must be more than 160 mm. The scale must be designed to measure pressure, the value of which is at least 4/3 of the minimum, the division value is less than 0.1 bar.
Types of testing and crimping of the system
As we were able to find out, if the tightness of the heating system is broken, heat transfer is significantly reduced. And the most important thing is that the working fluid is lost and it has to be constantly added. The standards that we discussed above must be taken into account when servicing heating systems by utilities and government organizations. As for private houses, it is not at all necessary to adhere to, for example, SNIP 3-05-01-85.
Crimping must be carried out after the work has been handed over to the customer. Tests must be carried out before commissioning. In the future, it is recommended to repeat the tests every 5 years. When pressurizing a heating system with air, what pressure should be maintained? As in the case of the liquid method, you need to double the operating pressure.
To carry out diagnostics, you do not need to have special knowledge and skills, so anyone can perform it. There is no point in purchasing an electric or manual unit, since the most primitive one will cost you at least $100. If you wish, you can rent a device; in large cities, this opportunity is often provided by individuals or companies.
If you don’t want to take risks and conduct tests yourself, you can hire specialists. Upon completion of the procedure, they will issue you with a heating system pressure test certificate, which will indicate how and under what conditions the work was carried out. But the cost of the services of such specialists is quite high - you will have to pay about 2,000 rubles for each hour.
Tests in apartment buildings
In apartment buildings, pressure testing of the heating system with air can also be carried out. We will now consider the necessary conditions for carrying out the work. If you find water leaks, they need to be repaired. But often, without high pressure in the system, it is quite difficult to find thin cracks in the seams. In apartment buildings, it is necessary to carry out pressure testing of both individual apartments and all highways.
You need to prepare:
- Inspect all locking hardware. If the valves are made of cast iron, then be sure to replace the seals on them. Replace gaskets on flange connections. All bolts that have lost their original appearance must also be replaced. Be sure to install new pressure gauges; it is recommended to send the old ones for verification to decide whether they can continue to be used for measurements.
- Visually inspect all pipes and fittings to identify even minor defects and damage. If you find problem areas, you need to quickly repair them.
- Check the condition of the thermal insulation material on the lines laid in the basement and between floors.
After preparation, you can begin to carry out the actual crimping work:
- Fill the entire circuit with low-hardness water (to prevent scale from appearing). It is better to pump it into the system, of course, with an electric pump. Pressure - 6-10 bar. You need to lower the drain and supply hoses into the container with the liquid. Next, connect the pump to the heating network and turn on the pressure tester. It is necessary to set the pressure in advance.
- Time it for half an hour - during this period the pressure should remain almost the same level. If the pressure does not drop, the test can be considered completed. You can fill the system with working fluid and begin active operation.
- If the pressure drops, then there are defects in the heating system. The procedure for pressure testing a heating system with air is approximately the same, but you will have to use a soap solution - without it it is difficult to find a leak. Once you find the defects, you can begin draining the system and making repairs. Afterwards, you perform a re-diagnosis of the entire heating system.
The input unit is carried out similarly - the pressure should be about 10 bar.
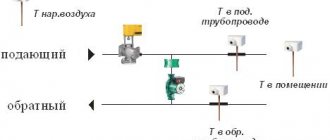
Diagram of pressure testing of an air heating system
Pressure testing of heating system with air
The crimping procedure is carried out either with water or air. The latter option is preferred in the cold season to eliminate the possibility of water freezing in the system if any defect occurs in it.
The technology for performing air crimping is quite simple. In any place convenient for you in the heating system (HC), a compressor is connected, which pumps air into the heating radiators and system lines. Its pressure rises to a predetermined value. After which the change in pressure is controlled by a pressure gauge.
In cases where the work is done efficiently, the pressure in the system does not drop over time.
Pressure testing of the heating system with air is performed in a certain sequence.
First, you need to completely drain the water from the system.
Next, you need to cover and seal the selected area of CO that is subject to subsequent monitoring. That is, the branch to be pressure tested is completely cut off from the central water conduit.
This procedure is performed using existing shut-off valves (valves or taps) located at the end and beginning of the section.
Before starting this stage of work, certain preparatory measures should be completed. Namely:
- Carry out a thorough inspection of all shut-off valves;
- If necessary, add oil seals to ensure complete sealing;
- Restore pipe insulation where necessary.
It is necessary to connect a compressor to the controlled area, the power of which is selected taking into account the internal volumes of the tested area.
Then it is necessary to create excess pressure in this area, the value of which should be no less than two to three times higher than the operating pressure specified for the CO. (That is, at an operating pressure of up to 2 atmospheres, the pressure in the system when pressurizing it with air must be brought to at least 5 atmospheres).
As a rule, the compressor is connected either to the CO drain valve or to one of the radiators, having previously unscrewed the Mayevsky valve (heating system air bleeder) from it and replaced it with an adapter that allows the compressor hose to be attached.
Compressor connection
Next, all connections in the system are checked for leaks (lack of tightness of the assembly). In this case, it is necessary to look at ALL connections, not only detachable ones, but also soldered ones (if the CO is assembled from propylene pipes).
In cases where crimping is carried out with air, all connections should be pre-coated with a soap solution. If this procedure is performed with water, then leaks will become noticeable even without it.
To summarize the above, we can say: That the crimping control process goes like this:
- We pump in air. In heating radiators and CO lines, it must reach a given pressure, the value of which is controlled by a pressure gauge;
- When the required pressure is reached, turn off the compressor;
- We fix the initial pressure and leave the line for a day (minimum control time - 8 hours);
- After the time has elapsed, we compare the values of the primary and actual pressure. If there is no difference, the work is done efficiently and the system is sealed. Otherwise, searching for the leak location and making modifications is required.
After performing pressure testing, you should leave the lines under excess pressure for a day (24 hours). During this time, all possible leaks will appear. It should also be taken into account that due to daily temperature changes, the pressure in the CO will partially drop, as the air cools and contracts.
The pressure level in the system is controlled by a pressure gauge, which must be connected to the system through a check valve. Otherwise, you will not be able to see any results.
Having completed the testing of the quality of crimping, we move on to the next section. And so on until the entire system is fully checked.
After completing the pressure test, the air must be removed. It should not remain in the heating system. It is filled with coolant and a test run of CO is carried out.
If noise appears in the lines when the boiler heats up, it means that there are air pockets in the system. It is necessary to bleed the air again.
Materials and equipment for work
The main tool for crimping pipes is:
- Crimping machines (manual and automatic);
- Air pressure gauge;
- Swedish Key No. 2;
- Gas key No. 2;
- Bayonet screwdriver No. 2;
- Consumables (sealing and gaskets).
Carrying out tests in private homes
It is worth noting that in autonomous heating networks, which are used in private homes, the pressure is usually no more than 2 bar. Therefore, in order to carry out tests, it is necessary to pump liquid into the system at a pressure of 3.5-4 bar. It is allowed to use both air and hydraulic methods of crimping.
Sequence of testing work:
- First, drain the coolant and pump pressurized water into the heating system circuit. It is imperative to add additives that are used when flushing the system. The circuit is filled with water through a pipe located at the bottom.
- Before washing, the filters must be thoroughly cleaned. It is recommended to carry out washing at least once a year.
- Next, drain the flushing fluid and fill the system with clean fluid. You can skip this step if you let the washing liquid cool to 45 degrees. After this, you need to use a pressure testing device to pump in more water to bring its pressure to 4 bar.
- If you use a manual pressure tester, then fill its tank with liquid, then connect it to the drain pipe of the heating system circuit. Next you need to open the taps and pump in water. This is done simply - you need to raise and lower the handle of the device. As soon as the required pressure is reached, close all valves.
- Leave the entire system filled for about half an hour and carefully monitor the pressure. If there is a drop of less than 0.2 bar over a period of 30 minutes, we can say there are no leaks. If the pressure drop is too large, then the defects need to be found and eliminated.
Remember that it is imperative to comply with the permissible pressure standards when performing pressure testing. It should also be noted that there is a high probability of leaks occurring inside the walls. In this case, you will need a thermal radiation meter. Only he is able to determine the presence of hot liquid leaks in the walls or under the floor.
Some may ask the question: “What pressure should be maintained when pressurizing a heating system with air?” Air is not a liquid, so it is allowed to pump about 2 bar into a system whose length is no more than 10 meters. But it all depends on the specific heating system, its length and volume. If it is relatively small, then the test pressure can be reduced.
Rules for pressure testing of an apartment building
Federal Law of July 27, 2010 N 190-FZ (as amended on July 29, 2017) “On Heat Supply” (as amended and supplemented, entered into force on August 10, 2017)
Article 20. Checking readiness for the heating season
1. The following are subject to verification of readiness for the heating period:
1) municipalities;
2) heat supply organizations and heating network organizations;
3) thermal energy consumers whose heat-consuming installations are connected (technologically connected) to the heat supply system.
(as amended by Federal Law dated December 30, 2012 N 318-FZ)
2. Checking the readiness of municipalities for the heating season and investigating the causes of emergencies during heat supply are carried out by the federal executive body authorized to carry out federal state energy supervision. Checking the readiness of heat supply organizations, heating network organizations and consumers of thermal energy for the heating period is carried out by local government bodies, and in heat supply price zones by local government bodies together with a single heat supply organization. Investigation of the causes of emergency situations during heat supply is carried out in the manner established by the Government of the Russian Federation.
(as amended by Federal Laws dated December 1, 2014 N 404-FZ, dated November 28, 2015 N 357-FZ, dated May 1, 2016 N 132-FZ, dated July 29, 2017 N 279-FZ)
3. Checking readiness for the heating period is carried out by the bodies specified in Part 2 of this article in accordance with the rules for assessing readiness for the heating period, which are approved by the federal executive body authorized to implement state policy in the field of heat supply, and which, in particular, establish categories of thermal energy consumers subject to this inspection, requirements for these consumers and criteria for the reliability of their heat supply, taking into account climatic conditions, requirements for heat network organizations, heat supply organizations on their taking measures to ensure the reliability of heat supply to consumers.
4. Checking the readiness of municipalities for the heating period is carried out, in particular, in order to determine the availability of an action plan to eliminate the consequences of emergency situations using electronic modeling of emergency situations, a monitoring system for the condition of the heat supply system, and a mechanism for operational dispatch control in the heat supply system.
5. Checking the readiness of heat supply organizations and heating network organizations for the heating period is carried out in order to determine the compliance of heat energy sources and heating networks with the requirements established by the rules for assessing readiness for the heating period, the existence of an agreement on the management of the heat supply system, the readiness of these organizations to fulfill the heat load schedule, maintain temperature schedule approved by the heat supply scheme, compliance with heat supply reliability criteria established by technical regulations, and thermal energy sources also in order to confirm the availability of standard fuel reserves. Heat supply organizations and heating network organizations are also required to:
1) ensure the functioning of operational, dispatch and emergency services;
2) organize the adjustment of heating networks belonging to them;
3) monitor thermal energy consumption modes;
4) ensure the quality of coolants;
5) organize commercial accounting of purchased thermal energy and sold thermal energy;
6) ensure verification of the quality of construction of heating networks belonging to them;
7) ensure trouble-free operation of heat supply facilities;
 ensure reliable heat supply to consumers.
6. Checking the readiness of thermal energy consumers for the heating period is carried out in order to determine their compliance with the requirements established by the rules for assessing readiness for the heating period, including the readiness of their heat-consuming installations for operation, as well as in order to determine their readiness to ensure the regime specified in the heat supply agreement consumption, absence of debt for supplied thermal energy (power), coolant, organization of commercial accounting of thermal energy, coolant.