The first thing you need to do is decide on the circuit diagram for supplying coolant to the battery. Since aluminum radiators are produced in sectional and panel types, it should be noted that they are connected in exactly the same way.
Aluminum radiator
Types of systems
- Single-pipe system - one pipeline is installed through which the heat source is supplied and the waste liquid is discharged. It is better to use in cases where a small number of batteries are installed. This is usually done when heating apartments where the riser runs in all rooms. With this scheme, each subsequent radiator will be colder than the previous one, but the number of pipes running through the room is reduced.
- A two-pipe system is the best method of design, making it possible to maintain a uniform temperature of the heating fluid throughout the entire circuit. When installing such systems, the supply line is usually located under the window sill level, and the return line above the baseboard.
We will consider below how best to connect heating radiators in one case or another, after we analyze each connection method separately.
- Lateral - with this method, the supply and return flow are supplied from one side. Works well with heating structures with up to 15 sections;
- Diagonal - best used on long heating elements. Communications are connected to the top hole on one side and the diagonally opposite outlet.
- The lower one is the least effective option; it requires high pressure in the coolant along the entire length of the heating structures. To maintain heat transfer, heaters with an increased number of sections are used. To ensure normal temperature in private homes, it is used only if there is a sufficient power pump in the heating system.
Installation standards for aluminum heating radiators
The installation of heating radiators is best left to professionals. This way you can avoid the negative consequences of self-installation and system breakdown.
When installing, you should be guided by the current SNIPs:
- distance from radiators to wall 2 -5 cm;
- distance from floor to radiator 10 -12 cm;
- distance to window sill 10 cm.
Aluminum radiators are mounted on the wall using the brackets included in the kit.
First, holes are drilled in the places of intended installation with a hammer drill and spacer dowels are driven in. The device should be mounted securely, eliminating the possibility of it sagging or tilting .
Heating pipes are a kind of blood vessels of the entire system. Therefore, their choice should be approached responsibly and based on the conditions of their subsequent operation. They can be divided into:
- steel;
- polypropylene pipes;
- metal-plastic pipes;
- copper pipes.
The main advantages of steel pipes are durability, resistance to water hammer and pressure surges. However, steel pipes are difficult to install, they quickly become clogged and are susceptible to corrosion.
Polypropylene pipes have taken a good position in application. They are not subject to corrosion, do not become clogged, their chemical composition does not change over time, and their service life reaches 50 years.
Reinforced polypropylene pipes are used for heating . A special welding machine is used to weld them, so the installation of the entire system can be completed fairly quickly. From an economic point of view, this is the most profitable option.
Metal-plastic pipes are also widely used. They have a long service life, are flexible and bend easily during installation.
Copper pipes are an excellent heating material. They have the longest service life. They are not subject to corrosion or clogging and conduct heat well. However, the cost of copper pipes is very high, so they are not used so often and their choice is approached after weighing the pros and cons.
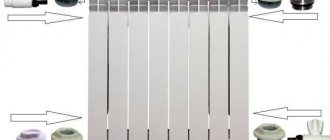
Recently, manufacturers of modern aluminum radiators have begun to supply ready-made connection kits measuring 1/2 and 3/4 inches when purchasing them. They include: adapters with right and left threads, 2 pieces each, an air bleeder, a plug, as well as brackets and dowels for attaching the radiator. All plugs and adapters have hex sides to allow them to be held with a wrench.
It happens that when we connect the heating system, we do not receive the desired heat. Let's consider what can become an obstacle to space heating:
- location of radiators - when installing, it is important to be guided by SNIPs;
- pipes in the heating system - it is important to use pipes designed for appropriate pressure and intended for heating.
Attention! Do not use water pipes for heating.
- accessories for radiators - it is necessary to install thermostats on each radiator, this way you can control the temperature in the house;
- thick curtains covering the radiator.
General rules for installing radiators
The battery is attached to the wall with special brackets. It can be installed openly, which is most optimal, recessed into a niche or covered with decorative finishing elements. When deciding how to properly install an aluminum heating radiator, you need to take into account that when closing the heat source, a loss of up to 30% of power is possible. Having made this choice, it is better to lengthen the heating devices through additional sections.
Any connection method will use three of the four radiator holes. Close the unused channel with a plug.
The two connection points to the system will act as input and output. On the third, always the top one, you need to connect the Mayevsky valve, through which air is removed after filling the system with coolant.
According to the design standards establishing how to correctly determine the connection location of an aluminum heating radiator, the following dimensions must be maintained:
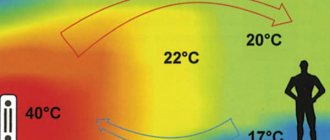
- There should be a free space of at least 10 cm between the top of the radiator and the window sill. If the distance is made smaller, the rising warm air will heat the window sill rather than heat the room.
- The gap between the floor and the heater should not exceed 12 cm. As this gap increases, the heating of the lower part of the room deteriorates.
- You need to retreat from the wall to a distance exceeding 2 cm. At a shorter distance, the free upward flow of warm air masses behind the sections is impossible, as a result, thermal energy will go into the wall.
Often people, without thinking about where and how to properly connect a heating radiator in an apartment or other room, reduce the efficiency of this device. In this case, losses will account for a considerable part of the precious heat.
- Installation under an element protruding from the wall by 3 - 5 cm - about 4%.
- Placement in an open niche - up to 7%.
- Partially closing with a grill - up to 15%.
- By installing the grill over the entire area of the heated parts - up to 30%.
For lateral and diagonal connections, it is better to arrange the entrance through the top channel. When the coolant is supplied from below, the heating efficiency decreases by up to 15%.
The top plane of the battery must be in a horizontal position.
Trying to follow the conditions for how to most correctly and conveniently connect heating radiators, do not forget to use a supply tap that has a digital or dot scale on the adjustment handle. The presence of this option will allow you to easily set the amount of incoming liquid.
When assembling the connections of the coolant supply and discharge pipelines with outlets to the radiator and at the connection points of heating kits, taps should be used that allow you to disconnect the battery from the system if it is necessary to repair or replace it. This mechanism is called “American”.
The laying of pipes connecting the radiator to the system is carried out after installing the sections.
When choosing how to properly connect heating radiators, we will consider each combination of the type of system and method of connecting the heaters.
Installation diagrams
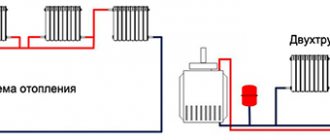
Aluminum radiators are suitable for both two-pipe and single-pipe wiring. In the first case, the connection of the supply pipe and the outlet pipe occurs in parallel; they are independent of each other and are connected through the final device of the heating system.
With single-pipe wiring, the coolant passes through one pipe sequentially through all radiators, gradually cooling down.
There are several schemes for connecting aluminum devices:
- diagonal;
- lateral;
- lower.
All schemes differ from each other not only in the installation method, but also in the quality of heat transfer.
Diagonal
The most effective and common installation method is a diagonal connection (heat loss is no more than 2%). The method is well suited for radiators with a large number of sections. The supply pipeline is connected to one of the upper pipes. The outlet pipe is connected to the bottom one on the opposite side.
This piping method is used mainly for two-pipe heating systems, because with a one-pipe system the coolant noticeably loses heat as it passes through each radiator.
The disadvantage of such a connection lies in its aesthetic unattractiveness, since the pipes run along the upper edge of the heating devices.
Lateral (unilateral)
The scheme is similar to a diagonal connection: the hot water supply pipe is on top, the outlet pipe is on the bottom, but the installation is made to pipes located on one side. It is important not to mix up the pipes or swap them.
This method is more often used in multi-storey buildings with small radiators. It is not suitable for devices with more than 15 sections, since with a larger number, the far (opposite to the connection point) side of the unit does not heat up well.
Lower
This connection is made to the pipes located at the bottom of the heating device. This installation scheme allows you to hide the heating system pipes under the floor, which is beneficial from a design point of view.
But the heat transfer with such an installation is much lower (about 15% less than the rated power of the radiator).
Single pipe system, side method
One-pipe system, side method.
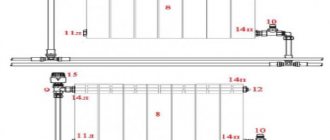
- Two tees are installed on the supply line. The opposite terminals are oriented along the pipe, and the side ones towards the battery. Their locations are selected in such a way that they correspond to the inlet and return outlets.
- The American type valves described above are mounted on the tees.
- The outlet from the shut-off device located on the coolant inflow side is connected to the battery inlet.
- A pipe is laid from the outlet to the remaining tap.
Review of aluminum battery manufacturers
Today, many models of aluminum radiators from different manufacturers are sold on the market. Therefore, you can easily select the aluminum heating radiators that best suit your technical parameters, external design and financial capabilities.
You can purchase the desired model on the market, in a specialized store. Aluminum heating radiators are also sold via the Internet. The advantage of such a purchase is that it saves time. If you have any questions regarding the parameters of the equipment, you can ask them to an online consultant or call the phone number listed on the website and chat with the manager.
It should be noted that for heating radiators, prices for aluminum, steel or cast iron models in the online store are usually lower than the market average. Therefore, many people prefer to order heating devices online.
Both imported and domestic products are available for sale. Naturally, prices for domestically produced aluminum heating radiators are lower than for foreign analogues. But this does not affect the quality of the product. Since many modern domestic batteries are produced using Italian technology. Among domestic manufacturers, it is necessary to highlight the companies Rifar and Thermal. They produce durable aluminum heating devices at reasonable prices.
Since Italian aluminum heating radiators have always been famous for the highest quality, they are very popular on the market, despite their high cost. Here we should note the products of Fondital, Sira and Global. These companies also produce bimetallic heating radiators. Hungarian-made heating devices are also popular. True, they are inferior in quality to Italian models. Good aluminum batteries are produced by the Hungarian company NAMI.
One-pipe system, bottom method
- On the riser, as close to the floor as possible, two tees are mounted in series, and locking devices are installed on both.
- From the tap of the supply side of the pipe, a branch is laid along the floor or lower part of the wall to the nearest lower inlet of the heater.
- As close as possible to the supply outlet, the far lower opening of the sections is connected to the return flow valve.
The three previous methods are acceptable only if the distance from the supply pipeline is short. For this reason, professionals use them to solve the problem of how to connect a heating radiator in an apartment where risers run through each room.
Adding sections to an aluminum radiator
If you need to add several sections to the device, the question arises of how to connect aluminum radiators. To do this, the previously installed battery must be dismantled and placed on a floor covered with film, with the outer side facing you.
You can add heating radiator sections as follows:
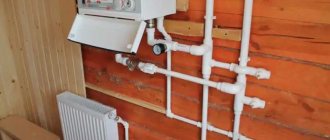
Installation and piping of a heating boiler in a private house
- We remove the plugs from the ends of the collector outlets.
- We put a rubber gasket on one side of the nipple without thread.
- After this, insert the nipple into the manifold and tighten it.
- Now we connect the section that we plan to add to the other side of the nipple. Use a wrench to tighten the connector. During this process, both sides will be tightened at the same time because each side has opposite threads. Tighten the connection as tightly as possible.
- We check how tightly the sections are connected. For this purpose, you need to pour slightly colored water into the device and wait several hours.
Advice! To avoid distortions of the device, we tighten the nipples on the lower and upper manifold by the same number of turns. To do this, they need to be counted during rotation.
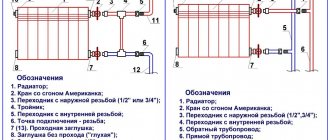
Two-pipe system, side method
- Choose a convenient place on the supply pipe, preferably as close as possible to the radiator, on its outer side (to the left or to the right) for installing the tee. When determining the position of the tee, you should take into account the need to turn the tap in the direction of the entrance to the battery using an angle.
- A valve is mounted on the tee, as in the one-pipe system.
- From this tap a connection is made to the upper inlet channel of the radiator.
- The lower hole on the connection side of the sections, which in this case will serve as an outlet, is connected to the return flow pipeline according to the same principle. For the aesthetic component of the design, it is advisable to observe the analogy of a mirror image of the supply part of the circuit.
DIY installation and connection of heating radiators
The installation or reconstruction of a heating system involves the installation or replacement of heating devices. The good news is that, if you wish, you can handle this yourself without the involvement of specialists. How heating radiators should be installed, where and how to place them, what is needed to carry out the work - all this is in the article.
It is possible to install heating radiators with your own hands
Two-pipe system, bottom method
Two-pipe system, bottom method
- The supply and return pipelines are laid above the baseboard, along the floor or under it.
- The outlet through which the coolant flows is connected to any of the lower holes of the set of sections. The procedure for performing the work is the same as in the two previous options.
- A return flow of liquid is mounted on the lower opposite channel. The mirror principle with respect to the incoming pipes is observed.
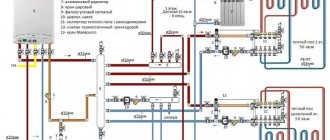
Heating system diagram
All other things being equal, a two-pipe system is more efficient, but it is also more complex and expensive. It makes sense to use it in a room with a large number of rooms.
Heating system diagram
Next, you need to mark the place where the radiator will be installed. To ensure normal air supply to the battery, it is necessary that it be at least 15 cm from the floor surface and at least 5 cm from the wall. Batteries are usually placed near windows, in areas free of furniture.
When choosing fittings for the battery, it is imperative to provide for the presence of a control valve, which will allow you to both “slow down”, avoiding excessive heat, and completely turn off the heating if necessary.
Boiling water under high pressure is a serious matter, it doesn’t like jokes, so it’s better to do everything right right away. Battery packaging is the process of assembling the battery from purchased sections and connecting the fittings. For packaging, in addition to naturally the battery sections, you will need a set of fittings, sealing flax, investment paste and a torque wrench. Under no circumstances should this useful tool be neglected: all connections must be tightened strictly to the torque specified in the documentation. If you don't tighten it enough, you'll end up with a geyser in your apartment; if you tighten it too much, you'll break the thread.
The control valve will help control the temperature
When packing, you need to connect taps to the battery depending on the chosen battery connection diagram - one-sided, diagonal, or bottom. Close the unused holes with a blind plug; do not forget to install a Mayevsky valve on one of the side holes to bleed air from the aluminum radiator. All joints are sealed with flax and investment paste.
The pipe is installed on brackets at a height corresponding to the above conditions. It is better to install the battery at a slight angle relative to the plane of the wall, this will prevent “airing”. The installed aluminum radiator is connected to the heating system by pipe fittings.
Heating is a high-risk system. When deciding to repair elements of the heating system yourself (especially in an apartment in an apartment building), you take on considerable responsibility. If in doubt, it is better to contact professionals.
READ How to install jailbreak on ipad
Important
In order not to violate the calculated order of how to connect aluminum heating radiators, two conditions must be met.
- When arranging the outlet from the supply line to the battery and the outlet of the return flow, it is imperative to use pipes with the cross-sectional area specified by the section manufacturer.
- The diameter of the main supply and return pipelines must be at least twice the diameter of the branches.
In most cases, the heated liquid is supplied through mains from above. But sometimes, especially in buildings from the middle of the last century, this order can be violated. Before starting work, check the direction of the coolant supply with your local operating authority.
Radiator selection
You should start by choosing a radiator, and the main criterion for choosing will be the operating pressure for which the radiator is designed. For a private house with its own heating system, a radiator with a working pressure of 6-7 atmospheres will be sufficient, but if you need to connect a radiator to the central heating system of an apartment building, it must withstand a pressure of at least 10 atmospheres.
Currently, the consumer is offered two options for aluminum radiators - standard or European and reinforced. The latter can operate under pressure reaching 12 atmospheres. When connecting to a central heating system, you must choose among reinforced radiators.
The number of sections plays a big role
Next you need to decide on the required number of sections. To do this, we determine the amount of heat. Necessary for heating the room and divide by the heat transfer of one section of the selected radiator.
The amount of heat required for a standard room can be taken equal to 1 kW per 10 m 2 of room area. For non-standard premises and more accurate calculations, we will use a ready-made table:
Radiator power table
It should be remembered that the connection diagram for a battery of more than 12 sections must be double-sided, diagonal or saddle. With a one-sided battery connection scheme consisting of a large number of sections, a “pocket” of cold water will form on the side of the radiator opposite the pipes. “Extra” sections simply won’t work; we end up with harmful ballast.
Using forced injection, the battery can be expanded to 24 sections, even with one-way supply, but the radiator in this case must be reinforced.
It should be remembered that coolant must be supplied to reinforced radiators under high pressure only through metal pipes. Metal-plastic may not withstand such pressure, and the consequences will be the most dire.
It should also be taken into account that the heat transfer of the radiator indicated in the documentation is relevant only for one-sided or diagonal supply of coolant to the radiator. When using bottom feed, feel free to subtract 10-15 percent.
If the heating system is installed in a private house, then it is possible to choose the general heating arrangement yourself - one- or two-pipe.
Removing air from radiators
When the system is filled, air accumulates in the upper corner of the battery not used for connection, which must be removed. To do this, you need to place a liquid container under the pre-installed Mayevsky tap and open this device.
After waiting until the output stream is smooth, without splashing or air bubbles, the tap should be closed. After this, go to the next battery in the chain and perform the same actions.
It is required to start from the radiator located first on the supply pipe. After finishing the round, go around the second circle, check that all the air has been removed. If necessary, duplicate the entire process several times.
Now, knowing how best to connect heating radiators in an apartment or house and paying attention to each stage of work, it is not difficult to provide the desired warmth and comfort in your home.
If you do not have sufficient experience in construction work, lack tools or confidence in your abilities, it is better to entrust such a responsible task to professionals.
What are the criteria for choosing radiators for an apartment?
When the weaknesses of central heating are already known, you can imagine what criteria good batteries should meet:
- For radiators, the pressure declared by the manufacturer must be greater than the pressure in the heating system. Let's look at the numbers as an example. In five-story buildings of the old layout, this indicator is no more than 5-8 atmospheres. Modern multi-storey buildings are heated under pressure up to 15 atmospheres;
- We will separately highlight the ability to resist water hammer. Because it is difficult to protect yourself from pressure changes when you are in an apartment, it is better to prevent this in advance. By the way, if you often hear noise and humming in the batteries, it is better to contact your utility service, as this may be causing problems with the pressure;
- The water quality in the old system is poor, so the batteries must adequately withstand its chemical attack without deforming. It is necessary to install radiators with a special coating on the inside or chemically neutral material for the walls. Their thickness should be such that sand particles and small stones do not rub it;
- When choosing suitable radiators for an apartment, it is important to remember their main function - to heat. It is better to choose radiators with high heat output;
- The appearance of the radiators also plays a role. It’s unlikely that anyone will like the old and scary cast-iron appliances of incomprehensible shape that used to stand in every corner. Batteries should look harmonious in the apartment;
- lifetime. There is nothing to comment here. The less time you have to bother with installing these large and expensive devices, the more profitable it is for the owners.
We recommend: What characteristics are used to choose autonomous heating batteries?
General installation recommendations
Installation of aluminum radiators is usually carried out in the warm season. Before purchasing batteries, you need to calculate how many of them you will need. To do this, multiply the area of the room by 100 W and divide by the energy output of a separate section (indicated in the product passport). The resulting number indicates the number of sections required for the given area.
Types and configuration of aluminum radiators
Standard aluminum batteries are usually installed in a heating system with a low permitted coolant pressure (up to 18 atmospheres). These indicators are characteristic of autonomous systems in low-rise buildings, where water hammer and pressure testing with critical water pressure are excluded.
Attention! During operation, hydrogen accumulates in aluminum radiators. It is periodically vented through the air vent, otherwise sooner or later the battery will burst. You cannot test for hydrogen with a lit match.
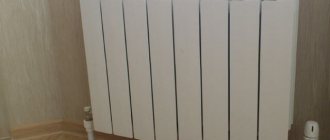
Reinforced aluminum heating devices can withstand pressures of up to 25 atmospheres. Such products can be used in a central heating system. It is possible to increase the reinforced battery up to 12 sections, subject to artificial circulation - up to 24 sections.
Reinforced aluminum radiator
Accessories (plugs, gaskets, valves, brackets, ball valves) are supplied in a package with the radiator. Shut-off valves for temperature control are also sold separately. With its help, they not only adjust the temperature in the room, but also shut off the radiator for repair or replacement.
Basic components are supplied with the device
Aluminum radiator pipes
The pipes to which aluminum batteries are connected must have a special anti-corrosion layer. If this is a local system, then the batteries are connected to it with metal-plastic pipes. It is better to connect to the centralized heating network through steel pipes.
The device must be placed on the wall in accordance with SNIP standards:
Following these directions will ensure proper circulation of warm air.
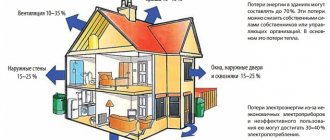
Heat loss for different installations of heating devices