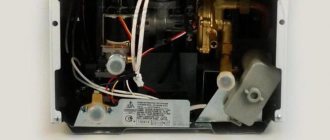
A gas water heater or gas heater is a metal body with two pipes attached to it, supplying cold water for heating and gas.
A gas water heater has several components:
- Radiator;
- Gas supply pipe;
- Burner;
- Igniter.
Cold water supplied through the pipe puts pressure on the membrane that releases the gas. When it begins to flow into the burner, it is ignited by the igniter, which heats the heat exchanger, through which warm water flows to the tap.
The igniter can be with piezoelectric, manual or electronic ignition. The gas is automatically ignited when the water tap is opened.
Main types of faults
You can fix a malfunction in a gas water heater by turning to specialists for help or doing it yourself. But still, when working with such equipment, it is necessary to know the safety measures, as well as their strict adherence.
IMPORTANT! Otherwise, independent repair of a gas water heater is fraught with HUMAN SACRIFICES.
List of breakdowns found in geysers:
- The igniter does not light;
- The pilot light goes out;
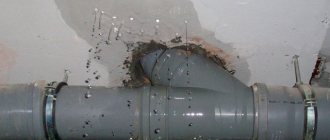
- There is a pipe leaking in the radiator;
- Water is leaking at the connections.
There are two main reasons why a gas water heater leaks. Failure is determined by elimination. Where exactly the fault is located is indicated by the localization of the liquid. The fact that the gearbox has failed will be indicated by water flowing from below. If condensation appears in the column, the heat exchanger (gas column radiator) is faulty.
The most common breakdowns:
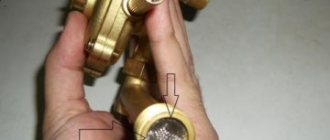
- A reducer or water block is a device that sends a signal to open the gas valve and then to ignite. From the inside, the gearbox looks like a hollow structure, divided in two by a membrane. When water is supplied to the reducer, pressure arises, from which the membrane wears out over time, leading to malfunctions. When liquid drips from the column's safety valve, this means that the membrane is blocking water access, but due to wear, the barrier disappears.
- Another sign of a problem with the membrane is a leaking water unit. Such a breakdown can also be caused by failure of the rod sealing gasket.
At first, during operation, only a few drops of water are released; over time, the flow in the gas water heater becomes more and more intense. Microcracks or corrosion in the radiator appear due to constant exposure to fire. As a result, the copper or steel pipes of the coil burn out. In this case, condensation first accumulates on the internal components and the housing. Leak points are indicated by a change in the color of the copper - it turns green.
First of all, if water is flowing from a gas water heater, you need to check the places to which the pipes are connected. This will prevent leaks due to failure of gaskets and loose threaded connections.
Preparation for soldering
Prepare the tools you will need for your work:
- Soldering iron (at least 100 W).
- Metal brush or fine sandpaper.
- Solder. It is recommended to take an alloy of tin and lead.
- Flux. You can take rosin or small crumbs of aspirin tablets. The latter should be sprinkled onto the heated place so that it spreads.
Now you need to prepare the column. To determine the location of the leak, do not rush to turn off the water. Do this:
- Remove the casing from the device (you may need to unscrew the bolts).
- Turn on the water supply and inspect the heat exchanger for leaks.
- If you need to weld a copper tube on a bend in an accessible place, you do not have to remove the column.
- If the fistula is located in a hard-to-reach place, you need to dismantle the body and disassemble it.
- Turn off the gas supply.
- Drain the water. To do this, open the hot stream and remove the nut from the cold pipe.
- The latest models have a plug on the bottom. Place the container and open the cap. The water will drain on its own.
Important! Before starting repairs, the radiator must be completely dried with a compressor or vacuum cleaner. Otherwise, moisture will not allow the fistula to heal.
Now use sandpaper or a brush to clean the damaged area. Often in such places a green spot is visible. Do not use too much force to avoid damaging the tube further. Finally, wipe the stripped part with a degreaser.
Repairing leaks
A visual inspection allows you to detect leaks. To do this, you need to remove the casing, which is secured with bolts or latches. Before carrying out work, you will need to turn off the water and gas supplies. But if water drips from the gas water heater only during operation, then you need to turn on the water heating for a few seconds.
Once the reason why the column is leaking has been identified, you can begin to fix the problem:
- On average, the membrane lasts from five to eight years. To eliminate the leak, you need to change the gaskets on the rod and replace the worn membrane with a new one (for which you will need to remove the “frog” and disassemble its body).
- Gaskets on threaded and other connections last from two to four years. Replacing all gaskets eliminates the leak. A leaking hose cannot be repaired and must be replaced with a new one. The use of sealants or special silicone compounds significantly improves sealing.
Regular maintenance of the gas water heater, including replacement of all seals, prevents leaks. You can clean up leaks at threaded connections with your own hands.
Troubleshooting problems that appear in the membrane requires understanding the operating principle of the water unit and having the skills to maintain such equipment.
The sequence of actions during repairs depends on the equipment model and manufacturer. The Neva, Ariston, Bosch, Oasis or semi-automatic geyser have their own design features and their own segment, which is most susceptible to failure during operation.
Heat exchanger repair procedure
If traces of leaks are found inside the structure, then the problem is much more serious. A leak can form from a copper radiator in a household gas water heater, which can be caused by deformation of the tubes. It can also appear due to malfunctions in the operation of the water unit, which is typical for automatic geysers. Such a violation indicates a malfunction of the gearbox, which can cause the column to completely fail.
Hard water from the city water supply, improper connection (grounding), and frequent overheating of the column contribute to the fact that scale begins to form on the walls of the heat exchanger pipes. The material of the radiators is not particularly durable, so fistulas quickly appear on the surface of the pipeline and heat exchanger.
Owners of modern geysers very often encounter this problem. This is due to the fact that such devices use thin copper, often of low quality. To correct the problem, you can perform ordinary soldering at the site of the fistula.
Stage #1 - draining water from the radiator
It is worth noting that you cannot immediately proceed to soldering. First, you should make sure that the dispenser is disconnected from the gas and electricity supplies.
It must also be disconnected from the water supply and the heat exchanger, which contains a sufficient amount of coolant, must be completely emptied. If this simple precaution is neglected, the incoming heat will be constantly removed due to the liquid.
If a situation arises when the treated section of the heat exchanger does not heat up to the required value, then it should be opened to drain the hot liquid
It is not possible to remove all the liquid from the heat exchanger using a tap. Therefore, you should unscrew the nut that is placed on the pipeline. Now all that remains is to get rid of the leftovers. For this purpose, you can use an ordinary vacuum cleaner or compressor, or you can also manually circulate air using a garden hose.
Stage #2 - soldering copper pipes
When the heat exchanger has been completely emptied, you can begin soldering. But how to properly solder a heat exchanger in a gas water heater in places where fistulas form? This is quite easy to do, since the whole process is well established. If you have never done this, we recommend that you read the instructions for soldering copper tubes.
First, you should take a fine-grain emery cloth and work it over the required area. Cleaning the fistula should be carried out until there are no oxides left. It is not difficult to determine their location, since such copper has a greenish tint.
After cleaning is completed, rub the desired area with a cloth soaked in cleaning agent. Now you can proceed directly to tinning. To do this, everyone individually selects solders for themselves. You can also take the advice of professionals who recommend using POS-61. All that remains is to take a soldering iron with a power of 0.1 kW and rosin as a flux.
If rosin is not available, you can use aspirin. It is sold at the pharmacy. It will be effective in situations where it is necessary to work with a problem area that cannot be completely cleaned.
In the case when the solder does not flow, but becomes loose, it is necessary to additionally warm up the point that is being soldered. To do this, you can use a very weak 0.04 kW soldering iron or a hair dryer
When soldering is done on the heat exchanger of the gas column in the required place, evenly distributing the layer of solder over the area, it is necessary to increase the thickness of the homogeneous mass to 2-3 mm. Thus, the fistula will completely close and will not appear again.
In addition to the main part of the heat exchanger, the entire pipeline must be inspected. Green oxidation can also occur on copper tubing. If this problem is not corrected, then in the future it will lead to the inevitable appearance of microcracks.
It is worth noting that soldering is possible even if the smallest problem points and areas are detected. It is necessary to immediately tinning and soldering these places. If this is not done, then possible problems will arise every few months.
Soldering should be done even where it is impossible to reach. In this case, you should remove the radiator and disassemble it to get to the problem area.
Stage #3 - searching for defects after soldering
It is not always possible to detect all possible defects during a visual inspection. Even sandpaper treatment does not always give the desired result. In this case, special diagnostics, which are performed under pressure, can help.
To do this, apply a water jet inside the radiator assembly. You can use a rubber shower hose that bends well. One side of the hose should be connected to the water supply channel. The second edge is with the radiator tube. All that remains is to close one of the edges of the tube with a shut-off valve.
When searching for defects using tap water, a marker should be prepared. Use it to mark problem areas that are visually impossible to notice.
Now you need to turn on the faucet that feeds the water heater. During this procedure, it is important to carefully monitor the heat exchanger and all tubes. If there are barely noticeable cracks on the surface, they will immediately become visible. Water droplets will form where they are detected. The remaining areas will be dry.
In this way, it will be possible to detect all problem areas that require repair and solder them. At the same time, you can flush the radiator, ridding it of scale.
If there is a lot of damage, or the pipe material is too thin and cannot be soldered, then it will not be possible to do without large financial investments. In such a situation, you will have to purchase and install a new heat exchanger. And if the model you need is quite expensive, then you may have to think about choosing and buying a new speaker.
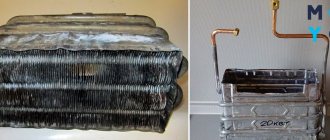
Radiator leak
Hot water appears thanks to the existing heat exchanger. The heat exchanger radiator consists of metal pipes and plates located close to each other. The plates come into direct contact with the fire, due to which soot appears on them during operation.
Signs of soot accumulation include:
- The flame is yellow;
- When burning, the fire deviates to the side and heats the body (the flame should tend upward);
- Soot falls off the gas water heater;
- Even when operating at full power, the water heats up weakly.
To remove soot, you will need to remove the casing by unscrewing the bolts (latches) that secure it.
Important! To prevent soot from entering during disassembly of the column, it is necessary to cover the burner with a rag.
After the assembly is removed, it must be washed by placing it in a container with water for several hours to loosen the soot. This will make it easier to clean the space between the heat exchanger plates. For quality cleaning, it is recommended to use running water, a long-bristled brush and detergents. After drying, the radiator is put in place.
Green spots on the heat exchanger indicate existing cracks and holes.
If the geyser is leaking due to a failure of the heat exchanger radiator, then the actions should be as follows:
- The water supply pipes must be shut off to prevent water from entering the gas water heater. After which the hoses are disconnected and the remaining water is drained. The remaining liquid in the coil is removed with a pump or vacuum cleaner; you can try blowing the water out with your mouth using a hose. This must be done, since the remaining moisture absorbs heat during the soldering process, and it will not be possible to heat the metal to the desired temperature.
- Damaged areas (they are green) will need to be cleaned with sandpaper and degreased with a solvent, and then wiped dry.
- Crushed rosin or an aspirin tablet should be sprinkled on the work surface. Rosin and aspirin will serve as solder here.
- Using a soldering iron with a power of at least 100 W (since they will have to work at temperatures above 180 degrees), it is necessary to increase the solder to a height of approximately two millimeters. If the soldering is loose, this means that the working surface is not heated enough. You can additionally heat the soldering area with an iron or another soldering iron.
- Each through-hole fault will need to be soldered in a similar manner.
- After the soldering work is completed, you need to wait until the working surface has completely cooled and assemble the gas water heater.
- Before full operation, the equipment is started in test mode.
How to check for leaks
After soldering the geysers, you need to check the tightness of all pipes.
To do this, they are carefully examined to see even the smallest fistulas - their presence is indicated by small green spots. To avoid re-disassembling the column in the near future, these defects are also cleaned and soldered. After this, you need to connect water to the gas water heater with a soldered heat exchanger and open the tap.
Water is supplied slowly and gradually so that it displaces the air from the column. Once the entire heating system has been filled, the tap can be opened to full capacity. In this way, the strength of soldering joints is checked under maximum water pressure. At the same time, the soldered joints are re-inspected for water leaks.
At the very end, the boiler with a gas water heater is turned on to check its performance when in contact with hot water. In this case, the soldered areas can be wiped with a dry cloth to detect the slightest signs of moisture.
Leakage of threaded connections
Sometimes water drips from the gas water heater due to leaking threaded connections. In the places where they are located, manufacturers use American nuts (flare nuts).
To seal them, rubber gaskets are used, which, when exposed to high temperatures, lose their elasticity, become hard and allow water to pass through.
To troubleshoot you will need:
- Turn off the water (there is a special tap on the tube through which cold water is supplied to the column);
- Unscrew the threaded connection with an adjustable wrench (it will be easier to unscrew if the connection is slightly heated);
- Take out the old rubber gasket and carefully inspect the threads.
If the thread is not damaged, then you just need to replace the gasket with a new one and tighten the connection with a wrench. If there are defects on the American thread, the union nut will need to be replaced.
The best option would be modern silicone gaskets. They are more durable than rubber seals and provide better sealing. Instead of one gasket, you can use two in one place of the threaded connection.
Technical reasons for column leakage
There are two main failures that lead to leaks. The malfunction is determined by the method of exclusion. The breakdown is indicated by the localization of the appearance of liquid. So, if water flows from below, most likely the malfunction is associated with a failure of the gearbox. When condensation appears, the breakdown is associated with the heat exchanger. Below is a description of common problems:
- The malfunction of the water unit is a gearbox, a simple control device that sends a signal to open the gas valve and to the ignition unit. Inside, the “frog” is a hollow structure divided in half by a membrane. When water is supplied to the reducer, pressure is applied to the diaphragm, which in turn leads to the movement of the rod connected to the gas valve. The membrane fails due to prolonged pressure and mechanical stress. Signs of a breakthrough:
- water drips from the safety valve of the gas water heater - the membrane blocks the access of liquid, but the barrier disappears after damage or wear of the gasket;
Pipeline leak
In some cases, the geyser leaks as a result of the formation of holes in the copper pipes. A thorough inspection of the heat exchanger when the water is turned off will allow you to find the location of the leak. Liquid leaks from large holes, minor damage is detected by rust around it and green spots.
What to do to fix the leak:
- Cold welding. It is important that the welding compound used can withstand high temperatures. Similar information can be found on the packaging of the product. You will need to remove a piece of cold welding from the packaging, knead it with your hands (wearing gloves) until it begins to harden. Then apply the composition to the pipe and smooth it until it hardens completely.
- Soldering holes. You can eliminate the reason why the gas water heater is leaking by soldering the damaged area. It will first need to be cleaned, degreased and coated with flux. Using a powerful soldering iron or torch, it is necessary to cover the damage on the pipe with solder (the solder layer should be approximately 1-2 millimeters thick). It is recommended to solder several holes located close to each other with a piece of copper plate. It is not advisable to solder Chinese inexpensive heat exchangers, since very often they are painted on top. In this case, paint is used by manufacturers to hide the uneven color of low-quality copper (it contains impurities). In this case, the tubes burn out during the soldering process because they are too thin.
- Installing a clamp with a rubber gasket. The simplest way to eliminate a leak without damaging the structure. This measure is especially effective if the tube does not fit tightly to the casing and if there is enough space.
In some cases, it is possible to discover the reason why the column is leaking too late and the pipe manages to rot to such an extent that only its replacement can save the situation. Finding the right part is not easy even in specialized stores. Using a flexible water line or a corrugated stainless steel hose instead of a rotten tube will help solve the problem.
It is easy to replace a worn rod o-ring yourself, as well as rubber gaskets. It is quite possible to fix a leak in a gas water heater yourself; no special skills or knowledge are required. But still, when repairing such equipment, you should not forget about safety. If you do not have confidence in your own abilities, then it is advisable to seek help from specialists.
How to fix a leak?
Having discovered the cause of the leak, you can begin to eliminate it. Our further actions will depend on which part of the gas water column is the source of the leak.
Radiator leak
The fact that there is a crack or hole in the radiator is indicated by the presence of green spots on this part. The procedure for eliminating a leak in the radiator will be as follows:
- We shut off the water pipes to prevent water from entering the column. Disconnect the water supply hoses from the column. Drain the remaining water from the radiator. To remove liquid from the coil, use a vacuum cleaner or pump.
- Armed with sandpaper, we clean the damaged areas. Then we treat these areas with a degreasing solution and wipe them dry.
- We take a soldering iron with solder, which can be used at temperatures above 180 degrees (the power of the soldering iron must be at least 100 W). Grind a piece of rosin or grind an aspirin pill into powder. Sprinkle this mixture onto your work surface.
- Having heated the soldering iron to the desired temperature, we increase the solder to a height of approximately 0.2 cm.
- We repeat this procedure for each through damage.
Related article: Interior and design of a small living room - planning tips (35 photos)
Alexander Gerasimov in his video will show and tell you how to properly solder a geyser radiator yourself.
Leakage in threaded connections
Quite often you can detect leaks in the threaded connections between parts of the gas water heater. Pay attention to which pipe has a leak: the left pipe usually supplies water for heating, and the right pipe usually supplies gas. As a rule, water begins to leak from the pipe if the sealing gasket is worn out. Changing this part is very easy.
- The first thing to do is block the water supply.
- Then we disassemble the connection in which the problem is detected (we use a regular wrench for this purpose). We remove the worn gasket.
- We clean the connecting elements from dirt and degrease them.
- If the thread on the American nut is damaged, it should be replaced.
- Then we install a new rubber gasket and assemble the connection.
Leaking pipes
Sometimes a leak is found not in the connection of the tubes, but directly in them themselves. Experts advise that if cracks and small holes are detected in the tubes, use the same method as for eliminating a leak in the radiator, that is, soldering. However, in the absence of proper care, it is not always possible to detect damage in time. If you realize it too late, and the tube has already become rotten beyond repair, you will have to replace it.
Those who have encountered a similar problem say that it is very difficult to find a suitable tube, even in stores specializing in the sale of gas equipment. As a replacement for the tube, you can use a corrugated stainless steel hose or flexible water line.
How to properly solder a tube without spoiling it and extending the life of the gas water heater can be seen in the video by Vladimir Pekar, which is presented below.
Replacing the water assembly rod seal
Another possible place for leaks to occur is the gas-water unit. If water begins to ooze from it, most likely the rod o-ring has worn out. This part will be fairly easy to replace.
Related article: How to properly use mirrors in the living room interior
The parts of the water assembly are held together by six screws - we unscrew these fasteners first. Then we separate the two parts of the assembly housing. From the inside we remove the membrane, the spring and the plate with the rod, which is a round disk with a metal pin. If you unscrew this pin, you can find a rubber ring underneath it - this is the seal. We remove the worn ring, put a new one in its place and assemble the assembly in the reverse order.