Design and principle of operation of the circulation pump
If you do not know what the principle of operation of the circulation pump is, then it will be difficult for you to both carry out repairs and perform maintenance.
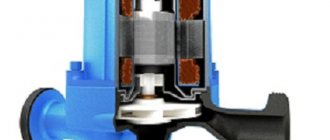
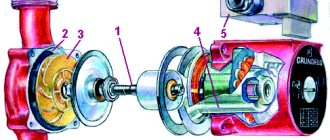
The circulation pump is constructed from the following elements:
- body, which is made of stainless steel or non-ferrous alloys;
- an electric motor whose shaft is connected to a rotor;
- the rotor on which the wheel with blades is mounted is the impeller (its blades are in constant contact with the pumped medium; they are made of metal or polymer materials).
There are two types of circulation pumps:
- with wet rotor;
- with dry rotor.
Types of circulation pumps are described in this article
For units with a wet rotor, this part is always placed in a liquid medium. Such pumps are usually supplied to domestic heating systems. Due to the fact that the rotor is located in the liquid, all moving parts are not only lubricated, but also effectively cooled.
The main advantages of this type of circulation pump:
- During operation, they make virtually no noise, since the water in which all the parts of the device are located absorbs vibrations well.
- They are easy to install; just insert them into the pipeline; repair and maintenance will not take much time and effort.
The disadvantages of wet rotor pumps include low performance; they should be mounted exclusively in a horizontal position. Also, if there is no liquid in the heating system, such devices may fail.
Circulation pump and pump
The drive motor of pumps with a dry rotor is allocated to a separate group. Rotation from the electric motor shaft is transmitted to the impeller using a special coupling. Compared to the previous type, this one has higher productivity, efficiency reaches 80%. Also, the design of units with a dry rotor is more complex, and therefore maintenance and repair are also somewhat more difficult.
Prevention and Maintenance
Long service life and trouble-free operation are possible only if proper operating conditions and regular maintenance of the pump are observed. Maintenance means periodic inspection and cleaning of the pump. Inspection for abnormalities in operation should be carried out at least once a quarter, that is, twice during the heating season. It is advisable to perform cleaning every two to three years, depending on the quality of the water and the conditions in which the pump operates.
During the entire period of operation, it is advisable to periodically check the operation of the pump:
- Connections are checked for leaks. If identified, gaskets and seals (tow, FUM tape, etc.) are replaced.
- The presence and condition of grounding is visually checked.
- The sound of a running engine should not be accompanied by clangs, knocks, or extraneous sounds.
- The engine should not vibrate much.
- The pressure in the line is checked and its compliance with the nominal one.
- The housing must be clean and dry. If this is not the case, then you should carry out external cleaning, check the electronic unit for flooding and eliminate the reason why the pump is wet.
Approximately every two to three years, it is advisable to clean the pump, including all its elements. This only applies to models that can be disassembled. There are pumps with a pressed or solid, welded casing that does not require repair or disassembly. Such units fail and are then replaced with a new assembly. It is advisable to entrust this work to a service center. However, if you have the skills and tools, you can do everything yourself
Required:
- hex wrench;
- slotted screwdriver (flat) 4 and 8 mm;
- Phillips screwdriver.
Before disassembling the pump, drain the water from the system or drain a separate area in which the pump is involved, dismantle it and then begin disassembly.
Procedure:
- Using a hex wrench or Phillips screwdriver, unscrew 4-6 bolts around the perimeter of the engine housing at the junction with the shell of the pump part.
- Remove the shell, leaving the impeller on the rotor shaft along with the engine.
- Locate four drainage holes around the perimeter. Using a narrow slotted screwdriver, pry the jacket of the engine compartment under the impeller little by little around the perimeter. As a result, the shaft with the rotor and impeller will come out of the grooves and stator shell. You can help yourself by unscrewing the protective plug on the outside of the pump, inserting a screwdriver into the slot at the end of the shaft and lightly knocking the shaft out of the support bearing.
The analysis is now complete. Now you should clean the surface of the rotor, impeller and the inner surface of the shell from plaque and scale, if any, without damaging the surface of the parts. It is not permissible to use a coarse abrasive. It is better to use a brush with hard polymer bristles. Cleaning products containing a weak solution of hydrochloric acid can help. As a last resort, the finest sandpaper is used - “zero”.
For wet rotor pumps , it is important to check the cleanliness of the channel inside the shaft and the drainage holes located in the protective jacket separating the area of the pump part and the motor. The fluid enters the rotor precisely through these holes and then returns through the internal channel; if they are clogged, engine cooling suffers.
For pumps with a dry rotor, waterproofing the support bearing is important. If a leak is detected from the pump block to the stator block, then all gaskets and seals inside the device should be completely replaced.
The condition of the bearings on which the shaft rests is checked. If they are already quite broken, they will need to be replaced, which is extremely difficult to do at home; you will have to contact a service center.
All seals and gaskets inside the pump should be checked for wear and replaced with new ones if necessary. Once all elements have been cleaned and checked, reassembly is carried out in reverse order.
Circulation pump needs cleaning
How to carry out regular pump maintenance?
From time to time, preferably at least once a month, it is necessary to carry out an external inspection and check the quality operation of your circulation pump device.
Pump design option
- Turn on the pump and in operating mode, check for any extraneous noise or excessive vibration.
- Check the coolant pressure supplied by the pump. It must correspond to the indicators stated in the technical data sheet.
- Make sure that the electric motor of the device does not become overheated.
- Check the presence of grease on the threaded flanges and, if necessary, restore it.
- Make sure there is a ground connection between the pump housing and the appropriate terminal.
- Inspect the pump from all sides and make sure there are no leaks. Typically, such vulnerable points are the interface between the pipeline and the housing of the pumping device. Check the tightening level of the bolts and the normal condition of the gaskets.
- Inspect the terminal box. All wires must be securely fixed. The presence of moisture in the unit is unacceptable.
Causes of breakdowns
Let's consider a number of reasons leading to failure of the circulation pump:
1.When the shaft does not rotate and the noise increases.
The problem occurs when the equipment has not been turned on for a long time. The electric motor shaft has oxidized.
What to do in this case:
— turn off the power supply;
— drain the water from the pump and the entire piping system;
— remove the fasteners that secure the body and electric drive of the circulation pump;
— remove the engine;
— use your hands to turn the rotor;
- blow out the oxidation areas with a compressor;
- do preventive maintenance - turn on the electric motor at least once for thirty minutes within thirty days.
2.Noises are heard when the unit is running.
The cause may be debris around the motor shaft.
To fix the damage, do the following:
— turn off the power supply;
— it is necessary to drain the water from the entire system, including the pump;
— remove the housing from the electric drive by unscrewing the fasteners;
— remove the engine;
- remove garbage;
— for prevention, install a mesh filter on the inlet pipe of the pipelines.
3.No noise or rotation
Diagnostics may be as follows: there is no power supply to the equipment or there is insufficient voltage in the electrical network.
To identify a malfunction, you need to measure the voltage of the electrical network by connecting a tester to the terminals.
Check whether you have connected the electric pump to the power supply correctly.
Circulation pumps from domestic manufacturers have a fuse installed. And when there are power surges in the network, they burn out.
Replace them.
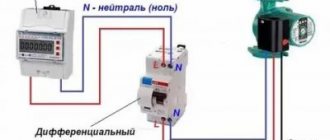
To avoid damage, you need to connect electric pumps as indicated in the technical data sheet of the product.
Provide the required voltage at the system input.
4. The circulator pump goes silent after working for several minutes.
The main reason may be scale formation on the rotor.
We fix the problem like this:
— we disassemble the electric drive and clean the lime that has accumulated between the stator and rotor.
5.The unit is very noisy.
We diagnose air getting into the heating system.
You need to bleed the air from the pipe.
To prevent the formation of an air lock, it is necessary to install an air vent in the upper part of the system.
Before starting, it is necessary to remove air from the circulation pump.
6. The pump makes a lot of noise and vibrates.
The main reason may be the lack of required pressure in the system.
You need to check the water level. If necessary, top up.
We repair circulator pumps so that they create the pressure required by the technical data sheet.
Carry out a technical inspection of the entire unit within a month.
7.The equipment vibrates.
The bearing is worn out. And there is an imbalance in the rotation of the shaft.
The bearing needs to be replaced with a new part.
When pressing the product, use a puller.
You can also perform this operation using a wooden hammer.
Before this, it is necessary to clean the seat from dirt and rust, wipe with solvent or kerosene, and wipe dry with a rag.
Next, lubricate with lithol 24.
8.The required pressure value is not provided.
You have incorrectly connected the entire set of equipment to three-phase current.
Connect everything according to the technical instructions.
The liquid can also be very viscous.
To eliminate this reason you must:
— clean the filter located in the pipe;
— check the condition of all pipes that are connected to the electric pump;
— adjust all initial parameters.
9.The system does not turn on.
No power is supplied to the motor.
We check:
- how the phases are connected correctly. You need to check the connection with the product data sheet. Then connect correctly;
— serviceability of the fuse. Burnt out - needs to be replaced;
— rupture of the electrical wire in the winding. This is done using a multimeter. Its readings should be from ten to fifteen milliamps.
The winding resistance should be in the parameters thirty-five dash forty Ohms.
If it shows infinity, the circulator pump requires replacement.
When the readings tend to zero, the windings are closed.
10. The pump turns off from one to fifteen minutes.
You have connected the equipment incorrectly.
If after checking, you have connected everything correctly, clean the connection contacts and terminals.
Possible problems and solutions
What breakdowns can occur and how to repair the circulation pump yourself? Let's figure it out.
The pump hums but the impeller does not rotate
Possible reasons:
- Foreign object in the impeller chamber.
- Prolonged downtime of the apparatus led to oxidation of the rotor shaft.
- The power supply to the device terminals is interrupted.
In the first case, troubleshooting can be done by carefully removing the device and unscrewing the housing in the impeller area. If there is a foreign object, remove it and rotate the shaft by hand. To avoid re-entry of a foreign body, a filter should be installed on the pipe.
Pump humming can also be observed during prolonged inactivity and shaft oxidation. It is necessary to thoroughly clean all oxidized areas and lubricate the moving parts of the working unit.
The circulation pump also hums when there is a power failure. First check the voltage with a tester. If the cable is faulty or broken, it should be replaced. If the cable is ok, check the voltage at the terminals. The infinity icon on the tester indicates a short circuit. Less voltage means a winding break. In both cases, it is necessary to replace the terminals.
The pump doesn't work at all
The pump does not work when there is no voltage. The tester checks the voltage, as well as the correct connection of the device to the power supply.
Circulation pump shaft
If there is a fuse in the pump, there is a risk of it blowing due to power surges. If this happens, replace the fuse. It is advisable to install a reliable stabilizer.
The pump starts but stops after a couple of minutes
The reasons may be:
- Lime deposits between moving parts of the device.
- Incorrect pump connection at the terminals.
The pump can turn on, but also stop immediately if there is scale. Remove limescale and lubricate the joints between the stator and rotor.
In the second case, check the tightness of the fuse on the device. Remove it and clean all the clamps. All wires must be correctly connected in the terminal box.
The pump is noisy when turned on
If the pump is noisy, this may indicate the presence of air in the system. It is necessary to bleed the air from the pipes and install a unit in the upper part of the circuit so that the air is released automatically.
Circulation pumps: types of faults and DIY repair methods
Most modern circulation pumps require virtually no maintenance. Repairing such devices requires increased care and understanding of the structural part of the equipment. It is recommended to trust equipment repairs to qualified specialists who have experience working with circulation pumps of different types and manufacturers.
Quite often, interruptions and defects occur during the operation of the circulation pump. Which must be eliminated as quickly as possible. A malfunction can be determined by certain characteristic signs, which allows you to quickly identify the nature of the breakdown and return the equipment to working condition as soon as possible. In this article we will look at types of pumping equipment malfunctions, as well as methods for self-repair.
Operating rules
When using a circulation pump in a closed loop, you must follow some rules that will help minimize the risk of equipment failure. Basic user rules:
- the equipment should not function if there is no heater in the pipeline;
- if the system has been idle for a long time without operation (for example, during the off-season), it is necessary to start the pump at least once a month to operate for about 15 minutes. This will help avoid oxidation of the actuating parts of the device;
- the temperature of the heating liquid should not be lower than +65⁰С, then hard salts will not settle on the walls of the pipeline;
- During operation, there must be a sufficient amount of heater in the circuit. If there is too little or too much of it, the equipment may fail;
- When starting up for the first time, be sure to check that there are no extraneous noises or vibrations;
- there should be no cracks or other visible damage on the body of the pumping device;
- it is necessary to carry out grounding, which is a prerequisite for warranty service from many manufacturers;
- It is necessary to regularly check the places of attachment to the main line for leaks. If any malfunctions are found, you will need to replace the gaskets and tighten the connecting fasteners.
Common faults and how to fix them
Anyone may encounter a situation where the circulation pump is faulty. This may manifest itself in uncharacteristic sounds and vibrations, loss of room heating efficiency, or the device simply does not function. Most problems can be repaired yourself; you just need to correctly determine the cause of the problem.
The device gets very hot
A functioning circulation pump must be identical in temperature to the coolant. In a situation where there is a large temperature difference, this indicates improper installation or improper use of the equipment.
The equipment may overheat for the following reasons:
- Incorrect installation. Such a malfunction can be determined if an increase in the temperature of the pump is noted immediately after installation.
- Low mains voltage. If the voltage is below 220 Volts, the electric drive will heat up very quickly and will soon fail.
- Insufficient bearing lubrication. If there is not enough lubricant, the bearings quickly wear out, which leads to equipment malfunction.
- Entry of a foreign object. If there is a large amount of slag in the pipeline, then small particles can get stuck in the actuators, which jams the electric motor. It is important here to clean the device quickly, as there is a risk of the motor coil failing, which will lead to a complete stop of the drive.
- There is a blockage in the system. Rust and other deposits that form on the inner walls narrow the lumen of the line, which impedes the flow of fluid. This increases the load on the pump, and cleaning the system will help solve the problem.
There is operating noise, but the operating shaft does not rotate
The most common cause of such a breakdown is oxidation of the drive shaft. This may occur due to the fact that the circulation pump has been idle for a long time. To troubleshoot the problem yourself, you need to do the following:
- completely turn off the power supply;
- drain the entire heater from the closed circuit;
- unscrew the connecting screws and dismantle the drive motor along with the rotor;
- dismantle the pump itself.
Also, the equipment will emit operating noise, but will not perform its functions when any foreign object gets inside the actuators, which will prevent the wheel from rotating.
In such a situation, you will need to check the pump for the presence of foreign elements and remove them from the working area. To do this, you need to follow the following algorithm of actions:
- completely turn off the power supply;
- drain the entire heater from the closed circuit;
- disassemble the pump housing;
- remove foreign objects;
- install a filter on the inlet pipe;
- install the pump back into the circuit.
High noise level during operation
The equipment may produce noise effects if there is too much air in the piping. To eliminate the malfunction, you will need to open a special unit located in the upper part of the case, after which the air will be automatically removed from the line.
The device turns off randomly
This malfunction occurs when deposits form on the internal elements of the device. This problem can be solved by disassembling and cleaning the pumping device from the inside. The procedure must be completed as quickly as possible, since delay can lead to equipment failure.
The pump is turned on and does not work or make any sounds.
If, after turning on the device, it does not show any signs of a working unit, then, most often, the problem lies in the power supply. For diagnostics, you do not need to disassemble the equipment; just use a tester and check the voltage at the terminals.
Most electrical problems can be resolved by properly connecting the pump to the mains. In more rare cases, the fuse blows (if provided by the device model), then it will need to be replaced.
Strong vibrations or knocking noises in the device
Such signs most often indicate bearing wear. The solution is quite simple and practical - replacing the worn part with a new one.
If self-repair does not help, it is recommended to contact qualified specialists who will help eliminate any malfunction of the circulation pump.
The pump does not start
If the device does not hum or function after switching on, the problem is probably due to the power supply. How to eliminate such malfunctions can be seen in the video of repairing a circulation pump. However, it should be understood that the reasons are different.
Repairs do not always require disassembling the pump. You should use a multimeter to check the voltage at the connection points of the unit. Perhaps it does not meet the standards or is completely absent.
The pump may not have been properly connected to the electrical outlet. In such a situation, it must be disconnected and connected correctly according to the manufacturer's instructions.
The electronics of the device contain a fuse. If there were power failures, it may have burned out. You should disassemble the device and replace the fuse with a similar one.
Prevention of circulation pump breakdowns
The equipment must be prepared in advance for intensive use during the cold season. Emergency repair of a heating circulation pump can cause a lot of inconvenience and lead to unplanned expenses. Prevention, to some extent, is a guarantee that the system will not fail at the most inopportune moment.
The pump in the heating system circulates the coolant
Careful owners perform the following activities before the onset of cold weather:
- check whether the device is installed correctly;
- renew the lubricant on the pipes and gaskets of the pump;
- clean the filter of the suction pipe;
- check how tight the connecting nodes are;
- Using a tester, they evaluate whether the device is correctly connected to the electrical network.
It is also necessary to conduct a test run to ensure that the equipment is working properly.
Owners of a house with autonomous heating need basic knowledge about the design and operating principle of circulation pumps. Any signs that the device is operating abnormally should not be ignored. After all, breakdowns in most cases are caused by improper operation. In order for the pump to function without failures, it is enough to regularly monitor the system throughout the heating season and carry out the necessary preventive maintenance.
How to disassemble a heating circulation pump with your own hands
To repair the circulation pump, it is necessary to dismantle it and disassemble it thoroughly.
Initially, the device must be disconnected from the electrical network. To disconnect the cable from the terminal box, you must remove the housing from the device's power supply. Then you need to shut off the water supply through the side valves and drain the remainder in the system. Next, you need to unscrew the pump with a hex screwdriver.
You may encounter a problem when the bolts are stuck. They need to be moistened with WD-40 and after 20-30 minutes try to unscrew them again.
After dismantling is completed, it is necessary to remove the cover of the device. Below it is a rotor with a wheel and blades. You need to remove the rotor, which is usually secured with bolts. This will give you easy access to the internal parts of the pump. Then you should carefully inspect the device and troubleshoot any problems.
Summarizing all of the above, it is worth noting once again that the circulation pump is a very important element of the heating system, which is assigned serious functions. That is why it is very important to monitor its operation and carry out regular maintenance. In the event of malfunctions and malfunctions, you need to immediately take the necessary measures, otherwise you can start and your unit will simply fail.
Operating the circulation pump
It is necessary to follow some rules when operating the pump, including the following:
- The pump should not operate if there is no water in the heating system.
- The pump must not be allowed to operate at zero flow.
- A certain range of permissible flow rates must be observed during pump operation. The pump may fail if the water supply is too low or too high.
- If the pump is idle for quite a long period of time, then to prevent it you will need to turn it on at least once a month for 10-15 minutes. If this is not done, some pump components may oxidize.
- For normal operation of the pump, the temperature of the coolant in the heating system should not be higher than +65 degrees. This is necessary in order to prevent the precipitation of hard salts.
Temperature at the inlet and outlet of the circulation pump
- First, you need to make sure that there are no vibrations or noise from the heating pump.
- Check how the circulation pump works, based on its pressure-flow characteristics.
- Check to see if the electric pump motor is overheating.
- Check visually if there is a ground connection on the pump housing.
- Check if there are any leaks in the places where the pump is attached to the pipeline. If there is a slight leak, you will need to replace the gaskets or tighten the connecting components.
- Check how well the electrical wires in the terminal block are connected to each other.
Replacing the repair kit
Replacing the circulation apparatus repair kit includes:
- disassembling the pump part of the device;
- replacement of components;
- checking engine operation;
- device assembly;
- diagnostics of equipment operation.
Some manufacturers offer ready-made repair kits for pumping equipment. For example, a repair kit for a circulation pump u4814 with a capacity of 5200 l/h, voltage 12/24 V and a pipe diameter of 38 mm. Purchasing such a kit will reduce the waste of time and money.
Air removal scheme
You should repair the circulation device yourself only after the warranty period has expired or if it is impossible to call a repair specialist. Some pump components are difficult to find on the open market, which is explained by the trade policies of the manufacturing companies.
Do-it-yourself circulation pump repair: diagnostic and troubleshooting techniques
Owners of autonomous heating have long ceased to rely on the natural circulation of the coolant, forcing it to vigorously run through the pipes with the help of a circulation pump.
Considering that private houses are, for the most part, located at a considerable distance from all kinds of workshops and service centers, it is very important for the owner of such a home to master the repair of a heating circulation pump with his own hands.
- In the warm season, when the circulation pump remains idle, turn it on for 15 minutes every month. Of course, the device should not run idle: if the heating system is currently empty (many people drain the coolant for the summer), you just need to pump water from one container to another, connecting a pump to them using hoses. This measure will prevent oxidation of the shaft surface, which could result in blocking. And thanks to such “training,” the bearing will last longer.
- During the heating season, periodically pay attention to how the pump works. Are there any noises, vibrations or other signs of developing defects? Does the unit maintain the required system pressure? Is the engine getting too hot? A malfunction detected at an early stage is much easier to fix than one that has already been severely neglected.
- If a coarse filter is installed in front of the pump, it must be periodically checked for contamination, even if the system uses prepared coolant (the filter can become clogged with rust washed off by the working medium from the pipe walls).
- It is also necessary to check from time to time whether the amount of lubricant is sufficient in those places where it is provided.
How to clean parts
The pump is clogged due to accumulated lime deposits. Excessive contamination can lead to complete failure of the heating unit. Small deposits on the shaft can be removed yourself using ordinary vinegar essence.
To clean the inside of the pump from contaminants, dilute it with water 1:1 . Pour the resulting solution into the pump through one of the fastening connections.
After a day, the lime deposits will partially dissolve, and to remove the residue, disassemble the unit and clean it thoroughly.
Clean the inside of the pump carefully, removing remaining deposits from all surfaces, using a wooden spatula. Finish the treatment with sanding, which can be done using a piece of cloth or a special paste.
Prevention and diagnosis of breakdowns
Simple preventive measures will help increase the service life of heating equipment:
It is prohibited to turn on the pump without water.
- To prevent oxidation of parts during inactivity, turn on the equipment once a month for 15-20 minutes.
- visual inspections regularly , be attentive to noise, excessive heating of devices, and leaks.
Before the start of the new heating season, a technical inspection of the equipment is carried out. Carry out a test run and check the condition of the most important components:
- correct connection to the pipeline;
- tightness of connecting elements;
- filter condition.
Typical breakdowns of pumps of different brands
Equipment from popular domestic and foreign brands has its own characteristic failures. Devices from the Danish manufacturer Grundfos , despite their reliability and durability, require regular replacement of mechanical seals . If this is not done in a timely manner, water will penetrate inside and damage the winding.
It is not advisable to service the unit at home. The specific design requires that repairs be carried out by an experienced specialist, ideally an employee of a company service center.
A pronounced hum and pressure that has dropped to a minimum indicate that the impeller in the pump has worn out or has moved along the axis. The device must be disassembled, cleaned of sand, damaged elements replaced and new seals installed.
Gilex units often leak fluid from the electric motor . It can be replaced, but only with a similar composition.
Some craftsmen believe that it is not necessary to buy an expensive substance. You can get by with glycerin or transformer oil. However, this is not the best advice. The equipment does not tolerate filling with alternative means very well and can completely fail after such an operation.
It is better not to repair the device yourself, but to entrust this task to qualified specialists. They are guaranteed to fill the engine with the original composition and do so in strict accordance with the manufacturer’s wishes. After servicing it will work just as well as on the first day of purchase.
Worn seals are indicated by a low oil level in the pump motor. It is better to replace them as quickly as possible. This will protect the motor from overheating
In the “Malysh” coils often fail . Dry work provokes this problem. A strong noise heard when turned on without pumping out water indicates a break in the central axis to which the membranes with the armature are attached. This breakdown is easy to detect after disassembling the unit.
Replacing an axle even at home is not difficult. But finding a part on sale is really a problem.
Aquarius pumps tend to overheat . This drawback is especially active when the equipment operates in shallow wells. Repairs are expensive and sometimes amount to about 50% of the original cost. In such cases, many users prefer to buy a new device, albeit from a different manufacturer.
The same problem is typical for the “Rucheek” . Despite the modern design and compliance with current European standards, they do not tolerate continuous operation .
The manufacturer says that the devices can continuously pump water for no longer than 7 hours. However, almost always such a load leads to overheating. To avoid problems, it is better to take breaks and let the equipment rest every 2-3 hours. In this way, the service life of the pump can be extended.
Do not start water pumping devices with the shut-off valve closed. In the future, this will lead to breakdown of pumping equipment. Before turning on, the valve must be opened
Vodomet pumping equipment is considered to be quite reliable and operationally stable. Most breakdowns here occur due to improper use. Also, when equipment comes into contact with contaminated water, it quickly becomes clogged with silt and sand. In this case, the pump part of the unit requires replacement.
When a problem cannot be solved at home, you should seek help from the professional technicians of a certified service center. They will quickly determine what happened to the equipment and restore its functionality. Or they will recommend purchasing and installing a new pump if the old one cannot be repaired or it is not economically viable.
DIY installation
If you want to install, you need to know exactly how to install the pump to increase heating efficiency. Also, you need to study the types and characteristics of equipment for the correct selection to the existing system. When you purchase a kit, it comes with the necessary hardware and part of the wiring tool, as well as instructions for use. Before starting work, be sure to fully study the instructions from the manufacturer, and then cut off part of the pipeline at the pump installation site.
During the work, it may be necessary to clean the old heating system. Dirt, heavy metal residues, and corrosion may accumulate in it. This is difficult to do using a drain tap. Therefore, the best choice would be to drain the fluid through the incision site.
To clean, you need to attach a hose to the back of the system and supply water under pressure. For convenience, it is also possible to connect a hose to the cut and lead it to the sewer.
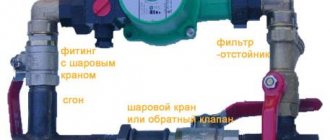
For ease of installation and maintenance, it is necessary to install a bypass. It is required in case of equipment failure or power outages. The refrigerant can then be transferred through the main line, the tap of which must be opened manually. If it is not possible to constantly monitor the pressure level, use an automatic one, which will regulate autonomously.
Two valves on a ball system are attached to the bypass on both sides of the pump to provide the ability to shut off the liquid for maintenance or drainage. Then, on the upper section of the line with a bypass connection, you need to connect a valve for the vertical release of gases.
Instructions for installation and replacement in case of malfunction:
- It is necessary to completely clean the system of liquid and dirt.
- If before the previous intervention the pipeline was operated for a long time without cleaning several times, carry out the flushing procedure several times.
- Then, you need to embed a pump into the installation site, or dismantle the old one in accordance with the work plan. If repairs or replacement are being carried out and the new equipment has similar weight and size parameters, you can swap places with the old one.
- Then, you need to fill the device with water.
- The operation of the assembled system will require careful testing. The equipment should start without errors. If such appear, the cause must be discovered and corrected.
- Then, completely remove gas from the heating system using a screw. After which you can clarify that the procedure was carried out correctly.
- Then the built-in device is turned on after it is completely filled with liquid. It is advisable to connect the water pump with an automatic fuse that notifies about errors.
How to diagnose a breakdown
To get rid of a breakdown, you need to find its cause. Diagnostics consists of the following sequential stages:
- Remove the distribution panel yourself.
- Disconnect the impeller from the engine.
- Check how it rotates when there is no load. If in future you want the engine to run smoothly and quietly, attach a smoothing capacitor to the part.
- With the impeller set aside, determine whether the motor is in working order or whether it is burnt out.
- If the shaft does not turn, most likely a part has broken, causing the engine to jam. Then small and, conversely, large parts of soil enter the unit along with water.
- It is likely that the stator winding burned out due to the accumulation of dirt and untimely disposal of it.
Please note that if the shaft rotates correctly, the lower component of the motor is assembled.
Revision of the motor part
Deep well pumps are equipped with a single-phase, mostly brushless induction motor. The connection diagram contains a starting capacitor. The stator of the electric motor has a monolithic attachment to the housing; it is often filled with epoxy compound.
In pumps of a monolithic design, the motor must be squeezed out of the glass by pressing on the connection outlet of the outgoing pipeline with the impellers removed. In rod pumps, the motor part is disconnected when the two halves are separated, in screw pumps - after removing the working screw. In all cases, the insides of the engine (capacitor, connecting terminals) can only be accessed after removing the sealed plug. It is fixed with 2-3 screws on the side surface of the sleeve and a powerful locking ring. In some types of pump, the plug may require the use of a special puller.
Well pump motor stator
All well pump motors are filled with oil, which performs lubricating, cooling and dielectric functions. The oil used is special food grade, but it is commercially available. Signs of low quality may be a cloudy color of the oil when mixed with water, darkening or the presence of mechanical impurities, as well as insufficient levels. If the oil is normal, it should be drained into a clean, dry container, leaving the motor housing for 15–20 minutes until the residue completely drains from the walls. Insufficient oil filling of the engine indicates wear of the oil seals.
In addition to spoiled oil, engine malfunctions can be caused by worn bearings, which can be determined by play and free-wheeling noise. If the pump has been operated for a long time under extreme conditions, the shaft may be bent (twisted) and the winding insulation may overheat. Burnt stators are practically beyond repair, but they are quite easy to replace.
Burning of the stator winding due to water entering the motor
Inspection of the pump mechanism
In addition to contamination, the main cause of breakdown of the pumping mechanism is long-term dry operation. Due to the lack of liquid, the centrifugal impeller blocks get very hot and sinter, so the only repair option is to replace them. The situation is similar with the auger and landing bushings. Also, with jammed impellers, the shaft can rotate in the mounting holes, and in powerful pumps, it can become deformed and even destroyed.
In screw pumps, screws and landing bushings are consumables; they are replaced every 3–5 years, depending on the intensity of use. The main reasons are the natural aging of elements and exposure to small abrasive particles.
Screw and bushing for auger pump
Let us draw your attention to the fact that the parts of borehole pumps have a high precision of fit, thanks to which the cleaned mechanism is easily assembled and disassembled. If during assembly the parts do not fit into place freely, then the order of installation of the elements is incorrect. Different pump models have specific design differences, but basic recommendations for self-repair and disassembly for inspection purposes are always described in the user manual, which often includes an assembly diagram.
Main types of breakdowns of Grundfos pumps
If you know how to handle equipment and have an understanding of the technical structure of water pressure equipment, you can repair the pump yourself.
To do this, you will need to correctly determine the cause of the breakdown and choose a method to eliminate it. Pumping equipment almost always breaks down suddenly, without any special warning signs.
All pumps, regardless of their technical characteristics or operating principle, are most often susceptible to the following malfunctions:
- There is no torque on the moving parts of the equipment.
- Spontaneous shutdown of the device.
- High levels of noise or vibration.
- Low water pressure.
If the device hums, but does not spin, then there is a high probability of oxidation of the rotating shaft, or calcification of the rotating parts. This is possible as a result of long-term downtime of internal mechanisms. When the device not only does not spin, but also does not hum, most likely the problem is in the power supply to the motor. Spontaneous shutdown of pumping equipment indicates the presence of mineral deposits between the starter and rotor.
Loud noise during operation is usually caused by air leaks into the water supply pipes due to depressurization of the unit. Vibration indicates faulty bearings on the rotating components of the pump. A drop in pressure is usually caused by clogged filters, or by improper connection of the device to a three-phase power source.
How to disassemble a drain pump
The analysis is carried out in several successive stages:
- Turn the pump over with the filters facing up and carefully clamp the housing in a vice. Remove the filter mesh, then the protective casing, under which the impeller is installed. For different models, it is mounted with bolts, clips, or screwed in with a thread.
- Unscrew the fixing nut holding the impeller to the rod. These nuts have a left-hand thread, so they are unscrewed by turning them clockwise. We remove the impeller, and if it is worn out, replace it with a new one.
- When the impeller is intact, disassembly should continue until the cause of the malfunction is identified. We unscrew the connecting bolts on the body, as a result of which it is divided into two components connected to each other by a train of multi-colored wires. If you need to disconnect them, you should first photograph their location.
- To separate the electric motor from the housing, you should lightly tap the rod with a hammer, since it is pressed into the housing very tightly. After removing the motor from the housing, the electrical part of the pumping equipment is diagnosed.
Stopping the chiller and dismantling the pump
If strong mechanical noise is detected from the chiller circulation pump, the system must be stopped (turn off the central switch). You will also need to relieve the pressure of the water system and completely drain the water in the pump connection area. For this purpose, there are drain plugs located directly on the body of the pump part of the device.
The main switch of the Wesper AQL80 chiller (top left), through which the power supply to the entire system is completely cut off. The next step is to disconnect the power cable to the circulation pump motor. Then the box cover (BRNO) is opened, the nuts securing the phases and neutral wire are unscrewed, and the disconnected conductors are pulled out of the box.
To dismantle the circulation pump, you need to unscrew two union nuts - the suction and discharge pipelines. After this operation, remove the pump frame fastening and remove the device from the chiller body. At this point, the dismantling stage of the circulation pump ends with the transition to the repair stage.
Disassembling the pump to replace bearings
The circulation pump for the Wesper AQL80 chiller system is a relatively simple design in a mechanical sense. To disassemble the device, it is enough to unscrew the eight screws securing the casing and remove the four studs on the motor part that hold the back cover of the electric motor.
Wesper AQL80 chiller system pump. Some time after the start of operation (5-6 years), the motor rotor shaft bearings usually fail. Separately, it is worth noting the mechanical fastening of the protective cover of the motor impeller. This element does not have the usual screw fastenings.
The protective cover is held on the body of the electric motor due to a protrusion running along the entire circumference. Therefore, a light blow (with a non-metallic tool) on the end edge is sufficient to remove this part.
The motor cooling impeller is mounted on the end of the electric motor rotor shaft. The end part of the shaft, where the cooling impeller “sits,” has a corrugated surface. To remove this part, you need to pull off the impeller with a puller (or carefully using a wide flat-head screwdriver).
Dismantling the pump part of the unit
The pumping part of the device is hidden under a casing made of stainless steel. The casing is tightened to the motor body with four pairs of hex head screws. Dismantling in this case is carried out by unscrewing all the screws and then tightening the casing.
Here you have to use some force, since the casing fits quite tightly. The traction force should be applied specifically to the body of the casing, and not to the rim, with which the casing itself is tightened with screws to the electric motor.
Ultimately (after removing the casing and motor stator), approximately the following picture opens:
View of a partially disassembled chiller pump. On the left is a rotor with bearings. On the right is a pump assembly that makes up a three-stage liquid pumping system. Now, in order to be able to completely separate the rotor with bearings from the pump part, this pump part must also be disassembled into separate parts.
It's worth noting right away:
Disassembly should be carried out with a mark of the location of each individual structural element. Otherwise, assembling the pump may cause difficulties.
Dismantling the parts of the pump part begins by unscrewing the screws securing all the blocks. This screw, accordingly, is located at the end of the shaft on the pump side.
View of the fastening screw that secures all the parts of the set that makes up the three-stage pump structure. After unscrewing the screw, carefully remove the volutes and impellers, as well as the intermediate rings that are placed between each individual stage of the pump. The circulation pump of this design is three-stage. Accordingly, the following are dismantled:
- three snails,
- three impellers,
- five intermediate rings,
- shaft seal assembly.
It is convenient to arrange all the parts in accordance with the dismantling sequence directly on site. So after replacing the rotor bearings, it is easy to assemble the entire set in reverse order.
The shaft seal assembly must be pulled off the shaft very carefully so as not to damage the rubber seal and graphite rings.
The pump module has been disassembled and laid out into parts in the order in which the parts are located on the shaft. The next stage of repair work is the complete dismantling of the rotor and replacement of defective bearings.
Removing the rotor and replacing bearings
The shaft, completely freed from pump parts, allows you to completely dismantle the rotor and replace faulty bearings. But here, too, there are some peculiarities of work. The front bearing is pressed quite firmly into the body of the cover.
To remove the bearing along with the shaft, it is necessary to use a tool that prevents damage to the surface and ends of the shaft. As a rule, in such cases a wooden or plastic hammer is used.
Bearings should also be pulled off the shaft of the dismantled rotor carefully and carefully. For these purposes it is convenient to use a suitable puller. Fitting new bearings onto the rotor shaft also requires careful handling.
In this case, bearings with number 60203 (closed) are used. Fitting the bearings into place should ensure complete integrity of the plates covering the ball area.
The recommended tool for these purposes is a metal sleeve with a diameter and wall thickness corresponding to the inner ring of the bearing.
How to disassemble a float
Sometimes the reason that the pump does not want to work lies in a malfunction of the float mechanism. It is intended to protect the device from dry operation. To repair a drainage pump with a float, you will need to disassemble this device and inspect it from the inside. To open the float, unscrew the connecting bolts on its body, then pry off the connecting seam with a screwdriver. Inside there is a freely rolling ball, the movement of which turns on/off the power supply.
It happens that the ball stops spontaneously, blocking the engine from starting. Sticking can also be caused by the float body losing its seal, as a result of which the ball rusts or becomes overgrown with mineral deposits. To correct the situation, you need to clean it and properly seal the seams.
How to turn off the float on a sump pump
In some situations, a complete replacement of the float device will be required. In this case, you will need to first disconnect it from the pump. The float is part of the electrical system of the pumping equipment, and is equipped with a lever with a circuit breaker. To turn it off, you will need to disconnect the wires and replace the faulty unit.
If a spare float is not available and the pump needs to be restored to service immediately, as a temporary measure, you can connect the wires leading to the float directly, without a disconnector. In this case, it is necessary to ensure that the junction of the wires is raised above the water level. Otherwise, there is a high probability of a short circuit. You will have to monitor the operation of the drainage pump with the float turned off “in manual mode”, otherwise it may break down when the pumped water level drops.
How to protect the pump from malfunction?
It is advisable to always maintain the required volume of coolant water in the pipes. Otherwise, the pump will wear out, both in case of excess water volume and in case of insufficient water volume.
To be on the safe side and avoid breakdowns of fairly expensive pumping equipment, it is recommended to adhere to some basic rules for operating equipment of this type:
- Do not allow the pump to turn on without coolant in the closed circuit. That is, if there is no water in the heating system pipes, then you should not “torture” the pump. This will cause your equipment to break down quickly.
- It is advisable to always maintain the required volume of coolant water in the pipes. Otherwise, the pump will wear out, both in case of excess water volume and in case of insufficient water volume. For example, if a pump can distill an amount of water from 5 to 105 liters, then the need to work with volumes from 3 to 103 liters will greatly wear out the working components of the unit, which will lead to its failure.
- In case of prolonged downtime of the pump (during the low heating season), it is necessary to run the unit in the operating position for at least 15 minutes once a month. This will avoid oxidation of all movable elements of the pump unit.
- Try not to exceed the coolant temperature above 65 degrees Celsius. A higher rate will negatively affect the working and movable parts of the structure.
- In this case, check the pump housing for leaks more often. If there is even the slightest leak somewhere, you should immediately identify the malfunction and carry out maintenance on the pump.
