Advantages of plasterboard boxes
In general, the construction of an outer box can serve various purposes, for example:
- Give structures an aesthetic appearance.
- Provide protection from accidental mechanical and other damage.
- Achieve a soundproofing effect (especially in the case of sewer pipes).
Plasterboard sheets meet all these requirements well, and although other materials can be used to construct the box, they are preferable for a number of reasons:
- Low price.
- Ease of assembly of the structure.
- Excellent environmental performance.
- High sound absorption rates.
Working with this material is not difficult, and therefore the involvement of professionals is optional, and if you have some skills, you can cover the pipes with plasterboard yourself.
Installation of the frame and its covering
The plasterboard box is fixed to a strong metal frame with vertical and horizontal elements made of profiles.
Note!
When alternating horizontal elements, a step of 60 cm must be observed.
The finished frame is sheathed with sheets and strips of plasterboard, pre-cut to fit the dimensions of the frame. Plasterboard parts are fixed to the profiles using self-tapping screws. They are screwed into the drywall with a small recess so that they can be hidden under a layer of plaster.
There are several methods for covering pipes with plasterboard:
1. Carry out “preservation of the vent riser pipeline: remove rust from the pipes, replace damaged sections of the pipeline, prime or paint the pipes, seal the joints between sections of pipes.
2. Work on installing the casing box should begin from the bottom. This means that the dimensions of the box, taking into account its contours, should be marked by drawing straight lines using a corner, starting directly from the floor surface - to the left and right of the pipe. Sections of profiles of the required length are fixed horizontally using dowels along the lines drawn on the floor. Horizontal profiles are installed in the same way on the ceiling (or in another place at the top of the future box). Vertical profiles are attached to installed horizontal ones. Next, the remaining horizontal profile elements are added in increments of 60 cm.
Note!
The vertical profile elements are attached to the horizontal guides using special self-tapping screws.
3. Cutting plasterboard blanks is carried out after the final installation of the profile frame. Drywall is cut with a special knife, often used for cutting wallpaper. On the front side of the plasterboard sheet, lines of the external dimensions of the individual sides of the box of profiles are drawn. Furrows are applied along these lines with a knife, one at a time for each workpiece. The cut plasterboard blank is simply broken and then cut on the back side of the plasterboard sheet.
Note!
Plasterboard blanks are secured to the box frame using ordinary metal screws.
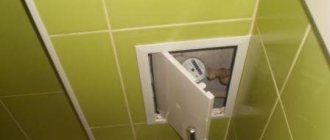
4. Arrangement of a window (ventilation hole) in a plasterboard box opposite the fitting (taps and connecting devices on pipelines). The need for such a window is obvious - during operation, regular inspection and repair of the sewer system is necessary.
Only after you have learned how to cover pipes with plasterboard and have completed all the work on installing the box, can you begin finishing work. They may include applying plaster to the surface of the box and then painting it, or lining the box with ceramic tiles.
The common property includes an in-house engineering drainage system, consisting of sewer outlets, fittings (including bends, transitions, pipes, revisions, crosses, tees), risers, plugs, exhaust pipes, drainage funnels, clearings, branches from risers to the first butt connections, as well as other equipment located in this system. Many apartment owners, after completing the installation of pipes or heating systems in the house, are wondering how to cover them with an outer box and what kind of cladding to use for this. Everyone has their own preferences in this matter, but the material that is most often used for this purpose is drywall.
Preparation for covering pipes with plasterboard box
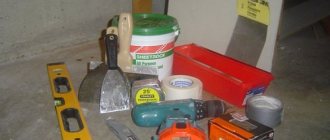
Before sheathing the pipes with plasterboard, you should do some preliminary work, which is as follows:
- Preparation of the necessary materials, including metal profiles (guides, racks), screws, dowels and the plasterboard sheets themselves.
- Preparation of the necessary tools (knife, screwdriver, hacksaw, plumb line, level, pencil).
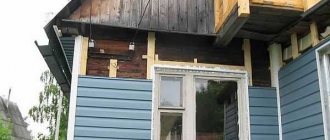
- In the case of metal pipe products, it is advisable, before covering the pipes with plasterboard, to clean their surfaces of old paint and repaint. After covering the pipes with plasterboard, access to them becomes very difficult or impossible.
Upon completion of the above work, before covering the pipes in the room or bathroom with plasterboard, you must first prepare a reliable frame for its fastening.
Materials
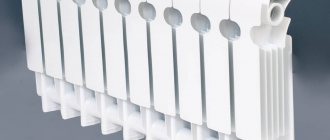
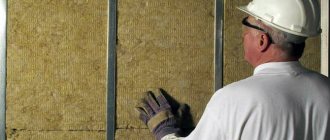
Before covering the pipes in the bathroom with plasterboard, let's figure out what this material is. As the name suggests, gypsum board is a sheet consisting of gypsum filler and cardboard. Cardboard in this “sandwich” plays the role of a reinforcing and binding coating, and gypsum acts directly as the main filler, or compound.
All sheets are perfectly flat and of the same thickness over the entire area. They are produced in thicknesses from six to twelve millimeters, each of these sizes is good for its own purposes. Thin sheets are used to sheathe light structures and ceilings, thick sheets are used to make interior floors, and in order to cover the pipes, you will need something in between, namely a sheet nine millimeters thick.
In addition, gypsum plasterboard can be ordinary and waterproof. It goes without saying that for finishing in wet rooms a second option is needed; it can be distinguished by the green color of the cardboard.
It is also worth mentioning the cuts of gypsum plasterboards. They come in different shapes: rectangle, slope, rounded and combined shape. For work, this parameter is not so important, since usually the edge of the sheet is simply cut to the plaster at an angle of forty-five degrees.
DIY frame installation
The material for constructing the frame structure to which the plasterboard sheathing will be attached is usually metal profiles (racks and guides) made of galvanized sheet.
These products are resistant to corrosion and rust, and therefore their use ensures a long service life and the absence of serious problems during operation.
Work on the manufacture of a frame structure consists of the following stages:
- Marking the lines and contours of the frame on the floor, walls and ceilings, made with a simple pencil using a level and plumb line.
- Installation of guide profiles in accordance with the marks and their fastening to the wall using dowels.
- Installing three vertical rack profiles and measuring the distance between them.
- Inserting rack profiles into the guides and attaching them to each other using small special screws called “bugs”.
After the specified work is completed, the frame for the planned cladding can be considered ready, and it is possible to begin the construction of the box itself from plasterboard sheets.
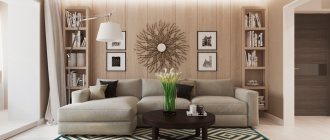
Covering pipes with plasterboard - ideas for implementation
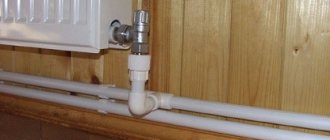
Communications in our homes are laid openly.
Heating pipes in the corners of rooms, plumbing connections in the bathroom and toilet really spoil the design picture. Today we will look at a solution to this problem using a plasterboard structure.
Drywall box in the bathroom.
Installation of plasterboard box
- Sheets of plasterboard are prepared for assembling the sheathing, after which they are cut into fragments of the required size.
- The blanks are inserted between the profiles and placed for subsequent fixation.
- The plasterboard blanks are attached to the frame using self-tapping screws. The heads of the screws should sink into the drywall no more than 1 millimeter. Drywall sheets are screwed to the frame on both sides.
- Using a hacksaw, the ends and edges of the used sheets protruding beyond the structure are sawed off. The edges in the places of cuts are leveled using a diamond mesh No. 100.
At this point, the assembly of the box itself can also be considered complete, and the next stage is the transition to its lining and additional work.
How to cover pipes with plasterboard in a bathroom
After appropriate measurements using a plumb line or level
Guide profiles
are attached to the floor, wall or ceiling (depending on the location of the box) using special dowels (there are several types of profiles for drywall; the U-shaped profile we need is
marked UD
).
The profiles are fastened with dowels
every 10 cm. These problems are easily solved by making thermal holes. They are made with an electric drill with a special attachment.
The diameter of the holes can be any, but the best option is from five centimeters. You can make it smaller, but then you need to increase the number of holes. After laying the pipes, all the grooves punched in the wall are carefully sealed with sand-cement mortar
without the formation of voids that can reduce the strength of the wall.7.
the rack profiles (CD) are cut to size.
. They are inserted into the grooves of the guide profiles and secured with special self-tapping screws. The minimum distance between such jumpers is 40 cm. You can, of course, try to make several small horizontal holes to a shallow depth (after all, the load-bearing wall is surrounded by a 3-centimeter protective layer of concrete).
But in order to protect yourself from serious fines, it is better not to take risks.
Step-by-step instruction
Let's consider step by step how to cover pipes with plasterboard with your own hands:
- The first thing to do is take measurements and other preparatory work described above.
Measurements of required distances
- Three rack-mount vertical profiles are installed.
Vertical rack profiles
- Measure the distance between the profiles.
Measuring the distance between installed profiles
- The resulting distance is measured on another profile.
Measuring the distance on the profile
- Several blanks are cut out.
Cutting blanks
- The blanks are inserted between the profiles.
Inserting blanks
- The workpieces are secured using self-tapping screws or a cutter.
Fastening workpieces
- Drywall sheets are screwed with self-tapping screws to the profiles on both sides of the frame.
Screwing drywall
- Saw off the protruding edges of the drywall sheets using a hacksaw.
Sawing
- Using a No. 100 diamond mesh, level the edges of the drywall.
Aligning edges
- The gaps between the drywall and the wall are filled with polyurethane foam.
Foaming cracks
- Insert a flange under the hood into the resulting box.
Flange
This completes the installation of the plasterboard box. Using these instructions, the process of covering pipes with plasterboard is quite simple and quick. A video on hiding pipes using drywall will help you solve any questions you may have about installing the box.
Did you like the article? Subscribe to our Yandex.Zen channel