Open heating Leningradka
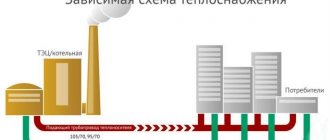
Initially, the schemes of the Leningradka single-pipe heating system were developed for an open type of heat supply with natural circulation. This approach makes it possible to create a completely energy-independent heat supply system without necessarily connecting to the electrical network. The only exception may be the boiler used.
Gravity heating scheme Leningradka
This Leningradka steam heating scheme is characterized by high inertia. The movement of the coolant through the pipes directly depends on the degree of its thermal expansion. Basically, this process takes place in the accelerating vertical drain, which is connected immediately after the boiler. This circumstance determines the use of vertical piping for the Leningradka gravity heating system for a two-story house.
An important point is the correct selection of pipes and the material for their manufacture. It is recommended to do the calculation of the Leningradka heating system with your own hands according to the standard scheme. First, the heat losses of the building are determined, then a boiler with the appropriate power is selected. To minimize hydraulic losses, which will significantly affect the speed of movement of the coolant, you should calculate the Leningradka heating system yourself using special programs.
But besides this, attention is paid to the following aspects of organizing open-type single-pipe heating with natural circulation:
- Height of the accelerating riser. It should be at least 2.2 m. This problem is not significant for installing the Leningradka heat supply system for a two-story house;
- Pipe diameter. For heating with natural circulation, it is best to use large-diameter pipes - from 32 to 40 mm. It is also recommended to install polymer lines due to their smooth internal surface;
- Maximum length of pipelines. It can be no more than 30 m. Otherwise, even with an ideal connection of heating radiators in Leningradka, the speed of movement of hot water will significantly decrease and thermal imbalance of the system will occur;
- Requirements for boiler installation. For proper operation of the heating system, the boiler must be located below the level of the radiators. This is necessary to create the proper pressure indicator of a cooled coolant with a higher specific density on a hot one. As a result, natural water circulation will improve.
If, for a number of reasons, it would be problematic to implement a similar water heat supply scheme for Leningradka, you can add a circulation pump to the system. This will allow you to avoid making the required slope of the pipes, ensure a normal speed of movement of hot water and stabilize the thermal distribution.
Installation subtleties and descriptions of common mistakes
In the Leningradka heating system design there are a number of bottlenecks that need to be given maximum attention for the system to operate efficiently.
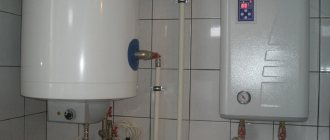
Storage tank position. In a two-story house, this element can only be located in the attic. At the same time, for closed boilers, the attic may not be heated; for open-type tanks, insulation and heating of the room is mandatory.
Accordingly, an electric boiler or other type of equipment for heating the coolant should be downstairs, in the basement or boiler room on the ground floor.
Number of radiators . This option works best in small buildings that require 5...6 radiators. Already on the sixth radiator at a supply temperature of 80 degrees, the heating will be only 45 degrees, the seventh or eighth will practically not work.
Pipe selection. In order to save money, metal pipes are often chosen for the Leningrad scheme, not stainless steel or copper, but made from ferrous alloys. It is worth noting that for the northern regions of the Russian Federation, polypropylene or cross-linked polyethylene pipes are not suitable at all: here the temperature of the carrier in cold weather can reach the melting point of plastic (95 degrees Celsius).
For natural circulation, it is important to select the correct pipe cross-section - it should be at least 1 inch (nominal internal diameter), and also to reduce the number of valves and taps in the communication. In such a scheme, an open-type expansion tank with an accelerating manifold, located above the level of the radiators, is most appropriate.
For closed tanks, a “safety group” must be installed. This is a pressure gauge, safety valve and automatic air vent. Otherwise, with a noticeable increase in pressure in the boiler and expansion tank, equipment damage may occur.
The nuances of design and installation, typical mistakes are discussed in the video.
Wiring options and operating principle
A simple Leningrad heating system uses the unique properties of liquids, which when heated become lighter and rise into the connected radiator.
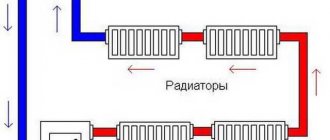
The pipe in a one-story house is laid along the perimeter of the building, usually under the floors or at their level. The hot pipe is an additional source of heat, which provides more uniform heating of the room. As a result, freezing of areas remote from radiators is eliminated. To heat private houses and cottages, a single-pipe Leningrad heating system is used, with proper calculation and installation, it is sufficient for coziness and comfort. In principle, Leningrad heating is a modernization of the simplest single-pipe wiring diagram. In a single-pipe system, all radiators are connected in series and from the last battery the coolant is returned to the boiler for subsequent heating. The system is primitive to the extreme, its main drawback is the uneven heating of radiators along the path of the coolant. The second drawback is that to replace or repair any radiator, you need to stop the heating system. If the system is mounted as a closed system with a circulation pump, then with a small number of radiators (no more than 5), the uneven heating is insignificant. Single-pipe scheme. if larger diameter pipes are used, it can work as a gravity one with an open expansion tank.
Modernized single-pipe scheme Leningradka
The Leningrad single-pipe forced circulation heating system differs in the way the batteries are connected to the supply pipe.
Radiators are installed parallel to the pipe, in the direction of hot water flow. First, the top of the radiator is connected, and then the lower battery pipe, but the lower connection can also be used. Bottom connection - the inlet and outlet pipes of the radiator are located at the bottom. The coolant circulating in the supply pipe at a sufficient speed ensures uniform heating of heating devices. This is how heating works in a private house in Leningrad - a simple and reliable system. The supply pipeline is located around the perimeter of the building and provides additional heating.
If necessary, you can connect convectors hidden in niches under large windows to it. The convector is positioned horizontally and in order for water to flow into it during installation, it is necessary to insert the pipe in a special way. It is cut at an angle of 45 degrees and welded into the supply pipe. Resistance to the oncoming flow is created and part of the water from the supply pipe branches off and enters the convector.
Vertical single-pipe heating circuit
In multi-storey buildings, a vertical layout is used. The supply pipe is led into the attic and then insulated. Outlet pipes descend from the supply pipe. Batteries on floors are connected in series
During installation, it is important that the radiators are positioned strictly along the same vertical line.
Sometimes a parallel connection of radiators on different floors is used. With this connection, the batteries are connected in parallel to the supply pipe, and the battery outputs are also connected in parallel to another pipe, which goes down and connects to the “return” pipe. In this case, we can highlight the elements of a two-pipe system. This is a combined scheme.
Scheme of Leningrad with natural circulation
For small houses and cottages, a single-pipe heating system with natural circulation from Leningrad can be used, in which the movement of water occurs under the influence of gravitational forces. To organize such a scheme, it is necessary to use pipes of sufficiently large diameter. A larger diameter of the supply pipe will reduce the hydraulic resistance, and an increased amount of coolant will reduce the uneven heating of the radiators. In addition, a pipe laid around the perimeter of the room acts as an additional heat source. During installation, it is necessary to observe the slope of the pipes in the direction of movement of the coolant. A simple and reliable heating circuit is easy to install and operate. It can be easily upgraded. When installing bypasses, taps and valves, it becomes possible to replace or repair batteries without stopping the system. The Leningrad scheme, after modernization, allows setting the desired temperature and adjusting the output of radiators in different rooms.
Technological diagrams
There are several heating schemes for Leningradka. They differ in the location of the radiators, the complexity of installation and subsequent maintenance. A short video will help you understand this issue better.
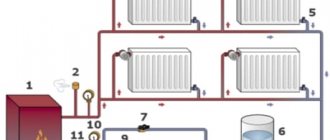
To create a Leningradka heating system in a private house, you will need seven basic elements.
| Image | Name | Purpose |
| Boiler | This is where the water heating process takes place. It can be electric or gas. | |
| Expansion tank | It accumulates excess heat produced by the boiler. The tank also prevents overheating of the structure, increases the efficiency of water heating, and increases the heating speed. | |
| Circulation pump | Installed in structures with forced circulation. It forces hot water to quickly move through the Leningradka system in a private house. | |
| Pipes | Necessary for supplying heated water and discharging already cooled liquid. Can be metal, polypropylene or metal-plastic. Their diameter is selected based on the characteristics of the system. | |
| Radiators | With their help, heat spreads throughout the room. Today they are made from cast iron, aluminum or steel. There are also bimetallic models. | |
| Shut-off valves | Allows you to overlap individual areas. | |
| Filter | Installed in front of the boiler. Prevents contamination from entering the device. |
The combination of these elements and their location are selected in accordance with the specific circuit.
Horizontal scheme
For one-story buildings, Lenigradka with a horizontal heating system is suitable. It involves installing radiators in one row and at the same level from the floor, but taking into account the required slope. All structural elements are mounted along the walls around the perimeter of the room. A circular contour is formed.
There are two ways to connect radiators with this scheme:
- Nizhny. In this case, two branches are cut into the main pipeline, which are connected to the lower pipes of the battery. A jumper remains directly under the radiator.
- Diagonal. Water enters through the upper radiator pipe, and exits through the lower. The efficiency of such a scheme with natural circulation turns out to be low, since the lower corner of the battery, located under the inlet pipe, does not heat up well. It is recommended to use it only if a pump is installed.
To be able to quickly shut off one of the batteries, taps are installed at its outlet and inlet. A needle-type valve can also be installed on the jumper. If you close it, you will be able to direct the maximum amount of heat to the radiator.
The horizontal heating scheme does not allow connecting a “warm floor”. Installation of such equipment is possible only for vertical systems.
Vertical scheme
The vertical heating scheme is used for two-story buildings. A heating pipe circuit is installed on each floor. There are two options:
- Upper spill. The coolant enters the radiators from an expansion tank located above the main pipeline line.
- Lower spill. Heated water is supplied from the bottom of the building. She first walks along the first floor and then moves to the second.
A system in which the boiler is installed below the level of the radiators is considered more energy efficient.
Open and closed circuits
The Leningrad heating system is called open, in which an expansion tank with a pipe is installed. It can only be organized with natural circulation of fluid. Such a system has direct access to the environment. The pipe prevents the tank from overfilling and excessive heating of the water.
The open-type tank is mounted on a separate riser located on the pipe that removes the heated coolant from the boiler. It is installed in the attic of a building or under the ceiling. The main thing is that it is higher than the boiler. This scheme allows air bubbles that accidentally entered the system to escape without getting into the radiators. The penetration of oxygen into metal batteries provokes a high rate of corrosion.
A closed heating circuit is characterized by the absence of contact between the system and the environment. Instead of an expansion tank, it uses a hydraulic accumulator. In essence, this is the same container, but with a membrane to maintain stable pressure inside. Installation of a circulation pump is required. This heating system also uses additional equipment:
- Safety valve. Allows you to drain excess water in an emergency. This reduces the pressure in the line, which will prevent boiler breakdown.
- Air vent. This device removes gases. They can form when the thermostat fails and the liquid boils.
- Monometer. This device allows you to control pressure.
A closed heating circuit allows you to create a fully automated system. Therefore, it is considered the most preferable for modern homes. Gravity-flow structures can be used for small one-story buildings. But you need to be prepared for the fact that you will need to install large diameter pipes, which will spoil the interior. In addition, such a scheme will only work if all its parameters are accurately calculated.
Heating systems
Despite the variety of options, the operating principle of the system comes down to two types. You can implement them both in your own home and in a city apartment.
- Natural circulation - the coolant, usually water, moves under the influence of gravitational forces and due to the difference in temperatures of heated and cooled water. It will function effectively subject to certain conditions: the total horizontal area of the system should not exceed 3500 sq. m, and the heating boiler should be located at least 3 m below the radiators. If in a private house or apartment on the ground floor it is possible to place the boiler in the basement, then This is the best option, judging by consumer reviews.
- Forced circulation - the coolant moves through the pipes due to the operation of pumps.
Scheme of Leningrad
There are two different schemes for connecting pipes to a heating boiler.
- Single-pipe - the coolant moves through one pipe to the radiator, is partially cooled in it and moves to the next one. This option requires a shorter pipeline length - approximately 30%, and is easier to install. Installing the system is quite feasible with your own hands. The most common heating option is Leningradka.
- Two-pipe - coolant of the same temperature is supplied to all radiators in parallel through one pipe, and returns through another pipe from each radiator to the boiler. In such a system, all radiators heat up equally, and the heating in the house will be more uniform. The system also allows you to regulate the heat output of each radiator individually.
There are two possible types of wiring, each with its pros and cons.
- Vertical - supply and discharge pipes are located vertically to each radiator. The scheme is recommended for systems with forced circulation: a less powerful pump will be required, since circulation is partially ensured by the natural drainage of water from the highest point. This heating method is most often implemented in multi-storey buildings, where main pipes are located in attics or technical floors.
- Horizontal - pipes are located horizontally within the floor. The advantage of the system is the ease of adjustment and overlap. In Leningradka horizontal wiring has been implemented. The photo shows a diagram with a horizontal scan.
As a rule, for a private house, they choose the options of a single-pipe or two-pipe system with horizontal scanning, being quite effective, the systems are quite easy to install and quickly repaired.
Drawing of the Leningrad heating system
The difference between Leningradka and the classic single-pipe system
The principle of both systems is the same - serial connection of radiators with a single pipeline. The only difference is the presence in Leningradka of a jumper under the heating radiator. That is, heated water simultaneously passes both in the radiator and under it through a separate pipe.
Thanks to this feature, the Leningradka system provides a higher water temperature in the radiators than the classic single-pipe design. This effect is achieved by mixing the liquid at the outlet of each battery and jumper. In practice, the temperature difference most often does not exceed 5 degrees, but it can also be significant.
The presence of a jumper also allows you to shut off one or more radiators if necessary. This will help reduce the room temperature. If one of the batteries leaks, you will not have to turn off the entire heating system in a private home.
Some installation features
When designing a system, using information from the Internet and performing installation yourself, remember that a large amount of reading material and watching videos increases your chances of successfully completing what you started. But the most optimal way to organize heating with your own hands would be to involve, at a minimum, a professional practitioner for consulting support.
To ensure high-quality heating of the outermost radiators in the chain, the number of their sections should be increased.
For the gravity version of the system, pipes of significant diameter must be used. And the total length of the circuit should not exceed 30 m.
Installation of the supply main pipe must be carried out at a slight slope. The radiators themselves are installed at the same height and do not at all distort the “geometry” of the room.
Vertical wiring of the “Leningrad” and long “horizontal” will definitely require the introduction of a circulation pump into the system.
When installing a supply pipe deep into the floor with your own hands, you should remember the need to insulate it with heat-insulating roll materials. This will save you significant money during the operation of the system and will not lead to overheating of the “underground” space.
Photo of a needle type tap
Ball valve
Only needle-type valves should be used as shut-off valves on bypasses and auxiliary circuits of the system. They are able to smoothly regulate the flow of liquid through themselves. The use of ball valves is unacceptable here, since they are not intended for “half-open” operation. They are either closed or completely open. Only in these two positions is their long-term performance maintained. There are enough videos on this topic on the Internet.
Concluding a long stream of thoughts, we would like to note that the single-pipe “Leningrad”, which has long been proven over decades of use, with a modern “upgrade” with a circulation pump and control valves on the bypasses, allows you to obtain the advantages of a more complex heating system with its real simplicity and low investment. Ensure its correct installation with your own hands and spend the cold seasons in the warmth and comfort of your private home.
Installation technology
Installing Leningradka in a private house is not difficult, but requires certain knowledge. Before purchasing the necessary equipment, it is important to make all the calculations correctly. The dimensions and length of the pipes, the number of radiators and sections in them, and the characteristics of the required shutoff valves are determined. This is explained in more detail in the video.
The main line can be located both on the surface of the wall and in its plane. In the latter case, good thermal insulation will be required. Otherwise, the heat loss will be so great that it will not be possible to warm the air in the room.
Preliminary calculations
The first thing you need to do before installing the Leningradka heating system is to carry out all the necessary calculations and draw up a diagram of the arrangement of the elements. First, input data is collected. These include:
- The area of the entire heated room and each room separately.
- The height of the ceilings in the house.
- Information about the location of the building relative to parts of the world, the number of walls in the building.
- Number and size of windows and doors.
Based on the area of each room and the height of the ceiling, the power required for heating is determined. This is easier to do with the help of online calculators, which can easily be found on the Internet today.
Knowing the power, the number of radiators and sections in them is determined. You can also use a special calculator for this. For example, for a bathroom with an area of 6.3 square meters with one window, four sections of a bimetallic battery will be required. If there are two windows in the room, then the estimated number of radiators is divided by 2 and the device is installed under each opening.
Then they move on to determining the total volume of coolant. To do this, add up the volumes of all radiators, boiler and pipeline. In order for the calculation to be correct, a layout diagram of all devices must first be drawn up. On average, the volume of one 5 kW boiler is from 7 to 10 liters, and each battery contains 13.5 liters. Don't forget to add the volume of the expansion tank.
Preparing the premises
If the heating system pipes are located on the surface of the wall, then no special preparatory work is required. It is only recommended to complete the finishing of the walls, since it is impossible to paste wallpaper or other material behind the radiators.
In a situation where the pipeline will be hidden inside the walls, a fine will need to be prepared. The easiest way to carry out the work is with a hammer drill.
An important part of the preparation is determining the location for the boiler. More often, floor-standing models are placed in basements. Wall-mounted appliances can be located in utility rooms, designated boiler rooms or bathrooms. The main thing is to protect the surfaces around the device with non-flammable materials.
Then they organize the opening for the chimney. Its size and location depend on the design of the boiler. Detailed instructions are prescribed in the instructions for the device.
Selection of radiators and pipes
When designing a heating system, the correct selection of pipes plays an important role. Products made from polypropylene are considered the easiest to install. But in the Northern regions their installation is undesirable. When the boiler output is above 95 degrees, such pipes can melt. This increases the likelihood of them breaking and damaging property in the apartment.
Metal pipes are most efficient. But many have to abandon them due to the high price and complexity of installation. Therefore, metal-plastic products are the best option.
The diameter of the pipeline is determined based on the number of radiators. If you plan to install 4 - 5 batteries in a room, then 25 mm pipes for the main and 20 mm for the jumpers are suitable. If there are from 6 to 8 radiators, choose models with parameters of 32 mm and 25 mm, respectively.
For the Leningrad system with natural circulation, the minimum pipe size is 40 mm. And the more batteries you need to install, the larger the size you choose.
Among radiators, the most popular are aluminum models. They are lightweight, heat up quickly and have high heat dissipation. Their advantage is also their low price and ease of installation. However, such batteries can be installed in a house with good quality water. Otherwise, they will quickly become unusable. They also should not be left without water for a long time. For example, if the heating system in a country house or house is drained for the summer, then it is better not to use such radiators.
Classic cast iron models are reliable and durable. They are not subject to corrosion and are not demanding on the characteristics of the coolant. But they are heavy and take a very long time to warm up. Therefore, the efficiency of such a battery is low.
Bimetallic radiators are the best option for heating in a private home. They have a protective shell, making it impossible to get burned on the device. Such batteries can withstand large pressure drops and water hammer, they are durable and reliable.
Accounting for slope and distances
Creating the correct pipeline slope is especially important for Leningradka systems with natural circulation. For full movement of the coolant, the slope should be 10 mm per 1 meter of pipeline. If it is not possible to implement such a design, it is possible to reduce this parameter to 5 mm per 1 meter of pipe.
When installing the pump, it is also not recommended to install pipes strictly horizontally. But in this case, it is enough to organize a minimum slope of 2 - 3 mm per meter of pipeline. Thanks to this, it will be possible to freely drain water during repair work or before preserving equipment.
Heating system assembly Leningradka
The assembly process of a single-pipe system is divided into several stages:
- Installation of a heating boiler. For gravity flow schemes it is lowered 0.5 - 1 meter below floor level.
- Installation of radiators. It is recommended to mount them directly under window openings. If this is not enough, then hang additional devices along blank walls.
- Placement of the expansion tank. Modern boilers often already contain a tank, so there is no need to purchase one additionally. If it is not there, then the container is mounted above the boiler level on a separate riser.
- All elements are connected by pipeline. At the same time, a circulation pump is installed in the system.
Jumpers are welded into the main line. They are manufactured with bends. When calculating the distance between them, an error of 2 mm is taken into account.
A separate expansion tank requires insulation. This will reduce heat loss and prevent the liquid from freezing.
Welding work
If metal pipes are chosen for the heating system in a private house, then welding work will have to be carried out. All joining parts are pre-cleaned with a file or grinder. Afterwards they are washed and degreased.
It is permissible to use gas or electric arc welding. The first is realized using filler wire, due to which a strong seam is formed. Electric arc welding uses special electrodes.
When connecting the main line to the jumper, it is important to determine which end to weld first. This depends on the specific arrangement of the elements. A situation is possible when, after connecting one edge, on the other side there is no space left between the tee and the pipe to bring the welding machine.
What needs to be done before launch?
Before starting the Leningradka heating system, it is important to make sure that there is no air in it. To do this, you need to open all available Mayevsky taps. It is also necessary to check all threaded and welded connections for leaks.
Water heating also requires temperature balancing. This work is carried out using a needle valve installed on the pipeline. Only after the temperature has been equalized in all radiators can we prepare for the system to be fully operational.
Adjusting the heating system parameters automatically
There is a special automatic device that regulates the temperature of the coolant in the circuit by sending commands to the mixer - it is called a servo drive. This device works like this: a thermostat or sensor installed in the room measures the temperature of the coolant, air and floor of the premises, and sends a signal to the servo drive. It, in turn, moves the flaps of the three-way or four-way valve to the appropriate position, according to the sensor data.
In particular, the steam temperature is regulated by moving the damper in the mixer. As a result, the underfloor heating circuit is blocked, and some of the water enters the return line. This leads to a decrease in floor temperature. As soon as it reaches the minimum value, the servo drive turns on again and opens the damper to mix hot coolant into the circuit. This process is cyclical.
Fundamental features of the functioning of the Leningradka
As already mentioned, the Leningrad heating system wiring diagram involves the sequential connection of all devices starting from the boiler.
Therefore, the temperature at the inlet of the coolant return pipe will be much lower than at the outlet of the supply pipeline. It is thanks to this temperature difference that water naturally, according to the laws of physics, circulates along the circuit of the heating system. At the same time, the single-pipe “Leningradka” scheme, despite all its apparent simplicity, can be used even in two-story buildings. Since in the provided scheme it is possible to lay the pipeline below the level of the floor surface, it is necessary to worry about high-quality thermal insulation. If this issue is neglected, then the efficiency of the Leningrad heating system will significantly decrease and, in addition, the structural elements of the floor will overheat greatly, since the temperature of the coolant in the pipe is quite high.
Pros and cons of the Leningrad system
The advantages of a single-pipe heating system are:
- Low cost: the most important “plus” is that of all types of heating, Leningrad is the least expensive. Both pipes and fittings are required for it in minimal quantities. Installation costs, which are the least labor-intensive, are also reduced.
- Simple device: this quality is evident not only during installation, but also at the design stage. If in a two-pipe system, due to incorrect calculation of diameters, zones with weak circulation or even stagnation of the coolant can form (this phenomenon is called imbalance), then when constructing a one-pipe system you don’t have to worry about this - the working medium will flow through all radiators under any conditions, since She simply has no other way.
- Possibility of hidden pipe laying: since the radiators are connected by just one pipe, it can be located at any level (in a two-pipe system, the supply line must be laid above the radiators). Taking advantage of this opportunity, the pipe is often hidden in the floor structure, but even just laid along the baseboard it will not be particularly noticeable.
As for the disadvantages of a single-pipe system, the most important of them have already been mentioned by us - uneven heating of the room and significant hydraulic resistance of the circuit. The latter circumstance does not make it possible in some cases to include a heated towel rail in the system.
Also, the “disadvantages” include the impossibility of individually adjusting the heat transfer of radiators and repairing them without shutting down the entire system.
Technical essence of "Leningradka"
Typically, a heating system is built on the basis of two lines - direct (supply) and return (collection). Radiators are installed between them - heat-removing elements, which in this case are located parallel to each other.
Single-pipe and two-pipe heating systems.
The idea that illuminated the minds of the creators of the Leningradka was very simple - to combine the collection and supply lines, while halving the number of pipes , as well as simplifying and speeding up installation.
However, in this case, the radiators can only be arranged in series - the coolant passes through them one by one, giving the first of them most of the heat and overheating it .
Overheating of the first radiator in a single-pipe heating system is dealt with in different ways: by changing the diameters of the lines, the number of sections and other methods, more like shamanic dances with a tambourine.
Special schemes for its construction are also used, which are compromises with the two-pipe one.
Two main types of schemes for constructing a single-pipe heating system are used:
1. Horizontal;
2. Vertical.
Advantages and disadvantages of Leningradka
What are the advantages of a single-pipe Leningradka for a private home?
- Minimum costs for system modernization;
- Uniform heating of rooms;
- Possibility of adjusting the temperature in the rooms;
- No costs for additional equipment;
- Easy to install.
Not without certain disadvantages:
- Difficulty in expansion - it is possible to increase the length, but within limited limits;
- Inability to connect heated floors - for this you need to lay a two-pipe system;
- Additional costs for a circulation pump - if you need to heat a large building.
Despite the shortcomings, the use of the Leningradka scheme in small private houses is completely justified. In the case of installing a closed system, the costs will be higher.
Types of heating system Leningradka
A two-pipe heating system has many advantages. It allows for uniform heating of the rooms, since the temperature of the coolant throughout the entire system is almost the same. The disadvantage of the two-pipe scheme is its high cost - you need to buy more pipes and make many connections. But it allows you to heat private houses of any size.
Single-pipe heating systems differ from two-pipe heating systems in that they require lower installation costs and are simpler.
If the household is small, then creating a complex and expensive two-pipe system does not make much sense. It is best to save money and install a single-pipe system. It will ensure heating of all rooms and will reduce installation costs. As we have already said, such a scheme will lead to the fact that the distant rooms will be noticeably cooler - this is due to the cooling of the coolant as the radiators pass successively (this is exactly how the coolant flows in such systems, returning to the boiler through one whole pipe).
What to do in this situation? We recommend using a single-pipe heating system with natural circulation “Leningradka”. How does it differ from standard single-pipe heating? The thing is that in conventional heating the coolant passes through the pipes sequentially, giving them all its heat. In Leningradka, the radiator inputs and outputs are closed by a jumper/bypass. What does this give?
- The coolant flows not only through the radiators, but also through the jumpers - this compensates for the decrease in its temperature;
- It becomes possible to regulate the temperature in the rooms - the coolant flows only through the jumper, through the jumper and radiators, only through the radiators;
- Hydraulic resistance is reduced - the natural flow of coolant is improved.
The Leningradka heating scheme in a small private house means savings on materials and uniform heating of all rooms.
When shutting off the jumper/bypass or heating battery, you should be wary of completely shutting off the heating system - this is unacceptable, as it leads to overheating of the heating boiler and the activation of the automatic system, which prevents its breakdown.
One of the distinctive features of the Leningradka is the bypass, on which it is advisable to install a tap, as well as on the taps going to the radiator.
The Leningradka heating system with forced circulation may be required when heating large houses. For example, you decided to add a couple more rooms to your house, but you don’t want to spend money on laying a two-pipe system. In this case, you need to take care of improving the coolant pressure in the system - for this it is supplemented with a small circulation pump. What will he give?
- Improved coolant flow - it will be able to overcome the hydraulic resistance of pipes and connections;
- More uniform heating - the water simply will not have time to cool down, since it flows through the pipes at an increased speed;
- The possibility of increasing the maximum length of horizontal sections - the system will be able to heat a large house.
In terms of efficiency, Leningradka is close to two-pipe systems, but this is only true for small houses. In large buildings it is impossible to compete with two-pipe heating.
Approximate calculation of the Leningrad heating scheme
Using the calculation example, it will be easy to see that designing this system is really not difficult.
Basic data for calculation:
- area of the building/apartment broken down by individual premises;
- ceiling height;
- information about the orientation of the external walls of the premises to the cardinal directions and the number of such walls;
- number, type and size of windows and doors.
A table for calculating a one-story house according to the proposed layout may look like this.
The required heating output is calculated using an online calculator for a ceiling height of 2.5 m and an outside temperature of -15 degrees Celsius. We believe that the thermal insulation of the walls is good, and there is a warm attic above the rooms.
| Room | Area, sq.m. | Presence and orientation of external walls | The presence of a balcony or entrance door | Availability, type and size of window | Required heating power, kW |
| Tambour | 5,45 | Three, S, E, W | Entrance | Single, double glazing, 1000x1500 mm | Not heated |
| Bathroom | 6,3 | Two, Yu, Z | No | Single, double glazing, 700x500 mm | 0,5 |
| Bedroom | 11,96 | Two, Z, S | No | Single, double glazing, 1500x1500 mm | 1,07 |
| Living room-kitchen | 23,02 | Two, S, B | No | Two, double-glazed windows, 1500x1500 mm | 2,05 |
| Utility room | 4,48 | Two, V, Yu | No | Single, double glazing, 700x500 mm | 0,36 |
| Total | 2,98 | ||||
With such low heating needs, the number of radiators for each room (except technical) is taken one at a time; the number of sections of bimetallic radiators is determined using an online calculator.
For the bathroom you will need 4 sections, for the bedroom 8, for the living room-kitchen 16. Considering that there are two windows in the living room, it is reasonable to divide the heating into two radiators - under each window, distribute one radiator of 8 sections.
Important: this calculation gives an approximate and, with a high degree of probability, an underestimated value of the required power of heating devices. It is advisable to increase the numbers by 10...15%.
Thus, we can assume that the bathroom will need 5 sections, in the bedroom and kitchen-living room - 9 instead of 8. However, radiators are usually produced with an even number of sections, so we accept 6 for the bathroom, 8 for the bedroom, 8 and 10 for the kitchen -living room
Next, you need to determine the total volume of coolant. To do this, you need to know the internal volume of each radiator, boiler and pipes. Without an accurate plan for laying communications and knowledge of the passport data of the battery and boiler models, this calculation cannot be performed. The volume of the expansion boiler is also added here, approximately 15% of the total volume of coolant in the system. Taking the data on average, we can assume that an electric boiler with a power of 6 kW has an approximate volume of 7...10 liters, the total volume of radiators at the rate of 0.39 liters per section is 13.5 liters. We add here the internal volume of the pipes and expansion tank - we get approximately 35...45 liters of coolant.
Leningradka installation sequence
The installation itself of such a device as the Leningrad heating system with your own hands does not require special skills. In order for everything to be installed correctly, you just need to follow a certain sequence of actions. First of all, it is necessary to lay pipes from the boiler around the perimeter of the room (it is best to use a pipe with a diameter of 1.5-2 inches). Next, an element is inserted near the boiler, to which the main pipe of the vertical main will subsequently be connected. The upper part of this section is the place where the expansion tank should be installed. The last stage of installation includes connecting the radiators.
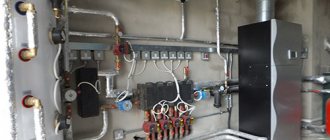
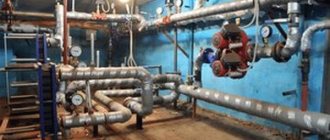
Boiler piping diagram
At the same time, it closes on the heating boiler, thus forming a ring. In this case, an additional element must be cut into the main line near the boiler - a pipe, in the upper part of which there must certainly be an expansion tank.
Its presence in the system is extremely important, since it is designed to increase the pressure in the system, which has a positive effect on the speed of movement of the coolant, and, accordingly, on the level of heating of the radiators
There are two types of insertion of heating devices into the main line. This can be done by connecting the lower battery pipes to the pipe. It is also possible to connect the device diagonally. That is, the inlet and outlet pipes of the radiator are located at different heights.
The Leningrad heating system with your own hands is a very convenient and practical heating system that is perfect for almost any building; the Leningrad heating system for a two-story house or a multi-story house is possible.
Varieties of "Leningradka"
Vertical connection.
Horizontal connection.
Depending on the location of the risers, the Leningradka is divided into horizontal and vertical schemes. The first is used for one-story houses, and the second is installed in buildings with two floors.
According to the method of coolant movement, this heating system can be with natural or forced circulation. The natural movement of liquid along the circuit is carried out due to the specific location of the heating element, expansion tank and pipes. As a rule, the circuit through which water circulates is installed at an angle.
Forced movement of the coolant is ensured using a special pump, which is built into the structure. Typically, this device is mounted in a circuit that is responsible for directing the fluid back into the system.
In addition to the above, the Leningradka heating system is divided into open and closed types of construction.
Open type of heating system
Single-pipe “Leningrad” with bottom connection of radiators.
The open-type Leningradka heating system is a design where the coolant from the heating device flows through a line into the first radiator in the chain, then into the next one, and so on to the final one. After which the liquid flows through the return riser back into the boiler and further along the same pattern.
This circulation process implies that the volume of coolant increases when heated, and accordingly, its excess must be discharged into a special device.
For reference! In an open-type Leningradka, this function is performed by an expansion tank, which is equipped with a pipe. It is with its help that excess liquid is drained during excessive heating.
When connecting radiators to the system, methods such as serial, diagonal and parallel can be used. The last of them is considered the most optimal option, since each radiator is connected separately to the riser, which allows it to be dismantled if necessary, without completely turning off the heating structure.
"Leningradka" closed type
Scheme of the "Leningradka" closed type.
This scheme involves the installation of a membrane expansion tank, which creates an excess pressure within the structure within 1.5 atmospheres. A closed type system requires the installation of additional equipment, such as a pressure gauge, air vent and safety valve.
What is the Leningrad heating system?
Firstly, where did the name itself come from - “Leningradka”? Rumor has it that this is a consequence of the fact that such a system was first used in construction organizations in Leningrad. However, it is very difficult to agree with such a categorical statement - the heating system is so simple that it simply could not but be used in any other regions. Perhaps some technical regulations were developed in the city on the Neva, which then spread throughout the country? But one way or another, during the period of mass urban construction, especially in barracks-type houses and in one-two-story social buildings, this heating system became prevalent. This was explained by its extreme simplicity and maximum efficiency - it was probably simply impossible to come up with something cheaper.
So, “Leningradka” is a single-pipe heating system in which heat exchangers are located on one looped line in series, as if “strung” on it.
The simplest schematic representation of "Leningradka"
Thus, the coolant along the path from the boiler (or from the central heating input) sequentially passed through all radiators, from beginning to end. It is clear that it gradually lost its heating temperature, therefore, in theory, radiators located closer to the boiler are always hotter than those located further away, especially the last ones in the line.
Such a system can operate both with natural circulation (as shown in the figure above) and with the creation of forced movement of the coolant (diagram below). This does not particularly affect the placement of heating radiators.
“Leningradka” can also be organized as a closed type
This type of radiator layout is most often used in one-story construction - when all heating radiators are located on the same level. In this case, the main pipe looping the circuit from the boiler is always placed along the floor. By the way, this makes it possible to place it discreetly without much hassle, decorating it with floor covering.
Classic placement of the “Leningradka” - a ring around the perimeter
However, “Leningrad” can be quite justified in a two-story house (on the Internet you can find wiring diagrams for even three floors). True, in this case, heating will necessarily require forced circulation - creating a natural rise of the coolant to a significant height is quite problematic, since a high-power boiler is required, and a very accurate calculation of pipe diameters in vertical and horizontal sections. And in this case, the profitability of such an approach will be questionable - it is easier to embed a circulation pump of the required capacity into the circuit.
In this case, by the way, it will not matter much which expansion tank will be used. “Leningradka” with forced circulation fits well into both closed and open heating systems. If the circuit is arranged according to a closed principle, hermetically, then both ordinary water and special antifreeze can be used as a coolant (more about this in a separate article on the portal).
The figures, as an example, show the most simplified schemes, which are used extremely rarely in practice. There is a reason for this - it will become clear after becoming familiar with the main advantages and disadvantages of the Leningradka.
Operating principle of the Leningradka heating circuit
The emergence of modern heating equipment and new technologies made it possible to improve the Leningradka, make it controllable and increase its functionality.
The classic “Leningradka” is a system of heating devices (radiators, converters, panels) connected by a single pipeline. A coolant – water or an antifreeze mixture – circulates freely through this system. The boiler acts as a heat source. Radiators are installed along the perimeter of the home along the walls.
The heating system, depending on the location of the pipeline, is divided into two types:
- horizontal;
- vertical.
The system piping can be located either below or above. The upper arrangement of pipes is considered the most effective in terms of heat transfer, while the lower pipes are easier to install.
Bottom connection of devices requires the mandatory use of a pump, which is why the economic priorities of the system are somewhat reduced. The upper option requires precise calculations during the design period and the construction of a booster section, which increases the length of the pipeline and the costs of its construction.
When connecting heating appliances from the bottom to the heating main, it is necessary to provide for a narrowing of the pipes in the area necessary to direct the coolant to the radiator
Coolant circulation can be forced (using a circulation pump) or natural. The system can also be closed or open. We will talk about the features of each type of system in the next section.
Called “Leningradka,” the single-pipe heating system is suitable for one- and two-story residential buildings of a small area, the optimal number of radiators is up to 5 pieces.
When using 6-7 batteries, it is necessary to make scrupulous design calculations. If there are at least 8 radiators, the system may not be efficient enough, and its installation and modification may be unreasonably expensive.
The diagonal connection option in a single-pipe circuit, although it allows you to increase the heat transfer of the system by 10 - 12%, does not eliminate the “skew” in the temperature regime between the first and outer batteries from the boiler
Single-pipe heating circuit
The single-pipe heating circuit has a fairly simple equipment model, which can be examined in more detail in the video. It is necessary to lay a main line from the heating boiler, which will be branched. After this, the required number of radiators or batteries is placed on it. The main line, stretched throughout the house, comes back and connects to the boiler. This method creates a circulation of hot water inside the pipes to uniformly heat a private home.
The hot water cycle can be configured so that it can be turned on forcibly, or so that it circulates randomly. Along with this, the heating circuit can be designed both as a closed type and as an open one, depending on the source of heated water.
At the moment, a single-pipe heating system can be installed even by the standards of current heating design in a private house. At the owner’s discretion, elements such as radiator controllers, thermostats, balancing valves and ball valves can be added to the circuit. With the help of these devices, the heating system of a private home will acquire a modern temperature control model, which will have a positive effect on the overall comfort of its control.
Ball valves on radiators. Click on photo to enlarge.
First of all, it will be possible to lower the temperature in little-used rooms, but you must always set the regulator to the minimum value so that the room does not become damp and maintains its proper appearance. In addition, it will be possible to increase the temperature in the bathroom or bedrooms if desired. The modernized Leningradka also allows you to regulate the heating of a specific radiator, that is, independently of other heating devices.
Along with this, a good solution would be to include a bypass valve circuit in a single-pipe heating system. The advantage of such equipment is understandable, since the repair of each radiator will occur independently of the entire heating system. In this case, it is not even necessary to turn off the system.
Principles of installation of a horizontal single-pipe system
Despite the fact that it is quite simple to equip a private house with a horizontal heating system, this procedure has its own nuance that must be taken into account when designing: the main line must be placed exactly under the floor.
When installing a horizontal single-pipe system, you need to lay the line directly into the structure of the floors or on top of them. You can see this diagram in the video. When choosing the first option, you need to think about insulating the heat that will come from the pipes, otherwise there will be excess heat transfer in this room.
Mayevsky crane. Click on photo to enlarge.
If you place Leningrad in the floor structure, then its surface, as a rule, is equipped for this heating system. In the case of placing a single-pipe heating circuit on top of the floor, the alteration, accordingly, can be carried out directly during the construction period.
The main line is placed at a slight slope so that the liquid inside the pipes can circulate according to a given flow. But the heating radiators are placed at the same height. In addition, it is necessary to install Mayevsky taps on them so that air can be released from the pipes before starting the heating system.
Horizontal heating system. Click on photo to enlarge.
Principles of installation of a vertical single-pipe system
The Leningrad heating system for private housing based on a vertical scheme is installed if there is a need for forced circulation of hot water. This type of installation has its advantage: the radiators heat up faster, even if the main line is made of narrow pipes. But for this circuit to work, a circular pump is required.
In the absence of such a pump (not provided), hot water circulates naturally, without outside help. This scheme is due to a specific installation in which the coolant circulates due to the simplest laws of physics: a liquid with a changed density provokes the movement of masses under the influence of heating or cooling.
Scheme of operation of a vertical heating system. Click on photo to enlarge.
Such a heating system requires a main line of sufficiently large diameter. In addition, it is installed at a certain angle. When envisioning a vertical heating system, you need to design its installation well, otherwise there will be a risk of not reaching the main line to its destination. Its length can be a maximum of 30 m.
Construction schemes
The horizontal single-pipe system is most often used in individual low-rise housing construction. Vertical - in a massive multi-story building.
Horizontal
The main line is a horizontal ring starting at the boiler outlet pipe and ending at the inlet pipe. It runs at a distance of 5–10 centimeters from the floor (sometimes located under it) with a slight slope towards the boiler in the direction of movement of the coolant.
Radiators are installed on it using pipes of smaller diameter. There are two possible ways to connect heat exchangers:
1. Top wiring, when the supply pipe is connected to the top manifold;
2. Bottom distribution - the supply and exit of the coolant is carried out from below.
In a horizontal design, radiators are always flow-through - the coolant enters from one end and exits from the other. This reduces the hydrodynamic resistance of the system.
For normal operation of a system with a horizontal collection and supply line, a number of additional technical solutions are used.
Immediately after the boiler outlet pipe, a vertical riser pipe is installed, at the upper end of which an expansion tank is mounted if the system is open, or an automatic air trap if it is closed. This ensures an increased background pressure in the lines.
It does not have much effect on the circulation of the coolant, since the decisive condition is the height difference between the lower point of the boiler and the upper plane of the first radiator.
However, increased pressure shifts the boiling point to a higher level, which saves a single-pipe horizontal system, the natural circulation in which is usually very sluggish, from water hammer.
Circulation in single-pipe horizontal systems can be either natural or forced.
To activate the natural one, so-called accelerating collectors are used - another vertical pipe, rising through which the coolant falls down, driven by gravity.
This ensures a fairly high speed of its movement along the collection and supply line. However, as practice shows, the use of such a device gives a good effect only in houses with ceilings higher than 2.5 meters.