The principle of operation of a warm water floor from a gas boiler
A water heated floor means a system of pipes through which hot water is constantly circulating, heated by an energy carrier. In this case, a gas boiler. It is not advisable to install such structures in multi-storey apartments, since this is prohibited by law, but in a private house this is the best option.
We suggest you find out which boiler to choose for a warm water floor, how to calculate the power, diagrams and installation instructions.
It is much easier to install a system from centralized heating, but it is inconvenient - you will have to wait for the heating season. The gas system can be used all year round.
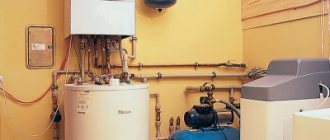
A gas boiler is a specialized unit that heats water and cools liquids using natural gas. The system is equipped with a coolant mixing unit, which has a collector, a thermostatic mixer and a pump, thereby maintaining the required temperature regime. Hot water moves along the contours.
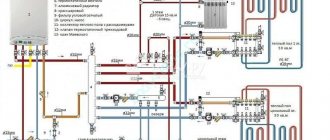
Connecting a heated floor to a floor heating boiler (diagram)
As mentioned above, here we include wall-mounted boilers without a built-in forced system for coolant circulation. Floor heating boilers rarely have a pump in their design. Therefore, the following diagram applies more to them. But the boilers considered in the first option are well suited to such a system.
This scheme includes an external circulation pump, a three-way valve, and other elements that include a pumping and mixing unit. In principle, having already assembled this unit with a manifold, all you have to do is include in this diagram a safety group and an expansion tank if it is not in the boiler itself. We looked separately at how to assemble a manifold with a mixing unit with our own hands, so we will not repeat it here.
Preparatory activities
Before you begin installing a warm water floor, prepare tools, materials, premises, make certain calculations, and draw up a schematic plan of the system.
Premises requirements
Gas boilers are classified as explosive equipment, so you will have to adhere to the basic standards for the premises, which ensure safe operation:
- minimum ceiling height – 2.5 m;
- You cannot install the boiler so that it touches other pieces of furniture - maintain a distance of 50-70 cm on all sides;
- the walls in the room with a gas boiler must be fire-resistant (finish with fireproof materials);
- a ventilation system must be installed;
- minimum room area – 4 sq. m;
- a ground loop is installed in the room;
- depending on the power of the boiler, the cross-section of the chimney is selected;
- the door to the room should have a width of 80-100 cm;
- the room must have access to the central gas pipeline and water supply;
- It is necessary to have a pipeline with cold water.
If there is a central water supply, there is no need to use a pump. This significantly saves the family budget. To connect a water floor system, a manifold distribution unit is required.
Carrying out calculations and creating a project
Design is an important step. First of all, a diagram of the house is created with the rooms where the pipes will be located (over time, people forget the exact location of the system, but the plan will allow you to see it). Be sure to think about where the furniture will be installed, since pipes are not laid in these places.
There are other nuances that must be adhered to:
- one circuit should not exceed a length of 100 m, as the heating efficiency is reduced;
- the length of all contours should be approximately the same (a discrepancy of 10-15 m is allowed);
- retreat from the walls by 28-35 cm;
- the distance between the pipes is 10-20 cm (in harsh climatic conditions there should be a minimum value).
One of the most important points is carrying out all the calculations. It is difficult to cope with such a task on your own, so it is better to entrust this procedure to professionals.
The number of pipes can be calculated as follows: L = S / N * 1.1 , where L is the length of the pipes, S is the area of the room, N is the step length, 1.1 is 10% of the margin for pipe turns.
Eg:
- S = 50 sq. m.
- N = 0.2 m.
- 50/0.2*1.1 = 275 m.
In this figure, do not forget to add the distance to the collector, multiplied by 2, since there are 2 pipes (to the supply and return collectors). Heat loss, wall width, flooring material used, etc. must be taken into account.
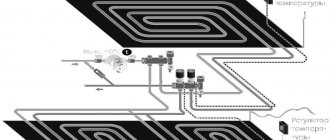
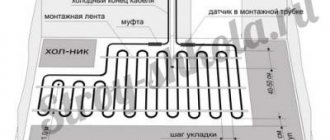
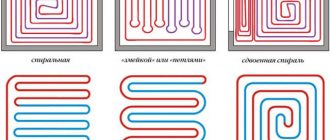
An example of a water floor layout:
It is important to think about how the pipes are installed. Mainly 3 methods are used:
- The snake is a loop-shaped system that covers the entire area. The loops are wall to wall, but hot water only flows down one side.
- The double snake differs from the regular one in that the hot pipes are located throughout the room.
- A snail or spiral is the best option for a private home, since the entire area is heated.
Tools and materials
The first thing to choose is the pipes. They are made from different materials and differ in diameter. What is used:
- Copper pipes are considered the best, as they are durable, reliable and have a high degree of heat transfer. At the same time, the cost is the highest.
- Metal-plastic is a modern material that has received a well-deserved place in the forefront in popularity. The price is lower than copper, the quality is almost the same (they will last several years less).
- PEX is made of polyethylene and is a budget option. There is a significant drawback - it is impossible to achieve an ideal shape, since when water is supplied, the pipes straighten.
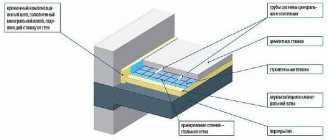
The second important material is insulation, as it ensures heat preservation. For a warm water floor powered by a gas boiler, the following is most often used:
- EPPS – extruded polystyrene foam. It is characterized by high strength, low heat conductivity, resistance to high humidity, and affordable cost. The material is produced in the form of slabs with a thickness of 0.2, 0.3, 0.5, 0.8 and 10 cm (dimensions: 50x100 cm, 60x125 cm). The connection method is grooved, so EPS is installed quickly and easily.
- Thermal insulation profile mats are made of high-density polystyrene foam. A fairly convenient material for a water floor, since the surface is equipped with round or rectangular “spikes”, which makes it convenient to place pipes. The thickness of the mats varies from 1 cm to 3 cm, the size is 50x100 cm or 60x120 cm. The downside is the high cost.
You can use other more affordable materials, but those described above are considered the most optimal. Eps can be purchased with a foil layer on which markings are applied, but the cost of this type of material is higher. In addition, for a cement floor, the presence of foil does not make sense (there is no reflectivity, concrete corrodes aluminum).
Consider the thickness of the insulation based on the following requirements:
- It is better to lay material 10 cm thick in 2 layers on a soil base;
- when paving on a concrete screed, 5 cm is sufficient;
- when laying on the 2nd floor - 3 cm.
Additionally, you will have to buy fastening material - disc-type dowels, which are attached in the center and at the joints so that the slabs do not float up when the screed is poured from above.
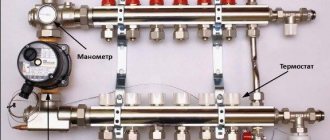
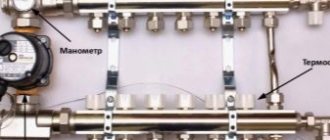
The third toolkit is a collector-mixing unit. Its purpose is to receive coolant, distribute heat throughout the system, regulate temperature and flow, balance circuit loops, and remove air. Collectors are different, but for water heated floors powered by a gas boiler, they buy a unit with a special configuration.
What to pay attention to:
- The manifold block must be equipped with various fittings - balancing valves for adjustment with a flow meter, which are mounted on the supply section, as well as shut-off valves or thermostatic valves for return. An automatic air vent and drain valve must be present.
- To connect pipes to the manifold, fittings (compression, axial or press fittings) are used.
- To mount the collector-mixing unit, buy a bracket that provides the required center-to-center distance.
- Manifold cabinet of open or closed type.
The collector unit is installed so that the length of the loops in all rooms is approximately the same.
Other materials and tools:
- damper tape;
- reinforcing mesh;
- sand;
- cement;
- crushed stone;
- plasticizers;
- metal profiles;
- accessories;
- taps.
Installation of additional automation
The diagram - boiler - metal circuit - collector - warm floor - is the simplest. It is not complicated by additional equipment.
If several circuits are installed in a house, the coolant in each system must be heated to a certain temperature, then an additional control unit is used. It is a three-way valve with a thermal head and a circulation pump.
Automation will allow you to withstand different modes in individual rooms. The optimal air temperature in the bedroom is 18-20 0C, in the living room 22-24 0C, in the bathroom 30 0C.
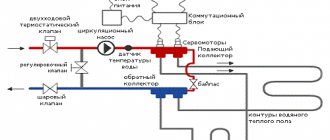
The automation is connected to the distribution comb. A bypass is installed between the supply and return collectors. Additional equipment is connected to it. A rotameter is installed at each outlet of the supply manifold. The return outlets are equipped with thermal heads.
- The hot coolant enters the floor line. If the temperature of the liquid in the system rises, the three-way valve closes the outlet of the supply circuit and opens the outlet for the return.
- In the mixing chamber, cold water is mixed with hot liquid from the boiler.
- When the temperature in the water-heated floor decreases, the valve closes the return outlet. Hot coolant is pumped into the floor circuit.
You can connect the underfloor heating system from the boiler yourself. It is necessary to choose the right boiler and determine the water circuit diagram. A separate circuit is drawn for each room.
Additional automation is installed on the distribution comb. Experts recommend maintaining the technology for connecting plastic pipes to collectors.
YouTube responded with an error: The request cannot be completed because you have exceeded your quota.
- Related Posts
- What equipment is needed for water heated floors?
- What kind of liquid should be used for underfloor heating?
- Do you need an anchor bracket for underfloor heating?
- How to install heated flooring under a shower stall?
- How to make a warm floor?
- How is a heated floor connected?
Useful tips
To ensure that the underfloor heating system from a gas boiler operates in the correct mode, follow some rules. Experts recommend the following:
- When installing a gas boiler, be sure to install a chimney and additionally an emergency purging system for the circuits. This is necessary in case of breakdown.
- Install compressed air cylinders. They make it possible to operate uninterruptedly at the lowest air temperatures.
- Purchase boilers, manifolds and other components only from trusted manufacturers.
- The maximum pressure for a warm water floor is 10 bar.
- When purchasing a gas boiler, pay attention to the set of functions, since some models cannot be used for water heated floors.
- Try to install the boiler in a living room, and not in the basement, etc., since in the event of a malfunction in winter, the system freezes.
- Do not make the top screed until you have checked the functionality of the system (pressure testing).
How to connect a heated floor to a heating system
We do not encourage anyone to circumvent the laws, but simply provide information on how such a connection can be implemented, especially since the given diagrams are also suitable for private houses, where, as they say, everyone is their own boss.
Schematic representation of a water heated floor system
For normal operation of the equipment, you need to provide two basic conditions. The first is the supply of water to the system, heated no more than 55 degrees (this is the maximum). High temperatures can damage the floor covering, and it will be uncomfortable for you to move on such a hot floor - the optimal temperature is 26-30 degrees. The second point is to ensure only the required heat consumption, otherwise you will get a drop in battery performance, which defeats the purpose of the whole idea.
Now let's look at several connection options and compare which one best meets the specified requirements.
Direct connection
This method is the most primitive - the heating circuit is directly connected to the radiator supply and return (two-pipe system). Such a system will work more or less normally only if the following conditions are met:
- The total area that will be heated by the heated floor should not exceed 100 square meters.
- The water is heated by a gas boiler, which can automatically maintain the coolant temperature at 40-50 degrees.
- The boiler room is equipped with a good circulation pump, the performance of which will be sufficient to operate the entire heating system.
The underfloor heating circuit is connected directly to the radiator
In principle, this connection option has the right to life, but it has several serious disadvantages. Firstly, water will always move along the path of least resistance, and this will be a central line, and not winding underfloor heating pipes with radiators. Secondly, if there is serious frost outside, you will start to heat it up more, which will cause the floors to warm up to an uncomfortable temperature for walking.
Also, a funny situation occurs when the “masters” connect the heated floor circuit to the return line into a gap. As a result, coolant consumption decreases, and both radiators and heated floors stop heating.
Connection via valves
It would be much more correct to connect the heated floor circuit through RTL thermostatic valves. They are placed on the return line, after which it is set to the desired temperature.
RTL valve
RTL valve prices
RTL valve
This scheme works as follows:
- The device measures the temperature of the coolant circulating in the heated floor.
- As soon as it reaches the level specified by the user, the thermostatic valve in the system closes. Circulation in the heated floor stops, water flows only through the radiators.
- The warm floor cools down, giving off heat to the concrete screed, which then passes into the floor covering.
- As soon as the temperature drops to a threshold level, the valve opens again and circulation resumes.
Serial connection of underfloor heating
This system also has disadvantages. The most important thing is the limitation on the length of the pipeline, which should not exceed 50 m. If you connect a longer circuit, the heated floor begins to warm up unevenly - the system has a very high hydraulic resistance. To solve the problem, the circuit is developed into 2 or 3 separate parts.
However, there are more advantages:
- You can do this kind of heating in any room, and there is no need to connect it to a boiler. Savings on materials are evident.
- In terms of price, such a solution will be much cheaper than options with mixing units and powerful pumps.
- If air thermal heads are installed on the radiators, then the heated floor can function in the summer, while the radiators will be cold.
Connection of underfloor heating and heating system
This connection scheme can also be used in apartments with central double-pipe heating.
Advice! Dirty coolant, which is not uncommon for central systems, will quickly lead to failure of the RTL valve.
Connection to one-pipe distribution
The single-pipe system or “Leningradka” is known for its trouble-free operation and high reliability, but it has one serious drawback - the temperature of the water in the last radiators is significantly reduced, which is why a lower temperature is set in rooms far from the boiler. If you also connect a heated floor to such a system, you can expect an even greater drop in temperature, plus you will need to install a pump, since the water itself does not circulate well in such a floor.
A single-pipe system is characterized by a temperature drop closer to the end of the circuit
In general, a warm floor with this connection has the following parameters and requires:
- For everything to work properly, there should be no more than 5 radiators in the circuit. They are connected by a DN pipe.
- The insertion of the heated floor is done at the end of the circuit, after all the radiators, so as not to reduce the temperature on them.
- The distance between the feed and return taps must be at least 30 cm.
- It is also necessary to install a three-way mixing valve so that the temperature in the circuit is maintained at the same level.
Three way mixing valve - The main element of such a system is a three-way valve that mixes hot and cold water, obtaining the desired temperature of the coolant that circulates in the heated floor.
- A pump is connected to it for forced circulation - it drives water through the heated floor loop, and the valve adds hot water to it as needed.
Series heating circuit
Interesting to know! This scheme can be used in old houses. Let’s say right away that you won’t be able to get permission for this from the energy company, so all existing connections are illegal.
I use this connection quite rarely, due to its instability. The pump in the system creates increased pressure, and when the valve opens slightly, it is transmitted to the radiators, causing them to become unbalanced, negatively affecting water flow. Such a connection is unpredictable and sometimes fraught with accidents, so don’t be clever and connect the heated floor normally, from the boiler. Savings are not needed in everything and not always.
Traditional heating floor connection diagram
Any self-respecting plumber will tell you that for a normally functioning heated floor system, a mixing unit is necessary. This system allows you to organize separate control of floor heating in rooms, which is very convenient in practice. Of course, this means the purchase of additional expensive equipment and greater pipe consumption, but the system as a whole will always work stably, and it will be devoid of the shortcomings that we voiced earlier.
Complex mixing unit
Prices for mixing unit for heated floors
Mixing unit for heated floors
In practice, the following connection options are used:
- A comb is installed, which is equipped with thermal heads if the total length of the circuit exceeds 50 m. The operating principle is the same as that of inserting into a pipe through an RTL valve, only the regulators are installed separately for each circuit. Circulation through the system is carried out by a pump installed in the boiler room.
- The system may also include a two-way mixer combined with a manifold . It is placed on the supply and controlled by a thermal head, the temperature sensor from which is hidden inside the manifold. In such a scheme, an additional pump is needed that will pump water through all the separated loops of the heated floor.
- The three-way mixing valve can be installed together with a thermostatic valve. This scheme is the most advanced and is suitable when the heat consumption in the circuit is very large.
Manifold for underfloor heating
Security measures
Be sure to follow the safety rules when operating a heated water floor from a gas boiler:
- install a gas analyzer - it’s expensive, but you will be sure of safety (if the burner goes out unexpectedly, the protective system is triggered);
- Avoid placing flammable objects near the boiler;
- Do not repair the gas system yourself - be sure to call a gas service employee;
- the boiler must be installed on a fireproof base;
- If a gas leak occurs (a specific smell appears), immediately turn off the supply and call the gas workers.
A DIY water heated floor from a gas boiler will significantly save your family money. To ensure safety, strictly follow all installation requirements. If you are not confident in your own capabilities, consult with specialists or entrust such a complex task to professionals.