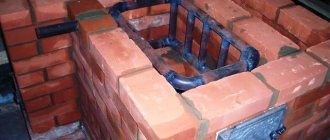
The main elements of a fireplace stove with increased heat capacity are in the following order:
A fireplace stove can replace any heating appliances and can become an excellent oven. You can learn how to install it at your dacha from the video. It is the winding serpentine air duct that allows the heated air in the firebox to rise, pass through the entire structure of the stove and thereby heat the stove bench. On the 9th and 8th rows, overlap is performed on the firebox and bed. Next are the rows for the hob and oven, and another row that separates the oven from the wall. After the lintel has been laid out, it is necessary to use simple or, if desired, decorative masonry above the oven chamber: with a wedge or an arch. Next, a metal corner is used above the stove for cooking, and a decorative shelf is made from it. Subsequent rows will combine all the chimneys into one and windows will be made on the walls of the stove.
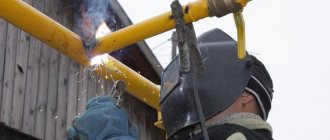
Next we lay out the pipe. It has a square shape, and the optimal pipe laying will be 2 and a half bricks. The ceiling through which the pipe passes is insulated using basalt slabs in several layers.
When we build brick ovens, we need to know all the nuances and have designs; even the smallest detail can disrupt the design.
Review of the best domestic fireplace models
Russian is very noticeable on the fireplace stove market. Consumers leave positive reviews about the company's products. The best assembly is considered to be the stoves from the Ardenfire series. The products use some elements from the best foreign manufacturers: Germany, France and Japan, and are assembled using unique technologies. Each series is characterized by being equipped with heat-resistant glass, sufficient power up to 12 kW and compactness.
Corner stove-fireplace "Amur" - wood-burning
The stove is designed to heat 90 sq. m area. The manufacturing technology is combined: the firebox is laid with fireclay bricks and lined with high-quality steel. The brick is designed for 5 years, after which it should be replaced. The firebox door has high-quality heat-resistant glass of Japanese origin. There is excellent heat flow through the door and good visibility of the fire. Glass is self-cleaning and can withstand high temperatures.
Corner stove-fireplace “Cupid”
The firebox has a volume of 73 liters and can provide power up to 10 kW. The weight of the entire structure is 157 kg, which allows you to quickly install the fireplace stove. High efficiency 3 kg of firewood allows you to keep the room warm for 8 hours.
Attention! This is a wood-burning model of a corner stove-fireplace for a summer cottage; it cannot be heated with coal. Guarantee of at least 10 years of work
Guarantee of at least 10 years of work.
Corner fireplace-stove "Neva" - wood-burning
A very compact model with a height of 87 cm and a width of 64 cm. The small size of the fireplace allows it to be installed in the smallest cottage. The model has gained well-deserved popularity among domestic consumers.
Corner fireplace-stove "Neva"
The power is enough to fire 60 square meters. m. of housing. This compact model warms up the home in 3 hours; you will need to add 3 kg of firewood to keep the room warm for 8 hours.
The weight of the structure is 95 kg, allowing installation to be completed in a couple of hours by connecting the pipe to the chimney. The manufacturer provides a 1-year guarantee of flawless operation.
The group's products produce products that comply with European standards, but are designed specifically for our climatic conditions.
Corner wood stove fireplace "Bavaria"
The domestic manufacturer Ecofireplace produces long-burning stoves that are popular with private homeowners. The company supplies a wide variety of models of heating structures, including high-quality options for corner wood-burning stoves and fireplaces for country houses.
Fireplace stove "Bavaria"
A sample of European quality, with small dimensions, it is capable of heating a room of 80 square meters. m. Made of high quality steel, the grate is made of cast iron, the self-cleaning system is heat-resistant glass. It has a very stylish look: the glass is framed by black steel doors, the side panels are trimmed with ceramics.
The design is equipped with a hob, without an oven. The depth of the firebox allows you to place wood logs up to half a meter, while the height of the fireplace is 86 centimeters. As on almost all Bavaria models, the corner fireplace stove has an economical fuel consumption mode.
The service life of Bavaria stoves is at least 10 years.
A fireplace is very useful for any home, and it is unlikely to get in the way or spoil the appearance. Such heating structures have many advantages that owners of home fireplaces enjoy. External energy independence of housing; if gas or electricity is turned off, the house will remain warm due to heating by the fireplace. It has high performance and can be used as the main source of heat for a summer residence. Fuel can be purchased as needed, at any time of the year.
Potbelly stove made of sheet steel and fireclay bricks
Greetings to all DIY enthusiasts, I offer for your consideration instructions for making a potbelly stove from sheet steel with your own hands. The inside of the oven is lined with heat-resistant brick, which protects the steel from overheating and also allows it to accumulate some heat. To make the stove, the author used a sheet bending machine. At the top of the stove there is a fairly large plane that should get very hot. You can cook or reheat food on this surface. The stove has a large firebox with a large door, and also has a convenient ash pan and an excellent ash pan. If the project interests you, I suggest you familiarize yourself with it in more detail!
Materials and tools used by the author:
List of materials:
- Sheet steel;
- a piece of round pipe for the smoke pipe; — steel plates; — sealing cord for furnaces; - door hinges; — bolts and nuts; - grate bars; - heat-resistant brick; - square pipes for legs; - heat-resistant paint. List of tools:
- grinder; — sheet bending machine; — band cutting machine; - welding machine; - tape measure, marker and other measuring tools. Homemade manufacturing process:
Step one. Cutting the material
First of all, the author drew all the necessary details on the sheet and started cutting. If you are interested in the sizes, they are all in the video. The author cut it using a grinder. At the end, the resulting workpiece remains to be bent on a sheet bending machine, and the finished body for the furnace is obtained. For the stove you will also need to cut out the bottom and smoke pipe from a piece of round pipe.
Frames made of steel plates need to be welded around the combustion window and the ash cleaning window. The doors will then rest against these frames, and an insulating cord will run along the contour of the doors.
Step three. Damper
The author installed a damper in the smoke pipe so that after heating, it was possible to close the draft through which heat would escape from the room. Be sure to cut out a piece of metal in the damper so that it does not close completely. This is done for safety, so that if something happens, carbon monoxide does not leak into the room.
Step four. Doors, lid, legs
We make doors from sheet steel; their edges can be bent with a bending machine. Each door has grooves along the contour into which the author places a sealing cord.
We make the oven lid from thick sheet steel, since it will heat up to high temperatures. If there is no such steel, you can cover the lid with heat-resistant bricks.
The legs for the stove are made of profile pipes; at the bottom there is a grate made of steel plates. You can store firewood, dishes, etc. on this grill.
Step five. Brick
Inside, the author lined all the walls of the furnace with heat-resistant bricks, which were placed on edge. This design will prevent sheet steel from overheating and burning out. The brick will also allow you to accumulate some heat. Kiln grates were installed in the oven, and special steel plates were welded to fix the bricks.
The finishing touch was an additional internal door; the author hung it with a hinge. This door prevents smoke from escaping into the room when adding firewood.
This completes the project, I hope you liked the homemade product and found useful thoughts for yourself. Good luck and creative inspiration if you decide to do this again. Don't forget to share your ideas and crafts with us!
Source
Become the author of the site, publish your own articles, descriptions of homemade products and pay for the text. Read more here.
The working process of a Russian stove
Despite serious competition and a solid history, the design is still in demand among country property owners. Based on how the Russian stove is structured from the inside, it will be possible to focus on the dimensions from the outside and accordingly plan a place for it and lay the foundation.
Before you put together a Russian stove, you need to understand its operating principle - the design is a periodic heating device, that is, when burning wood, it accumulates heat, then releases it for almost a day. The structure can warm or languish like this for almost a day, which makes it possible to cook baked milk in it, steam porridges and soups, without controlling the process.
Before making a Russian stove, you should build a separate foundation that is not connected to the tape, since the structure is usually heavy
This is especially important when the house “dances” on heaving soil during freezing and thawing. In this case, the stove will move along its own amplitude along with its foundation, without destroying the finish or affecting the walls and openings
Cross-section of a Russian stove during heating and simmeringSource 2proraba.com
Work principles:
- the entire structure stands on a brick or concrete slab;
- firewood for kindling is stored in the stove, where it dries very well and, when ignited, lights up instantly;
- the top of the sub-peck is made with a hemispherical arch, like a trough;
- sand, clay, broken brick - any heat-intensive material is poured onto it, and the front part of the firebox (cooking chamber) is laid on top of it under the stoves; it is placed without clay mortar.
If you ignore the topping, then you can forget about real hearth bread and pies. By the way, they are baked on cabbage leaves.
Next comes an injection with an overtube and a highlight in the form of a tapering nozzle. On the sides of the fold near the walls there are ash pits - recesses for smoldering coals (for the next kindling) and ash. Sometimes they are raked into a fringe - a part of a cast iron or stone slab (pole) protruding from the face (brow) of the stove.
To reduce costs and cleanliness in the room, there is no need to make an ash pan and ash pan. Previously, they were raked into a nook of the mouth, then the coals of birch, maple, elm, oak and aspen retained their heat for only a day.
Cooking in a cast iron pot over coalsSource yandex.net
Most likely, this is where the belief came from that the Russian stove is quite picky when it comes to fuel. But this is not so - it works on any solid fuel, including:
- brushwood;
- dung;
- dead wood;
- sawdust
- straw;
- peat briquettes.
Thanks to this configuration, the combustion chamber acts as an economizer, where the following happens: the smoke circulation heats the air, which enters the firebox without removing oxygen from it and without interfering with combustion - mixing of heat flows should not occur. In essence, a combustion chamber is an energy recuperator (heat exchanger).
Before building a Russian stove, you should check the dimensions in advance - this is important so that the structure does not smoke, does not cool down quickly and does not use a lot of firewood. For the same purpose, perfectly smooth haila vaults are made.
Moreover, they cannot be plastered, so the bricks are chipped from the inside and polished until glossy - then there will be no swirls in the slit.
Smoke from the stove goes into the chimneySource stroyfora.ru
Device and principle of operation
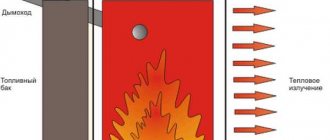
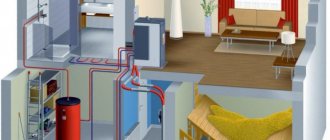
The fireplace stove is installed on a foundation slab, arranged on a drainage pad made of sand and crushed stone. The structure has two combustion chambers. The one that forms the working area of the fireplace has an increased height and can be equipped with a glass door. Often it has a curved shape - this way it is possible to increase the area of the reflective surface.
Scheme of gas movement inside a combined type heating device
The firebox is made in both rectangular and trapezoidal shapes. In the latter case, it tapers to the rear wall, which is inclined, with a small threshold - a fireplace tooth or a gas threshold. Its purpose is to hold carbon deposits that settle on the walls of the chimney. Above the firebox there is a smoke collector, which goes into a direct gas channel.
The firebox has reduced dimensions and lower air supply. Depending on the configuration of the heating device, the roof of the firebox is equipped with a hob or covered with brickwork. Combustion products from the firebox rise into vertical channels arranged in accordance with the schemes of Dutch or Swedish stoves.
Internal structure of the fireplace stove
To prevent combustion products from entering the room, the smoke ducts of both devices are equipped with valves, which are closed as necessary. In addition, the chimney is equipped with an additional damper, which prevents heat from escaping after the fuel has completely burned out.
Alexey Madyanov: construction of stoves and fireplaces
Privacy Policy
Who are we?
Our website address: https://pechidoma.rf.
What personal data do we collect and for what purpose?
Comments
If a visitor leaves a comment on the site, we collect the data specified in the comment form, as well as the visitor’s IP address and browser user-agent data to help identify spam. An anonymized string created from your email address (“hash”) may be provided to the Gravatar service to determine whether you are using it. Gravatar's privacy policy is available here: https://automattic.com/privacy/. Once a comment is approved, your profile picture will be publicly visible in the context of your comment.
Media files
If you are a registered user and upload photos to the site, you may want to avoid uploading images with EXIF metadata as they may contain your GPS location. Visitors can retrieve this information by downloading images from the site.
Contact forms
Cookies
If you leave a comment on our site you may opt-in to saving your name, email address and website in cookies. These are for your convenience so that you do not have to fill in your details again the next time you comment. These cookies are stored for one year. If you have an account on the site and you log in, we will set a temporary cookie to determine whether your browser supports cookies; the cookie does not contain any personal information and is deleted when you close your browser. When you sign in to your account, we will also set several cookies with your login information and screen preferences. Login cookies last for two days, screen settings cookies last for a year. If you select the “Remember Me” option, your login information will be retained for two weeks. Signing out of your account will remove your login cookies. When editing or publishing an article, an additional cookie will be saved in the browser; it does not contain personal data and contains only the ID of the entry you edited; it expires after 1 day.
Embedded content from other websites
Articles on this site may include embedded content (such as videos, images, articles, etc.), such content behaves in the same way as if the visitor had visited another site. These sites may collect data about you, use cookies, embed additional third-party tracking, and monitor your interaction with the embedded content, including tracking your interaction if you have an account and are logged in to that site.
Web analytics
Who we share your data with. How long do we keep your data
If you leave a comment, the comment itself and its metadata are retained indefinitely. This is done so that subsequent comments can be identified and approved automatically, rather than being placed in a queue for approval. For users who register on our website, we store the personal information they provide in their profile. All users can see, edit or delete their profile information at any time (except username). The website administration can also see and change this information.
What rights do you have over your data?
If you have an account on the site, or if you have left comments, you can request an exported file of the personal data we have stored about you, including data you have provided. You can also request deletion of this data, this does not include data that we are required to retain for administrative, legal or security purposes.
Where do we send your data
User comments may be checked by an automated spam detection service.
Pros and cons of the design
The undoubted advantages of modern buildings are the following:
- high efficiency: even for the simplest units it is 65%, for complexly modified ones it is 85%;
- “omnivorous”, while when switching from one type of fuel to another, no change in heat transfer and a decrease in technical parameters were identified;
- availability and cost-effectiveness of materials: brick, clay and sand are used in construction;
- fire safety: the fire burns in the depths of the stove and coals and firewood cannot fall out;
- ease of maintenance and operation: with one morning heating, the heat lasts 24 hours;
- health benefits: the bed warms and heals the body and joints, and food cooked in a Russian oven does not have carcinogens;
- multifunctionality: in addition to the firebox itself, you can make a hob that opens into the kitchen and fireplace on the second floor.
Three hearths operate simultaneously - a firebox, a stove in the kitchen, a fireplace in the attic. Source yandex.net
The disadvantages include:
- quite large dimensions;
- the need for cleaning;
- inability to use gas;
- a separate foundation is required;
- heating a relatively small room - 50 sq. m.;
- after a long break, gradual warming up throughout the day is required.
It is believed that not all the secrets and capabilities of the Russian stove have been revealed yet.
Formation process
You can make such a design yourself using prepared drawings. The material used is fire-resistant ceramic brick of high standard. All drawings and diagrams are completed in advance. After completing the order, you can determine the required number of bricks. We suggest watching how to develop a plan for building a stove in the video presented.
Foundation and foundation
The mixture for the mortar can be bought ready-made in bags or kneaded with your own hands from cement, sand and clay. In accordance with the design, a cast-iron cooking plate, doors for the firebox, valves, and a grate are purchased in advance.
Like all furnaces, the unit requires a separate foundation, because the total weight reaches 10 tons. You can do it yourself by calculating the depth of the pit, provided that every 5 cm corresponds to 1 ton of weight, and the area of the foundation should be 15 percent larger than the base of the furnace. A layer of sand is poured into the bottom of the pit, compacted, covered with a layer of crushed stone, reinforcement is installed and concrete is poured below floor level. The foundation takes at least two weeks to harden, after which waterproofing is done to prevent moisture from entering the oven. A clear example of creating a foundation in the video instructions.
Based on the developed order, the base of the stove is laid out first. It should be made of several rows of bricks, horizontally aligned, with right angles. The distance from the masonry to the wall must be at least 15 cm. In the next row, a vent and air ducts are laid.
Main design elements
Due to the serpentine winding duct, the air heated in the firebox rises, passes through the entire body of the stove and heats the stove bench. On the eighth-ninth row, an overlap is made on the bed and firebox. Then the rows for the oven and hob are laid out, as well as the row separating the hob from the wall. After this, jumpers are laid out. Above the oven, simple or figured masonry is used (arch, wedge), and metal corners are used above the stove casing, and a decorative shelf is made.
The next rows combine all the chimneys into one, and windows are made on the walls, next to the oven there is a “letnik” to maintain combustion in the warm season, and those located higher are for stronger heating of the room in the cold season. The pipe is laid higher, has a square cross-section, the best masonry size is 2.5 bricks. The ceilings through which the chimney passes are insulated with basalt slabs in several layers.
Shutdown
It is better to lay the outer part of the chimney from sand-lime brick; it is more resistant to temperature fluctuations and precipitation. After the chimney is built, all cast iron and other fittings are installed. For accuracy of work, each layer of brick is checked against the drawings of the order, which can be hung near the construction site. An example of creating a simple stove with a stove bench is presented in the video.
If you are planning simple brickwork, then it will be enough to simply clean the surface of the stove with a stiff brush and level the seams. The brick oven can be painted with heat-resistant paint in the desired color and you can add Russian traditional ornaments and designs made by yourself.
The stove has a high level of efficiency (up to 60 percent), it evenly heats one or more rooms, is safe to use, has a long service life, and produces a healing effect.
When starting work, you need to evaluate your strengths, because building a stove with a stove bench is not cheap. A good home craftsman can complete many stages of construction with his own hands, but a professional stove maker will correct the work or, based on his experience, help correct mistakes.
Types of stoves for baths: metal, stone
The range of ready-made and self-made sauna stoves is represented by designs with different types of fuel consumed: gas, electric, liquid fuel, wood and hybrid. By type of design: open, closed or combined heaters, internal or external fireboxes, straight or side chimneys. The latter option is available in almost all modern models.
A “black” firebox, without a chimney, is considered dangerous and is sold extremely rarely.
But the main influence on the performance characteristics of a sauna stove is the material of the walls; depending on this criterion, they are all divided into:
- Stone - massive structures with high thermal inertia, requiring a reliable separate foundation. Laying such stoves from solid refractory bricks takes a lot of money and time, but the result always pays off. Stone stoves look attractive, heat a large area with minimal wood consumption, have a long service life and work reliably in conjunction with properly constructed ventilation in the bathhouse.
- Metal, with walls made of steel or cast iron. The first ones last a relatively short time (5-15 years), but benefit in price, heating speed, ease of installation and weight. Cast iron structures weigh up to 100 kg or more, and cost 3-4 times more than steel ones, but they pay off in reliability, safety and durability.
Important criteria for preparatory work
In order to complete all the preparatory work, avoiding the most common mistakes, which are very difficult to correct later, the following instructions will help you:
- Due to the large mass of brick kilns, there is a need to build a separate foundation. At the same time, it is not tied to the house, since subsequently it will undergo mandatory shrinkage, which should not appear on other elements of the building;
- The size of the foundation should be slightly larger than the fireplace itself on all sides (10-25 centimeters);
- To perform masonry work, you will need to buy both cheaper ceramic bricks, from which the main part of the structure will be made, and fire-resistant fireclay bricks. The second is needed to lay the elements of the firebox and chimney, which are subject to the most intense heat. It is worth noting that the price of fireclay bricks is quite high, and a lot of material will be needed;
- The seams between ceramic and fireclay bricks must be at least 5 millimeters, and the adhesive mortar itself is mixed based on clay and heat-resistant cement;
Stick to the same thickness of seams: optimally 5-7 millimeters
Stick to the same thickness of seams: optimally 5-7 millimeters
Corresponding recesses are left for each decorative element and fittings
Corresponding recesses are left for each decorative element and fittings
- Additional fittings and components (grate, ash pan, doors) are installed according to the diagram and are pre-purchased in a specialized store or made to order;
- For additional fixation of the doors, grate or ash pan, you will need to use annealed wire, which is installed between the bricks, after which it is filled with a solution for additional fixation and adhesion (preliminarily threaded into specially prepared holes and twisted with a bundle);
- In order to avoid too much variation in temperature conditions in the area of the combustion chamber, before installing it, be sure to extend a special asbestos cord between it and the bricks;
- In order to save effort and free time, the chimney can not be laid out with bricks, but give preference to a ceramic block variation (sold in a fully assembled state);
- If the brick does not have a very attractive appearance, you should take care of finishing such a surface. For these purposes, you can use any fireproof materials (tiles, ceramics, decorative plaster, heat-resistant paint, natural and artificial stone). Finishing a fireplace is not only a way to give the unit a unique style and individuality, it can also significantly increase the overall efficiency of the stove.
A brick fireplace stove for a summer cottage is an excellent opportunity to quickly and economically heat both a small and a two-story house with several rooms. In order to familiarize yourself with the variations of ready-made arrangements, we also recommend reading the article “Corner brick fireplace stove.”
Brick options for laying stoves
Layout of a brick oven.
Kiln bricks come in different types. When choosing one option or another, it is important to take into account the necessary characteristics and future operating conditions. Among these types of bricks, there are not only special fireproof ones, but also fireclay ones. Most often used:
- Borovichi brick. It is dense and has high frost resistance. The red brick has 3 working surfaces, slightly rounded edges, which makes the block attractive. After construction, such a stove can no longer be lined.
- Vitebsk red brick has a lower density and its frost resistance is minimal. There are 2 working surfaces, the edges of the block are sharp. It is used for laying stoves, as it has the necessary properties, and its price is optimal. Block sizes may vary slightly. This must be taken into account when performing work.
- Fireclay brick is also called fireproof brick. When choosing such a material, it is important to pay attention to quality, since it can differ significantly from different manufacturers. Good fireclay bricks are characterized by excellent density, a creamy color, sharp and even edges, and all blocks are of equal size. Today you can purchase blocks of various shapes, but Sh8 is used as standard. It is used to decorate fireboxes, the hottest areas of the furnace. The entire oven can be made from such material, but the cost will be too high. With exactly the same success, it can be made from ceramic stove bricks, and only the firebox can be made of fireclay. It should not be used in chambers intended for cooking, as chemicals are released during heating. When purchasing, it is best to give preference to well-known brands that will guarantee excellent quality. Otherwise, the stove will soon require repairs.
Return to contents
Preparation of oven mortar
To lay a Russian stove with a stove, you will need a special stove mortar, the main component of which is clay. You will need the fattest clay you can find.
The clay is cleaned of debris and filled with water for at least a day. After swelling, it is ground on a sieve with a mesh size of 5 mm.
The second integral component of the solution is sand. It must be thoroughly washed and free of dirt, and then calcined before kneading.
As a rule, the proportion of sand and clay in the solution for a Russian stove with a hob is 1:3. However, a lot depends on the fat content of the clay, so you need to select the exact ratio experimentally. It is worth trying several variants of the solution, making balls the size of tennis balls from each. After three days of drying, we evaluate the results. It is desirable that there are as few cracks as possible, and that at a break the clay does not crumble into dust. It doesn’t hurt to know that Kuznetsov furnaces are built in approximately the same way.
Brick stove: laying in rows
Before you start laying, you need to draw up a correct work plan and if you stick to it, you will get the desired result.
The rows of masonry are as follows:
- We lay out the first row without mortar, leaving 5 mm gaps between the bricks. After laying out the first row, you need to check the evenness of the walls with a level or rule and measure the diagonal of the laid out rectangle. If the diagonal is the same, then the angles are right angles.
- Next, we place the 2nd row on a solution of clay and sand with bandaging of the seams. Laying the firebox of the fireplace stove begins from the 3rd row. Starting from the 9th row, the firebox window is covered with an overlap of bricks. The ceiling can be made in the shape of an arch, that is, the bricks can be laid out in a semicircle.
- We cover the 13th row with a wedge overlap. But until the 14th row is laid out, which will press the overlap, it will not hold. And it is for this reason that before laying the 13th row, it is necessary to make a wooden shield and secure it in the firebox using wooden supports at the level of the upper edge of the 12th row, and only then do the laying of the floor, that is, the 13th row.
- At the end of the ordering, you don’t have to take out the shield, as it will burn out after the first fire of the fireplace stove, but the ceiling will be held in place due to the pressure of the upper rows of masonry. And together with the overlap on the 13th row, they also begin to push the fireplace shelf forward. This shelf is pulled out by 5 cm, and on the next tier it is pulled out by 7 cm. bricks placed on the ceiling significantly increase its strength due to the bandaging of the seams.
If the description seems difficult to you, the diagram in the photo can always come to the rescue, where all the rows of masonry are indicated in detail.
Fireclay brick oven: masonry process
Stoves are quite common today, even though there are more modern heating systems. For a bath or sauna, to provide additional heating in the house, brick stoves remain indispensable. Such a stove can be built from red or fireclay bricks, but fireclay brick itself is too expensive and is rarely used for stove bodies . Most often, the masonry is made from red stove bricks, and fireclay is used for the firebox. The result is excellent quality at optimal financial costs.
Fireclay brick is frost-resistant and can withstand temperatures up to 1500 degrees.
The laying of the stove itself is carried out in compliance with the order, i.e., a special layout for each row. The diagram shows how much material is used and in what order the individual bricks and other elements of the future furnace will be arranged. To begin masonry work, you must first decide what the stove structure will be. Today 3 types are used:
- A heating and cooking stove is the best option, which is suitable for ensuring a comfortable temperature in the house and for cooking. Special compartments for baking bread are popular, but bricks should be chosen carefully; fireclay cannot be used, since when heated it releases chemicals, and this is unacceptable when cooking.
- Conventional cooking stoves are intended only for cooking, boiling cabbage soup, and drying fruit.
- Heating stoves and fireplaces are designed to heat a certain area or room.
There are separate heaters for baths; the process of laying them differs from conventional stoves. It is necessary to install a special grate for stones and a container for heating water. The stove itself must be durable and resistant to temperature changes.