Installing heating pipes with your own hands, if you know how to do at least a little tinkering, is certainly justified:
- The cost of replacing the heating system by hired craftsmen is no less than 12,000 rubles, of which no more than 5,000 is for materials.
- The work requires a reasonable approach, but is not technically or technologically difficult.
- If the radiators remain in place, no special permits or paperwork are required.
Note: a meticulous inspector may find fault with hidden wiring. In this case, you need to refer to the list of signs of apartment redevelopment, see, for example, the article on connecting a balcony with a room. It only talks about moving RADIATORS, and not a word about pipes. In general, “What guys? Who saw them?
Related works
Replacing the heating system in an apartment with your own hands is often combined with measures to insulate the apartment and repair the floor with additional insulation. At the same time, hidden pipe routing is achieved in the most natural way, the total repair costs are reduced by 7-10% (at current prices the value is more than noticeable), and if the apartment has heat meters and HMS installed (see below), then heating costs for season they fall by 15-20 percent (!). In a private home, too, but you don’t need to spend money on heat meters.
Heating replacement sequence
Before you get down to work, you need to draw up a competent action plan. This will allow you to turn off the heating for a minimum period.
- First you need to mark the wall for attaching new batteries;
- Some units must be pre-assembled;
- Now you can contact the housing department or a plumber about turning off the riser;
- All that remains is to partially or completely replace the heating in the room or apartment.
Marking the battery mount
Before you start installing batteries on the wall, you need to consider some requirements.
- The lower part of the battery should be at 10-15 cm from the floor level;
- The upper edge of the radiator should be located at a distance of more than 15 cm from the window sill;
- The distance between the wall and the surface of the radiator is selected within 3-4 cm;
- These indentations and gaps are required for good air exchange, as well as for the possibility of wet cleaning.
Pre-assembly of units
At the stage of assembling the nodes of a new highway, the following operations are performed:
- gaskets are installed and plugs are screwed in;
- cranes are installed;
- pipe sections are marked and cut;
- corners and tees are soldered in;
- a unit is assembled consisting of a radiator, taps and pipes up to the points where the heating system bends 90 degrees.
When the unit is fully assembled, replacing the heating system batteries in the apartment will become much easier and faster.
Heating off
One of the most difficult stages of replacing heating in an apartment is turning off the riser or the entire heating system of the house. To do this, you need to negotiate with representatives of the housing department or with the plumber of the cooperative building.
Tapping process
After turning off the riser, you should make sure that there is no water in the system. To do this, you can unscrew the air valve or loosen the plug. If water does not stream out from under the plug, then you can begin dismantling the old system.
- Using a grinder with a cutting wheel, the pipe is disconnected at convenient points. Once the radiators are removed, you can make neat cuts.
- If you have an agreement with your neighbors, you can unscrew the remaining pipes from their radiator so as not to make unnecessary connections. You will have to slightly widen the opening in the wall to remove a section of the heating system.
- If you need to connect an old neighbor's main and a new polypropylene pipe, you will need a die for cutting external threads on a steel pipe.
- Using a sealing tape and a limit switch, two different pipelines are joined.
- A new “tied” battery is installed in the places where the markings are applied. To work you will need a drill and a concrete drill bit.
- All that remains is to combine the vertical and horizontal pipes. The connection method depends on the type of pipe: polypropylene, cast iron, aluminum.
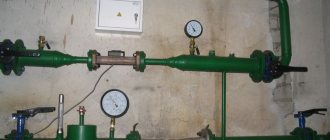
About HMS
HMS (hydromagnetic system, magnetic anti-scale apparatus) has nothing to do with “living” and “dead” water and other esoteric wonders. The principle of its operation is simple: an insert with strong magnets is mounted into the pipe; The pipe material doesn't matter.
Household hydromagnetic systems
Water is a conductor of electricity, and it moves and flows in the pipe. An electromotive force, EMF, is induced in a conductor moving in a magnetic field. In the lumen of the HMS, it is only a few volts or fractions of a volt, depending on the flow speed, but this is enough so that the impurities contained in the water (they are either in the form of ions or their molecules are polarized) do not settle on the walls of the pipes, but stick together and form a thin the suspension, which at the heating unit will precipitate in the settling tank, and the sludge will be removed.
There is nothing to be afraid of when using HMS: electrically neutral and therefore the most persistent components of impurities form a thin dense layer of sediment on the inner surface of the pipe, its properties reminiscent of corundum. After a growth of approximately 20-60 μm, the layering stops: surface polarization increases and pushes the next “candidates” back into suspension.
HMS has long been widely and successfully used in industry; most often to prepare water for purification and filtration. In recent years, household HMSs have appeared on sale for installation on water supply and heating pipes. At home, HMS provides, in addition to heating reliability and savings, another important advantage: a warm floor in a system with HMS almost never requires a bulkhead, and an additional circulation pump is most often not needed for it.
HMS should be installed on the supply pipe at the very beginning of the system, before wiring. If there are several risers, then for each riser. The HMS does not break down, does not require maintenance, and its validity period is unlimited.
SAN SAMYCH
Any heating of enclosed spaces is possible thanks to the remarkable physical property of liquids and gases - convection. She is the one who boils our kettles, cooks our soup, and raises our balloons. Because of it, winds and hurricanes blow on Mother Earth, it rains and there are droughts. But we are talking about heating...
Two friends meet. One knows almost everything about heating, the other is a jack of all trades, accustomed to doing everything himself, not trusting anyone and testing every advice in practice. The first is called Vova, the second is Ivan. We started talking.
Ivan: - Vova, how can I make heating in the house, cheap and cheerful?
Vova: - Van, the simplest heating in the house is, of course, a stove.
- But then, if there are many rooms, each room will have to have a stove, and that was once the case. No, Vov, let's be more serious.
- Fine. If you make a larger stove in one of the rooms, put a tank of water on it, and run a pipe through the rooms, one end of which is cut into the upper part of the tank, and the other into the lower part, then the water flowing through the pipe, due to convection, will heat the air in the rooms, and it will be warm there. By the way, such heating is still used in many villages in our Motherland because of its simplicity and reliability.
—Are you suggesting that I make a big saucepan? Where will I put the little ones? The stove is not dimensionless.
- No. Now I will explain everything to you. Let's mentally squeeze the middle part of the tank to reduce its volume. The funny thing is that our mover - convection - will not suffer at all.
Because the force of convection does not lie in the volume of water, but in the difference in height H between the discharge of hot water from the tank and the influx of already cooled water. And, of course, it depends on how much we heat the stove, that is, on the temperature, or rather on the temperature difference between the top and bottom of the tank.
“It turns out that instead of a huge tank, we can simply install a vertical pipe, and at the bottom of this pipe we will heat water, for example, in a boiler or in a coil installed in the same stove.
- Right. And the heating pipe, the so-called We will replace the heating circuit with a pipe of smaller diameter, and in order not to lose the heating area, we will install radiators.
The result will be a completely modern single-pipe circuit with a sequential arrangement and bottom connection of radiators. This is, one might say, the simplest scheme.
- Yes, but each subsequent battery in this circuit is cooler than the previous one, and the last radiator barely heats up.
- Let's try to improve it. For example, like this.
By adding the so-called air duct - a pipe connecting the upper connectors of the radiators.
- It's gotten a little better.
- This should be due to the partial combination of convection of each of the radiators. Convection in radiators can be combined almost completely using this scheme:
— Yes, but now there are problems with bleeding air from the radiators, pulling not one, but two pipes in the rooms, and the last radiator did not heat up very much.
- Okay, let's try it differently:
- Great! The batteries heat up almost equally, but this can be corrected by adjusting the taps at the entrance to each of them. True, for some reason they are a little cooler than before, and installation is a real pain, there are so many tees. But I'm not afraid of difficulties. What could be better?
- Let's watch.
- Yes, the radiators are much hotter, but again there is this air, again there are two pipes, the top of which is always before your eyes. And for some reason the latter is much cooler than the first.
- And if so:
— Now the last radiator is the hottest, and the first one is barely warm. Besides, there are already three pipes!.. Well, okay, one is under the ceiling, the second is along the baseboard, but the third... No, that won’t work!
- Okay, let's change it.
- Yes, now all radiators heat equally, but why do we need three (!) pipes.
- I agree, there’s no point.
- What's this? Three tees per battery! I asked for cheaper.
- But what hot radiators. And there is no need to regulate. Okay, let's remove one drain.
- And if so?
— It’s also possible, but a diagonal connection is considered more effective than a lateral one. Although the side connection is more convenient. There is one more point: when the radiator is connected to the side (one-sided), dirt from the system may settle in the corner opposite from the connection, as a result, the distant sections may heat less or become completely clogged. This does not happen with a diagonal connection.
- What are you doing? Where does the dirt in the system come from? I'm not a fool, I will only fill the system with clean filtered water.
- Then pour boiling water into the system so that it is 105-110 degrees Celsius.
- How? Why?
— Because only then there will be no oxygen in the water, which oxidizes, in principle, any metal. And the resulting rust can clog any radiator. Therefore, it is not recommended to drain the system unless absolutely necessary.
— And yet, what is the best way to assemble the system?
- Basically, it doesn’t matter. You need to look at the ease of installation, the location of radiators, doors, windows, furniture, etc. All schemes can and should be combined, depending on specific conditions. It is important to remember that with a serial connection scheme, water flows from one radiator to another and, naturally, cools down, but with a parallel connection, the temperature of the water in the radiators is almost the same.
- But there was a scheme when the last battery was hotter than the first. What's the matter here?
- Yes, the reason is resistance to the movement of water. Water from the first radiator needs to overcome the resistance of subsequent ones, but the last one has minimal resistance. This should also not be forgotten.
TO BE CONTINUED.
sansamuch.ru
Stop heating the street!
Whether the radiators will be changed during the heating reconstruction process or not, but since they will still have to be removed for some time, it is highly advisable to cut off the outflow of heat to the outside. To do this, you need to cover the wall behind the batteries with heat-insulating mats aluminized on both sides. How such a bedding works in terms of heat can be read in the article on floor insulation; here it is enough to note that in a block Khrushchev house with radiators in niches, double heat shields behind the radiators are equivalent to covering the walls with 20 mm plywood.
In an alternative option for insulating the wall behind the radiator, heat-insulating material (1) and aluminum foil (2) are used separately.
Installing the shielding mat is simple: we cut holes in it for the hooks of the battery suspension, apply thin “sausages” of construction silicone or mounting adhesive using an “envelope” to the side adjacent to the wall, put it on the hooks and press it to the wall.
An indispensable condition: the mat must be organic, made of synthetic or natural fibers. The use of open mineral wool mats in residential premises is unacceptable - it is harmful to health.
Type of heating device.
Three types of radiators are suitable for installation in the central heating system of an apartment building from modern heating devices:
-cast iron
-bimetallic
- steel tubular.
The advantage of cast iron radiators is their versatility, due to which their operation does not depend on the direction of coolant supply through the riser, but there are 2 serious drawbacks. Cast iron is a fragile material, so it is not recommended to install them in systems with high pressure, therefore, according to the project, you will never see cast iron radiators in modern high-rise buildings with more than 9 floors. Cast iron also cannot be processed in the same way as steel and aluminum, so the surface of cast iron radiators is always rough and requires additional painting.
Of the bimetallic radiators, it is worth highlighting two models that stand out from the entire variety on the market due to their construction and design: Rifar Monolit and Rifar Supremo.
Rifar Monolit.
Rifar Supreme.
These two models, unlike all other bimetallic radiators, have several important design features:
- radiators have an all-welded manifold, eliminating leakage between sections.
-inlet diameter to the manifold Du-20 (3/4″), which eliminates the need to install a transition fitting mounted on a gasket, which can eventually lose its elasticity and cause leakage.
- wide mounting spaces for brackets, thanks to which the radiator slides without causing any extraneous sounds during thermal expansion on the risers.
The advantage of tubular steel, as opposed to bimetallic, is the absence of a large number of thin plates, which in rare cases can cause acoustic discomfort.
steel tubular radiator .
The latest radiators are very expensive, but I have good news for you: domestic manufacturers have mastered the production of affordable steel tubular radiators under the RadStal brand, which in their design and appearance are no different from the German Arbonia.
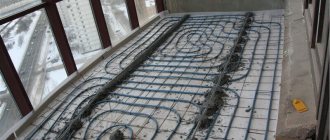
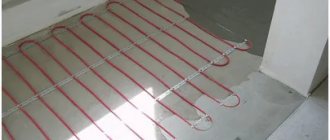
Floor insulation for hidden wiring
Removing heating pipes out of sight is tempting from an aesthetic point of view. To prevent hidden heating wiring from subsequently causing the righteous anger of heating engineers with accompanying sanctions, it is advisable to prepare the floor accordingly. If the decorative flooring is laid on joists and additional floor insulation is not required, then the pipes are simply laid between the joists, and removable access hatches are installed above their connections.
Otherwise, the pipes must be laid in the floor. Methods for floor insulation are described in the corresponding article, and for this case we can recommend the following:
- We lay pipes.
- We form an additional warm screed from foam concrete. We fence the pipe connections until the concrete hardens with boards according to the required dimensions (see at the end).
- We lay 12-18 mm plywood flooring directly over the warm screed, gluing the joints with liquid nails or assembly adhesive. We cut out openings in the plywood above the pipe joints.
- We restore the finished flooring. We cut out the hatches for access to the pipes larger than the openings in the plywood - they will simply be removed.
Note: It is advisable to use sheets of tongue-and-groove plywood. But if there are no wild parties in the apartment, you can also install a simple one - it is much cheaper.
The second method is somewhat more expensive, but it is easier to work with and provides access to the pipes along their entire length. To do this, we use foam concrete or aerated concrete slabs with cement-sand mortar as a warm screed. The rest is the same.
Pipe type selection
The next, and very important, stage of preparation for work is deciding which pipes to use for heating. Costs, complexity of work, and reliability of heating with its durability depend on this.
Steel
There is nothing bad to say about steel as a material for heating systems, and in combination with HMS, steel pipes become truly eternal. In addition, steel pipes are cheaper than all others. There are only two small “buts”:
- Firstly, steel is difficult to work with and welding will most likely be required. That is, to independently install heating with steel pipes, you need to have the working skills of a mechanic and pipe welder, or hire a specialist temporarily. And you will have to buy or rent steel equipment: a pipe bending machine, pipe dies with a knob, etc.
- Secondly, if cast iron “accordions” are replaced with aluminum, it is necessary to insert at least 10 cm of propylene in both the supply and return pipes and radiators, otherwise in a conductive medium two different metals will form a galvanic couple and electrocorrosion may begin.
Propylene
Polyisopropylene pipes for heating systems (trade designation - PPR) are the main competitor of steel, equal or superior to it in everything except price. In an apartment building, a valuable advantage is that propylene pipes are “blind”: the blow to the pipe does not reverberate across all floors. They practically do not transfer heat to the ceiling.
The main advantage of propylene is reflected in the collective transition to them. Currently, most houses are equipped with house heat meters, and a complete transition to house-to-house heat meters is inevitable. Heating payments are “scattered” across apartments by area, and replacing steel with propylene throughout the entire house reduces heat leakage by three to four times.
In some regions, because of this, there is an increase in the fuss of thermal power plants: with a massive transition to propylene, planned “Soviet” losses on highways become very noticeable for them, which forces them to find means and methods for their reconstruction. One heating engineer put it this way: “For us, switching to propylene is like discovering antibiotics for doctors.”
A separate section below will be devoted to the specifics of installing polypropylene heating systems.
Other plastics
Installation of heating with plastic pipes made of other polymer materials attracts many due to its relative cheapness. Pipes made of modified polyethylene, specially designed for heating systems, are actively advertised; trade designation – PER. Unfortunately, they have a fundamental drawback: the softening temperature of the starting material is 65 degrees Celsius versus 130 for polyisopropylene.
No modification of fundamental defects can, in principle, eliminate it, therefore PER or PVC heating wiring can be recommended only in warm regions with predominantly low-intensity heating. In the middle zone, you should not expect a service life of simple plastic of more than 10 years, and in the north it may not survive until the end of the heating season without leaking.
There are two more nuances: if Chinese propylene is practically not inferior in quality, “cool polyethylene is worthless. And metal fittings (see below) on any PER often leak - this is due to the high “slipperiness” of polyethylene.
Note:
R - means reinforced for direct flow of hot water. Both “cold” and “hot” water pipes are not suitable for heating. Conflicting user reviews are explained precisely by ignorance of this circumstance.
Metal-plastic
Metal-plastic heating pipes are somewhat more expensive than propylene ones, and installation requires quite expensive additional equipment: a pipe cutter, a press for flaring the ends, a special pipe bender. And the heat outflow through the thin wall is quite high. There are also technical disadvantages: gaskets in connectors often leak even in the most “company”, thin pipes are afraid of shocks and direct sunlight.
Nevertheless, it is beneficial to distribute heat throughout the apartment using metal-plastic pipes:
- Equipment rental is compensated by a smaller number of rather expensive fittings: metal-plastic pipes can be bent.
- The high cost of the pipes themselves is compensated by the reduction in the length of the pipelines: flexible pipes can be routed along the shortest route.
- You can also do without a pipe bender if you firmly remember that the bending radius must be at least 5 clearance diameters: metal-plastic bends easily by hand.
- The design of the connectors allows the use of additional low-cost sealing, see below.
- Heat loss in the apartment is not terrible, since it will still go into the room.
- With hidden wiring, the thickness of the floor does not need to be tied to the pipes and connectors: the pipes are thin, and there are no intermediate fittings.
Copper
They speak sharply but fairly about the installation of heating with copper pipes on construction forums: “Let sellers of copper pipes install copper for heating. If they counted crows in school chemistry lessons.”
And the point here is not that technical additives to the coolant water can corrode copper. And it’s not that copper pipes perfectly heat walls and ceilings from the inside at the expense of their “lucky” owner. And not in the price of copper itself.
Copper pipes are connected by soldering. The main part of solder is tin. Tin exists in two chemically identical but physically distinct forms: a white soft metal (white tin) and a gray semiconductor powder (gray tin). Chemically speaking, tin is known in the form of two allotropic modifications.
White tin is an unstable allotrope; over time it turns into gray tin. Any radio amateur knows: old solderings are prone to crumbling, they need to be soldered again. Under water pressure from the inside, the slightest microcrack will leak, and always in winter, when the system is full. And heating is not running water; you can’t bring a bucket of heat from another entrance, from a water heater or from an ice hole.
Let's not remember the horrors of unfrozen houses, which are reported from time to time in the media. But the neighbors in the riser will have a compelling and undeniable reason to demand compensation from you for the costs of electric heating during your repairs. Which will cost a pretty penny anyway.
In general, the conclusion about copper is that its advertising can be explained solely by the tricks of marketing specialists armed with modern brainwashing technologies. There are no physical, technical, or objective economic justifications for heat supply with copper pipes.
Conclusions on the section:
- In apartment buildings, the optimal option for heating wiring - from the entrance to the house to the risers inclusive - is propylene; in apartments - metal-plastic with additional sealing with tow.
- For compact private houses, the best heating system is steel.
- For houses with 2-3 floors with 1-2 entrances, households with attics, heated garages and outbuildings, polypropylene has no alternative.
Modernization of the radiator heating system of a private house | HOUSE OF IDEAS
The task of simply heating the house, in general, does not cause any special problems. An ordinary stove or even a simple “potbelly stove” can more or less cope with this. The question is how to do this in the most efficient and economical way.
A fresh look at warmth
Home comfort, especially in the cold season, largely depends on the temperature of the main living spaces. However, the task of a home heating system is not limited to just the heating function. Much more important is its ability to maintain the most comfortable and natural microclimate for our body.
The issue of proper organization of the heating system is relevant not only for developers. The level of gasification of existing settlements, inherited from Soviet times, is traditionally quite high, but a huge amount of individual housing is still heated in an ineffective and uneconomical way.
Ways to improve heating quality
The most common heating scheme not so long ago provided for the natural circulation of coolant in the system. The movement of water through the pipes was ensured by the operation of the simplest physical law: hot water has less density and less weight than cold water. In such systems, the heated water leaving the boiler rises up the supply riser and, having passed the highest point, flows down through the pipes to the heating devices. Giving up its heat, the water cools down (at the same time becoming “heavier”) and returns through the return pipeline back to the boiler.
The disadvantage of this method is that it is difficult to raise hot water to a sufficient height to provide the required pressure. To improve circulation, it is necessary to heat the water almost to boiling point, which leads to overheating of all system components, large wasteful heat losses and excessive gas consumption. Sometimes you have to abandon radiators and use large-diameter steel pipes, and lay them at a certain angle. Which absolutely does not decorate the interior of the rooms. Such a system has enormous thermal inertia, so the microclimate in the rooms can only be regulated by the “window” method.
The forced method of water circulation is completely devoid of these disadvantages. The use of special pumps in the heating system allows us to solve both the problem of efficiency and the problem of providing comfortable heating. Advantages of forced circulation: Small diameter pipes can be used, joined using fittings, without the use of welding. This greatly facilitates both installation and repair of the heating system.
You can arrange pipes and heating appliances in any order, including hiding them in the floor and walls. Heating a rapidly circulating coolant requires much less gas, which is a significant saving. In addition, the heating intensity can be adjusted using the pump speed switch. Of course, in this case, the performance of the home heating system depends on the reliability of the power supply. However, this issue can be completely resolved.
The pump is usually installed on the “return” side, since the water temperature is lower here. Circulation pumps for heating systems are suitable for domestic needs; they operate completely silently and consume very little electricity, approximately 80-100 W. The pump axis should be horizontal, and the arrow on the body should correspond to the direction of movement of the coolant. Many models have step switches that allow you to adjust the rotor speed and, accordingly, the speed of water circulation in the system.
The main parameters of the pump are flow and pressure. The circulation rate of the coolant in the system depends on the supply (Q, m3/hour). If it is too large, the system overheats even at low engine speeds (the water does not have time to cool, the house becomes hot, the air dries out), which can lead to failure of the boiler and the pump itself. If the pressure is too high (N, m of water column), the load on fittings and heating devices increases due to excess pressure. If the pressure is insufficient, the pump cannot overcome the hydraulic resistance of the circuits.
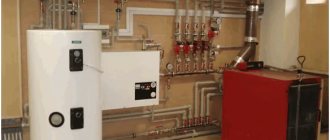
Many models of modern heating boilers already have built-in pumps for circulating coolant. A single-pipe horizontal system usually allows you to get by with such a built-in pump of a wall-mounted boiler. It ensures a minimum pipeline length. After flowing through the heating devices, the coolant returns to the supply system. At the same time, the water temperature decreases, which means that the surface area of the radiators should increase as they move away from the boiler. A significant disadvantage of a horizontal single-pipe system is the inability to regulate the heat flow. Partial regulation is carried out using auxiliary devices. But this is not always economically justified.
The two-pipe water heating system is more progressive. If it is used, each heating device has two pipes suitable for it: for supplying and removing coolant. The system is mounted in the form of a star or in the form of a loop. In the first case, the return and forward pipes from the common pipeline go to each heating device. In the loop, both forward and return pipes bypass the cascade of heating devices in series. The disadvantage of a two-pipe system is the loss of hydraulic pressure in each circuit (that is, in each radiator).
For boilers with natural circulation, the diameter of the pipes was very important, because when it narrows, the heat simply does not reach the farthest points of the system, and the efficiency is significantly reduced. The advent of pumps made it possible to use pipes with a smaller diameter. Today, metal-plastic and polypropylene pipes are especially common, less stainless and copper.
End: A little about gas heating boilers
domidei.ru
Wiring diagram
Developing, drawing, designing and approving a heating scheme for a new building or at least moving a radiator to another location is the subject of a separate article, not even several articles. Therefore, we believe that we are only talking about the reconstruction of heating in a city apartment and all the batteries remain in their places.
Methods for connecting heating radiators
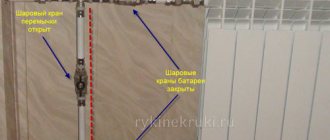
In this case, the general heating scheme of the house remains as is, and we only need to choose the method of connecting the radiators to the riser. There are four options, see fig. Bottom connection – for hidden wiring. It is important not to forget about TWO ball shut-off valves for each radiator, for supply and return; they are highlighted in color in the left picture. In the event of a leak, this will allow you to disconnect one battery without affecting the entire system.
For steel and metal-plastic with aluminum radiators, do not forget about propylene inserts to avoid electrocorrosion. They are also highlighted and labeled on the left.
What does it take for batteries to work efficiently?
An efficient heating system can save money on fuel costs. Therefore, when designing it, you should make informed decisions. After all, sometimes the advice of a neighbor in the country or a friend who recommends a system like his is not at all suitable.
It happens that there is no time to deal with these issues yourself. In this case, it is better to turn to professionals who have been working in this field for at least 5 years and have grateful reviews.
Image gallery Photo from Step 1: Regardless of the type of heating device, its installation includes a number of similar steps. First, mark the wall and install brackets for the radiator. Step 2: Before attaching the radiator, you need to check that it is installed correctly using a building level. If necessary, it is better to move the bracket before connecting Step 3: If there are no complaints about the location of the heating device, its branch pipe is connected to the supply pipe Step 4: Then a connection is made to the pipe that removes the cooled coolant from the radiator to the heating boiler Marking the wall and installing brackets Checking the location before mounting Connection radiator to the supply pipeConnecting the radiator to the return pipe
When deciding to install new batteries or replace heating radiators yourself, you need to take into account that their efficiency is directly affected by the following indicators:
size and thermal power of heating devices; their location in the room; connection method.
The choice of heating devices amazes the imagination of the inexperienced consumer. Among the offers are wall-mounted radiators made of various materials, floor and baseboard convectors. They all have different shapes, sizes, heat transfer levels, and connection types. These characteristics must be taken into account when installing heating devices into the system.
For each room, the number of radiators and their size will be different. It all depends on the area of the room, the level of insulation of the external walls of the building, the connection diagram, the thermal power indicated by the manufacturer in the product passport.
The location of the batteries is under the window, between windows located at a fairly long distance from each other, along a blank wall or in the corner of the room, in the hallway, pantry, bathroom, in the entrances of apartment buildings.
It is recommended to install a heat-reflecting screen between the wall and the heating device. You can make it yourself using one of the heat-reflecting materials - penofol, isospan or another foil analogue.
You should also adhere to the following basic rules for installing a battery under a window:
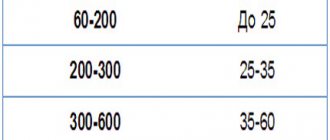
all radiators in one room are located on the same level; convector fins in a vertical position; the center of the heating equipment coincides with the center of the window or is 2 cm to the right (to the left); the length of the battery is at least 75% of the length of the window itself; the distance to the window sill is at least 5 cm, to the floor - no less than 6 cm. The optimal distance is 10-12 cm.
The level of heat transfer from devices and heat loss depends on the correct connection of radiators to the heating system in the house.
It happens that the owner of a home is guided by the advice of a friend, but the result is not at all as expected. Everything is done like his, but the batteries don’t want to heat up.
This means that the selected connection diagram was not suitable specifically for this house, the area of the premises, the thermal power of the heating devices were not taken into account, or annoying mistakes were made during installation.
Installation of propylene heating
Heating with polypropylene pipes is not installed “plumbing”: it is carried out mainly with fittings; Soldering is only permissible for connecting straight pipe sections to size. Both soldering and fittings for heating pipes also require special ones, more on that below.
Such requirements are explained by reliability considerations: any malfunction will be revealed, at best, during pressure testing of the system before the start of the heating season, or even at its height in severe cold.
Soldering
The technology for soldering polypropylene is described in detail in the corresponding article. To assemble a heating system, it is important to know that soldered butt joints of pipes are unacceptable. The ends of the pipe sections must be soldered into a special coupling: a larger diameter pipe with a stepped internal profile. Accordingly, you need a suitable soldering iron; a regular “iron” will not work.