The simple, unpretentious design of the potbelly stove made it a hit among heating devices that can be built at home. This popularity is due to several factors, one of which is the undemanding nature of materials. A good, productive stove can be made from metal, which can always be found from a thrifty owner - pieces of reinforcement, strips of sheet steel, remnants of metal pipes and angles, and even from parts from various machines and mechanisms. Often, a ready-made container is used as a housing - a piece of large-diameter pipe, a barrel for fuel and lubricants, or a container for household propane-butane. We’ll tell you in more detail about the advantages of the last option and how to make a potbelly stove from a gas cylinder with your own hands.
- 2 Design features and principle of operation
- 3 Preparatory activities
3.1 What kind of cylinder is needed and how to prepare it for work
- 3.2 What you need to avoid being distracted by small things
- 3.3 Which design to choose for your project
- 3.4 Drawings and diagrams of potbelly stoves that can be built from gas containers
- 4.1 How to make a vertical unit: step-by-step description of processes
The secrets of the popularity of a potbelly stove from a cylinder
This stylish potbelly stove can be built from a regular gas cylinder
Potbelly stoves are simple, small-sized stoves designed for heating small rooms that, for some reason, cannot be heated by a full-fledged engineering system. Most often, units of this type are made of metal and are used in garages, sheds, country houses, greenhouses and change houses. Sometimes potbelly stoves are also installed for temporary heating of residential premises, and with minor modifications they are left as the main source of heat.
Making a stove from a gas cylinder has a lot of positive aspects:
- the thickness of the walls of the container is more than 3 mm, which is quite enough to ensure the rigidity and strength of the structure;
- Vessels for storing gases are made of high-alloy steels that successfully resist corrosion. In addition, sufficiently thick and high-quality metal guarantees that the walls of the potbelly stove will not burn out for a long time;
- minimal modifications will be required. Since there is no need to manufacture the furnace body, the time for building the heating device is reduced;
- Even if you buy a container for household gas, its cost on the secondary market is only a few hundred rubles. Most often, you can get a cylinder completely free of charge by asking around among your acquaintances and friends;
- from the point of view of heating engineering, the cylindrical shape of the firebox is optimal, therefore a potbelly stove made from a vessel for household gas is economical and highly productive;
- the existence of several structures, among which are horizontal and vertical units of direct or pyrolysis combustion;
- very fast heating of the room both due to radiation and convection.
The disadvantages of a heat generator built using a gas cylinder are inherent in all potbelly stoves. Firstly, the walls of the heating device become red hot, which in no way contributes to the safety of the unit. Secondly, it is impossible to guess the exact amount of firewood in order to somehow regulate the heating temperature. Thirdly, the extremely low heat capacity of such a structure. The potbelly stove will provide heat exactly until the wood burns out. After this, it will instantly cool down.
Most often, 50-liter propane cylinders are used to make potbelly stoves.
To increase the heat-storing capacity of the furnace body, the unit is often encased in brick or stone masonry, a water jacket and other methods of energy storage are used.
I would also like to note not a minus, but rather a feature associated with the fact that gas cylinders are painted with ordinary enamel. At high temperatures, the paint will burn out, filling the room with toxic smoke. To eliminate the possibility of poisoning, you will have to remove the top coating mechanically or conduct the first two or three fires in an open space.
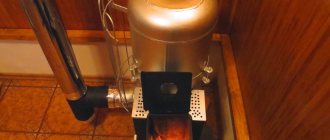
Manufacturing of a two-chamber pyrolysis stove
The photo above shows a potbelly stove made from a gas cylinder. This version of the potbelly stove is more compact and economical. Instead of two 50 liter propane cylinders, we will need 1 24 liter propane vessel and 5 pipes with a diameter of 57 mm and a length of about 400 mm.
The operating principle is as follows:
- The first propane cylinder is similar to the previous option. The only difference is that instead of grates, there are slits cut on top of the cylinder itself.
- There is an opening on top of the cylinder. 5 heat exchanger pipes fit there. Through these pipes the smoke rises into the secondary chamber. Following this path, the heated air releases some of the heat into the room.
- Additionally, warm air is supplied to the secondary chamber through a separate channel. A pyrolysis effect is created - the smoke burns out in the fuel chamber and releases additional heat. And only after that they finally come out.
The power of such a horizontal stove can reach up to 5 kW. This is enough to heat 50 m2 of usable area.
Making a pyrolysis (long-burning) two-chamber stove is not much more difficult. It is more compact, but has less power. In the same way, we will prepare tools, materials and you can make the necessary drawings.
Materials and tools
You will need the following materials:
- electrodes
- cutting wheels
- 1 gas cylinder 24 liters
- sheet 2 mm thick
- corner for making “legs”
- fittings with a diameter of 20 mm
- pipe diameter 57 mm
- pipe diameter 20 mm
- other
You will need the same tools:
- portable welding machine
- "Bulgarian"
- drill
- drill
- other tool.
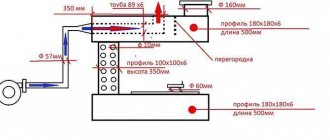
Below is a drawing of a potbelly stove made from a 24-liter gas cylinder.
Step-by-step instruction
Diagram of a two-chamber pyrolysis stove
Your actions should be like this:
- We cut a hole for the stove measuring 260x200 mm in the bottom of the propane cylinder.
- Make an ash pan and weld it to the bottom. Weld the supports.
- Make a grate.
- We make a heat exchanger according to the drawing above. We cut the pipes in a checkerboard pattern. It is critical to maintain all distances.
- We weld a pipe with a diameter of 20 mm for an additional supply of warm air, having first bent it at a right angle.
- We cut a hole in the cylinder and weld the heat exchanger.
- Now let's make a secondary chamber with a chimney.
- We use a blank cut from a cylinder as a cover for the chimney. It is needed for longer burning.
Design features and principle of operation
Like any other direct combustion solid fuel stove, the unit, made from a gas cylinder, consists of several parts:
- firebox combined with the body;
- grate;
- blower chamber;
- chimney.
The blower is located at the bottom of the stove and is a small chamber (essentially a channel) necessary to supply oxygen to the combustion zone. To regulate the amount of air, monitor the process and remove ashes, the ash pan is equipped with a door.
Simple design is one of the components of the success of cylindrical potbelly stoves
In the middle part of the furnace there is a combustion chamber, which is separated from the ash pan by a grate. Being the main module of the heating device, the firebox simultaneously plays the role of a loading compartment and a heat exchanger. Like the vent, the firebox is equipped with a door through which firewood is placed into the potbelly stove and ash is removed.
The chimney is a channel necessary to remove combustion products from the working area. A damper must be installed in the chimney, which is closed after the wood burns out. This prevents heat from escaping from the room when the stove is not in use.
The operation of a heat generator from a gas cylinder is not difficult. After the firewood is placed on the grate, they are set on fire and the combustion chamber door is closed. The blower must be open at this time - air passes through it to the fuel. The intensity of combustion is controlled by closing or opening the bottom door. Heated gases are removed through the chimney.
To increase the efficiency of heat exchange, the potbelly stove is equipped with additional elements that allow the residual heat of the flue gases to be removed. To do this, an air heat exchanger or a water jacket is installed on the chimney. Often the modification consists of lengthening the part of the chimney that is located in the room.
Types of ovens
To make a potbelly stove, you should take a 50-liter cylinder, specially designed for storing propane mixtures. These cylinders are used:
- in everyday life - they are used to supply gas to tiles in houses that do not have centralized gas heating;
- in the industry for gas cutting.
To build a small stove, you can use 12 or 27 liter cylinders.
Having selected a suitable container, you should decide which oven design is more suitable. The potbelly stove can be made in vertical and horizontal versions.
Vertical
In this design, the cylinder is installed in the usual position - with the valve up. For stable support, a special ring is constructed from below. The vertical option is more convenient, since the stove can be installed in any corner of the room, where it does not take up much space and provides better traction. The only negative is that it is more difficult to design such a stove.
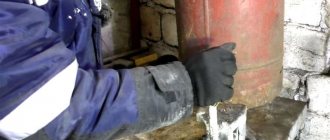
The selected cylinder must be prepared - remove gas residues and odor. They do this as follows:
- The cylinder is taken outside and the valve is opened. In this case, a characteristic hissing sound should be heard with which the gas leaves the container.
- The container is filled with a special bleaching solution, for example a ten percent mixture of soda ash. Washing will allow you to get rid of both the odorant aroma and the mercaptan fragrance.
Now the completely cleaned cylinder can be converted into a potbelly stove. It is advisable to select a suitable drawing on which the diagram of the future apparatus is drawn in detail.
A homemade vertical potbelly stove is made in several stages:
- The existing hole for the valve is expanded to approximately 10 cm. The ring is edged with a collar, using a steel plate 5 cm thick for this purpose. The hole is used for the chimney.
- Stepping 10 cm from the bottom of the cylinder, carefully cut out a rectangular hole. There will be a blower here, and a cut out fragment of the cylinder will serve as a door.
- Having risen another 10 cm, a second, much wider hole is cut out to access the firebox. The cut piece is also not thrown away (the future door).
- Inside the cylinder, in the space between the lower part (blower) and the upper part (firebox), shelves are welded on which the grate will be placed.
- Hinges are installed to secure the doors. Each door must be equipped with a latch.
If you cut off the top of the cylinder very evenly, you can build a hob in this place. For a vertical stove it will be small, but for a kettle or saucepan it will be quite suitable.
Horizontal
In this position, the cylinder lies on its side, with the valve to the side. For stability, legs are welded to the side of the cylinder. A horizontal model of a potbelly stove in a lying position takes up a decent part of the floor, but making it is faster and easier.
The work is performed as follows:
- The entire upper part of the cylinder (at shoulder level) is cut off with a grinder, including the hole for the valve. The top is removed to make it easier to operate inside the container.
- Supports are welded to the bottom of the body - in the form of a stand or legs, so that the cylinder can lie stably horizontally.
- At the top, at some distance from the back wall (closed end), a round hole is cut - an exit for the future chimney. A collar in the form of a ring is welded over it, for which a curved steel strip 5 cm thick is used.
- Small holes are burned inside, into which grates are then cut (transversely to the cylinder). There is another, more convenient solution - two metal corners are welded inside, forming peculiar shelves. A grate is then placed on them, which can be easily removed if necessary when it is completely burned out.
- The front part needs to be closed, at the same time forming a door. A steel element with a hole, equipped with a fitting and ball valves, is placed here and welded. The hole is bordered with a steel border, which is then covered with asbestos-cement cord. This design will allow you to press the door more tightly when closing.
- Mount the hinges on which the door is hung, which must be equipped with a latch.
In the described version, the role of the blower is assigned to a special fitting, welded into the front part, and also equipped with valves. There is another version of horizontal potbelly stoves, in which the hole for the valve is successfully used as a blower.
The lower part of the chimney pipe should move slightly upward from the edge of the grate. The pipe itself has a curved shape to allow for the removal of accumulated moisture.
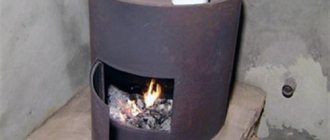
Long burning
The main disadvantage of the described furnace designs is the too short service life. There are types of heating units that can operate from one portion of firewood for 6–10 hours. Such long-burning stoves (often called bubafons) are very popular among the population, although they have many disadvantages.
The operating principle of such furnaces is determined by the design elements:
- The same 50 liter propane cylinder is used as a firebox. A hole is cut at the top through which a pipe is passed for air intake. The top of the pipe is covered with an air damper, and a weight in the form of thick metal disks is attached to the bottom. Steel strips are welded to the bottom of the disk, which disperse the incoming air.
- The firebox is filled with wood and set on fire. The disk is lowered so that it presses the fuel from above, forcing it to settle down as it burns out.
- A control valve at the top of the pipe controls the air supply.
- The chimney cuts into the side, just below the lid.
Over time, the stove can easily be converted into an upper combustion boiler. The design also has serious disadvantages:
- fuel cannot be reloaded, you will have to wait until everything burns out;
- even with the damper completely closed, the firebox does not stop working, secondary air enters it, so it will smolder for a long time;
- high-quality draft is required, otherwise the room will quickly fill with smoke;
- the slower the stove burns, the less it heats, and the more soot is formed;
- To bring the furnace to maximum heating, a quarter of the loaded fuel is spent.
Liquid fuel
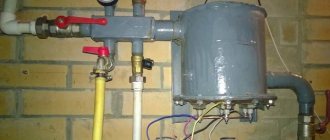
Over time, many farms accumulate large amounts of used engine oil. This is good fuel, and in this case it is completely free. The previously described options for potbelly stoves will not work. You need to make a special stove, always vertical, capable of running on liquid fuel.
Structurally, an oil combustion furnace has the following elements:
- container for liquid fuel;
- a hole through which oil is poured inside;
- a damper that allows you to control the intensity of combustion;
- chimney.
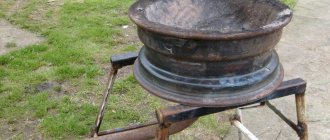
The same 50 liter cylinder is suitable as a reservoir. First, it is divided into two parts in a ratio of 2:1. The small part is turned into a fuel tank, the larger part into a combustion chamber.
The oven will operate according to this principle:
- Oil is poured into a fuel container and set on fire.
- Air is supplied inside, regulating the intensity of the flame with a throttle.
- The fuel in the chamber does not burn, but evaporates - the process of pyrolysis occurs.
- Oil vapor rises to the upper chamber, where it also burns.
In other words, a pyrolysis furnace uses heating from two sources at once - first from burning oil, then from its vapor. As a result, it is possible to achieve an efficiency of about 80%, which is much more than for solid fuel stoves.
This design is used mainly for heating residential premises, workshops, etc. It cannot be used in bathhouses. For safety reasons, fuel should be stored away from the stove itself.
Preparatory activities
If you think through everything and prepare it in advance, then during the work you will be able to avoid mistakes and reduce time costs. First of all, you will need to remove the remaining gas from the cylinder, collect the necessary tools and purchase the missing materials. A detailed drawing or sketch of the heating device will also help in the work.
What kind of cylinder is needed and how to prepare it for work
First of all, we note that only all-metal cylinders for household propane-butane are suitable for making a potbelly stove, including those used to equip LPG in trucks or cars. The best preparation can be considered a 50-liter vessel, which can be found in most private households. Its height of 850 mm and diameter of 300 mm is enough to burn all types of fuel, from firewood or sawdust to used motor oil.
A good potbelly stove can be built from a 27-liter propane cylinder if you use a horizontal design of the unit and retrofit it with an ash chamber. Its small size allows this unit to be used as a mobile structure.
Since even an empty cylinder may contain gas residues, condensate or its vapor, it can be dangerous to carry out any work with it without careful preparation of the container - any spark can lead to an explosion.
The water will displace the remaining gas from the cylinder, after which you can begin plumbing work without fear
To completely remove propane or its derivatives, use a proven method:
- Open the valve and release the remaining gas from the cylinder.
- Turn the container upside down and pour out the condensate.
- Using a gas wrench or an adjustable wrench, remove the valve.
- Place the vessel vertically and use a hose to completely fill it with water. The liquid will completely displace the remaining gas and make the preparation for the potbelly stove safe.
- After the water has been drained, you can carry out any plumbing work with the cylinder - cutting, drilling, cooking, etc.
Since both gas and condensate are explosive substances, and in addition, have a strong, unpleasant odor, work must be carried out in the open air, away from open flame sources.
The valve from the cylinder can be unscrewed using an adjustable wrench
What you need to avoid being distracted by small things
Before getting started, you need to prepare the following tools:
- welding inverter or transformer designed for currents up to 200 A;
- a manual grinder, or, as it is called in our country, an angle grinder, designed for the use of discs with a diameter of up to 180 mm;
- stripping and cutting discs for metal work;
- grinder attachment for cleaning metal from rust;
- electrodes with a diameter of 3–4 mm;
- welder's hammer;
- drill with a set of drills for steel;
- chisel;
- hammer;
- pliers;
- tape measure, metal ruler and square;
- marker and core.
In addition to one or two gas cylinders, to build a potbelly stove you will need:
A potbelly stove made from a cylinder can be equipped with factory cast iron doors
- sheet steel more than 3 mm thick;
- chimney pipe with a diameter of 100 mm;
- chimney elbow 90° or 2x45°;
- cast iron doors;
- grate bars or steel reinforcement with a diameter of 20 mm to replace them;
- hinges for hanging the door;
- metal corners with a shelf measuring at least 30 mm.
If you are a supporter of aesthetics in any of its manifestations, then, in addition to everything else, prepare a solvent, primer and paint. A painted potbelly stove will look much better, and the final finishing will give the unit a complete look. Of course, these materials must be designed for use in high temperature environments.
Which design to choose for your project
Despite all the variety of stoves that can be built from a regular gas cylinder, existing designs can be reduced to three main types:
- horizontal;
- vertical;
- combined.
A horizontal potbelly stove is easier to manufacture and, according to the owners, has greater heat transfer (which, in principle, is not far from the truth, given the slightly enlarged fuel chamber). At the same time, it occupies a large area, which in some cases is unacceptable. Horizontal units are good where there is room to turn around - in spacious workshops, warehouses, greenhouses, etc.
The horizontal position of the cylinder is more advantageous from the point of view of thermophysics
The vertical heating device takes up much less space and has an ideal configuration for installation in a corner. For installation in garages and small rooms, home craftsmen choose this particular design, although it is more difficult to manufacture. The difficulties arise from the fact that to install the grate you have to weld in a limited space, and this is not very convenient. At the same time, there is a method when, to install the grate, the cylinder is cut into two parts, and then welded again.
Vertical stove - one of the most compact heating devices
Combined potbelly stoves are made from two or more cylinders, one of which acts as a firebox, and the other as a heat exchanger. In fact, such a heating device is the same horizontal structure, but since its chambers are made of separate vessels, we still classify such structures as a separate subspecies. Combined-type stoves are the most economical and thermally efficient heating devices, but they cannot be called ideal, given their large dimensions and increased labor costs.
The combined heating device has increased efficiency
Below we have presented drawings and diagrams that can help you in your work or in designing your own structure.
Drawings and diagrams of potbelly stoves that can be built from gas containers
Drawing of a horizontal unit
Scheme of a vertical potbelly stove Drawing of a vertical potbelly stove made of yuallon Drawing of a long-burning potbelly stove
Cutting gas cylinders
Many people prefer to use a gas cutter at this stage, but using an angle grinder (angle grinder) is much more convenient. The fact is that the water from the cylinder does not drain, which means it will splash to the sides and boil, which is quite inconvenient (a conclusion from my personal experience). Using an angle grinder and a cutting disc, the top comes off fairly easily.
Cutting the cylinder using a grinder along the marked line
After this work is completed, the separated lid is removed and the water is poured into the second cylinder. In those areas where the hinges of our future potbelly stove door will be, the paint is removed from the surface. The second gas cylinder is prepared for the main work in exactly the same way.
The cleaned cut out lid should look something like this. All that remains is to weld the hinges so that the door can open. In addition, I made a hook for the locking mechanism, welding it to the side of the cylinder. The locking handle itself was made of a short bolt, which was screwed into place of the tap and a pin welded to it. Essentially, everything here is quite simple. In the photo below you can see what it looks like.
Red arrow – hinges (2 pcs.), yellow – locking mechanism, which can be completely turned out
Recommendations for choosing a location and operating a heating device
A potbelly stove is such a compact heating device that it can be placed in almost any room, the main thing is that the chimney can be taken outside. It must be remembered that the efficiency of the device and the safety of its operation depend on the correct choice of location for installing the stove. Therefore, we recommend taking the advice of professional stove makers.
- For maximum heat transfer, it is best to install the potbelly stove in the corner of the room farthest from the door.
- The installation site of the stove is covered with a metal sheet that is 20 cm greater than the overall width of the heating device and at least 60 cm greater than its length.
- The potbelly stove must not be installed under shelves or near places where flammable and explosive materials are stored.
- The room is equipped with effective supply and exhaust ventilation.
- When installing potbelly stoves, be sure to maintain the gaps between the walls of the heating device and the combustible structures of the room. For fire safety purposes, the latter are protected with special screens with ventilated gaps.
Once the safety of the heating device has been ensured, you can proceed to the firebox. For those who are encountering a potbelly stove for the first time, let us consider the process of putting the stove into operation in more detail.
The installation location of the stove must comply with safety standards
The first to be loaded into the firebox are flammable fuels - paper, cardboard, straw or rags soaked in kerosene. A few chips and finely chopped firewood are placed on top, and large logs are placed on top of them. Firewood can be placed in any way - horizontal rows, a cage, a cone, etc. After this, the bottom layer of fuel is set on fire and closed, leaving the ash door completely open. The vent is covered only when the stove reaches operating mode, as evidenced by a characteristic hum. The correct adjustment of the air supply is indicated by a slight noise, a “whisper” of the furnace - with such a load, the unit provides an optimal balance between efficiency and productivity.
You can stir the firewood only when it is at least half burning. Otherwise, normal combustion may be disrupted and the unit will switch to smoke generator mode. Coal is poured into the stove when the wood has burned through 70–75%, having previously poked through the heat with a poker.
We increase the efficiency of the furnace
A potbelly stove can heat a room in literally a matter of minutes.
Moreover, you can throw whatever comes to hand into the firebox: since it does not have an extensive network of chimneys, and the smoke in it comes out “directly,” you don’t have to worry about them getting clogged. But if a conventional heating stove installed in premises for permanent residence has an extensive network of chimneys that retain heat, in a potbelly stove it goes directly into the pipe, so its efficiency is not very high. That is why it is too “gluttonous” and requires a lot of fuel.
To reduce fuel consumption, you can use the following tips from experienced stove-makers:• firebox door and vent
in such an oven should be as airtight as possible;
otherwise, the air supply to the potbelly stove will increase, and the fuel will burn out too quickly;• to regulate the release of warm smoke in the chimney, it is advisable to provide a damper
;• next to the stove, you can provide
side metal screens
at a distance of 5-6 cm from the stove, in this in this case, it will heat the room not only through heat radiation, but also through convection (circulation of warm air); • a potbelly stove, “clad” in a metal casing, will help retain heat much longer;
Potbelly stove in casing
Round furnace with afterburner and casing with heat gun
• to retain heat in the room, elbows should be built up in the pipe; however, soot will be retained in them, so it is advisable to create a collapsible structure; • the pipe can also be given a stepped shape: arrange the elbows in stages, making a 30° turn with each step; in this case, each of the elbows must be securely attached to the wall with rods;
Stove with chimney elbows
• chimney capacity
should be less than the productivity of the furnace itself, in which case hot gases will not go into the pipe immediately;
its diameter should be only 2.7 times larger than the volume of the firebox, for example, with a firebox volume of 40 liters, the diameter should be 110 mm; • you can increase the efficiency of the stove by blowing the chimney with a fan
- this will turn the stove into a kind of smoke cannon ;• to reduce air circulation,
firewood in the stove
should be stacked as tightly as possible;
if it is heated with coal, you need to stir up the resulting ash as little as possible; • to regulate the air flow, the door to the ash pit can be made adjustable by providing it with vertically located slots and a latch
.
strips of metal
can be welded onto its body perpendicular to the stove;• if you place a couple of
buckets or a metal box with sand
.
then they will accumulate heat and store it even after the stove goes out; sand backfill or a heat accumulator made of stones
can also be sewn inside the metal body of the furnace;
Scheme of a potbelly stove with sand backfill, the stove is made of a pipe with a diameter of 500 mm, its length is 650 mm
• oven lined with 1-2 layers of brick
. will retain heat much longer;
• the volume of the furnace also matters: the larger the area of its walls
.
the more heat they will release into the room;• bricks or metal sheet
. on which the stove is installed will help not only protect the room from fire, but also retain heat.
Related video: Do-it-yourself potbelly stove stove
8f772c3fed439782b7a382d3001fa981.jpe