The Homius editors are receiving more and more photo reports describing the manufacture of various heating devices. And today we want to offer a step-by-step description of the process of creating a potbelly stove for a garage, provided by Mikhail Kozlov from the city of Ugra, Khanty-Mansiysk Autonomous Okrug.
Hello. I decided to write a report on how I made a potbelly stove to heat the garage. Frosts in our area can be quite severe, so sometimes such a stove is simply necessary. But after making the first sample, using one cylinder, I realized that such heating was not enough, and therefore decided to add a second one.
The result exceeded all my expectations. And now I will try to tell you how all this work was done
Preparation of cylinders: necessary procedures before starting work
Probably everyone understands that there should be no gas in the cylinders before starting work. That is why I opened the tap completely (the procedure was carried out outside). After 10 minutes, the cylinder was clamped in a vice by the edge of the lower skirt, and the tap itself was turned out using a regular gas wrench.
Method of clamping a propane cylinder in a vice
After the tap is turned off, the cylinder must be filled to the top with water. This is done for security reasons. For your own safety net. After filling, the tap was screwed into place, and a regular wire loop was put on it. This was done to make it more convenient to mark an even circle, which in the future will become the oven door.
Mark the top of the cylinder using a wire loop and a marker
Related article:
Do-it-yourself stove : drawings, video and photo instructions, operating principle, advantages and disadvantages, operating rules, review of finished models and average prices - in our publication.
Potbelly stove from a gas cylinder: advantages and disadvantages
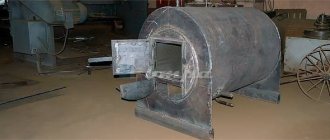
Made from a gas (mostly propane) cylinder, the potbelly stove has two fundamentally different types: vertical and horizontal. Although the manufacturing process does not limit the designer’s imagination. Options of a combined type are not excluded.
Examples of homemade products in the photo
Horizontal version
Vertical version
Combined version
This potbelly stove uses solid fuels: firewood, coal, fuel briquettes.
The advantages of such a stove include the following:
- good thermal conductivity due to the thickness of the metal wall of the cylinder (4 mm);
- optimal size/efficiency ratio;
- when used vertically, it takes up very little space in the room;
- ease of manufacture and availability of necessary materials;
- the possibility of equipping such a stove with a sheet of metal for heating and cooking food.
Disadvantages of such a potbelly stove:
- use only solid fuel;
- with a vertical design, it is necessary to adjust the firewood to the optimal size;
As you can see, such a stove definitely has more advantages.
Cutting gas cylinders
Many people prefer to use a gas cutter at this stage, but using an angle grinder (angle grinder) is much more convenient. The fact is that the water from the cylinder does not drain, which means it will splash to the sides and boil, which is quite inconvenient (a conclusion from my personal experience). Using an angle grinder and a cutting disc, the top comes off fairly easily.
Cutting the cylinder using a grinder along the marked line
After this work is completed, the separated lid is removed and the water is poured into the second cylinder. In those areas where the hinges of our future potbelly stove door will be, the paint is removed from the surface. The second gas cylinder is prepared for the main work in exactly the same way.
The cleaned cut out lid should look something like this. All that remains is to weld the hinges so that the door can open. In addition, I made a hook for the locking mechanism, welding it to the side of the cylinder. The locking handle itself was made of a short bolt, which was screwed into place of the tap and a pin welded to it. Essentially, everything here is quite simple. In the photo below you can see what it looks like.
Red arrow – hinges (2 pcs.), yellow – locking mechanism, which can be completely turned out
With grates or without?
In the simplest version, no grates are provided. If the cylinder is small or stands horizontally, then selecting a part inside is problematic. In this case, the design of a potbelly stove made from a cylinder is quite simple: the body is placed on legs, one door, and a pipe for connecting the chimney is welded in the upper part. All. The whole stove.
The internal structure of a potbelly stove made from a horizontally located cylinder is quite simple: only a door for loading fuel/unloading burnt coals and an exit for the chimney
The photo above shows examples of such simple ovens. In order to improve heat transfer, metal strips are welded to the outside of the body. In the upper part, in addition to the smoke pipe, there is another outlet - a lid is installed on it, and this outlet is used as a stove for cooking food and heating tea.
If you still want to make grates in a potbelly stove from a horizontally installed cylinder, you will have to weld a tray for collecting ash from below. Below there is a drawing and photo of the practical implementation.
Drawing of a potbelly stove made from a horizontally located gas cylinder with an ash pan drawer welded to the bottom
Ready-made stove from a cylinder with an ash drawer. A drawer, welded to size, is placed on this shelf. By extending/retracting it, the oxygen supply and the burning power of the wood are regulated
In vertical versions of potbelly stoves made from a cylinder, grates are most often installed. In this case, it is easier to allocate space. Usually, thick reinforcement bars are welded inside: a cast iron grate of a suitable size is difficult to find. But this option is bad because the reinforcement quickly burns out, and repairs are complicated: remove the old reinforcement and weld in a new one. You can weld pieces of thick corners or reinforcement inside (as in the photo), separately weld grate bars from the reinforcement and lay them on the corners.
Option for installing grate bars in a potbelly stove from a gas cylinder
This video talks about how to make a stove from a gas cylinder with your own hands - the grates are made of fittings.
Next step: connecting the cylinders to each other
I consider this work to be the most important. Laying the cylinder on its side, I used a marker to mark a rectangle on it, 10 cm wide over its entire length. Of course, it can be made shorter, but it seemed to me that this would be better for the operation of the potbelly stove. The marked area was cut out, and the part of the metal removed after this work was divided into two equal halves in length. It was from them that I made the transition from one cylinder to the second. This is very convenient and eliminates the need for unnecessary measurements and searching for additional material. A similar slot was made in the second cylinder, but the separated strip was used later for other purposes. It was from this that the plugs on the sides of the adapter from one cylinder to the second were made.
This is what a slot with side walls should look like:
Preparing the cylinders
Before cutting a balloon with a grinder, you need to protect yourself. To do this, condensate must be removed from the cylinder. This is very easy to do - you can follow the example of the author.
First, using a hand hacksaw for metal, the author cuts off the valve (under no circumstances use a grinder - the slightest spark can lead to an explosion).
After this, fill the container with water and drain it along with the condensate. We fill the cylinder with water a second time, and after that you can safely start cutting with a grinder.
Trying, fitting, additional work
The resulting sides were welded along the length, and plugs made of metal left over from the second cylinder were installed at their ends. I welded legs from a corner onto the lower cylinder so that our stove would not lie on the floor. At the same time, they should not be made high - no more than 20 cm. Having installed the prepared upper part, made from the second tank, I adjusted the hole to the resulting shaft. After making sure that everything matches, I removed the top cylinder. At this stage it was worth working a little more with the bottom one.
By the way, regarding welding. Many people do not attach due importance to the quality of the seams, believing that if a potbelly stove is made for a garage, then no one will look at them anyway. In fact, the need for good penetration is that the quality of the draft and the durability of the finished stove will depend on it. Therefore, if you do not have proper experience in welding, it is better to ask a specialist for help.
The fitting of the upper and lower compartments of the potbelly stove went well
Main types of oven
A vertical stove is made more often, as it takes up little space and has a neat appearance.
The horizontal design is valued due to the large cooking surface area. The dimensions of the ash pan and the hole for storing firewood in any device are 10x20 and 20x30 cm, respectively. Their markings are applied both to the drawings and to the cylinder itself - this makes it easier to cut out. The location of the holes is chosen arbitrarily, depending on the type of stove.
With the help of such a stove you can heat the room and even cook food outside
The chimney is made from a steel pipe, cutting it into different sections and welding them together. Additionally, you need to insulate it with mineral wool and foil. You can use the finished potbelly stove indoors or outdoors. If the stove is used for cooking outdoors, then it is enough to attach a low pipe for the smoke to escape.
Vertical stove
To create a vertical stove from a propane cylinder, it is placed vertically.
It is necessary to cut off the neck, use a marker to draw the markings of the ash pan, chimney and firebox. The holes are cut with a grinder or cutter. Reinforcing bars are cut into identical pieces, forming grate bars. They are welded to the body in parallel rows or in a snake. Hinges for doors are attached, doors are cut out of steel sheet or cast iron. A sliding mechanism or latches are welded to them. See also: modern types of potbelly stoves.
A hob is necessary if food will be cooked or water will be heated on the stove. To create it, you need to cut out a metal part of suitable size and weld it to the top of the cylinder. After this, all joints and seams are checked for tightness and strength, cleaned and sanded.
The vertical oven is more popular because it takes up less space
The hole for the chimney should be located at the top of the cylinder or on the side, sometimes the pipe passes through the central opening. In the side part, the elbow is first attached, then the chimney itself. Smoke and combustion products come out through the pipe. A metal stand or strong legs are attached to the bottom of the cylinder. Additionally, you can prepare the foundation for the potbelly stove.
Horizontal design
The first step is to create a strong stand. It is made of metal, the legs are welded, and then the body of the finished stove. A marker on the cylinder marks the location of the blower, chimney and fuel holes. The openings are cut with a chisel, grinder or cutter. Using a drill, holes are drilled in the lower part of the body. An ash pan is attached to the top; it is made of strong, heat-resistant metal. A damper is welded to the opening, which will serve as a blower.
The door is prepared from the cut out part of the cylinder. It must be scalded and attached to the body using hinges. Although you can make a cast iron door with a latch and weld it. The chimney should exit from the top rear of the stove. A steel sheet is laid and secured on top of the body to create a flat cooking surface.
A horizontal stove will require more space - this is its main disadvantage
You can buy ready-made burners in the store, cut a hole in the steel for them and secure them. This way you can make a stove from a horizontal gas cylinder, but it takes up a lot of space.
We continue to work with the lower compartment
On the opposite side of the lower cylinder, we cut out another similar hole along the entire length. This is necessary so that the ash pan can be made. It doesn't have to be copied across the width. There will be more - no problem. The main thing is that it is made to the full length.
A metal box was welded to the bottom of the hole, into which the remaining scraps from the gas cylinders went. But it is worth noting that there was not enough material to make the bottom of the ash pit. Fortunately, I still have the potbelly stove that I mentioned at the beginning. And since it turned out to be useless at our temperatures, it was decided to use it for spare parts. The locking mechanism for the ash pan can be made in completely different ways - as you wish.
This is the ash pan I got with a locking mechanism:
Making grate bars: collecting all the waste in the garage
It is clear that if grates are not installed in the stove, the firewood will fall down and the ash pan will have no practical use. For their manufacture, various pieces of reinforcement, studs, bolts were used - the original purpose of the rolled metal does not matter. The main thing is to assemble some kind of grate that will not fall into the hole in the lower compartment. Its main task is to hold firewood in the tank. At the same time, if the grate burns out, they can easily be replaced by reassembling and welding cuttings of reinforcement rods. In addition, in this work, unlike the connecting seams of the potbelly stove itself, no experience in welding is required. On the contrary, this is a good option for training metal welding for a beginner.
No welding experience is required to make grates
This is where the grates are installed
After everything is ready, you can install the potbelly stove in the place where it will subsequently stand, having first welded the upper and lower compartments together.
Principle of operation
The operating principle of this wood-burning stove is quite simple. All you need to do is place the wood on the grate and light it.
This will allow the metal canister to warm up. One of the advantages of this design is considered to be quick heating. Although after the wood in the stove burns out, the surface also cools quickly.
To increase the heat output of the stove, it is recommended not to install the chimney in a horizontal position, and to reduce its size.
Drawing of a potbelly stove made from a horizontal gas cylinder
Installation of a chimney for a homemade stove
Smoke removal is a very important process when installing a wood stove in enclosed spaces. Carbon monoxide is quite dangerous to human life and health. In addition, the draft will depend on the quality of the chimney, and therefore the quality of heating and the rate of temperature increase.
A hole was cut in the upper compartment of the stove. Here I used a gas burner, which turned out to be more convenient. The most interesting thing is that chimney pipes, if bought at the markets, will cost a fairly large amount. I was lucky; I had several pieces with a diameter of 100 mm lying in the garage. If there is no way to find them for free, then it is better to try to purchase them at scrap metal collection points.
To make the hole for the pipe more even, I used the rest of the disc from the grinder, although, in fact, there is no need for perfect accuracy here.
Marking the hole for the future chimney
I don’t think it’s worth talking about welding the smoke exhaust pipe itself. Each room has individual dimensions and layout, which means that in the end you won’t be able to find a single repeating option. For greater heat transfer, the chimney can be made using several elbows, although the heat that the flame will emit in such a potbelly stove is sometimes even too much.
The chimney was led out at a slight slope towards the wall, and then to the street (under the garage ceiling)
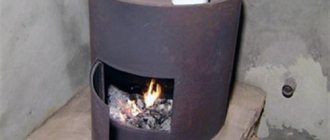
Checking the performance of a garage stove
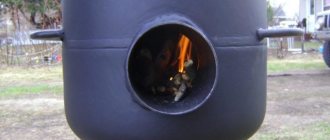
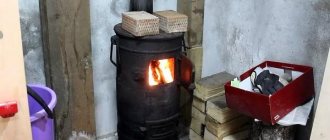
After all the work was completed, I decided to check the functionality of the stove. What I especially liked was the ability to load long pieces of boards. Having lit the stove, I began to wait for the result, which was not long in coming and turned out to be quite noticeable.
The first heat received from a potbelly stove from two gas cylinders
It is quite convenient that there is no need to bend over to the lower compartment to add firewood. Just open the top door. I deliberately opened both so that it would be clear how this can be done.
The fire began to break through the connecting shaft between the cylinders
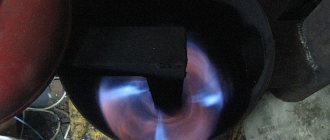
The work of the ash pan was also excellent. It is very convenient, and if there is a need to increase traction (and therefore heating), it can be opened and used as a blower. In my garage, at the moment, there is a fan installed opposite the stove, directed at the ash pan hatch and turned on, if necessary, in the most severe frosts.
Air passing through the ash pan promotes stronger combustion.
The design of the stove and its principle of operation
Like any solid fuel stove, a potbelly stove made from a gas cylinder has two main structural compartments: a firebox and an ash pit (ash pan).
The working process takes place in the firebox - fuel combustion. The ash pan is located under the firebox, directly connected to it through a grate and serves to remove non-volatile combustion products from the firebox.
Horizontal and vertical execution
During the combustion process, combustion products are formed. Volatiles are eliminated through the chimney under the influence of natural draft, and loose ones are eliminated through the holes in the grate into the ash pan. Subsequent removal of bulk combustion products from the ash pan is done manually using a poker or spatula.
The ash pan also serves to supply air to the combustion chamber (furnace). Therefore, it should be cleaned promptly. Without a normal air supply, fuel combustion efficiency is significantly reduced.
The heat from the stove comes into the room directly from the hot walls of the firebox.
Protection of the wall and people in the building
It is clear that some kind of fencing needs to be done, but there are certain nuances here. In my case, a metal profile was used. That part of it, which is located near the wall, was made to the floor, to protect the concrete from high temperatures (I felt them when I first checked the stove) and to additionally reflect heat from the cylinders into the room. As for the outer protective wall, it must be installed at a distance of 20-30 cm from the floor. This will ensure good air circulation. The resulting convection will allow the room to be heated much faster and more evenly.
As for my particular case, after the first ignition of the stove, 20 minutes later, the temperature in the garage became such that it was possible to walk around in a shirt (with the gate closed, of course). This is despite the fact that outside at that time it did not rise above -30ºС.
Protective screens are installed, the potbelly stove is operating normally
How to properly install a potbelly stove and chimney?
In order for the balloon furnace to work correctly and the efficiency to be maximum, it is important to carry out the installation correctly. Otherwise, the cold room may become smoky. All fire and safety regulations must also be observed.
Installation requirements:
- Any combustible objects should be no closer than half a meter from the stove. Distances to fireproof objects are not standardized.
- If you heat a greenhouse, do not place the stove close to glass or plants.
- The wooden floor covering must be covered with a metal sheet. On the side of the firebox, a patch measuring 50x70 cm is also covered.
- If the walls are made of wood, it is worth protecting them with fireproof material.
- The potbelly stove is placed at a height of 200 mm.
- Point a fan at the stove. Additional air flow due to convection will increase efficiency.
- Clear the ash pit from ash in a timely manner.
- Insulate the chimney. This will significantly reduce heat loss from the stove from the gas cylinder in the garage.
A little more about the chimney
It is worth noting here that thanks to the design of the stove, which consists of two sections, a chimney pipe that is too long will not “steal” heat - an increase in draft will only contribute to increased combustion and an increase in temperature. The main thing is to secure it so that the wind does not uproot it. But it’s worth thinking about the deflector (protective cap). If there is snow or a blizzard at night, the pipe may become completely clogged. In this case, lighting a potbelly stove will be quite problematic. In the photo below you can see that I raised the chimney quite high. However, when this photo was taken, the deflector had not yet been installed.
This is the chimney pipe I got