Thermal insulation is an important stage of arrangement
Nowadays, an insulated floor for a dacha is no longer a luxury; the owners of modern country houses want to be able to relax there not only in the summer, but also, say, comfortably celebrate the New Year.
Contrary to popular belief, it is not so difficult to make insulated floors in a dacha with your own hands; the main thing is to choose the insulation correctly, so that later repairs to the dacha floors do not become a regular occurrence and do not turn into a kind of hobby.
The market leaders in this case are the following materials:
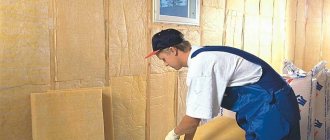
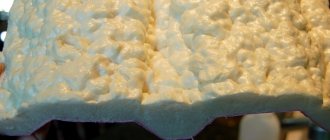
Mineral wool has many advantages; it is widely used for insulating walls and ceilings in almost any type of residential or commercial buildings. Available in the form of soft cotton rolls and dense mats. This material does not burn, does not melt and has good heat and sound insulation characteristics. But it also has serious disadvantages. The price of environmentally friendly, water-repellent mats is quite high, and cheaper options will quickly become unusable. In particular, budget options for mineral wool can get wet and lose their quality. Plus, they dry out and begin to crumble, forming microscopic and very harmful dust. Since the floor is constantly in motion, this dust will spread.
- Extruded polystyrene foam or, in the budget version, ordinary polystyrene foam, can be called perhaps the most common type of insulation. It belongs to environmentally neutral materials, retains heat perfectly, does not get wet and has decent soundproofing qualities.
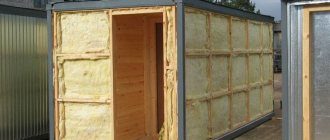
- One of the disadvantages is that it does not allow air to pass through, in other words, it does not breathe and when exposed to open fire it can melt and burn. But this is more relevant for wooden structures. If country houses are insulated from block containers, then polystyrene foam is the best option.
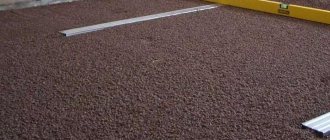
Expanded clay is currently considered one of the market leaders. This is a completely environmentally friendly, harmless bulk material. It is natural clay, fired and foamed in special ovens. The result is granules made of solid porous material that are not afraid of moisture.
Justification for carrying out the work
Insulating a floor on the ground with sawdust Some gardening enthusiasts work at their summer cottage not only in the summer, but also in the fall.
And they usually start work in early spring. However, a country house, as a rule, is not insulated, which can cause discomfort in cool weather. In the absence of insulation of the house, heating the room is problematic and expensive, especially if many communications in the country house are missing. Attempts to heat the dacha end with the heat from the heating devices escaping through the floor and ceiling.
You can carry out floor insulation work in your dacha with your own hands. To reduce the cost of purchasing materials, as well as to reduce labor costs, you can insulate only one or two rooms. However, insulating the entire room will be much more comfortable for spending time in spring and autumn.
When planning insulation activities, it is necessary to schedule the work for the summer period, this will improve their quality.
How to choose floor insulation
Professional builders have been arguing for a long time about the best thermal insulation material for a dacha floor, but in most cases, owners of their own homes care not only about the efficiency of the insulation, but also about its cost, and it is desirable that it be as low as possible. A warm floor in a country house can be made using inexpensive bulk materials, thermal insulation mats or slabs, and if funds allow, you can organize polyurethane foam spraying and forget about drafts forever. There are plenty of insulation products on the market, but almost always the choice is based on financial capabilities.
There are a number of requirements for floor insulation:
- Light weight so as not to create additional load on the foundation.
- Waterproofness - the insulation should not allow or minimally allow water to pass through, not dampen and provide additional waterproofing (ideally).
- Durability - agree, no one wants to undertake such large-scale work to change insulation every 3-5 years.
- Fire safety - insulation should not be easily flammable or support combustion.
- Ecological cleanliness.
If your financial situation allows, you can purchase modern insulation materials that can be easily and quickly installed without the help of specialists. There is a solution for budget-conscious owners - traditional insulation schemes using cheap materials, but you will have to tinker with their installation. Let's consider all the options.
Inexpensive insulation materials
If you want to save money on construction without sacrificing quality, there are several thermal insulation materials that reliably protect against the cold and are inexpensive. For example, our ancestors used dry sawdust to insulate floors. They can be purchased at a minimal price or even obtained free of charge from a woodworking industry. However, in this case, you will have to strengthen the waterproofing, because sawdust easily absorbs moisture, and when it gets damp, it stops retaining heat.
A more practical option is sawdust pellets - this is a product of modern production, the raw materials for which are wood processing waste. Sawdust is pressed under pressure into small hard granules, which do not easily succumb to moisture and last longer. The granules are treated with fire retardants (agents that prevent them from easily catching fire) and antiseptics. This material is mainly used for thermal insulation of floors on the ground. In addition, chemical-free pellets are an excellent, economical fuel for stoves and boilers. They are also used as cat litter, which speaks in favor of their environmental friendliness and safety.
Expanded clay has excellent thermal insulation qualities and is a favorite insulation material for budget-conscious builders. These are clay granules foamed under the influence of high temperature, which practically do not absorb moisture and can give the house warmth for many years and even decades.
The only drawback of expanded clay is its fragility, so care should be taken during transportation. For high-quality thermal insulation of the floor in the middle latitudes of Russia, it is recommended to pour a layer of expanded clay about 30 cm thick
Another inexpensive insulation material is mineral wool in rolls without a corrugated shell or foil layer. However, it, like sawdust, requires enhanced waterproofing. The same applies to rolled materials based on fiberglass, stone wool, and slag wool.
Foam boards are also inexpensive, but they are very fond of being damaged by rodents, which sooner or later appear in any private home. In addition, the foam should be protected from fire - and although it does not burn on its own, when melted it emits acrid smoke, which can lead to suffocation.
Expensive modern materials
If you want to carry out high-quality insulation of floors in your country house and are not short on funds, you have a lot of options open to you, each better than the other.
The most popular modern insulation materials:
How to choose lags
Logs are rectangular bars laid parallel to each other as the base of the floor. Hardwood and coniferous wood are used. The main selection criterion is strength. Do not use material that shows signs of rotting. The presence of a large number of knots is not scary. For the logs of a country house, timber with dimensions of 50x150, 100x150 mm is suitable. The larger the room, the greater the requirements for the strength of the foundation. Sometimes it is enough to lay paired boards on edge.
How to choose lags
The location and height of the logs are selected.
The height of the log should provide a ventilation gap between the insulation and the finished floor. The dimensions of the lumber chosen as the floor frame and the thickness of the insulation must match each other. For example, with a log height of 150 mm, it is not always possible to lay insulation with a height of 100 mm. It is necessary to take into account that a few centimeters will go under the subfloor board and the skull block. The log can be increased in height with additional slats.
Insulation on wooden floors
If the floors in the dacha are very strong and smooth, and there is no desire to open them, you can perform insulation directly on the boards. The disadvantage of this method is that the ceiling height will decrease by about 8-10 cm.
Tools and materials
To work you will need:
- grinding attachment;
- jigsaw;
- building level;
- primer;
- wood putty;
- bars 50x50 mm;
- sheet material, for example chipboard;
- vapor barrier film;
- insulation;
- self-tapping screws;
- screwdriver;
- construction tape.
The bars will serve as lags, so they must be smooth, without defects, and well dried. Since the work process will take very little time, the bars should be pre-treated with antiseptic impregnation and dried.
Floor preparation
Step 1. Carefully remove the baseboards and clean the floor from dust. Check the horizontality of the surface with a level gauge.
Step 2. If there are protrusions on the floor, the surface is treated with a sanding attachment. The gaps between the boards and recesses are filled with putty.
Puttying a wooden floor
Step 3. Cover the working surface with two layers of primer mixture and allow the floor to dry.
Step 4. The beams are laid out on the floor in parallel rows with a step of 30 cm. From the outer beams to the walls the distance is 2-3 cm. Using a level and wooden wedges, the beams are aligned exactly horizontally and screwed to the base with self-tapping screws.
Laying and fastening lags
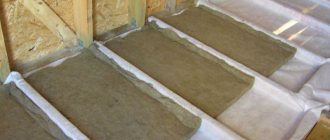
Step 5. The space between the beams is filled with insulation. Mineral wool and polystyrene foam are best suited for this. The resulting seams need to be blown out with foam.
Laying insulation in the space between the joists
Step 6. Cover the top of the insulation with a vapor barrier membrane, carefully straightening the material and securing the seams between the strips with tape.
Mineral wool is covered with a membrane
Step 7. For convenience, the sheet material is cut into squares and the flooring begins. Starting from the second row, the sheets are laid with the joints offset by 20-25 cm. The seams should be minimal, so fit the squares as tightly as possible.
Laying sheet material on joists
Step 8. If you plan to lay boards over chipboard, no additional treatment is needed for the subfloor. For thinner finishes, it is necessary to fill the joints and sand the entire floor with a sanding attachment. After this, remove the dust, apply a primer and wait until the floor dries.
The described options are the most practical for a summer residence; If you follow the technology, you won’t have to change the thermal insulation layer for at least 10 years.
An insulated floor in a country house will last at least 10 years
Comparative table of floor insulation
How to insulate cold floors in a private house
Insulation of a wooden floor in an old house
Preliminary work
In an old house, you can insulate a cold floor without touching the walls and other parts of the building.
- Remove old boards. They examine them and throw them away, rotten and rotten. Those that are not destroyed are left and used again.
- Check the condition of the underground part. It is important to determine whether the subfloor boards, joists and other wooden parts are well preserved. Rotten elements are removed to be replaced with new ones.
- While the floors are being dismantled, you should check the ventilation vents, the condition of the subfloor and, if necessary, carry out work in this part of the house. Sometimes it is necessary to remove excess soil or, conversely, add soil.
- After a thorough examination, new beams are installed or old, well-preserved logs are treated with a special protective compound.
- Then a subfloor is laid from substandard or second-rate unplaned boards. They are also impregnated from rotting and damage by rodents.
- Next, insulation measures are carried out.
Attention! Small gaps are allowed in the rough flooring. They will serve as additional ventilation for the lower part of the house.
Main works
It is better to insulate a cold floor in a wooden house with natural materials based on cotton wool. If the house is located near fields and is attacked by field mice and domestic rodents in autumn and winter, you should prefer glass wool. You will have to experience inconvenience during installation. But this will guarantee that the floors will last for a long time.
- A cage is mounted on the rough flooring or slats are nailed in increments of 40 cm.
- Next, waterproofing is laid - plastic film. The canvases are overlapped, not stretched, and secured with tape. The edges are folded up, extending onto the walls by about 10 cm.
- Thermal insulation material is placed in the spaces between the slats. It needs to be secured. It fits well into the space allotted to it and acquires the required shape and size.
- Lay any vapor-proof material tightly on top.
- Then lay plywood, chipboard, OSB or floorboards.
- The finishing coat is placed on top.
If houses are insulated with bulk material to insulate a cold floor, waterproofing is not done. Expanded clay and wood waste absorb excess moisture well and are not subject to destruction. Sawdust compresses over time and prevents heat from escaping.
Insulation of cold concrete floors
Types of materials used in floor assembly
For the construction of floors from natural building materials in the countryside, the following options are most often used:
- Sheet type building material. This variety includes plywood, chipboard and OSB;
- Uncut board;
- Lumber from laminated veneer lumber;
- The boards are folded.
The first two types of material are used in the construction of a rough foundation. In the future, a top decorative covering will be laid on the subfloor of the basement or first floor, which can be formed from boards, laminated veneer lumber or seamed lumber. The decorative coating is subsequently painted or varnished, as shown in the photo.
To ensure that the floors are not only beautiful, but also durable, it is important to choose high-quality wood of the right species. You can find out which wood species is best suited for floor assembly by watching the detailed video review attached to the article.
Ways to protect your dacha floor from moisture
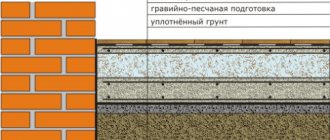
The problem when installing a floor in a country house on a strip foundation is often its protection from dampness coming from the ground. The durability of the floor largely depends on good ventilation of the subfloor. Therefore, taking care of it begins with a project that necessarily provides for the arrangement of vents in the strip foundation. Vents are holes located oppositely. They are opened in the warm season and closed for the winter if the country house is intended to be used in winter.
In areas where the groundwater level is high, simple subfloor ventilation may not be enough. Evaporation rising from the ground saturates the logs and leads to their rotting. Plastic film will help correct the situation. It needs to be spread under the entire area of the house and covered with a layer of regular sand.
By taking these precautions, you can significantly increase the durability of your entire floor structure.
By definition, a columnar or screw foundation allows for free passage of air. The logs on such a foundation will never rot, but the lack of strapping and warm filling around the entire perimeter leads to the need for more serious insulation of the floor.
Installation of a wooden floor on joists with tongue and groove boards
If a wooden floor is installed on joists and the plank flooring is made with tongue and groove boards, then you can make the floor with your own hands as follows. To install a finished floor on joists, it is better to use boards connected to each other in a quarter, on an insert strip or in a tongue and groove; these types of connections ensure a tight fit of the floor boards. The tongue and groove board differs in its sidewall: one sidewall has a groove, the other has a ridge. To fasten a tongue-and-groove board to a wooden joist, nails are driven at an angle into the corner of the ridge and the head is slightly recessed so as not to disturb the tightness of the boards.
When laying each subsequent board, for greater joint density, the laid board is knocked down from the side with a small hammer through a wooden block. You should not hit the board with a hammer, especially from the joint side, so as not to damage it. Use a wooden block. The block is placed against the board and the block is struck with a hammer. So the board fits tightly into the ridge with a groove.
Modern methods of insulating concrete floors
When working with a concrete floor, there are a number of additional ways to achieve the task. This should include:
Coating the floor with heat-insulating paint
This method has many advantages. Anyone can carry out these repairs themselves. The paint is suitable for both new and old buildings.
It is applied in several layers to a previously cleaned floor. Each layer must dry well, only then can you move on to the next one. As a rule, you can insulate a dacha in this way within 24 hours.
Floor covering with warm linoleum, technical cork or carpet
Carpeting and linoleum cannot sufficiently solve the problem of insulation. However, such options are quite economical.
When choosing a technical cork, you will have to incur significant material costs, but this material is considered the safest for health and is characterized by excellent performance properties.
Covering with sheets of plywood or moisture-resistant fiberboard and chipboard
This option is considered one of the budget methods. These materials can be laid either on logs or directly on a concrete floor. A more noticeable effect can be achieved by laying them in two layers on the concrete surface itself.
It is worth remembering that the plywood sheets should not completely coincide with each other. Between them you need to leave small joints of 1.5 mm, which will prevent unevenness of the finished floor, for which you can choose laminate, linoleum, carpet and other options.
Installing a concrete floor at the dacha
The specifics of insulating floors in a country house with a concrete base allow for several methods of insulation. The first is reminiscent of working with a wooden floor, and the second is only suitable for a concrete base. So, insulating the floor using film and layers of heat-insulating material in a dacha can be done with your own hands. The film is laid in one layer, its footage is easy to calculate. In this case, preliminary work is necessary - sealing cracks and chips using cement screed and putty.
After the surface has dried, a wooden frame is set up on it. The distance between the beams is at your discretion, but it is better that it is no more than 80 cm. A film is laid on this base and secured with a stapler. The space between the beams is filled with heat-insulating material.
The second option for the floor in the country house is a little more interesting. First, the floor is leveled using putty or screed. Next, you can lay a layer of roofing felt for additional insulation. Insulation is laid on it - always in the form of slabs. They are glued together to form a single layer. Filling with screed secures them completely. After drying, the flooring is laid depending on your preferences.
Key principles for arranging the floor in a country house - nothing complicated
First of all, experts advise always laying insulation on the floor base. In this case, the increase in cost of work will be insignificant, and you will have at your disposal a high-quality and durable surface. Perhaps someday you will decide to use your country house year-round, and this is where a well-insulated base will come in handy.
If insulation is used, the covering material must be installed in two layers. And between them, thermal insulation is installed. The main layer of the base is logs. They act as a strong frame. A so-called subfloor is attached to the bottom of the joists, on which a heat-insulating layer is placed. A layer of vapor barrier is laid on it. The top of this cake is crowned with a finished floor.
Installation of floor insulation in a country house
Wood by its nature is prone to deformation and warping during use. The following measures can prevent such “unsportsmanlike behavior”:
- Installation of boards with mandatory gaps near the wall surfaces of the house.
- Arrangement of space for natural ventilation of the floor.
- Installation of a sufficient number of supporting elements, the task of which is to support the lag.
You can make a wooden base with your own hands using one of two methods:
- The logs are placed directly on the screw or columnar foundation of the house. In such situations, the frame of the home and its flooring are connected to each other according to a rigid pattern. This means that both of these elements are subject to natural seasonal fluctuations.
- If it is not possible to place the floor base on the foundation, it is necessary to install an independent floor (each log in this case is placed on special posts). Such a structure is not tied to the structure of a residential building. Therefore, it can only be erected on sedentary and stable soils.
As you understand, the first method of arranging floor foundations in a dacha is considered more reliable and of higher quality.
Concrete floors
In modern construction, wooden floors are used very rarely; they have long been replaced by concrete floors. The main advantage of a concrete floor is its low cost, ease of installation, high strength and durability, as well as environmental friendliness and fire resistance.
But there is one big “BUT”: the concrete floor has high thermal conductivity, which is why even on the hottest days it feels cold. Therefore, it is necessary to cover the concrete floor with special insulation. You can use the same materials as for a wooden floor along the joists.
A well-dried concrete floor must also be covered with a waterproofing film before laying the thermal insulation layer. The technology for laying thermal insulation with joists is the same as for a wooden floor. It should be noted that when insulating using joists, the floor height will increase by 10-15 cm.
Another good way to insulate concrete floors is to use particle boards. This material is in no way inferior to mineral insulation and is quite often used for insulation in private homes and country buildings. Organic insulation materials include wood shavings, moss and sawdust. You can also add straw, small dry grass, reeds, hay, sedge or peat chips.
To protect the chipboard from moisture, the concrete is covered with polyethylene film with high waterproofing. Then chipboards are laid. In this case, the slabs do not need to be laid close to the walls, maintaining a distance of about 1.5 cm. This is necessary so that the slabs do not warp due to strong changes in temperature and humidity.
The plates are firmly fixed with dowels. After fixing the slabs, all joints must be reinforced with construction mesh and covered with putty, which is mixed 1:1 with oil paint. Then a plinth is installed around the perimeter. Linoleum or carpet is laid on the finished structure.
You can insulate the floor in your house with your own hands using “warm” linoleum. This material consists of two layers - a warm base and polyvinyl chloride, resistant to chemical and mechanical damage. The backing of such linoleum is made on the basis of natural felt or synthetic non-woven material. Its thickness is about 3-4 mm.
When laying insulated linoleum, it is cut so that there is a small distance between it and the wall, otherwise after a few days it will warp due to its increase in size as it is trampled down.
Concrete floors can also be insulated using technical cork, which is practical and durable. It is made from cork oak bark, which is glued together with the resin contained in the cork mass. This material is 100% environmentally friendly, does not allow water to pass through, has high heat resistance and does not burn. But there is also a significant drawback - high cost.
Isolon is also considered one of the best and most effective heat insulators. It is very easy to insulate a floor with its help - you need to roll it out on a well-dried concrete floor, and then start laying the floor covering.
Insulating the floor in your dacha is a necessary measure by which you will make your home even more comfortable. It’s so nice to sit down on a warm floor with the whole family when the weather outside is “non-flying” and play, for example, Monopoly or Twister.
Selection of materials
Examples of materials that can be used for insulation The most inexpensive materials for insulation are sawdust, earth and moss. But such materials are classified as outdated; they have their own characteristics and disadvantages. Let's consider the main materials that can be used as insulation:
- Sawdust. The most rarely found material is characterized by its low cost, ease of installation and low weight. The disadvantages of sawdust are the formation of rotting processes, as well as flammability;
- Expanded clay. It has a similar insulation principle to sawdust. It is resistant to combustion and rotting processes. The disadvantage is the significant weight of the material;
- Penoplex or extruded polystyrene foam. This slab insulation is fire resistant, practical, lightweight, and easy to install. It is not afraid of moisture, insects and rodents. Penoplex is often used to insulate the foundation of a house and the facade. An additional advantage is the fact that when insulating with penoplex, condensation does not form;
- Styrofoam. Somewhat similar to penoplex, however, these two materials have different characteristics. It burns well, is resistant to rodent attacks, but is most popular due to its attractive price. Since rodents are frequent guests in a garden house, you should use a special fine mesh to protect the insulation from mice;
- Polyurethane foam. Also has many advantages. Very practical and durable material;
- Mineral wool. It is a practical material for insulating not only floors, but also the façade of a country house. This material has been used for many years in construction work as it is of high quality and affordable.
For your information. If mineral wool is chosen as insulation, it must be laid with a thickness of 10 mm. For porous materials, the thickness should be 10-12 cm.
Also, when using roll insulation, you must remember to cover it with moisture-resistant material on both sides.
Do-it-yourself floor insulation in a country house or in a private house
An excellent option would be to simultaneously insulate floors with your own hands using organic and mineral insulation. They should be laid according to the principle of a layer cake. It is necessary to dry the material before laying, this will avoid rotting.
How to insulate a dacha floor with your own hands without removing the old one
Warm floors in a country house are a prerequisite for comfortable living in the winter. The funds invested in insulation are compensated by a reduction in heating costs and the absence of colds in the family.
Almost all technologies require the dismantling of the top covering and the installation of mineral fiber or polystyrene foam thermal insulation between the joists of the floor frame. What to do if the need for floor insulation occurs during the heating season? The traditional sequence of thermal insulation work with removal of the coating can create many problems for the owners living in the house.
On construction forums, owners of problem dachas offer their options, from which you can choose the most acceptable one.
To insulate floors using joists, our experts recommend
| Rockwool Light Butts | Baswool Light 35 | URSA GEO M-11 |
Methods for insulating a floor without pre-installation
In temperate climates, oriented strand board (OSB) flooring is practiced. The structure of the coating is characterized by low thermal conductivity. For decoration, several layers of colored varnish are applied to the surface. Naturally, the base must be fairly level. As waterproofing, you can use a fairly dense polymer film, sealed at the seams by heat welding.
In regions with difficult climatic conditions, high-density hydrophobized mineral wool panels are recommended for floor insulation. In the budget version - extruded polystyrene foam 30 mm thick. The insulation can be covered with any sufficiently strong and moisture-resistant panels; linoleum, laminate or material with identical properties can be used as the front covering.
Floor insulation in mineral wool version
- Panel stone wool, the thermal conductivity of which is sufficient for the implementation of the most complex projects, is characterized by stable working properties, chemical inertness, and a long service life.
- The material is environmentally friendly, therefore it has no restrictions on the internal insulation of residential premises. It is possible to use semi-rigid panels to insulate concrete screeds under floor tiles.
- Moisture-repellent impregnation of mineral wool panels works quite effectively, but the presence of a damp basement determines the need to use film or mastic waterproofing.
More affordable polystyrene foam and expanded polystyrene retain their insulating properties even in damp environments. To seal the system, it is enough to seal the seams and joints with moisture-resistant putty or glue them with construction tape.
When choosing insulation, this disadvantage should be taken into account first.
To insulate floors under screed, our experts recommend
| Penoplex Geo | URSA XPS N-III-L | Ravatherm XPS Standart G4 |
Expert recommendations
Indeed, the proposed schemes are workable and can be used in a budget option for floor insulation. It should be noted that manufacturers of cheap facing materials continue to use old technologies using phenol-containing components. Savings are possible, but it is better to refrain from purchasing cheap panels and insulation at the selection stage.
How thick should modern floor insulation be? It is difficult to recommend volumetric coverings, since raising the floor by only 80 mm significantly affects the reduction in the volume of the room. The low thermal conductivity of both insulation materials allows the use of slabs with a thickness of 20-30 mm. Even taking into account the panel cladding, the floor height will increase by only 40-45 mm.
Wood floor insulation
Wooden floors often deteriorate. If you purchased a house or inherited it, you need to meticulously inspect its condition. It happens that a house, quite suitable in terms of decoration and layout, turns out to be resting on half-rotten beams. Perhaps the builders did not saturate them with a solution that improves the properties of wood, and over time it became damp. If the floor is unusable, you need to dismantle it. All boards must be torn off from the base in the form of a ceiling of beams. This is labor-intensive work, but it must be done.
It is better to lay the floor in the dacha from new boards. It is better to fasten them with self-tapping screws rather than nails. They are easier to handle and dismantle. In addition, their fastening will not be a test for the tree, since the hole can be shot with a power tool. The boards should fit tightly together to prevent air from leaking from the basement or crawlspace. By the way, it can be filled with a metal mesh to prevent the movement of rodents if they get started.
A layer of insulation will provide a warm floor in the country house. Install wooden logs around the perimeter of the floor - beams, between which the insulation will be laid. The distance between them can be from 40 cm to a meter. A vapor barrier film is laid on them, which is fastened with a furniture stapler. It is better to seal any gaps or breaks. Secure the film at all folds so that it adheres to the joists and floor. Both polystyrene foam and expanded polystyrene are suitable for insulating floors in a dacha. Mineral wool is recommended as a filler for seams and joints. Insulation blocks are easy to cut, crumble and cover, so anyone can handle this job. The layer can be from 5 to 20 cm, depending on whether you plan to live indoors in winter.
The top layer will already become the finishing coating; it can be laid from chipboard, wooden panels, plywood
Here it is important to level the base so that all the boards are on the same plane. Between them, gaps are acceptable, and even necessary, that will allow the material to expand and contract depending on humidity, in its natural mode
Fastening here should be done carefully so that there are no protruding screw heads or other irregularities on the surface. Such a floor in the country house will retain the heat that will be produced by a fireplace or convector, and will also maintain the temperature inside slightly higher than that outside, even during your absence.
Replacing the floor in a garden house
This terrible day has come. When it became necessary to change the floor in a room in a garden house. More than 20 years have passed since its construction. You look at it, everything seems to be fine, but when you pass, it bends under your feet.
After questioning the owner, it turned out that the floor was covered with chipboard panels.
I don't know why this was done. But the floor is completely rotten and only linoleum holds a person. After lifting the linoleum, it turned out that in some places there was another layer of linoleum.
The logs are made of timber 200 x 100 mm; inspection of the logs showed that they were also rotten in places, since they were used. The distance between them is quite large. They are not secured in any way to the wall or to the support.
It became clear that the number of lags needed to be increased. Up to 7 pieces, then between the logs there will be 793 mm. With the expectation that the outermost joists will be 100 mm away from the walls. All this with a room length of 5.66 m. Based on these calculations, materials were purchased.
According to the following floor installation diagram.
And, namely: - logs, timber 200x100x3000 mm - 7 pcs, - timber for the subfloor sheathing 25x25x3000mm - 14 pcs, - boards for the floor 100x25x6000 mm 34 pcs, (including for joist supports) - boards for the air gap 100x25x3000 mm - 7 pieces, - metal fastening corner for attaching the log - 28 pieces. (4 pcs per joist), - frame anchor 10x112 mm - 12 pcs, - hydro-steam insulation Axton D... 35 m2 (film), - Start insulation 50 mm thick 2 rolls (20 m2 per roll), - two third-party construction tape along the double perimeter of the room, - construction stapler with a supply of staples, - wood screws with anodized coating 4x50 mm 2.5 kg. — antiseptic 10 l — floor paint 5 l
The floor boards and rough timber were treated twice with an antiseptic. No treatment was carried out on the front side of the floorboard. Left to dry.
The joists were cut to size, tried on in place, labeled and also treated with an antiseptic.
Next, the lodgment boards for the logs were processed to size and treated with an antiseptic. They are leveled in place on roofing felt, and secured with frame anchors (10x120 mm) directly into the foundation, 6 pieces per board.
Then the logs were placed in their places. And they are secured with self-tapping screws to the cradle through the fastening corners on both sides of the log, and at both ends of it.
Next, each end of the log from the wall is protected with roofing felt.
Next, at the bottom of the log, a subfloor beam is attached to both sides of it.
Retreat. One fine day, after the weekend, I had to harvest mushrooms, the so-called cow mushrooms. To this day I don’t know where they came from.
The next stage of work was preparing the subfloor. The boards for it were sawn to the size of each lag span, from available material, and then treated with an antiseptic and dried.
Then the subfloor was laid out in its own span with a gap between the boards and secured with self-tapping screws to the subfloor beams so that it would not move. The gap between the boards is clearly visible in the photo, through the film.
Before laying the hydro-steam insulating film around the perimeter of the room, double-sided construction tape was glued to the walls, approximately at the level of the future baseboard.
The film was laid out on the subfloor with a reserve with access to the wall and attached to construction tape; as it was laid, the second sticky side of the tape was released.
This can be seen in the previous photo and the next one.
The film was attached to the joists and subfloor with a construction stapler and staples. Thus repeating the profile of the floor.
The second strip of film must be laid with the calculation of overlapping the first strip by 200 - 300 mm. The free end of the film (overlap) along its entire length without gaps is closed with ordinary tape. And the installation of insulation begins.
The insulation is cut into pieces of the required size so that it fits tightly between the joists. The pieces of insulation are laid in two layers so that the joints of the first and second layers do not coincide, the joint of the second layer is slightly shifted relative to the first layer.
The film is laid in the same way as the first, releasing the adhesive strip of tape as you go and gluing the end of it to the wall. The film is secured to the joists with staples from a construction stapler.
This can be seen in the next photo.
The second strip of film is laid in the same way with overlapping and sealing the joint gap with tape.
Thresholds pass in the same way as along walls, with two layers of construction tape
Air gap boards are installed along the top of the film, where it runs along the joists.
It's time to plan the floorboards.
I did this on a 6 meter beam. After processing the boards, I fed them in batches through the window, after cutting them to size. And arranged them in the order of their future installation.
The boards were installed in place using wedges to avoid unnecessary gaps in the floor. The wedges were secured to air gap boards secured to the joists.
Thus, the film coating was not damaged.
Then putty the floor and clean it. I used a grinder with a flap wheel. So what to do? He worked wearing a muzzle.
Next, installation of baseboards, I used old baseboards. This is followed by trimming the protruding film and construction tape above the top edge of the baseboard.
Well, how's the finish? Painting the floor twice.
Become the author of the site, publish your own articles, descriptions of homemade products and pay for the text. Read more here.
Wood flooring installation process
In the process of constructing a wooden floor covering, whether in a country house or in a brick cottage, there is nothing complicated: the work can be done with your own hands. However, in order to obtain a beautiful, strong and durable coating as a result of the work, it is necessary to take into account many nuances when performing it, and also to study well the theory of floor laying.
In a brick house, cottage or small wooden building, you can arrange the floors with your own hands in different ways. Let's look at the two most popular options:
- A floor covering created on a rough layer and with an additional layer of insulation (sound insulation), located on a base of soil or on overlapping beams;
- The floor is made of wood, built on a concrete base with an insulating layer.
In country houses, the first option is more often used. Moreover, this method creates floors on the first floor or basement, and it can also be used when arranging floor coverings on different floors of the building.
In the second option, the flooring design is built completely differently and can be modified and modified to reduce costs. More often, this method is used to make floors in brick cottages and apartments; it makes sense to lay floors in the kitchen on a concrete base.
Do I need to insulate ceramic tiles on the floor?
Scheme for insulating a concrete floor under tiles
Despite all its advantages, ceramic tiles, like porcelain tiles on the floor, are a fairly cold material.
If you insulate the floor in an apartment on the ground floor, then problems with cold flooring in the kitchen or bathroom can be avoided. Otherwise, before laying the tiles, you should insulate the floor according to the instructions by laying the underlay.
The most popular thermal insulation materials for insulating floors under ceramic tiles in apartments and private houses today are expanded polystyrene, penoplex, Knauf heated floors, basalt wool, penofol, etc. The main thing is that the base is level, since the concrete screed on the balcony or in the kitchen will be applied on top of the insulation.