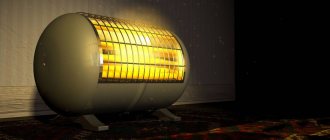
Infrared heaters are an innovative technology that uses short-wave infrared radiation to provide an immediate sensation of soothing warmth moments after the device is turned on. Thanks to the use of new technologies, the operation of an infrared heater can enhance the feeling of warmth even in poorly insulated, large rooms and open spaces.
Heating installations equipped with electric infrared emitters make it possible to select specified zones and surfaces in which the feeling of warmth will be several times higher than in the rest of the object.
Areas of application
Infrared heat emitters are ideal for heating use and can be used for:
- spot, zonal or general heating;
- halls, workshops, garages;
- outdoor work;
- restaurants and hotels;
- infrared saunas;
- SPA salons;
- shops and supermarkets;
- livestock farming;
- heating pools;
- winter and botanical gardens;
- heating of sports facilities and playgrounds.
Also, infrared heaters are increasingly used in everyday life and have firmly taken their place in houses and apartments. Due to their ease of operation, they are excellent for heating kindergartens, schools and other educational institutions. Often used for large-scale concerts and other outdoor events. They can be seen in the open areas of bars and restaurants - where other types of heaters are powerless.
The benefits and harms of infrared radiation for humans
In addition to heating functions, infrared rays have a positive effect on the body. Below is a list of positive effects on the human body.
First of all, it should be said that infrared light destroys harmful microelements that are present in the air. Therefore, the use of such heaters is recommended for room cleaning.
If a person has suffered any injuries or illnesses, then infrared radiation will also have a beneficial effect on the health of the body. It has a positive effect on the nervous system of the human body. But you need to know that you should avoid prolonged exposure to these rays on the body.
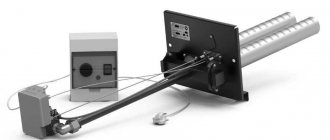
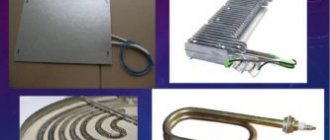
Heater design
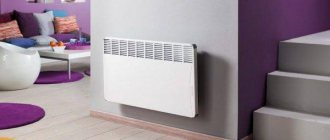
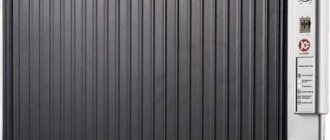
Manufacturers offer infrared emitters in forms suitable for various applications. One of the new products is flat heating panels that emit infrared rays that can be used to heat residential buildings. In the form of simple but modern infrared emitters, they can be used for local heating of rooms. There are also devices of this type for heating rooms near the house - terraces or open gazebos. Heaters do not have complex mechanisms or electronics. The operating principle of each device is an infrared emitter, which, when heated (usually to high temperatures), begins to emit heat waves. The design is simple and does not require special care.
Types of IR ceiling heaters, their comparison
| ALMAK IK-11 (1 KW) | PION LUX 10 (1000 W) | PION CERAMIC 08 (800 W) | HEAT PHONE ERGNA 1.5 KW | |
| Time to warm up the surface to operating temperature | 15 minutes | 15 minutes | 10 min | 20 minutes |
| Supply voltage | 220 V | 220/230 V | 220/230 V | 220 V |
| Heated area as main heating | 10-15 sq meters | 10-15 sq meters | 8-15 sq meters | 15-20 sq meters |
| Frequency Hz) | 50 | 50 | ||
| Manufacturer | ALMAC | PION LUX | PION CERAMIC | TEPLOFON |
| Working surface temperature | 250 | 250 | 230 | 300 |
| Type | ceiling with closed heating element | ceiling with closed heating element | ceiling with closed heating element | ceiling with closed heating element |
| Power, W | 1000 | 1000 | 800 | 1500 |
| Cost, rubles | 4000 | 3800 | 4600 | 4600 |
We hope that the article was useful to you. We will be grateful if you share it on social networks with your friends.
Operating principles of IR heaters
Infrared radiation is absolutely safe for people and the environment due to its operating principle. Infrared heating does not cause convective air movement in the room, therefore it is an excellent source of heat for people with upper respiratory tract diseases and allergy sufferers, creating a healthy and favorable atmosphere. Infrared heaters produce heat in a natural way, similar to the effect of the sun's rays. The thermal effect is the result of the emission of electromagnetic waves of a certain length, which cause direct heating of people, furniture, walls or floors. Heat accumulates in walls, floors and objects within reach of the radiator.
Installation
Installation process
To make the installation of an infrared heater as simple as possible, it is better to place the panel with the connector facing the wall. Most models have self-clamping contacts. The delivery package includes elements for attaching the device to the ceiling.
The installation process includes the following steps:
- remove the device from the packaging and place it on any flat surface with the heating plate down;
- mark the installation location and make several holes;
- screw in the screw rings;
- hang the chains, adjusting the height (if necessary).
- Secure the device using mounting hooks or brackets.
As you can see, installing infrared heaters with your own hands is not a particularly difficult process. The panels can also be mounted on the wall, but the heating effect will be significantly less.
Installation of different models of IR heaters:
Network connection
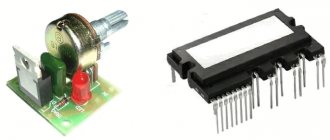
The device is connected to a thermostat, which will maintain the desired temperature. This is done through three terminals: “ground”, “phase” and “zero”. Accordingly, the supply cable must be three-core. As an option, you can use PVA 3x1.5.
The ends of the cable are connected to the terminals. The polarity is indicated on the ends of the wires. After the device is installed and connected, it is advisable to wipe the panel with an alcohol solution before turning it on.
Connecting multiple devices
If you are interested in installing infrared heaters with your own hands in large rooms, then you need to take into account that you will need several devices. To ensure coordinated operation, all panels are connected to one thermostat. This will allow you to effectively regulate the temperature throughout the facility.
Pros and cons of infrared heaters
IR heaters have their advantages and disadvantages. This must be taken into account when choosing a heating system.
The advantages include:
- direct heating of the necessary elements without the need to heat the air in the room. This is the main advantage of infrared heaters due to this operating principle;
- Infrared radiation has a healing effect on humans. Residents of a house heated by this method feel pleasantly warm and blood circulation in the skin improves. Radiation can relieve joint or muscle pain, improve the functioning of the musculoskeletal system, strengthen the immune system;
- speed of operation - a feeling of warmth comes immediately after turning on the device;
- lack of convection air movement, this is especially important for allergy sufferers;
- ability to effectively use equipment outdoors;
- saving on space heating;
- long service life;
- environmental friendliness - the emitters do not have harmful impurities, consist mainly of glass and ceramics, and are safe for health.
The disadvantages are:
- high energy consumption, this is typical for all electric heaters;
- heaters are safe for health; if you stay close to the emitter for a long time, burning and redness of the skin may occur;
- in particular cases when heating the air in the room is required, infrared devices will not help;
- bright light - devices with tubular heating elements have a fairly bright glow, this is a significant disadvantage at night in the bedroom;
- fire hazard if used improperly (applies to high-temperature models);
- rapid cooling of objects and rooms when the radiator is turned off.
Many of the disadvantages apply only to a certain type of high-temperature infrared heaters and are completely absent from others. Compared to the pros, the cons are not so significant, and after weighing all the pros and cons, they can be neglected or minimized.
Principle of operation
In order to understand how an IR heater functions, let us turn to the operation diagram of a classical heating system.
In the first case, the room is supplied with heat thanks to the heat transfer of the device itself. During the heating process, its walls give off heat, due to which the room warms up. This heating principle is simple, but it is not highly efficient either, since it is limited by the size of the device itself.
In another case, heating is carried out according to the principle of convection.
With this heating method, heat exchange is carried out due to the forced circulation of warm air masses. The set of such devices may also include special fans that create convection currents. This heating method is much more effective than devices with a standard heat exchanger, but it also has a number of disadvantages: heat is not always distributed evenly throughout the room, in addition, such heating devices are quite noisy; during their operation, dust may be released and drafts may form.
You can read more about the types of IR electric heaters here.
The operating principle of an infrared heater with a thermostat is completely different from the two described above.
The principle of heating with an IR heater
The room is heated by electromagnetic waves that spread throughout the room. These waves are in a given range: between the red end of the spectrum of visible light (wavelength - 0.74 microns) and the region of microwave radio emission (from 1000 to 2000 microns).
If we compare an IR heater and a conventional heating system, the efficiency of the former is much higher. This is also noted by the owners of such heaters.
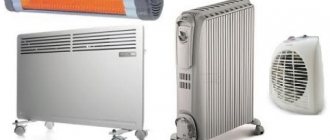
Types of infrared heaters
Infrared heaters are distinguished by the type of energy used:
Gas
Gas ones usually use ceramic elements that are heated by the combustion of natural gas. They have impressive heating power. Due to the nature of the combustion process, they are usually used outdoors or in well-ventilated areas. The emitters heat up to high temperatures and their use requires precautions. It is not advisable to use these models in places where there are a lot of children.
Electrical
Electric heaters can have different types of emitter: ceramic, quartz and film. They are characterized by lower heating temperatures and greater safety of use. They are often used for domestic purposes and are widely used.
According to wavelengths, heaters are divided into:
- short-wave - easy to distinguish, they emit in the visible spectrum, heat up to high temperatures - 900 ° C, burn oxygen in the room, which is why they are not used for use in residential premises and are more often used in production;
- medium wave - used in residential buildings and industry, can heat up to 600°C;
- long-wave - the “coldest” emitters - maximum heating 250-300°C. The second name is “dark” elements - their radiation is not visible to the human eye. They are widely used for domestic purposes and are rarely used for heating large rooms.
Ceramic emitters
Typically, ceramic heaters consist of a thin, ceramic plate through which a heating element is passed. A heated panel emits heat. The models are safe to use and do not heat up to high temperatures. Convenient for use in houses and apartments.
Quartz emitters
The main element in these heaters is a quartz tube filled with gas. This type of device is more economical, but also more expensive. It is in the action of these heaters that their healing properties are noted. Such devices are used for therapeutic purposes.
Film elements
Film infrared heaters consist of a thin metal film through which a resistive cord passes. These models are flexible and easy to install - you can install them yourself on any surface prepared in a certain way. The surface of the film is heated to 75°C.
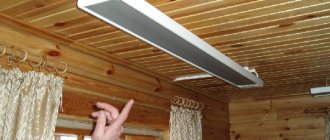
Ceiling IR heaters - pros and cons
In fact, this type of heater is ideal for rooms where heating only needs to be turned on from time to time. By type of power supply, they can be not only electric, but also gas, but since not all country houses have a gas supply, we will consider electrical appliances as an illustrative example.
Advantages of infrared ceiling heaters
The nice thing is that ceiling infrared heaters really have advantages, which actually consist of the following points:
- The appliances heat up the room very quickly . Depending on what power they have, the time during which you will feel the heat ranges from 20-50 seconds;
- If the windows in your house are bad and have small gaps, then there is no need to be afraid of drafts . Because the peculiarity of IR heaters is that they heat objects, their surface, and not the air (the device spends a maximum of 10% of energy on heating the air). So your warmth “will not go away” anywhere from you in such a situation;
Operating principle of an infrared ceiling heater
- infrared ceiling heaters do not emit any odors during heating;
- the devices do not burn oxygen and do not dry out the air in the room , and accordingly they will not cause any headaches;
- installation of infrared heating panels requires a minimum of space;
- IR heaters have a very high level of efficiency and due to this, it is possible to reduce energy costs . In addition, if you connect a thermostat to the system, the budget required for heating the dacha will decrease even more due to the fact that the device will turn on only when the room temperature drops below the programmed level;
Thermostat for ceiling IR heater
- ceiling heaters are absolutely silent;
Please note that during heating the device may make a slight crackling noise due to the expansion of the heating element - this is normal and there is no need to worry about this. The cracking, as a rule, stops after 15 minutes of operation of the device.
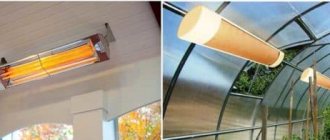
- This type of heaters can be used not only indoors, but also as additional heating of open areas . This, for example, could be gazebos, verandas, etc.
Outdoor IR heaters
As you can see, an infrared heater for a summer house is a really worthwhile thing! Both warm and economical. However, do such devices have any disadvantages? Let's consider this too...
Disadvantages of devices
In fact, it is difficult to identify any shortcomings in the design and, in principle, operation of a ceiling heater. However, you can often hear unflattering reviews from the owners of such devices - they say that it remains as cold as it was. What's the matter?
Installation
An important factor is correct placement
The main point that you should pay attention to when installing infrared heaters is the height of the ceilings. After all, the distance from the devices to a person’s head must be at least 0.5 m. The minimum ceiling height in the room where installation is planned is 2.3 m.
In large rooms, heaters are distributed evenly over the entire area so that there are no unheated areas. Finishing materials also need to be taken into account. If the ceilings are covered with flammable lining or plastic, it is better to purchase a floor heater or change the finishing material, or take all the required safety measures applicable in this case.
No additional fasteners are required for installation - all fittings are included in the kit.
All you need is a screwdriver and a drill:
- as an additional source of heating, devices are usually installed in the coldest places in the room: near the door or window
- holders-brackets are the first to be attached to the ceiling; they look like metal corners with holes
- after determining the exact location of the fasteners, holes are drilled in the ceiling and the brackets are mounted on the anchors; they should be screwed all the way
- for very high ceilings, suspensions are used - in this case, the height of the heaters can be adjusted
- electrical wiring is done according to the diagram given in the instructions
- Each device is checked sequentially
- wires are connected to the main wiring
Heating device mountings
Installation of film heaters is much simpler. Holes for fastenings are prepared on their surface (it is necessary to avoid only the location of the heating elements). Next, the device is screwed to the ceiling with self-tapping screws. These heaters can be secured using glue.
Device cost
The average price of infrared devices, depending on the power and the presence of additional functions, varies between 1900-8000 rubles. Products equipped with a simple mechanical thermostat cost 20-30% lower than similar models with an electronic heat regulator.
We present in table form the cost of ceiling devices from several domestic companies:
| Manufacturer | Average price (RUB) |
| Peony | 2500-3900 |
| Ecoline | 2000-7400 |
| Plan | from 2900 |
| Ballu | from 2500 |
| HeatV | from 3900 |
The price of the device is also influenced by the reputation of the manufacturer. Of course, for temporary heating of a summer house or a rented apartment, you can save a little and stick to budget models. For residential premises, it is still better to purchase products with a sufficient warranty period - their price will be fully compensated by long-term operation.
DIY heaters
Of course, it is almost impossible to make complex design models at home in the absence of special tools and knowledge. But anyone can make a simple infrared heater for heating a garage, cottage or greenhouse.
And even more so if you are a great jack of all trades and have your own small workshop at home
The simplest infrared heater is a sheet of foil placed behind a heating radiator. For the manufacture of more serious structures, you can use any type of heater - from a spiral to a laminated plastic coated with crushed graphite. As a reflector (reflector), you can take an aluminum plate or a shiny polished steel sheet.
Infrared devices made of glass and foil
Small infrared heater
We will need two glasses of the same size, foil, sealant, wax candle, epoxy glue and a wire with a plug:
- Before starting work, remove all greasy and dirty stains from the glass
- now it needs to be thoroughly smoked: fix the candle in a candlestick and evenly cover each glass on one side with an even layer of soot - it will serve as a current conductor
- we clean the edges of the glass from it around the perimeter - a clean strip measuring 0.5 cm should form on all sides
- cut out a rectangle from foil slightly larger than glass
- coat the smoked surface with epoxy glue and place a cut piece of foil on top; its edges should extend slightly beyond the glass
- coat the second smoked glass with glue and place it on foil; we bend the excess and wrap it on the glass
- We carefully treat the glass joints with sealant
- we attach two metal plates to a wooden block - we solder a fork to one of them
- press the block tightly against the foil folded around the glass
- we check the operation of the received device by plugging it into a power outlet
We use old reflectors
You can use any old reflector as a basis.
- We clean any old but working reflector from dirt and dust
- We check the integrity of the cord, spiral, terminals, etc.
- If necessary, we replace them
- We measure the length of the spiral and cut off the same piece of steel rod
- We wrap it with nichrome thread with a pitch of about 2 mm
- We remove the resulting nichrome spiral and place it on the dielectric, connecting it to the power terminals
- We connect the current and check the operation of the device
- The heated spiral fits easily into the grooves
Carbon heaters based on laminated plastic
Film heater
Devices with carbon-based film can be constructed from scrap materials. For this you will need:
- graphite powder
- a couple of sheets of paper-based laminated plastic
- copper terminals
- epoxy adhesive
- wire with plug
Graphite powder, which is a good conductor, must be fixed to the sheet. To do this, it is mixed with glue and applied in a zigzag pattern to the paper laminate. The sheets are also glued together.
Then copper terminals and wires are attached to the graphite conductor on both sides. For ease of control, it is better to connect a thermostat to the finished device. Before turning on, all workpieces should be thoroughly dried. The closest attention should be paid to insulation.