Due to the constant increase in prices for traditional energy resources, country property owners are looking for new options for heating their homes. Many people consider induction heaters, which use water as a coolant, to be one of the economical options. With the help of this equipment, according to some homeowners, it is possible to heat large rooms. This type of equipment on sale has a fairly high cost. But you can make an induction heater with your own hands if you have some skills in such work. And ready-made diagrams and a detailed video of the process will help the craftsman navigate the stages of work and make his work a little easier.
Working principle of induction heater
Before assembling an induction heater yourself, you must first become familiar with the general operating principle of this type of equipment.
Such units are in many ways similar to equipment that is equipped with heating elements. They also convert electricity into heat, which is necessary to heat the premises of the house. Heating of the device occurs due to the energy of the electromagnetic field created in the inductor. It is a coil in the form of a cylinder with a winding. Electricity passing through this coil creates voltage. As a result of the action of alternating current, vortex flows are formed. Then the energy of the electromagnetic field is taken up by the coolant, which is water. This energy is then generated into heat. In a short time, water with such heating reaches quite high temperatures.
Induction heater circuit
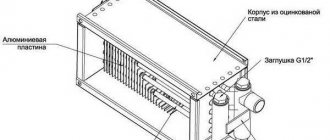
Induction water heater components
The simplest device for generating heat based on vortex flows is an electrical inductor, which consists of several windings:
- primary;
- secondary.
The primary winding converts electrical energy into eddy currents and then sends a magnetic field to the secondary winding. Next, the created electromagnetic energy is transferred to the coolant, heating it. The secondary winding is both a heating element and the body of an induction boiler. It consists of:
- external winding;
- core;
- electrical insulation;
- thermal insulation.
Operation of an induction heater
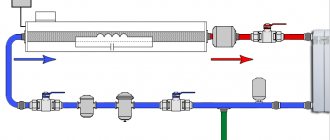
To allow cold water to enter the unit and hot water to exit into the heating system, two pipes are installed. A pump is built in to circulate the liquid. Overheating of water does not occur during operation of the heating system, since the liquid constantly circulates - cooled water is supplied and hot water is discharged. Such water heaters can be installed for heating in almost any room. Due to the design features of the system, the weight and size of the heating element are reduced, and heat transfer is significantly increased. The coolant ultimately receives about 97-98% of the energy without significant losses.
Attention! To install an induction heater, there is no need to do any major redesign of the heating system; this unit is simply built into it.
DIY instantaneous induction water heater
Before you begin installation, you need to stock up on the necessary parts. So, the best option would be a high-frequency welding inverter with a smoothly varying current range . Such a device will cost the least. A more expensive option would be a three-phase transformer, which is the AC power source for the water heater inductor. In this case, you should use a coil of 50-90 turns, and use copper wire with a diameter of 3 or more millimeters as the material.
As a core, you can use either a metal or polymer pipe together with wire (used as a heating element). In the latter case, the thickness of the walls should not be less than 3 mm in order to easily withstand high temperatures.
To assemble the water heater you will need: wire cutters, screwdrivers, a soldering iron and a welding machine if a metal pipe is used.
Installation of an induction water heater
Wrap the pipe with copper wire, making about 90 turns.
There are many options for assembling the device. We suggest trying to assemble the device according to the following scheme:
- Prepare your workplace, materials and tools.
- Fix a small piece of polymer pipe (remember that the minimum wall thickness should be 3 mm).
- Trim the ends of the core to leave 10 cm of wire left for taps.
- Mount a corner on the lower outlet. In the future, the return from the heating should be connected here (if the heater is used as a boiler).
- Place the chopped wire tightly around the pipe. It is necessary to make at least 90 turns.
- Install a tee on the top pipe through which hot water will flow out.
- Install the protective circuit of the device. It can be made from either polymer or metal.
- Connect copper wire to the water heater terminals, then fill the core with water.
- Check the functionality of the inductor.
Advantages of induction type units
The undoubted advantages of this type of home heating devices include the following characteristics:
- efficiency - the conversion of electrical energy into heat occurs almost completely without significant losses;
- ease of use - constant maintenance of units of this type is not required;
- compact dimensions - induction water heaters are small in size, they can be installed in the heating system in almost any room;
- quiet operation – this equipment operates quite quietly, no noise occurs during its operation;
- long service life - induction units are durable and can operate smoothly for 30 years or more;
- high environmental friendliness - no harmful emissions occur during operation of the device, a chimney installation and a ventilation system are not required.
Many people believe that induction boilers are much more profitable than other home heating options. And compared to equipment equipped with heating elements, the heating time of these units occurs almost twice as fast. Due to the constant circulation and vibration of the liquid, scale does not form in the pipes and inside the device, which greatly facilitates the maintenance and care of the heating system.
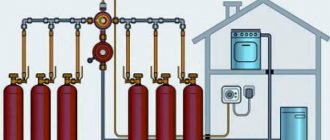
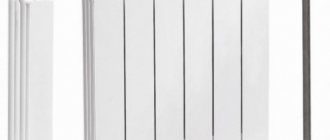
Appearance of induction boilers
But this type of device also has some disadvantages. And the main disadvantage is that induction equipment is quite expensive. But you can try to make such a heater for heating your home yourself.
Advice. If you have certain skills and technical knowledge, you can assemble an induction heater for your home with your own hands. But before you begin the process of assembling the device, you must first really evaluate your capabilities and experience in creating such units, since making them is not so easy.
Making an induction water heater with your own hands
The modern world dictates its own rules for saving the consumption of natural resources. For their safety, many people opt for electricity. But the need for it is growing every day. Its cost is increasing. It becomes unprofitable to heat the house using electrical appliances.
More recently, a new development in the field of autonomous heating and hot water supply called an “induction water heater” came to Russia. Installing the device allows you to provide heat to the whole house and save on electrical energy. It does not emit harmful substances into the air and is considered completely safe for human health. Induction water heaters are also used to heat water in a home heating system.
How to assemble an induction heater yourself
The modern market provides a fairly large selection of different models of induction-type equipment. But in order to save money, you can make such a device yourself. Of course, having decided to make this heater, you need to prepare the appropriate tools for the job and stock up on the necessary materials, many of which the owner may already have.
To make a simple heater design, you need to take the following components:
- a piece of plastic pipe with fairly thick walls - this will be used to make the body of the device;
- mesh (metal);
- copper wire;
- stainless steel wire with a diameter of up to 7 mm or wire rod.
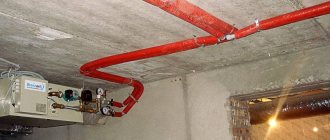
Homemade induction boiler
To install the heater into the heating system, you will also need a built-in circulating pump and adapters for connecting the device, as well as a welding machine and the necessary tools.
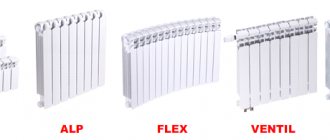
Homemade device options
The Internet contains a sufficient number of different designs created for various purposes. Take a small-sized induction heater made from a 250-500 W computer power supply. The model shown in the photo will be useful to a master in a garage or car service for melting rods made of aluminum, copper and brass.
But the design is not suitable for heating premises due to its low power. There are two real options on the Internet, whose tests and work are filmed:
- water heater made of polypropylene pipe powered by a welding inverter or induction kitchen panel;
- steel boiler heated by the same hob.
Reference. There are other, completely home-made designs, where frequency converters are assembled by craftsmen from scratch. But this requires knowledge and skills in the field of radio engineering, so we will not consider them, but will simply give an example of such a circuit.
Now let's take a closer look at how to make induction heaters with your own hands, and most importantly, how they then function.
We make a heating element from a pipe
If you have been actively searching for information on this topic, you have probably come across this design, since the master posted its assembly on the popular YouTube video resource. After which many sites posted text versions of making this inductor in the form of step-by-step instructions. Briefly, the heater is made like this:
- Inside a polypropylene pipe with a diameter of 40 mm and a length of 50 cm, metal dishwashing brushes are pushed (chopped wire - wire rod can be used). They must be attracted by a magnet.
- Threaded bends are soldered to the pipe for connection to the heating network.
- On the outside, 4-5 PCB rods are glued along the body. A wire with a cross section of 1.7–2 mm² with glass insulation, used in welding transformers, is wound on them.
- The hob is disassembled and the “native” flat-shaped inductor is dismantled. Instead, a homemade pipe heater is connected.
An important nuance. The length and cross-section of the wire for winding the coil should be determined from the standard inductor of the stove so that it matches the power of the field-effect transistors in the electrical circuit. If you take more wire, the heating power will drop; if you use less, the transistors will overheat and fail. How it looks visually, look at the video:
As you might guess, the role of the heating element here is played by metal brushes located in the alternating magnetic field of the coil. If you run the hob at maximum, while simultaneously passing running water through an improvised boiler, you can heat it up by 15-20 °C, as tests of the unit have shown.
Since the power of most induction cookers is in the range of 2-2.5 kW, using a heat generator you can heat rooms with a total area of no more than 25 m². There is a way to increase the heating by connecting an inductor to a welding machine, but this has its own difficulties:
- The inverter produces direct current, but alternating current is needed. To connect an induction heater, you will have to disassemble the device and find the points on the diagram where the voltage has not yet been rectified.
- You need to take a wire of a larger cross-section and select the number of turns by calculation. As an option, copper wire Ø1.5 mm in enamel insulation.
- It will be necessary to organize cooling of the element.
The author demonstrates checking the performance of an inductive water heater in his video presented below. Tests have shown that the unit requires improvement, but the final result, unfortunately, is unknown. It looks like the craftsman left the project unfinished.
How to assemble an induction boiler
In this case, there is no need to disassemble the cheap Chinese stove. The point is to weld a boiler tank according to its dimensions, following step-by-step instructions:
- Take a steel profile pipe 20 x 40 mm with a wall thickness of 2 mm and cut blanks from it to the width of the panel.
- Weld the tubes together lengthwise, joining the smaller sides.
- Weld iron caps hermetically at the top and bottom to the ends. Make holes in them and install threaded pipes.
- Attach 2 corners to one side by welding so that they form a shelf for the induction stove.
- Paint the unit with heat-resistant spray enamel. The assembly process is shown in more detail in the video.
Final assembly and commissioning consists of mounting the boiler on the wall and inserting it into the heating system. The hob is inserted into the socket from the corners on the rear wall of the tank and connected to the mains. All that remains is to fill the system with coolant, bleed the air and turn on the inductor heating.
Here you are faced with the same problem that occurred with the previous model. Undoubtedly, induction heating will work, but its power of 2.5 kW is enough to heat a couple of small rooms when it’s freezing outside. In autumn and spring, when the temperature has not dropped below zero, a homemade boiler can heat an area of 35-40 m². How to properly connect it to the system, see the next video:
Induction heater assembly
Work on the manufacture of the heater is carried out in several stages:
- Cut the stainless steel wire into pieces approximately 5-7 mm long. Place a metal mesh at the bottom of the plastic pipe and fill all the free space inside with cut pieces of wire. Then close the pipe on both sides.
- Next you need to make an induction coil. To do this, carefully wrap the prepared pipe with copper wire at regular intervals. You should get at least 90-100 turns of wire.
- The prepared device can be built anywhere in the heating system. The device is connected to the inverter with an external winding made of copper wire. A circulating pump is built in to pump water. It is imperative to carry out electrical insulation work on the device. Don’t forget about thermal insulation of the heater with special material. Without thermal insulation, the efficiency of the system will be significantly lower.
The cost of a homemade induction boiler is quite small. But still, to manufacture it, you need experience in such work, as well as at least a little technical knowledge in this field. If all work is carried out carefully and in accordance with the recommendations, such a device will operate smoothly, with good heat dissipation. It is possible that it will turn out to be somewhat unsightly in appearance, but this will not make the heater function worse.
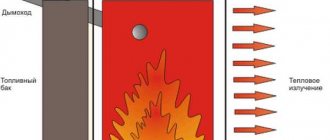
Induction heater. Fire, water, working people, but not fire!
I was looking forward to this toy. I have known about induction heating for a long time, since my student days. Sometimes I saw videos of how workpieces are hardened, carbide plates are soldered onto cutters, and so on. But for me, all this was something from the field of production, dirty, hot and stuffy workshops. Therefore, when I saw this heater in the list of gadgets offered for review, there was no hesitation. I just wanted him!
Freudian slip and paragraph 18
Like probably most readers, I am interested in different things. There is always a temptation and desire to buy something for your hobby, or you just want to play with a gadget you like; as you know, the price of toys only changes with age. Reviews are a combination of business and pleasure. I like to share my experience of interacting with various things, sponsors seem to like how I do it, and it turns out to be a mutually beneficial cooperation. I never review things that I'm not interested in and don't want to spend some time with. As a rule, I take things whose purpose and characteristics I have a good idea of, so I avoid my and yours, my dear readers, disappointment in most cases.
I do reviews objectively, I do not advertise products, and my goal is to give you food for thought and share my experience of using this item. Read, think, write your opinion in the comments - the truth is born in communication and exchange of opinions!
Recently there was a review of this device from the respected dia. In this review, dia even removed some of the parts to better understand the structure of this gadget and drew its electrical circuit. I won’t duplicate his work, you can go to that review and see everything. And don't forget to put a plus sign on dia please.
In my review, I would like to tell you what induction heaters are, why they are needed at all, and why I was so happy and waited for the arrival of this gadget. And the most interesting thing is what I did with it 
As usual, let's start with a short excursion into history.
The phenomenon of electromagnetic induction was discovered by Michael Faraday in 1831. Electromagnetic induction is the phenomenon of the occurrence of electric current in a closed circuit when the magnetic flux passing through it changes. Without Faraday's discovery, we would not have had transformers, generators, radios, and the electrical and electronics industry in general.
Induction heating is the heating of materials by electric currents that are induced by an alternating magnetic field. Those. By creating an alternating magnetic field and placing material there, we can heat it. And already in 1900, the Swedish one built and launched the first induction steelmaking furnace!
In order to melt or at least heat the metal, we need to create an oscillatory circuit and place a metal object in the field created by this circuit.
Here is a drawing of an induction steel melting furnace. It shows that the crucible with molten metal is surrounded by coils that induce an alternating magnetic field on it.
And this is the oven in action.
In general, the induction heating circuit looks like this: We have a generator and an oscillating circuit. The oscillation frequency in the circuit depends on the inductance of the coil and the capacitance of the capacitors. Different materials are susceptible to different vibration frequencies. For example, at the frequency of circuit oscillations at which steel melts, for example, non-ferrous metals may not even begin to really heat up. And vice versa.
Where is induction heating used? In fact, in a huge number of places. He is everywhere around us. Induction electric stoves, as the most striking example
Induction instantaneous water heaters
Portable heaters, with their help, for example, you can heat up and unscrew a rusted nut.
And in production, an induction heater is used for surface hardening of products. It is fast, economical and safe, in terms of the absence of fire and flammable materials.
And the most interesting thing for me is probably, because... I am the owner of small home turning and milling machines - soldering carbide plates onto cutter holders.
As I said, for me, induction heating systems have always been either the lot of industry or craftsmen who solder huge monstrous circuits with giant power supplies, for which it’s a stretch to find a place in the home. And what a surprise it was to discover a tiny device from the “plug into the power supply and have fun” class.
Let's move on to the hero of our review. It consists of two parts. A generator built on the basis of a conventional two-transistor multivibrator (for the circuit, you can go to the review of the respected dia), for those who understand electronics, then nothing complicated, but for those for whom these are unfamiliar terms, then in a nutshell - a simple and reliable circuit that works "from the box". An assembly of containers is located on the generator board. The second part is the oscillating circuit coil. Both parts are connected with a screw connector.
The size is miniature 5.5 cm by 4 cm and 2 cm thick. Coil diameter 2.8 cm, length 7.5 cm. Device power supply 5-12V, current up to 5A.
Those. the maximum power consumption can be 12V x 5A = 60W. This is the consumption of not the brightest incandescent light bulb. Is it a lot or a little? Let's estimate on our fingers. The modern steel industry spends on average 650 kWh to melt 1 ton of steel, i.e. 650 Wh per 1 kg or 65 Wh per 100 gram melt. Thus, our little one, with the proper approach and minimizing heat loss into the atmosphere, can melt a little less than 100 grams of steel in an hour. Very, very good. It would seem 60 W of power consumption and 100 grams of molten steel. It is very useful to count everything, because... Some things are not at all obvious to the eye, as was the case for me in this case.
Let's move from words to entertainment.
I had a whole bunch of ideas that I wanted to implement.
I made a detailed video on all the ideas. You can watch it at the end of the review
.
Idea number 1. Hardening screwdriver bits. Often, if you have to tighten a lot of screws with a screwdriver, you will see a picture of the bits licking off the crosspiece.
There is a way to extend the life of bits. Often bits are sold slightly under-hardened. This is apparently done to avoid their splitting during operation. Or for some other unknown reasons. Such bits can be additionally hardened. This is what we will do.
How are metals hardened? There are a huge number of alloys and individual heat treatment modes. I will not dive into these jungles within the framework of this review. If everything is simplified to the extreme, then for hardening products made of unidentified steel in primitive home conditions, you can (with a bunch of conventions, of course) use the following method.
A. Heat until cherry brown (750 degrees Celsius). b. Cooling in water c. Leave in the oven at a temperature of 180-190 degrees Celsius for 1 hour. Vacation is necessary to relieve internal stress so that the product does not burst in our hands during operation
Here is a picture with the colors of the metal and their corresponding temperatures
Accordingly, we warm up the bat
And cool it in water. Then leave in the oven and... voila. We have a stronger bat in our arsenal.
Idea number 2. Make mini wood chisels from the remains of a hacksaw blade. Detailed process in video. I’m only sharing a photo of the final products.
They look unsightly, but they cut wood properly. The test is on video.
Idea number 3. Make a real drill from improvised nails and pieces of iron. And the drill turned out! It has successfully drilled through wood, aluminum... and more. Look at the video))) Everything withstood the sharpening and the hardened tip, except for the body of the drill, which I released, but did not harden again. This is what happened to him after my bullying)))
Idea number 4. Water heater. Test of concept. We put the nail in the tube, the tube in the spiral - the water boils.
You can heat something, for example water in a container. Put a can of milk there, connect a temperature sensor to control the temperature and there will be a yogurt maker))).
Here is a video of my mockery of matter)))
Like a resume. I liked the induction heater. For home use, I personally will definitely find it useful. From time to time I need to harden some small part (a knurling axis for a lathe, for example). And I like this method better than the burner at home. I also got great pleasure from the process of creating qualitatively new things from scraps of saws and unnecessary keys.
Do I want a higher power heater? To the apartment - definitely not. Other modes, different safety precautions. To a separate workshop - definitely yes.
I'm amazed at the speed of progress, to be honest. And technology. A device the size of a matchbox allows you to feel like a blacksmith, a thermostat, and a plumber-heater))
Enjoy life, choose the tools and toys you like, and good luck!
The product was provided for writing a review by the store. The review was published in accordance with clause 18 of the Site Rules.