Home / Solid fuel boilers
Back
Published: 04/25/2020
Reading time: 3 min
0
1061
A brick boiler with a skeletal heat exchanger is a modern, improved modification of a brick stove, in which heating efficiency is increased by installing an internal heating circuit made in the form of pipe registers.
They are connected to a water heating system with standard heating appliances. Typically, such a heating source is installed in stove-heated houses or in large bathhouses.
The feasibility of installing this type of heating units depends on the smoke exhaust system and the availability of the room to accommodate a fairly large structure.
- 1 Why it is better to install tubular heat exchangers
- 2 Operating principle of a furnace with a built-in tubular heat exchanger
- 3 Pros and cons of a boiler with a skeletal heat exchanger
- 4 How to make a new furnace with water heating
Method of operation and design
A stove with a water circuit built in at the masonry stage.
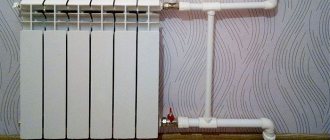
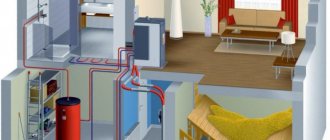
A brick stove with a water circuit for heating a house works according to the standard principle. To install it, it is necessary to create a water heating system, through which heat is supplied from the stove walls and heating radiators connected to the main circuit. The loop pipes are connected to the boiler or register built into the furnace. The coolant is heated by passing through a hot register, then it passes to pipes and radiators.
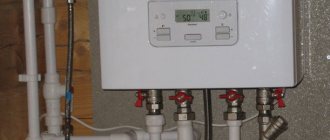
Having passed through the circuit, the temperature of the coolant decreases and it again enters the heat exchanger, where it warms up again. For ideal fuel circulation, a special pump is built into the circuit. An important element of the system is the expansion tank. If we are talking about a closed system with a sealed circuit, such an element can be placed anywhere. As part of an open system, the tank is placed at the highest contour point, this can be an attic or other room.
The expansion tank is a container for excess heated coolant. It has a varied design, size and volume; it must be selected taking into account the type of heating system and the amount of coolant.
Making a boiler
Uninformed ordinary people believe that a Russian water-heated stove is like a saucepan with pipes passing through the brickwork. This is not true, although there are cylindrical boilers - they are more used in metal units powered by solid fuel, electricity or diesel fuel.
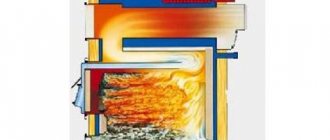
For a brick stove, the boiler is a set of tubes welded to another, larger in diameter, and working as a feed in the stove heating system. Arranged in the shape of the letter P, they will be washed by flames, which will allow the media to heat up at high speed and circulate throughout the system.
The boiler should be installed in the very center of the firebox so that the fin tubes are on both sides of the chamber. Before starting work, it is necessary to have a complete drawing according to which the boiler and subsequent masonry will be manufactured.
Pros and cons of heating with a water circuit
In winter, the stove must be heated continuously, adding firewood manually.
Brick stoves with a water circuit, used for heating a private house, have their advantages and disadvantages. They need to be taken into account when choosing a similar device for a bathhouse or living space. You need to choose a suitable model taking into account the specific parameters of the house. The best option would be a long-burning stove, capable of operating for 12-14 hours after one load of fuel.
The list of advantages of a furnace with a water circuit includes:
- economical fuel consumption compared to systems operating on other energy sources;
- the ability to install the stove in conjunction with other heating systems;
- the ability of the stove to successfully fit into any interior design project.
One of the disadvantages of such units is the need to heat the stove in winter in continuous firing mode. Otherwise, the rooms will not warm up to the optimal temperature.
A furnace with a water circuit is not an automated system, so heating fuel in some models of units must be loaded manually.
The Russian stove is the progenitor of all heating units
The design consists of a firebox, an ash pan and a combustion product removal system. The features of the oven can be seen below:
- The heat release from a Russian stove cannot be compared with well-known units - up to 6500 Kcal. Having calculated the approximate amount of fuel, we can confidently say that the system is cost-effective. And if a Russian stove with water heating is installed, the efficiency will increase by 2-3 times.
- As a rule, firewood is typical fuel for a Russian stove. In some cases, coal - if the design allows the removal of heavy gases. This type of fuel is not expensive and, provided its delivery is trouble-free, owners will not encounter any hassle.
- There is no need for a constant firebox - coal or firewood is placed inside 2-3 times a day. Even if the stove is equipped with a water boiler, fuel consumption will not increase.
- Brick for laying a Russian stove is an affordable material, the purchase of which even for a large unit is not ruinous. The design pays for itself quite quickly.
It would be unfair not to talk about the shortcomings of the Russian stove. However, each of them can and should be corrected. So:
- Constant control over the combustion process. That is, it is impossible to leave a stove with a water boiler, whether it is Russian or another type, without supervision. You will have to monitor the smoke channels when adding fuel and cleaning the ash pans.
- During the off-season, the stove cannot be used for heating. It will smoke and flare up for a long time, clogging the channels with soot. This is due to the fact that traction in cold weather is much better than in positive temperatures - the pressure is low and the reverse process occurs.
- The laying of a stove should only be done by a specialist - previously, good stove makers were worth their weight in gold. Ideally, stove heating with a water circuit, the design of which was proposed by the master, is produced by him. Therefore, when contacting a company for the appropriate services, you should order the entire complex, from laying to ignition.
Perhaps one of them will be clogged or deformed, which will naturally affect combustion. In addition, you should not close the chimneys before going to bed without making sure that the coals inside do not have a blue flame - this is the release of carbon dioxide. Misfortune then cannot be avoided.
However, despite its shortcomings, the stove remains the most popular unit among heaters for a private home.
Types of systems
A stove with forced circulation warms up the room more efficiently and quickly.
A brick stove with a water heating boiler, made with your own hands or purchased, can operate on a system with forced or natural circulation. Each of the two types has its own characteristics and differences that need to be taken into account.
Forced circulation
A system of this type is complemented by a circulation pump, which is responsible for moving the coolant through the chimneys. By connecting the system to electricity, the pressure level in the radiator can be controlled using valves. This also makes it possible to reduce the amount of fuel for heating the coolant. Forced circulation is quite economical, but its main disadvantage is its dependence on power supply. If there is a power outage, it will not work.
Natural circulation
With natural circulation, it is impossible to regulate the temperature, in addition, the system is difficult to install.
A system with natural circulation works based on the application of the laws of physics. During operation, the coolant moves through the pipes due to differences in the density of cold and hot water. The main advantage of the system is energy independence, which is why it is often created in homes where power outages occur. Among its disadvantages, they note the need to use heavy metal pipes, for example, cast iron, which are difficult to install. Also, the system does not have the ability to regulate the heating level of each room.
A stove or fireplace with a water circuit can be made of cast iron, steel or brickwork. The owner of the house chooses the appropriate option. When choosing, take into account the total area of the premises that need to be heated, the power of the device, the amount of space allocated for the stove, the location of each element of the circuit, the functions of the unit and its design. In addition to these parameters, you need to remember the need to install a special foundation under the stove.
Advantages and disadvantages of a combined system
A stove with a traditional heater heating boiler consists of components such as grates, a smoke exhaust duct, an ash pan and a combustion chamber. These attributes of a classic country stove are familiar to any village resident. As for modern stoves, visually they are almost completely identical, but they have slightly different characteristics:
- A simple village stove emits no more than 6500 Kcal of heat per hour of operation. This amount of heat is enough to heat a house with a small area. This heating method is ideal for a country house.
- If stove heating is combined with water heating, the productivity will increase several times. It will also be possible to heat a larger area of the house. In this case, the same amount of solid fuel will be burned. In addition, not so many exhaust gases will be emitted into the atmosphere, which will increase the efficiency of the system.
- In order to achieve even higher efficiency, you can combine two heating systems, convection and water. During simultaneous operation of two systems, their performance will be summed up. In one hour of operation, such a tandem will produce up to 21,000 Kcal. This amount of heat is enough to heat a house with an area of up to 300 square meters. meters.
- An important advantage of such a heating system is the availability of fuel. Typically, wood or firewood and coal are used to operate such a heating system. This fuel is the most accessible and relatively inexpensive.
Firewood is the most affordable fuel for heating
- A stove with a water heating boiler does not require a constant fire. For such a system to function, you will need to add fuel only 2 times a day. Regardless of what the temperature is outside, it will be possible to create the most optimal microclimate for you in the house.
- The efficiency of an ordinary village stove reaches a maximum of 50%. If you combine two heating systems, this figure will increase to 85%. Taking into account the fact that a wood-burning stove is used to organize the heating system, this indicator is ideal.
Stove heating also has its disadvantages. Such a stove-boiler for heating a house can be installed not only in a country house or village house; sometimes it is installed in country houses belonging to the elite category. Sometimes such stove heating boilers can perform not only the role of a heat source, but also a decorative function.
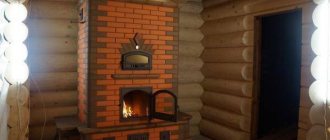
A stove can be a wonderful home decoration
Connecting the stove to a water heating system
The water circuit is lined with fireclay bricks so that it does not burn out ahead of time.
To fully connect the device to the general system, you will need to purchase a coil for the stove for water heating. It is installed inside the firebox. When choosing it, take into account the thickness of the walls of the stove; if we are talking about a device that runs on wood, the walls may be thinner.
Units fired with coal briquettes may have denser walls. This condition cannot be ignored, otherwise the boilers will quickly burn out and will have to be replaced before the end of their intended service life.
How to make a new furnace with water heating
There are many drawings on the Internet for making a heating stove with your own hands. If the developer lacks practical experience, it is safer to entrust such work to professionals who will carry it out, taking into account fire safety requirements and operating rules.
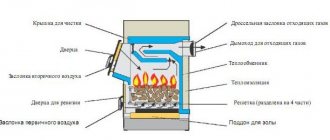
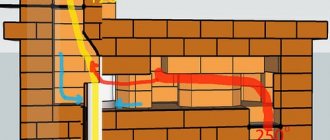
Algorithm for constructing a furnace with a skeletal heat exchanger:
- The heat exchanger is prepared according to the dimensions of the combustion chamber.
- A brick foundation is built for the stove, and waterproofed roofing felt is laid under the foundation.
- The bottom of the firebox and the ashpit are laid out with fireclay bricks, separated by a cast-iron grate.
- A skeletal heat exchanger is installed and a brick wall is laid out using a pattern. Ensure the size of the firebox so that there is a gap of up to 2 cm between them.
- A door is installed in front of the firebox.
- A channel for the smoke exhaust system is left behind the combustion chamber.
- A cast iron hob can be installed on top of the combustion chamber.
- The smoke exhaust duct is made of brick or steel pipe.
- Allow time for the masonry to dry thoroughly, then connect the in-house heating system to the heat exchanger pipes, which should contain a mud trap, shut-off and control valves, air vents, an expansion tank and radiators corresponding to the thermal load of the heated room.
- Finally, the heating system is pressure tested, a test fire is performed, and the performance of the heating equipment is checked.
When constructing a stove heating source, it is important to pay attention to the thickness of the walls, which are made of fire-resistant fireclay bricks. It depends on the type of fuel; for coal-fired devices, the walls are made wider.
This limitation should not be ignored, otherwise the stoves will burn out very quickly, and a new structure will have to be installed.
Calculation of power and size of heat exchangers
The power of a heat exchanger depends on the materials from which it is made. If the part is cast iron, the best choice would be models of the MS-110-300 and MS-90-300 series. Due to their small size, they easily fit into the firebox; their heating area for each fin will be 0.14-0.16 m2. If you take these numbers into account, you can calculate how many sections are needed to heat each circuit. For every 10 square meters of room you will need 1 kW, equal to approximately 0.1 m2 of area from the total heating of the heat exchanger.
Construction of a brick oven with a heating boiler
Construction work begins after preparing a standard design and manufacturing a heat exchanger, the dimensions of which are used to lay the brickwork of the furnace.
A furnace with a water circuit can be placed in a place convenient for operation and maintenance.
After the construction of the foundation, the arrangement of the furnace is prepared, taking into account the water circuit - a plan for the location of the ash and fuel chamber, the smoke exhaust and the hob (if present).
To build a furnace with a boiler, heat-resistant bricks without chips, cracks or damage are used.
The construction of the furnace is carried out in stages:
- Preparing a kiln solution from clay, sand and water. You can purchase a ready-made mixture, but experienced craftsmen mix the brickwork mortar with their own hands.
- A layer of waterproofing made of roofing material or film is laid on the foundation.
- The oven mortar is evenly applied to the waterproofing and the initial brick row is laid. Next, according to the diagram, subsequent rows are completed, and a heat exchanger is mounted in the firebox.
- An ash pit and a combustion chamber are being built. The correctness of the masonry is checked by the building level.
- The door to the combustion chamber is fixed, the stove vault and chimney are laid out. Rounded bricks are used to line the internal walls of the firebox and chimney.
- After the masonry is completed, the water circuit is installed. Water pipes connected to a heating radiator are supplied to the heat exchanger. An expansion tank is installed, and the finished system is filled with water or other liquid.
How to make a stove with your own hands
Diagram of components of a brick stove with a welded water circuit
Sometimes it becomes necessary to equip a brick stove with your own hands and build it into a niche or install it on a square or rectangular foundation. First of all, markings are made for the stove and the foundation is poured. After it dries, two rows of brickwork are laid out according to the ordering scheme in order to level the uneven foundation and make a base for the unit. Next, you will need to lay out the rows on the clay mortar and finish the laying, taking into account the thickness of the seams between the rows in the process.
When the body is ready, all that remains is to install the doors, firebox, hob, heat exchanger and other parts. After completing the work, the stove must be heated completely and its performance checked.
You can develop drawings for the stove yourself or seek help from professionals. If you lack experience, it is better to entrust this work to specialists who will prepare a detailed diagram taking into account the requirements for the heating system and a specific room. In this case, the finished unit will fully comply with the safety requirements and criteria for the heating system.
Placing the boiler in the furnace
The best option for a stove will be the one that involves masonry and at the same time a pre-prepared boiler is built in.
Then the stove with a water heating boiler will have some features in its design that provide a higher degree of efficiency and small size. Laying bricks for a stove with a boiler with your own hands includes the following steps:
- Laying a concrete foundation with reinforcement.
- The masonry is made using sand-clay mortar. It will be good if you soak the sand and clay in water overnight. Thus, by grinding the clay with sand and leaving them overnight, they will mix better, and you need to mix two portions of sand to one portion of clay.
- It is necessary to lay waterproofing on the foundation; the most practical option would be roofing felt.
- The layer of solution must be distributed evenly onto the waterproofing with your own hands and use a level. Only after this does the laying of the first row of bricks begin.
- The first step is to form the outline of the blower itself and install the doors for it. Then place a grate on top of several rows of brickwork, which separates the vent and the firebox.
- When forming a firebox with your own hands, it is necessary to take into account the dimensions of the boiler and prepare the gaps that should be between the outer walls of the boiler itself and the masonry along the entire perimeter of the firebox. In the first row of bricks along the perimeter of the firebox, it is necessary to make a side in order to install a corner. The boiler will be fixed to these corners. It is also worth remembering about the openings on the sides of the firebox in order to bring out the supply and return pipes.
- Laying the walls of the chimney with your own hands should include the formation of channels so that excess heat is dissipated and ash and fumes can be dumped.
- At the end of all the work you do with your own hands, you should lay out the chimney. After completing all the work, you can connect the heating system to the boiler and check its functionality.
Manufacturing a boiler for water heating Heating system with a double-circuit boiler Heating a house with an air-heating boiler Scheme and steps for connecting a gas heating boiler to the heating system