Primary circuits and system functionality
To operate the heat pump, a source of thermal energy is required, which can be any medium, provided that in winter its temperature stably exceeds +1°C. Thus, it is practiced to install units that receive thermal energy from water, air and earth (from soil or deep rocks).
Water
Any natural or artificial reservoir is suitable for laying the primary circuit, provided that it does not freeze to the bottom. The length of the pipeline submerged to the bottom is determined when calculating the power of the heat pump - one meter of pipeline mounted with a snake or rings allows you to obtain up to 30 W of thermal energy. That is, a heat pump with a pipeline 500 meters long is capable of heating a house whose heat demand is 15 kW.
Horizontal pipeline circuit laid with rings
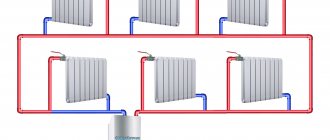
The principle of operation of a water-to-water heat pump is that the resulting heat is used to heat the coolant liquid in a radiator heating system or a heated floor circuit. The functionality of a water-to-water heat pump is sufficient to provide stable underfloor heating, as it allows you to maintain the coolant temperature at 45-60 degrees. For full-fledged radiator heating with such a temperature regime, the house needs to be seriously insulated.
Air
For a water-to-water heat pump, the conversion coefficient is on average 1.5-2.2. While an air-to-air or air-to-water heat pump exceeds this figure approximately twice - the conversion factor is more than 4.
Air-to-air heat pumps are widely used because they do not require the installation of large circuits. Any inverter air conditioner or split systems that heat a room are essentially heat pumps with low efficiency.
Operating principle of an air source heat pump
An air heat pump has a significant drawback - in frosty weather it has nowhere to get heat. Some models of units are designed to operate at -20°C, in other cases the limit does not fall below -10°C.
In addition to air-to-air units, there is an air-to-water heat pump. Its difference is that the resulting thermal energy does not heat the air in the room, but the coolant in the heating circuit.
The operating principle of an air-to-water heat pump is standard. In this case, the evaporator, additionally equipped with a fan, is installed outside the house, and the compressor and condenser are installed inside. By connecting a water circuit to the heat exchanger, you can arrange underfloor heating of the room.
Earth
The most stable natural source of heat is rocks at a depth of over 20 meters, as they are constantly heated by heat from the earth's core. But to install a U-shaped pipe circuit, you have to drill deep wells, which affects the installation price. Geothermal installations are effective, but they pay for themselves only after 10-15 years of operation, provided that the house is properly insulated.
Heat pump "Earth-Water"
A cheaper installation option involves laying the circuit half a meter below the ground freezing level. Laying pattern - snake or circles. Installation of such a system requires a large amount of excavation work, in addition, the external circuit may be damaged during operation.
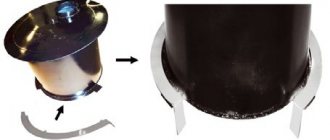
Installation stages
You can make your own heat pump entirely from old spare parts, taken, for example, from a non-working air conditioner.
Costs, payback, power
A factory device costs about 4,000 euros and more. A homemade pump for heating 100 m² of area will pay for itself after approximately 2 years. For houses with not very good thermal insulation, the power should be 75 W/m², with good thermal insulation, 50 W/m² is enough, and when using modern thermal insulation materials, 30 W/m² is enough.
The ideal option would be when the pump is included in a project for heating a house with heated floors and tiled flooring.
Process of creation
First you need to get a compressor from a non-working air conditioner, not necessarily a new one. It will be cheaper to purchase it at refrigerator repair shops. The compressor is attached to the wall with brackets (L-300 is suitable).
To make a condenser, a stainless steel tank with a capacity of 100–120 liters is suitable. It is cut in half and a coil is installed inside. You can make the coil yourself from a plumbing copper pipe or from a refrigerator. Here you need thick walls - from 1 mm and more. The tube is wound onto a regular cylinder (gas, oxygen) with a uniform distance between the turns and is fixed in this position with a perforated aluminum corner (it is used to form the corners under the putty). It is wound onto the coil so that each turn is located opposite the hole in the corner.
The result will be an even pitch of turns and structural strength. After creating the coil, the halves of the container are welded. Threaded connections are also welded. Then the evaporator is created. A regular plastic container of 60–80 liters may be suitable for it. with a coil made of ¾-inch diameter pipe mounted inside. Simple water pipes are used to transport water.
The evaporator is mounted on the wall with an L-bracket. But the injection of freon should be done by a refrigeration equipment specialist: he will weld the tubes and pump freon into them. After which the structure is connected to the heating system inside the house, and then to the external circuit.
Features for each type
A vertical ground-water heating pump requires the creation of a 50–150 m well. Geothermal probes are placed in it and connected to the pump. The probes take heat from the ground, which is transferred with non-freezing water to the pump, and from there to the heating system. Probes are suitable for small areas, and a horizontal collector for large areas.
For a horizontal ground-water apparatus, you need to create a collector from a pipe system. It is located below the freezing level (1–1.5 m) and it looks like a kind of coil underground. The soil layer is removed, pipes are laid and the soil is backfilled. You can lay the pipes in separate trenches.
For a water-to-water unit, it is assembled from HDPE pipes, which are filled with a heat carrier and then transferred to a reservoir. The pipes look like a large coil at the bottom of the reservoir. It is advisable to place them in its center.
The air-to-water apparatus does not require labor-intensive excavation work. A place is selected near the house or on its roof, where a homemade heat pump is connected to the in-house heating system. Heat is extracted by fans and evaporator.
What is geothermal heating
This is heat extracted from the earth or water. At certain depths of the soil, a constant positive temperature is maintained, and there are no differences even in severe frosts, the same with water. A person’s task is to take heat from the earth or water, sending it to ensure comfort in living rooms.
Geothermal heating is like a regular refrigerator, but in reverse - the system produces heat, not cold. The pump algorithm is built on the transfer of heat from a source with a small potential of thermal energy to the coolant, and soil or water act as active heat sources.
Advantages and disadvantages of the system
Geothermal heating has several advantages:
- The release of thermal energy is many times higher than the cost of electricity consumed by the pump.
- Environmental cleanliness and safety. The system does not emit harmful substances, there are no emissions or slag after fuel combustion.
- There is no need to purchase fuel or gas; the entire structure is built without the use of chemicals or other substances, so heating with earth or water heat is considered the safest.
- If the installation and operation technology is followed, the equipment and the entire heating system will last without technical support for at least 50 years.
- The heat pump operates silently, there are no acoustic effects.
Maximum economic benefit is achieved without additional investments. The user needs to purchase all the equipment once, configure the design and no longer have to interfere with the operation of the system. An additional advantage is the location of all elements outside the building - heating from earth or water does not require the placement of large installations in the house, so the method of extracting and supplying heat is suitable for houses of any size.
The disadvantage is the large amount of one-time costs for purchasing equipment, installing and putting the system into operation. To form the structure, a pump, a certain amount of materials, installation of an external manifold and an internal circuit are required.
Manufacturing
Heat pump
The heat pump can be made from parts available on the farm or by purchasing cheap used spare parts. The installation procedure is as follows:
- We purchase a ready-made compressor in specialized stores or use a compressor from a conventional air conditioner. We fix it to the wall where our installation will be located. Reliability of fastening is ensured by two L-300 brackets.
- We make a capacitor. To do this, cut a stainless steel tank with a volume of about one hundred liters in half. We install a coil made of a thin copper tube with a wall thickness of at least 1 mm into the tank. For the coil, you can purchase a plumbing pipe or use a copper pipe from an old refrigerator. We make the coil as follows:
- a copper tube is wound onto an oxygen or gas cylinder; it is important to maintain a small distance between the turns, which should be the same;
- To fix the position of the tube turns, we take two perforated aluminum corners and attach them to the coil so that each turn of our tube is located opposite the hole in the corner. The corners will ensure the same spacing of the coils and give geometric immutability to the entire coil design.
After the main part of our system is ready, it is necessary to connect it to heat distribution and intake devices.
The assembly of the heat intake installation depends on the type of pump and heat source.
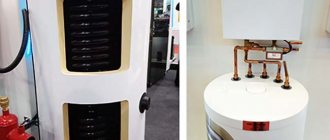
Heat pump for home heating: prices and manufacturers
Heat pump units on the Russian market are represented by products from the following companies: Vaillant (Germany), Nibe (Sweden), Danfoss (Denmark), Mitsubishi Electric (Japan), Mammoth (USA), Viessmann (Germany). Russian manufacturers SunDue and Henk are not inferior to them in quality.
The Nibe unit will easily fit into the interior of the house
To heat a house with an area of one hundred square meters, a ten-kilowatt installation will be required.
Table 1. Average cost of different types of 10 kilowatt pumps
| Image | Pump type | Cost of equipment, rub | Cost of installation work, rub |
| Ground-water Imported manufacturers | From 500,000 | From 80 000 | |
| Ground water domestic producers | From 360,000 | From 70 000 | |
| Air-water Imported manufacturers | From 270,000 | From 50 000 | |
| Air-water Domestic manufacturers | From 210,000 | From 40 000 | |
| Water-water imported manufacturers | From 230,000 | From 50 000 | |
| Water-water domestic producers | From 220,000 | From 40 000 |
The turnkey price of a heat pump averages about 300 – 350 thousand rubles. The most budget-friendly option is the air-water system, since it does not require expensive excavation work.
Calculation of the heating circuit
The first thing you need to do before installing a heat pump is to calculate the heat balance of the house. This will allow you to determine the heat transfer required to ensure the required comfortable temperature. When calculating the pump, the following data should be taken into account:
- purpose of the building;
- its total area;
- number of floors, area of each of them;
- ceiling height;
- desired (required) room temperature;
- walls (material, layer thickness);
- type and total glazing area;
- the presence of a ventilation system and its characteristics;
- demand for hot water, number of points;
- heaters and their type;
- presence/absence of land/water nearby;
- presence/absence of restrictions on electricity.
You can quickly pre-calculate the energy needs of your home using the formula:
P = V x C x T,
where V is the volume of housing in m3;
C - construction coefficient C = 0.75, if the house is very well insulated (RT2005) C from 0.9 to 1.3, when the house is poorly insulated C = 1.6;
T is the difference between the required temperature in the house and the lowest outdoor temperature during the cold season for the geographic area where the building is located.
DIY heat pump from a regular air conditioner. (Part 1)
Good afternoon. Today I want to talk about my personal experience of creating a heat pump from an air conditioner. And so on in order. The time has come to build a house, land in the city is expensive, and 7 kilometers from the city there are dachas in which land costs several times less. Of all the blessings here, only light. The water issue was resolved with a well and reverse osmosis. It took me a long time to decide on heating. Heating with wood or diesel fuel is not my option; I don’t have time to work 6 days a week. I read about PLEN, well, I think everything is decided, PLEN wakes up the whole house. I bought PLEN from the Chelyabinsk plant from the official representative in Krasnodar. The price tag was very steep. so I took it to the bathroom and 3 bedrooms, and decided to take it to the kitchen later.
Collected, hung, connected. Everything works and heats, on the website it was written that it was economical, but I didn’t check it because at that time the light was “cheap”. It's time to pour the floors and then a friend (thank him very much) gives me an idea - Make warm floors! I thought why? Is there a PLEN? But he and his wife persuaded him to place pipes in all the rooms and put them all in one corner. The house is slowly (very slowly) being renovated and then I decided to try warm floors. There was no boiler, so I decided to convert the boiler into a boiler. I started the floors and realized what kind of thing it was. Let's compare heated floors with PLEN.
Captivity warms objects, and they already warm the air. That is, objects are 1-2 degrees warmer than air. It doesn't heat concrete at all. Floors with PLEN remain cold and no no, the thought creeps in about how PLEN affects you. You lie down on the bed, look at the ceiling, and the warmth from the PLEN spreads across your face. It is absolutely useless in the bath. It doesn't heat up the stove. Warm floors are a fairy tale, no slippers or rugs, the warmth in the room is comfortable. Now that I have children, I don’t worry about cold floors. It's just great in the bath. The tiles are warm and the bath is warm. I remember as a child, I didn’t want to swim because it was cold in the bathtub in my parents’ house. If the house is well insulated, then the floors are not hot but warm. It's time to install the boiler. The choice fell on the EVAN 7.5 kilowatt electric boiler (the light is still “cheap”). The design is extremely simple: 3 tens of 2.5 sq. each. and a temperature control unit. The only negative of this boiler is the sound of the slamming starter, which was very annoying. I modified it with the help of a solid-state relay for the radiator and cooler. It worked perfectly, coping with a house area of 100 square meters. I don’t turn on PLEN anymore.
We have run out of “cheap” electricity and it’s time to save. I watched and read a lot about heat pumps. Our region is warm (Krasnodar Territory). Therefore, I decided to try the water-air system. A friend found a Kentatsu Denki KSRE50HZAN1 inverter split. According to the instructions, it should consume 1700 watts and output 5570 watts. He had it for 5 years not working, but he says the compressor should have been working. I started to figure it out. I found a burnt out diode bridge and replaced it. Then I ordered the driver from AliExpress, the smoke went further through the elements, I ordered the entire power board with the driver, it cost me 5000 rubles. Installed does not work