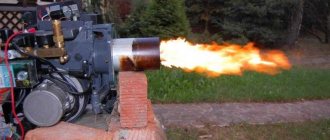
The Babington burner was originally used to heat buildings and ran on diesel fuel.
The burner's inventor, Robert Babington, patented his device in 1979, and after the patent expired, information about the invention became publicly available.
After this, many craftsmen came up with the idea of using waste oil in the burner instead of diesel fuel.
This is how the modern burner design arose, which is still used today.
Operating principle of the burner
The burner works by atomizing fuel with a stream of high-pressure air. The fuel flows down a spherical surface in which a small hole is drilled. Inside the sphere there is a tube through which air flows under pressure. It bursts through a narrow hole, tears off part of the fuel and sprays it, forming a conical torch.
The rest of the fuel flows by gravity into a special settling tank, which is located under the sphere. It can then return to the main reservoir.
Some consider the principle of operation of a torch to be similar to the principle of operation of a blowtorch, but there is a significant difference between them.
Operating principle of the burner during mining
In a blowtorch, air displaces the fuel, but does not mix with it. And in a Babington burner, a stream of air passes directly through the fuel stream, forming a cone of atomizing aerosol. This ensures better contact of small droplets with oxygen in the air and allows the fuel to burn more efficiently. That is why it became possible to burn oils, while a blowtorch uses gasoline.
When starting the burner, the torch may be unstable, go out, or, conversely, burst out. This is due to the fact that the fuel has not yet had time to warm up properly.
Device diagram
The main element of the Babington burner is a hollow part with an inclined or spherical surface, with a hole with a diameter of about 0.3 mm in the center. Using a pump with a small pressure, fuel is supplied to this surface and flows down it, so that as a result a thin film is formed on the part.
From the inside, a compressor supplies the part with compressed air (pressure - from 2 to 4 atm), which comes out through that very small hole. At the same time, it tears off a certain area of the oil film from the spherical surface, forming with it a flow of the fuel-air mixture.
All that remains is to set it on fire so that the Babington burner starts working and starts producing heat. Ignition is carried out, as in a conventional burner, using a spark. To do this, a homemade burner must be equipped with a car spark plug.
Babington burner drawing
That part of the fuel that did not take part in the combustion process flows down the part into the pan, and from it back into the fuel tank.
In order for the characteristics of a homemade Babington burner to be the best, it should be equipped with a heating system in which the fuel will be heated before entering the work surface. Thanks to this, it will become more fluid, and accordingly, the film it forms will be thinner. Thus, the degree of atomization will be the highest, so the burner will light up easily and work with maximum efficiency (fuel will burn in full).
From the principle of operation it is clear that the Babington burner really does not need a filter. No matter how many impurities are contained in the fuel, it will function properly. However, before refueling the burner, it is better to pass the used oil through a fine-mesh mesh.
Burners for gas boilers can be purchased, or you can make them yourself. Do-it-yourself gas burner for a boiler - basic requirements for manufacturing and operation.
What to do if the gas water heater stops lighting? This information will help you understand the causes and troubleshooting methods.
How to make a burner yourself
The simplicity of the burner design allows it to be easily manufactured in a home workshop or garage. Let's look at how to make a burner of the simplest design.
First of all, you should select materials:
- The body of the future burner is a steel tee with internal thread. Inner diameter – 50 mm.
- The nozzle is made from a squeegee (a piece of threaded pipe). The outer diameter must be 50mm to fit the body. The nozzle length is not less than 100 mm.
- Connection to the fuel line is made through elbow DN 10.
- The fuel line is a copper pipe DN 10, at least a meter long.
- The air duct is a steel tube of the same diameter.
- A metal sphere or hemisphere that can fit freely into a tee.
- Fuel tank and settling tank.
- Heating element for fuel.
The fuel tank should not be located in close proximity to the flare. Otherwise, a fire will occur.
DIY diesel burner
How to make a diesel burner with your own hands?
To make a diesel burner for a boiler yourself, a home craftsman can recommend a Babington burner.
It attracts with its simplicity of design and ability to work with fuel of any quality.
Thus, the used oil will not need to be cleaned of impurities, which users with a conventional burner are forced to do.
Step by step guide
Step one is to drill a hole in the sphere. This cannot be done using conventional tools, because the hole diameter should be from 0.1 to 0.3 mm. You need a special drill and a special chuck. If you have a drill with a diameter of 0.1 mm, but the power of such a torch is not enough, you can make two or three holes. Such holes are drilled at high speeds.
When the sphere has a hole, it is attached to the air supply tube. Then the structure is installed inside the tee. A rubber plug is placed at the outlet of the tube from the housing, which is necessary to prevent air under pressure from escaping out. A hole is drilled in the plug through which the tube will pass.
Waste oil burner
A fitting is soldered to the tee on top through which fuel will be supplied. A copper fuel line is connected to the fitting. Of course, the sphere inside the housing must be installed in such a way that fuel from the fuel line falls on it.
The next step is to take steps to warm up the fuel. To do this, a heating element is installed in the tank, which will carry out primary heating and prevent thickening at low air temperatures. The copper tube of the fuel line is bent into a spiral around the nozzle so that the oil heats up even more.
During installation, the nozzle is first screwed on, then the already twisted fuel pipe is put on it, and then connected to the fitting. The lower outlet from the tee is designed to drain the remaining fuel. The settling tank can be placed directly underneath it, but it is better to move it a little to the side, away from the flame.
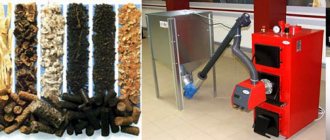
Pellets are wood processing waste. Do-it-yourself pellet burner - operating principle and manufacturing recommendations.
Step-by-step instructions for insulating the floor in a private house are presented here.
Instructions for making a gas torch for soldering can be found here.
What you need for self-assembly
Now let’s come closer to how to make a burner with your own hands during testing. The advantage is obvious - you will receive a high-quality device that will work perfectly and can compete with any industrial design. And most importantly, its cost is very low. You will need a compressor capable of providing a pressure of at least 2 atm.
The ideal option is from an old refrigerator. You also need to have the following materials:
- Fuel tank with a heating element installed in it. The heater will not work constantly; it helps partially warm up the oil.
- The second tank is designed to collect oil not sent to the injector.
- Copper tube to supply air to the burner sphere.
- Pipe for draining waste.
- Pump for pumping excess into the main tank.
- Metal pipe with a diameter of 2 inches for the nozzle.
- Tee for two-inch pipe.
- Materials for spherical nozzle.
When you have prepared all the materials, you can begin manufacturing a burner for solid fuel boilers.
First you need to make a spherical nozzle; fuel will flow through it in the future. Make a hole in the sphere; the diameter should be approximately 0.25 mm. Please note that the power of a homemade burner depends on the diameter. The smaller the diameter, the lower the power and vice versa. All difficulties await you in the manufacture of the nozzle. The channel for air passage must be made perfectly smooth. It is necessary that the air hits forward and not against the walls of the nozzle. The best option is to make a hole on a special machine.
But if luck smiles on you and you find a jet with the desired diameter, then do not miss the opportunity and place it in the center of the spherical element. If you can’t find a hemisphere, you can use a small piece of sheet metal with a jet attached inside. As a result, you will receive an oil spray nozzle. Heated fuel will flow into it, and atomization occurs due to the incoming air. When installing such a device in a universal boiler, you get an effective and cheap heat source.
Manufacturing recommendations
There are several useful recommendations that will help in making a burner:
- The hole should be exactly in the center of the sphere, and its axis should coincide with the axis of the air duct. Otherwise, the torch will hit to the side, and this creates additional danger.
- Instead of drilling a hole, you can use a ready-made jet. To do this, a hole slightly smaller than the outer diameter of the nozzle is drilled with a conventional drill, then it is modified manually, and the nozzle is simply hammered inside.
- If there is more than one hole, the distance between them should not be less than 7 mm.
- To ignite, you need to make a hole in the side of the nozzle.
- In the simplest case, fuel should be supplied to the burner by gravity, but a fuel pump can also be used.
- Even a low-power compressor (for example, from a refrigerator) can cope with air injection. The working pressure inside the sphere does not exceed 4 Bar (4 * 105 Pa).
It is not necessary to use a heating element in the design. When starting the burner, you can use a propane torch, hot water, or even an old coffee maker to preheat the oil.
Design
The diesel burner must include the following elements:
- Filter.
- Fuel pump with pressure gauge.
- Fuel preheating chamber with an electric heater located inside it.
- Nozzle.
- Divider.
- Ignition device.
This set of components is the main one.
In addition to it, the burner may also contain other devices:
- flame sensor: signals to the boiler control system controller the need to block the fuel supply when the burner goes out;
- vacuum gauge.
The latter monitors the amount of soot and nitrogen oxide in combustion products.
Using used oil will not only help you save on heating costs, but also recycle waste. Do-it-yourself burner - design and manufacture.
Read about the pros and cons of diesel fuel heating devices here.
If gas is not connected to the house, then it is better to use a diesel boiler to heat the room. Following the link, we will consider the features of a heating system using diesel fuel.
Pyrolysis option
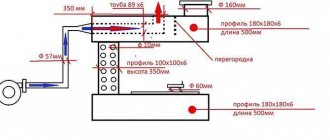
This design is so popular that it is also produced at industrial enterprises. In this case, the oil in the tank is set on fire. As it heats up, it evaporates, the vapors rise up into the combustion chamber (pipe with holes), where they mix with oxygen and continue to burn. In the afterburning chamber (expansion on the pipe) complete and final oxidation (combustion) of all fuel components occurs.
Do-it-yourself boiler: pyrolysis method
For normal operation of the furnace, air is supplied to the container where the oil is located and primary combustion takes place through a special hole with a damper. The position of this damper regulates the intensity of combustion and the temperature in the room. Air must flow freely into the upper combustion chamber. Therefore, a vertical pipe with two tanks is made with a large number of holes.
Waste oil boiler. Drawing with dimensions
Such a stove requires strict adherence to the recommended dimensions and compliance with the specified proportions. If you require a larger unit, increase all parts proportionally.
When installing, a direct chimney is required. Its height to the “crown” is at least 4 meters. Since the stove is not very heavy, the ideal option would be either a metal chimney or a sandwich.
Why can't the proportions be violated? The thing is that the optimal temperature at which all hydrocarbons are burned, and only carbon dioxide, nitrogen and water vapor remains at the outlet is 600 o C. If the furnace produces a temperature of more than 900 o C or less than 400 o C, the exhaust will heavy organic matter will be present. They have a very bad effect on the human body. That’s why it is advisable to strictly adhere to the given proportions: by doing this you guarantee the safety of yourself and those around you.
Everyone loves this stove. There is only one drawback: the small reservoir. Adding fuel while the stove is operating is dangerous, and waiting until it burns out is not always possible. Simply increasing the size of the tank will not work: a large amount of oil will not heat up to the required temperature and will not evaporate. There is one modification that will allow you to prolong the combustion without any problems. All that is needed is to make an additional reservoir nearby, which is connected to the main one according to the principle of communicating vessels.
A stove tank is a way to prolong combustion on one refill
Another modification allows you to remove heat from the upper circuit to heat water. By welding metal pipes into the upper part of the furnace, you get an exhaust furnace with heated water. The photo shows one of the options for such a heat exchanger.
The top of this boiler can be used to heat water
The disadvantage of such a boiler is that it burns out the oxygen in the room very quickly, so a good ventilation system is necessary. In addition, the furnace body heats up to a red glow, the temperature is very high, which requires careful compliance with fire safety standards.
You should definitely take care of the fireproof base on which the stove is installed and protect nearby walls from excessive heating with a metal screen. under which to lay a layer of heat insulation. To ensure that no one accidentally touches the stove, it is also advisable to have a protective fence.
You probably won’t be able to use homemade boilers for testing at home: you can’t leave them unattended for even a minute. Besides, they are unsightly in appearance. But heating a garage, greenhouse or other similar technical room is realistic.
Babington burner for waste oil, home design
Upon closer examination, it turns out that proprietary equipment for dirty and unstable liquid fuel is expensive and somewhat capricious. In this case, Babington burners come to the rescue. The design is not critically complex. Samples made at home on your own are workable. But most importantly, the Babington burner makes it possible to achieve the main goal - to save as much as possible on the most expensive utility - heating.
Why choose a Babington burner
Used oil is difficult to dispose of; some organizations do not know how to get rid of it. Meanwhile, it is an excellent energy carrier, with an average calorific value of 1 kW / liter, i.e. at the level of diesel fuel and gasoline. Drowning with mining, if you get it for free, is extremely profitable. How much money is spent on heating a private house?... It is enough to extract 5 tons of shareware mining and... But the problem of burning it remains.
- The advantage is that the Babington burner can operate on the most contaminated types of liquid fuel. The quality may change even during the direct combustion process, and the energy output may decrease, but the operation of the device remains stable.
- The second advantage is that the composition of the fuel mixture is not regulated. In a normal design, combustion always occurs with an excess of air (oxygen), everything that can ignite burns out.
- Maintenance of the combustion zone is extremely simple or not required, i.e. the burner or nozzle does not fail due to exposure to flame - the equipment is relatively reliable.
How is this achieved in the design?
Disadvantages of a simple mining torch
- The Babington burner contains an air compressor, and often an oil pump (why this may not be discussed below). This requires power supply and maintenance. Therefore, the burner is volatile and also with some probability of technical breakdown.
- The second drawback is that the burner operates with constant power, which is built into its design. The power can be changed stepwise by changing design elements (if any are available), but these are too rough and large values, for example - 22, 35, 57, 70 kW. In fact, the device can only operate in the “heated - stopped” mode, but it must be turned on manually...
- The only way to light a homemade Babington burner is with a torch or blowtorch. You need to apply a flame to the area of the flammable mixture of oil and air to set it on fire. Every time you need to turn on the heating, you need to visit the dirty furnace room. And also to turn it off. But why is everything dirty?
- The entire fuel system with open oil tanks, with possible manual transfer of oil, implies the presence of its vapors, smell, and spills. It is unacceptable for doors from such an aggregate shop to lead directly into the house. Therefore, a specially separate room with an installed Bangbinton burner and a boiler for which it can work is prepared, and the possibility of mechanical pumping of waste from storage tanks is created.
The operating principle of the Babington burner - what is the secret
The principle of operation of an oil burner is the formation of an air stream that hits the flow of liquid and sprays it. Mixing of oxygen and oil occurs directly in the combustion chamber.
But the main secret of the Babington burner - the special uniformity of fuel supply to the combustion zone under the influence of two forces - surface tension and gravity - does not depend on the operation of any mechanisms. The fuel simply flows down the metal surface.
Hence the main advantage - the ability to burn contaminated mixtures. There are no bottlenecks in the path of fuel movement; it is supplied through wide tubes and then falls onto the surface it flows around….
Design Features
The design is based on a hemisphere (ball) through which fuel flows in a wide stream from top to bottom. The hemisphere has a very narrow hole through which an air stream is supplied. The air sprays oil along its path, forming a stream of finely dispersed mixture, which is ignited and burns safely.
Air is supplied to the hemisphere under low pressure (up to 0.5 atm) by a compressor, and oil drains from a pressure equalizer tube (same level with overflow). But the viscosity of the oil should not be high and stabilized. To do this, it is heated in a copper tube, which wraps around the burner in 2–3 turns, which stabilizes the thickness of the flow on the hemisphere, and hence the combustion power.
Productivity (power) is actually determined by the area of the hole in the hemisphere and the thickness of the oil flow (its viscosity), i.e. the volume of oil that the air stream will spray per unit time. Unatomized oil flows back into the tank with a pump or into a sump, depending on the design.
And another important point that is sometimes forgotten: holes are made in the burner nozzle (preferably adjustable), through which secondary air is drawn in, with which complete combustion occurs.
Difficulties of self-production
Hemispheres (balls) for a Babington burner can only be made independently by a highly qualified turner. It is problematic to drill holes of 0.35 mm - for approximately 35 kW of power. Or a smaller diameter of 0.25 mm - by 20 - 25 kW. Or a couple of holes are made - for 70 kW, for example. But the main thing is the alignment of this hole and the direction of the burner, otherwise...
How to make a ball (sphere) for an oil burner can be seen in this video.
In the future, this key detail is framed by all the necessary “who knows what”. To equip the burner, a crosspiece of pipes, sections of pipes, a copper pipe for supplying fuel wrapping around the burner is used, from which it is supplied to the pressure stabilizer…. The simplest additional equipment is an air compressor with a storage tank (stabilized pressure is required), a barrel installed higher for fuel so that it flows by gravity, and the same barrel under the burner where the remains go. You can see one example of such a design...
teplodom1.ru
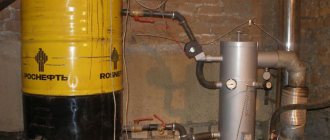
How to store diesel fuel
Fuel tank
Perhaps this is the very first question that faces the owners of a diesel boiler. And it’s true: there are special requirements for storing liquid fuels to ensure your safety.
There are 2 types of tanks for storing diesel fuel:
- open mounting - are plastic barrels made of polyethylene or PVC. Their kit must include a system for collecting fuel from the tank, a sealed lid and a float for determining the liquid level in the tank.
When can they be used? For storing fuel in small country houses, if the planned volume of diesel fuel does not exceed 1000 liters.
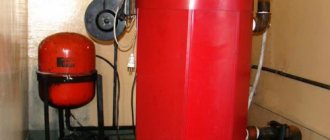
Large fuel storage tank
- closed installation - most often made of galvanized iron, however, recently it has also been possible to use chemically resistant plastic. They are installed in a pre-dug pit, which must be located at a distance of at least 5 meters from the foundation of the house. In this case, the system must be equipped with a pump to supply fuel from depth.
When can they be used? They are indispensable if you are going to store a large amount of diesel fuel (up to 20,000 liters).
Such systems must be equipped not only with level sensors, but also with fuel leakage sensors. Diesel fuel for filling the barrel is delivered by a special service for the sale of fuels and lubricants.
How to choose
When choosing, you need to pay attention to the following characteristics:
- thermal power;
- mass fuel consumption;
- pump performance, suction power;
- power consumption.
Thermal power is the main parameter by which you have to select a burner for a heating boiler. It is indicated in kilowatts and displays the amount of heat released during fuel combustion.
Diesel burners are produced with certain presets with optimal heat release. However, during tuning before commissioning, the actual power can be adjusted over a wide range by selecting:
- nozzle;
- fuel pump pressure;
- amount of supplied air.
When choosing, it is important to clarify the entire possible range of burner power changes, which can be easily determined from the table in the technical documentation.
The mass consumption of fuel depends primarily on the settings of the thermal power of the burner and the quality of the device itself. You can clarify the consumption in the same table where the parameters for adjustment are indicated.
The performance of the pump determines from what depth the device can independently supply diesel fuel. If the diesel fuel tank is located at a level with the burner itself, then the suction power may be low.
For buried underground storage facilities, it is especially important to clarify the maximum depth from which the pump can lift the fuel, even taking into account its increased viscosity at relatively low temperatures. Power consumption determines the amount of electricity required to operate the fan, igniter and burner control unit
Power consumption determines the amount of electricity required to operate the fan, igniter and burner control unit.