Preparatory stage
As a rule, in warm weather the heat supply structure is not used. Therefore, before starting heating in a private house, it is necessary to ensure the integrity and reliability of its elements and carry out a number of preparatory work. Before using a closed heating system, you need to determine the amount of deviation of its actual indicators from the calculated parameters.
According to the rules, preparation for the heating season is carried out in a certain sequence. First of all, a visual inspection of communications and heating equipment is carried out. For the property owner, the first question should not be how to put the radiator into operation. First of all, he needs to make sure that there is no mechanical damage to the device body and check the reliability of its connection to the pipeline.
Also, before starting the heating system, a number of preventive measures are carried out:
- Checking the condition of the smoke exhaust system. To start a boiler, there must be sufficient draft force in the chimney to maintain combustion. For this reason, the internal cavities are cleaned of soot and the integrity of the pipe is inspected. In a brick structure, if necessary, replace damaged elements. Rust, if any, is removed from galvanized pipes.
- Visual inspection of pipes. Without this, running the heating system is dangerous. You need to find out how tight the pipes are and whether there are any cracks or noticeable defects.
- Battery condition monitoring. Before starting heating in an apartment building, the management company must warn residents about this, and they must check the integrity of the radiators. You cannot disconnect individual devices from the heating network. When filling the pipelines, make sure there are no coolant leaks.
This is a list of rules without which the first start-up of the system should not be done. In order for the heating season to start correctly, a number of measures must be taken. A test run of the heating system in an apartment building is carried out 1–2 months before heating starts. It is best for property owners to stay home during this time to ensure there are no leaks.
Filling the heating system with coolant
Previously, it was recommended how to check the heating system in a private house - including a visual inspection of all its components. If malfunctions are detected, individual elements are replaced. Then they begin the process of filling the risers with coolant.
If radiators are not filled with water, a slight rusty coating appears on their walls. Therefore, before filling the heating system, experts recommend cleaning it. If there are liquid residues in the pipes, they should be removed. To do this, use a special pipe located in the lowest point of the heating system; the make-up unit should also be located there.
Then you can begin to solve the problem of how to start the heating correctly. For closed systems with forced circulation of liquid, hydrodynamic flushing is used. To do this, you need to purchase or rent a special pump with filtration and a chamber designed for cleaning agent.
Washing is done in a certain sequence:
- the pump pipes are connected to the system;
- launch and visually monitor the degree of contamination of water that has passed through the pipeline through a full cycle;
- if necessary, change the fluid to a new one;
- flushing procedures are performed several times until the water becomes clear.
Next, pressure testing is done. Before starting the heating radiator, carefully check the condition of its connection to the pipes. Experts advise changing gaskets and keeping the integrity of the couplings under control.
When it is necessary to start a closed system, an increased volume of coolant or air is pumped into the pipeline and thus the reliability of the joining of structural elements and assemblies is checked. In this case, the pressure value should exceed the nominal value by 1.2 times.
The liquid used in the flushing process must not be discharged into the sewer system, as it contains harmful substances that can negatively affect the functioning of the autonomous sewer system.
How should a heating system be checked for leaks?
Checking the heating system for leaks can be carried out either partially (in sections) or throughout the entire system. The system should be checked before connecting radiators, boiler, and plumbing fittings. And when all installation work is completed, it is necessary to check the system again for leaks.
The step-by-step test is described in the instructions supplied with the heating system, but some steps will be the same for almost any system. The test pressure level should be calculated by increasing the operating pressure by 1.5 times. But experts say that performing a test with such pressure is not enough, especially if the pipes are laid in the floor. The system of pipes and couplings can withstand much higher pressure - from 1 to 2.5 MPa. Experts advise testing heating systems (pipes and connections) with this pressure.
To create the required heating pressure, a special hand pump is used. Remember - before starting the test, it is necessary to remove absolutely all air from the system. In manifold systems (on the manifolds themselves), automatic air release valves must be installed.
Checking the system for leaks is carried out in two stages
:
- the first one is “cold”
. In a system filled with water, it is necessary to increase the pressure twice (the interval between the first and second “increase” is 15 minutes) to the initial values. This stage lasts at least 30 minutes. After the next 30 minutes, the pressure in the system must be maintained with a decrease in indicators of no more than 0.06 MPa. After two hours - no more than 0.02 MPa;
- the second stage is “hot”
. The test is performed after the boiler is connected to the heating system. Operating parameters are set at the highest operating level, but the design values should not be exceeded. Remember - a leak test of the system should be carried out after the house has been heated with this system for three days.
The test result is considered positive if no leaks were found during the test.
In the case where the heating system is constructed using plastic elements, it is necessary to ensure that the temperature of the water in the system, as well as the ambient temperature, is constant during testing. Otherwise, due to the peculiarities of the structure of plastic and its high coefficient of thermal expansion, it is possible for the pressure in the heating to increase when temperatures change, even if the heating system is not sealed.
The first stage of testing a system containing plastic elements for leaks is carried out in the same way as when testing other types of systems. But if expansion of the pipes occurred during the test, then the pressure in this case must be slightly increased. Then you should sharply reduce the pressure until half the working pressure is reached and maintain it at this level for 90 minutes. A slight increase in pressure will indicate the tightness of the system.
Pipes for heated floors: how to make the right choice?
Single-circuit and double-circuit heating boilers: what are their features?
Adding coolant volume to the heating structure
The working medium can be ordinary distilled water and antifreeze. Filling is carried out before starting the heating system in a private house, through the make-up unit located at the lowest point. This order is very important, since trying to add liquid through other pipes located above leads to the formation of air locks.
To ensure correct startup of the radiator, check the presence and functionality of Mayevsky taps. To do this, each of them is opened.
Then a certain procedure follows:
- It is necessary to open the air and bleed valves located at the highest point of the structure.
- Next, smoothly open the tap of the make-up unit, while keeping the water pressure low so that air pockets do not occur.
- After coolant begins to flow from the pipes of both valves, they are shut off.
- Mayevsky's taps remain open until working fluid flows out of them instead of air. This point is important, since starting the heating boiler if there are air pockets can lead to damage to the entire system.
If pressure testing has not been carried out previously, it is done during the process of filling with coolant. When starting the heating system, pressure gauges installed on the collectors, safety group, and boiler help control the pressure when filling with water.
Preparing the heating system of a country house for the winter period of operation
After all, the level of comfort in a country house directly depends on the reliable operation of the heating system.
To prevent the cold from taking your heating system by surprise, it is necessary to check in advance and, if detected, promptly eliminate all defects associated with its functioning. Despite the apparent complexity, the check will not take much time and effort. The main thing is to strictly follow all the steps, namely:
- Check the tightness of the heating system circuit.
- Remove air from the heating system.
- Check the functionality of the heating system.
- Check the coolant (replace if necessary).
To check the heating system for leaks, it is filled with water through the drain valve located at the bottom of the heating circuit. This is done so that the water, rising upward under pressure, gradually displaces the air from the system that has accumulated there during the summer months of inactivity of the heating system. The air is released through air vents.
After the heating system circuit is completely filled with water, its supply is stopped and the tap is closed. The water remains in the heating system for at least 1 hour. During this time, it is necessary to bypass the entire circuit of the heating system and make sure that there are no leaks anywhere and that the system is completely sealed. To do this, radiators, pipe connections, and taps are inspected. Moreover, even if no leaks are visible, you should pay attention to the readings of the pressure gauge installed at the inlet. If the pressure in the system drops when the taps are closed, it means that there is a hidden leak somewhere that needs to be found and eliminated.
If there are no leaks and the pressure is stable, we proceed to the second stage - pressure testing of pipes (working pressure in the system is up to 1.5 atmospheres) and test start of the heating system. We start the heating boiler and set the required temperature level. Now we check how the radiators work, whether all sections are heated equally, and whether any leaks have appeared. If it turns out that one or more radiators are not heating, the most likely reason is the formation of an air lock. To eliminate it, we gradually lower the temperature of the coolant, bleed the air and test the system again.
If the system passes the test, it is washed under pressure with tap water to filter and remove debris. Then the liquid is drained and the heating system circuit is filled with a working coolant - water or glycol-based antifreeze.
In addition, when preparing the heating system for the winter period of operation, it is necessary to ensure the efficiency of the heating equipment. If the heating system is built on the gravitational (natural) principle of operation, or outdated pumping equipment is used for forced circulation of the coolant, it is time to think about upgrading the heating system. Moreover, to obtain maximum results with a minimum of both time and material investments, the heating system needs only one part - a modern circulation pump. For example, a pump like ALPHA2 from GRUNDFOS.
ALPHA2 will fit perfectly into any heating system: one- or two-pipe system, a heated floor system, a system with natural coolant circulation, a heating system with radiators equipped with thermostatic valves.
Thanks to the AUTOadapt system, the pump automatically, without user intervention, flexibly adapts to the needs of the heating system and selects an operating mode with minimal energy consumption. This reduces energy costs by 25–30%.
The pump has a low level of energy consumption, which is confirmed by a certificate issued by the European VDE association. According to energy-consuming product design standards, circulators must have an EEI (Energy Efficiency Index) of less than 0.23. Alpha2 series pumps, depending on power, have an index from 0.15 to 0.17. This significantly reduces their energy consumption levels.
Installation (insertion) of the circulation pump is simplified and accelerated thanks to the use of the Alpha plug. To connect the power supply wires, you do not need to remove the terminal box. All you need is to insert a pre-prepared power plug into the plug of the pump control unit.
Installation of the pump is simple and straightforward; just read the instructions. Because the pump can operate at temperatures of the pumped liquid up to +110°C; it can be installed both on the supply part of the pipeline and on the return part, directly in front of the boiler.
Conclusion: by promptly preparing the heating system for the beginning of the winter season and installing the ALPHA2 circulation pump, you can ensure a qualitatively different level of operation of heating equipment.
You can find out more about Grundfos heating pumps here.
Useful information for installers is here.
As an advertisement
First start of the heating boiler
The sequence of actions when starting the boiler for the first time before the start of the heating season largely depends on the model of the device and its type, but it requires a visual inspection. This is one of the important stages that precedes the final start of heating in the house.
The heat exchanger is the most vulnerable component of the unit. Checking it is a must, since during operation it is constantly exposed to high temperatures. Simultaneously with starting the radiator, inspecting the boiler is one of the most important tasks of the preparatory stage.
A gas boiler
To live in a house in comfort, you need to know how to properly start the heating system if the water is heated by a gas boiler. For different models of units, the startup sequence is different, which is due to differences in their design.
This especially applies to condensing devices, in which condensate must form correctly during operation, because without it, heating the secondary heat exchanger is impossible.
To correctly start heating with a gas boiler, after filling the system with liquid, you need to perform certain actions:
- The valve located at the bottom of the unit should be opened to prevent liquid from entering the circuits, since it is usually closed after the end of the heating season. As a result, the pressure gauge readings change, and the pressure value cannot exceed 3 atmospheres.
- When the coolant has heated up, open the make-up valve again. In order to remove the remaining air pockets, Mayevsky cranes are used. During this procedure, the pressure decreases slightly.
- In reality, the radiators have to be started 2 times - when filling with hot water and when turning on the boiler.
- The correct operation of the unit is monitored using the values that appear on the dashboard.
If you strictly follow the instructions for starting the heating system, it will maintain a stable temperature without pressure surges in the pipelines.
It is advisable that the first start-up of a gas boiler is carried out by employees of specialized service centers for servicing this heating equipment. It also doesn’t hurt to know what to do if the gas boiler blows out with the wind, in order to solve such a problem if necessary.
Checking heating system elements
Without the correct functioning of all components of the heating system, it will not be possible to start it correctly. First of all, you need to check the operation of measuring devices - thermometers and pressure gauges.
It is also necessary to check the functioning of the protective elements. The system may not start if the bleed valve or air vent seats do not move due to limescale or rust. For this reason, each of them is opened manually.
The pressure of the air chamber controls the expansion tank; it must exceed the nominal value in the system by 5-7%. If the design of the tank allows you to change the membrane, it should be disassembled and checked in what condition it is.
The cost of the service for launching a heat supply system in a private household depends on many factors and is determined individually.
Water heating in a modern home is a complex system that must work reliably and uninterruptedly. However, there are a number of reasons why a failure occurs, such as installation errors, equipment wear and tear over time, etc. All these factors can affect the tightness of the circuits and cause malfunctions. To find the damaged area, a pressure test of the entire water heating system is required. How is this manipulation performed in a private (country) house and is it possible to do it with your own strength and hands? What level of pressure should it be? You can read about all this and watch the video.
Pressure testing - what is it?
Pressure testing of a finished water heating system is a test of tightness and assembly quality. Whether the system can be put into operation or not depends entirely on the results of such a check. This is the first procedure that needs to be carried out after installation and before turning on the heating.
At its core, it is control without destruction. Air or water is pumped into the system, thereby creating increased pressure. If there are no leaks, you can safely put the system into operation.
Pressure testing is also carried out when checking an already operating system. After all, leaks often appear at the places where parts are connected using fittings, soldering or welding. The pipes themselves may also suffer, for example, from mechanical stress or corrosion. High temperature and pressure also cause gradual wear of pipes and parts of the water heating system. To detect and eliminate the location of the flaw, crimping is required.
This is a set of measures through which not only the heating system, but also the hot water supply, sewage system, and pipes in the water well can be checked in a private home.
The crimping procedure includes:
- pipeline testing and flushing;
- checking and, if necessary, replacing parts;
- restoration of damaged insulation.
The following are tested under high pressure:
- strength of housings, as well as walls of pipes, radiators, heat exchangers and fittings;
- fastening when connecting the elements that make up the system;
- maintenance of taps, pressure gauges, as well as gate valves.
What is crimping
In theory, heating and water supply systems are a multi-component structure and require a large number of different special equipment for installation, maintenance and repair. In order to avoid problems and identify weak points in the system, pressure testing, or hydraulic testing, is used.
Source: nastroikezhenshinenemesto.ru
How does it work? Depending on the material and type of pipes/radiators, as well as the specifics of the system, liquid is injected and the required load is selected - from 25 to 80%. Using a pressure gauge, you can clearly monitor the level of hydraulic load on the system and, by increasing the indicators, identify problems in connections, places of depressurization, carry out repair operations and replace equipment, fittings, gaskets and other elements. In addition, pressure testing will help free the pipeline circuit from insoluble particles clogging the system.
Advice: it is recommended to carry out pressure testing of central heating only after the end of the heating season or after major repairs and replacement of the main elements of the system.
Autonomous systems in apartments and private houses are pressure tested according to a similar principle; for this it will be enough to start the water, but heating systems should be checked completely before operation.
Important: when making major repairs and hiding pipes under false walls, floors or suspended ceilings, you must carefully check the pipes and make sure there are no defects.
The main task of hydraulic and pneumatic heating testing in a private house is to prepare the room for the heating season and operation, therefore compliance with the sanitary and technical conditions of the system plays an important role.
Is it possible to perform a full range of crimping work with your own hands? The process does not require special knowledge and practice; it is enough to theoretically familiarize yourself with the rules and think through the sequence of work. As for expensive equipment and tools, they can be rented.
The hydraulic test is most often used. To carry out this, you will need to connect a water pump (electric or manual) to the heating system, install a pressure gauge in the heating circuit and determine the upper limit pressure twice the operating pressure. The process is simple and completely doable with your own hands.
Pneumatic testing, that is, pressure testing of heating with air, is also used and practiced by experienced specialists. It is most effective when checking the tightness of individual system components, such as heating panels, radiators, heat exchangers, etc. An air compressor or car pump is suitable for testing, since the required pressure parameters are quite small, only 0.1–0.15 MPa is required .
When installing a heating system, pay attention to the technological and operational characteristics specified in the product data sheet. The document may indicate the preferred method of testing and crimping.
Existing methods for pressure testing a heating system
Pressure testing with water . With this method, a hose running from the water supply is connected to a tap located on the collector or boiler. After filling the system with water, the pressure level should reach operating figures - 1.5 atm.
Pressure testing with air . With this method, a pressure tester is connected to the system - a compressor that pumps air. The pressure in the area being tested should become greater than the working pressure, which is usually 1.5 - 2 atm. In this case, an adapter is installed in place of the Mayevsky tap, designed to connect a compressor.
Advice. In order not to specifically purchase an expensive pressure tester, when carrying out independent work to check a small area, you can use a car pump with a pressure gauge.
Air pressure testing is carried out when it is not possible to connect to a water supply system, as well as in winter, when there is a possibility of water remaining in the pipes with subsequent freezing. When working with air, the integrity of the system is determined using pressure gauge readings. If the discharge pressure is kept at the same level, there are no leaks. To visually detect fistulas, a soap solution is applied to the suspected areas.
Heating system measurements
When inspecting the heating system, it is necessary to carry out at least the following measurements:
- network water consumption,
- network water temperature,
- average air temperature in heated rooms,
- network water pressure.
Water consumption for the heating system is determined in one of the following ways:
- directly using flow meters,
- by the known diameter of the elevator nozzle and the measured pressure difference in front of the nozzle and in the suction pipe of the elevator,
- based on measured temperatures before and after the heating system by comparing them with calculated values.
With an independent connection scheme, we measure the temperature of the heating and heated coolant at the inlet and outlet of the heat exchanger.
We measure the air temperature in several rooms located on different floors and oriented to different cardinal directions to be able to estimate the arithmetic mean air temperature in the building.
This temperature is needed for subsequent comparison of the actual and calculated loads of the heating system.
We measure the pressure at the inlet and outlet of the heating point, before and after the heating system, and for an independent heating system, also before and after the heater.
Since the daily heating load schedule is quite stable, measurements of coolant parameters are carried out throughout the day with an interval of 2–3 hours.
All measurements are carried out over several days with different outside air temperatures and, accordingly, network water temperatures.
How does the crimping process work?
- Preparing the system before pressure testing. If the system is autonomous, then the heat generator is turned off first. If not, then taps are used to close off the area where inspection is required. The coolant must be drained.
- The system circuit is filled with water having a temperature of no higher than 45 C. The air is gradually released.
- The compressor is connected and air begins to flow into the pipes.
- At the beginning of the procedure, the pressure is brought to the working level and the area is visually inspected for violations. Then the pressure is gradually increased to the test level - this is maintained for at least 10 minutes.
- The area or the entire system is inspected for leaks at the connections. It is mandatory to visually inspect fittings, radiators and the entire length of pipe walls for fistulas. If deviations are detected, all defects and shifts are recorded. The operation of taps and valves is checked.
- Using pressure gauge readings, the drop in pressure level is determined. If it has not decreased, the system is in normal operating condition.
- Based on the results of the inspection, a report is drawn up.
Pressure in pipes during crimping process
The test pressure level, as recommended by building codes and regulations (SNiP), should be 1.5 times higher than the working pressure, but not lower than 0.6 MPa. According to the rules of technical operation of heating networks - 1.25 times higher than the working one and not lower than 0.2 MPa.
In a private house with up to three floors, the pressure usually does not exceed 2 atm. When it is exceeded, a special valve is activated and a reset occurs. In five-story buildings the pressure is 3-6 atm; in buildings from 8 floors - 7-10 atm. The maximum test pressure level depends on the characteristics of the constituent elements of the system: pipes, radiators, fittings, etc.
Plastic parts inspection process
When testing, it is necessary to consider whether there are plastic parts. This is explained by the fact that the thermal expansion of plastic has high rates, which means that the temperature of the water in the system and the surrounding temperature must be constant. If the temperature changes and the seal is not maintained, the pressure in the heating system will still increase.
When testing equipment, the pressure should be increased to a value that is approximately 1.5 times higher than the working pressure, then hold it for 30 minutes. If expansion is observed in the pipes, then it is necessary to slightly pump up the pressure level, and then continue checking, maintaining constant values. After 30 minutes, you can sharply lower the value to a level that is half the working level, keeping it in this way for 90 minutes.
Related article: Plastic entrance doors: photos in private houses
If a slight increase is observed, this does not indicate expansion in the pipes, but the tightness of the entire system. When carrying out checks, many experts recommend repeatedly reducing and increasing the pressure level so that you can accurately say about the performance of the entire heating system and the ability to accept any load (limited by the values specified by the manufacturer).
Checking the heating installation is carried out using various methods, including increasing/decreasing pressure in the pipes. When performing such work, it is necessary to follow the instructions exactly to avoid ruptures or leaks. In this case, certain factors should be taken into account that have a strong influence on the inspection process, for example, the material of pipes. Only after making sure that everything is in perfect order can you begin operation without worrying about sudden leaks.
The best posts
- Cold smoked smokehouse
- Advantages of acrylic putty over other existing mixtures
- Cozy DIY candlestick from a jar
- Do-it-yourself laminate wall finishing: cladding on lathing
- Interior of opinion leaders: how do bloggers really live?
- Stone garden paths: made of concrete, brick, pebbles, gravel, tiles and more (40 photos)
- Is it possible to make a balcony if there is none: all the pros and cons
- How to seal a leak in a radiator?
Crimping: how to do it yourself
Often, when building a private house, the heating system is installed before the water is connected. Therefore, a large water container and a submersible pump are used to pump water into the pipes. During the manipulation, you need to constantly monitor the pressure using a pressure gauge and control the water level in the container, gradually adding it if necessary.
When the pressure readings rise to 2-2.5 atm, the pump is turned off, and the remaining air is gradually released from the system using Mayevsky taps. Further, after the mark on the pressure gauge drops below 1 atm, filling with water continues. This is done until the water completely displaces the air and the pressure reaches a level of 1.2-1.5 atm.
If no leaks are detected, you can connect the boiler and start the system.
For such an important event as crimping, it is better to hire a team that has the appropriate license. These people are fully responsible for the actions performed. In this case, the customer receives all the necessary documents about the work performed.
Attention! The report on the pressure testing carried out must include the time during which the system was under test pressure and indicate its level.
Pressure testing of a heating system is a matter that requires a serious approach. This operation should be carried out with your own hands only in extreme cases.
Checking the heating system
To be sure of the reliable operation of your heating system in the autumn-winter period, it is necessary to check in advance its technical condition and the functionality of all components. In this article, we do not suggest that you arm yourself with special plumbing tools and devices; it will be enough to independently perform an inspection and small routine operations to adjust and configure it. The heating system , like any hydraulic device, requires constant monitoring for timely detection and elimination of faults. The boiler is its main element, however, its other elements must work reliably and be in good working order. Here we will look at these components.
Water level and pressure in the system
We check the pressure of the heating system according to the readings of the pressure gauge installed on the pipeline. If the pressure corresponds to 1-1.5 atm (100-150 kPa), then the water level is at an acceptable level and there is no need to add it. When the pressure is below the specified value, it is necessary to add water to the system. It is impossible to add cold water to a heated boiler, since when it comes into contact with heated components, the latter quickly cools, and as a result, the formation of microcracks, which over time render the working element unusable. Low pressure and low water level in the heating system, when the water is not drained, indicates that there are leaks somewhere. They need to be identified immediately. Leaks most often occur at pipeline connections. Minor coolant leaks are allowed as they are inevitable.
Removing air
To remove air from the heating system, special air valves are provided, which must be turned slightly counterclockwise with a screwdriver, key, or hand (if you have a special handle). First, the air comes out with a hiss, and after a while the water comes out. It is necessary to hold the air valve open until there is no air at all and only water flows out.
When removing air, you should have a small container of water and a rag on hand to wipe everything dry. Where there is no air valve, air in the heating system was removed by unscrewing the valve at the top point of the pipeline. This procedure should be performed with caution, having one more valve in stock, since under mechanical stress the valve may crack and fail. You should only unscrew the valve to remove air if you are sure that this is the reason - the system has returned to normal parameters, and the radiator (battery) is cold. Air valves can be located in the boiler room itself, where air is removed automatically and no human intervention is required. However, it makes sense to check them too before the heating season - by pressing the valve located under the cap of the float mechanism. If the air valve is working properly, water will appear after pressing.
Pressure testing of the heating system: video
In the question: what should be the pressure in the heating system in a private house - every homeowner should have a good understanding.
After all, not only the efficiency and performance of the circuit, but also its integrity depends on this parameter.
In this article we will consider this issue in detail and understand the reasons for the deviation of pressure from the norm.
Crimping process
The pressure for pressure testing is selected based on the technical characteristics of the materials, radiators and the state of the system in the house
. The pressure used in the heating system is selected depending on its purpose and type of equipment. For crimping input nodes, a pressure of 16 atm is used, for the heating system of a multi-storey building - 10 atm, for a private house - 2-6 atm.
When performing pressure testing, the wear and tear of the building and heating system should be taken into account. In new buildings, the test is carried out with a pressure exceeding 1.5 - 2 times, and in dilapidated houses no more than 1.5. If the heating radiators are made of cast iron, during the test the pressure cannot exceed the limit of 6 atm. For convectors this value is 10 atm.
The decisive criterion when choosing pressure during system testing is the parameters reflected in the technical data sheet of the equipment. The “weakest” part of the system is taken as the starting point.
Sequence of work
Crimping occurs according to a single algorithm, which looks like this:
- If work is carried out in a private house with autonomous heating, the boiler is turned off. Turn off the section of the heating system to be checked.
- Drain the water.
- The pipeline is filled with water whose temperature does not exceed 45 degrees. While filling is taking place, air is removed from the system.
- Special equipment is connected to the system - a heating pressure tester, with which the pressure is pumped up to the operating level. At the same time, a visual inspection of the area being inspected is carried out.
- Carry out a gradual increase in pressure to the value specified in the test plan. Perform a visual inspection of the system for leaks and damage.
- The resulting value is recorded for 10 minutes using a pressure gauge. The readings are recorded. If it remains unchanged, then the system is sealed and ready for use.
The pneumatic testing method is used if the hydraulic method cannot be used. For example, at sub-zero temperatures. The reference point for identifying a leak in a pipeline is the readings of the pressure gauge. Places of possible leakage are determined by treating them with a soap solution.
What pressure in the heating system of a private home is considered normal?
First of all, you need to know that the pressure in any heating system should not exceed the strength threshold of its weakest component.
Typically these are boiler heat exchangers.
The most durable of them can withstand pressures of up to 3 atmospheres or bar.
Pressure is often indicated in MPa (megapascal). The correspondence of the values is as follows: 1 atm = 0.1 MPa.
Fittings and radiators are generally more durable. For example, a cast iron radiator can withstand a pressure of 6 atm.
The answer to the question of what pressure can be considered normal for a particular heating system will depend on its type. The simplest type is systems with natural circulation of coolant, also called thermosiphon. In such a circuit, the coolant moves only due to convection. This phenomenon is caused by gravity, which is why such systems are also called gravitational.
The pressure in a thermosiphon system depends only on the height of the water column, that is, on the difference in height between the lowest and highest points. This pressure is called static. A height difference of 10.34 m creates a pressure of 1 atm at the lowest point. Thus, a boiler tank designed for 3 atm can only collapse if the system rises 10.34 x 3 = 31.02 m above it.
Heating system with expansion tank
Once again, we draw the reader’s attention to the fact that the static pressure in the heating system is maximum only at the lowest point. In the direction from bottom to top, it gradually decreases and at the top point it becomes equal to zero.
The actual pressure at the top point of the liquid volume is equal to atmospheric pressure, but we are interested in the so-called excess pressure - it is precisely this that is equal to zero.
Since there is no excess pressure at the top point of the circuit, the expansion tank installed here can look like a simple open container. Therefore, such systems are also called open.
If the heating system is equipped with a circulation pump that pumps coolant, it must be made closed.
Pressure test
Pressure test diagram.
What is a heating system pressure test? This is a test for tightness, that is, the absence of leaks during the operation of the heating pipeline during the heating season. For different systems, this process may differ in small details, but the general scheme of the test remains the same.
The test is carried out with an initial pressure approximately 1.5 times higher than the operating level. For example, if the working level is 1 atm, that is, 0.1 MPa, then the level for testing should already be 1.5 atm. For other values, the pressure at the test time is determined in exactly the same way, that is, the working pressure must be multiplied by 1.5 times.
Experts advise taking into account that the general system with couplings in pipes can withstand even greater pressure; for many heating devices it can be increased even to 2.5 MPa without damage to the equipment.
Carrying out such work is only possible if all the elements of the heating system are not built into the wall surface; a strong increase in pressure is only used for the open heating system of the house.
Pressure is supplied to the pipes using a special pump, usually a manual one. In this case, air must be completely removed from the pipes, since even its small presence can signal a depressurization of the pipe. We repeat, the heating installation must be completely filled with water; air pockets are not allowed.
For manifold installations, air vent valves should be installed. In the section of pipes where the pressure is the highest, it is necessary to install a special pressure gauge. This is usually the lowest point for the entire heating installation. Next, the process is divided into 2 stages; we will consider them in more detail. What should a heating test be like: stages of testing Testing heating systems consists of 2 stages that allow you to maximally check the condition of the equipment and its readiness for operation. The first stage of verification is to perform the so-called cold process. The heating installation is filled with water, after which it is necessary to increase the pressure to the initial position within 30 minutes (at intervals of 10-15 minutes).
Related article: How to make a corner computer desk with your own hands
After every 30 minutes, the pressure should not drop below 0.06 MPa. After 120 minutes of testing, it should not decrease by more than 0.02 MPa. After the check is completed, it is necessary to carefully inspect the condition of all connections in order to fully ensure that there are no possible leaks.
The second stage of pressure testing is carried out in the so-called hot form. In the first case, the water was cold, now hot water is poured in, its temperature should be close to the working temperature. The test begins with the boiler, that is, a heat source, being connected to the heating system. This can be any equipment that is used as a source of coolant. After this, all parameters in the system are set at the maximum operating level, but care must be taken to ensure that the pressure does not exceed these permissible values.
Before starting testing work, the house should be heated for 3 days - this is one of the mandatory conditions for testing. If no leaks are observed during filling with hot water, then we can assume that the heating system test went well.
Pressure in a closed heating system
The circulation pump creates increased pressure in the section of the pipeline located behind it, thereby providing a number of advantages:
- The maximum length of the circuit becomes virtually unlimited (for a circuit with natural circulation - no more than 30 m). You just need to select a pump with sufficient power and devices with sufficient strength (in the area with the highest pressure).
- Smaller diameter pipes can be used.
- Radiators can be connected in series (single-pipe circuit).
- If the radiators are connected in parallel (two-pipe circuit), then with a circulation pump the heat distribution in the circuit will be more uniform.
- Since the coolant moves faster, it does not have time to cool down much, which means the boiler operates in a gentle mode.
- A system equipped with a circulation pump can be operated in low temperature mode, which may be required during the off-season. In a thermosiphon system, under such conditions, the convective flow will not be powerful enough to push the coolant through all the pipes and radiators.
The pressure developed by the circulation pump is called dynamic.
Closed heating system
Obviously, it must meet two requirements:
- Be no more than the value specified in the instructions for the boiler and other devices.
- Have power sufficient to overcome the hydraulic resistance of the heating circuit, which depends on its duration, configuration (single-pipe with series connection of radiators or two-pipe with parallel), pipe diameters and coolant movement speed. The user does not need to make complex calculations linking all these parameters. He just needs to adjust the pump power so that the temperature difference between the supply and return is not too large - usually 20 degrees.
In private homes, circulation pumps usually develop such a pressure that, combined with the static pressure (which does not go away), it amounts to 1.5 - 2.5 atm. As you move away from the pump, the dynamic pressure, “eaten up” by the hydraulic resistance of the circuit, gradually drops, while remaining quite high.
What to do if the pressure in the heating system drops
Pressure in the expansion tank.
When operating autonomous heating systems, the most common emergency situations are those in which the pressure gradually or sharply decreases. They can be caused by two reasons:
- depressurization of system elements or their connections;
- problems with the boiler.
In the first case, the location of the leak should be located and its tightness restored. You can do this in two ways:
- Visual inspection. This method is used in cases where the heating circuit is laid in an open manner (not to be confused with an open-type system), that is, all its pipelines, fittings and devices are visible. First of all, carefully inspect the floor under the pipes and radiators, trying to detect puddles of water or traces of them. In addition, the location of the leak can be identified by traces of corrosion: characteristic rusty streaks form on radiators or at the joints of system elements when the seal is broken.
- Using special equipment. If a visual inspection of the radiators does not yield anything, and the pipes are laid in a hidden way and cannot be inspected, you should seek the help of specialists. They have special equipment that will help detect leaks and fix them if the home owner is unable to do this themselves. Localizing the depressurization point is quite simple: water is drained from the heating circuit (for such cases, a drain valve is installed at the lowest point of the circuit during the installation stage), then air is pumped into it using a compressor. The location of the leak is determined by the characteristic sound that leaking air makes. Before starting the compressor, the boiler and radiators should be insulated using shut-off valves.
If the problem area is one of the joints, it is additionally sealed with tow or FUM tape and then tightened. The burst pipeline is cut out and a new one is welded in its place. Units that cannot be repaired are simply replaced.
If the tightness of pipelines and other elements is beyond doubt, and the pressure in a closed heating system still drops, you should look for the reasons for this phenomenon in the boiler. You should not carry out diagnostics yourself; this is a job for a specialist with the appropriate education. Most often the following defects are found in the boiler:
Installation of a heating system with a pressure gauge.
- the appearance of microcracks in the heat exchanger due to water hammer;
- manufacturing defects;
- failure of the make-up valve.
A very common reason why the pressure in the system drops is the incorrect selection of the expansion tank capacity.
Although the previous section stated that this may cause increased pressure, there is no contradiction here. When the pressure in the heating system increases, the safety valve is activated. In this case, the coolant is discharged and its volume in the circuit decreases. As a result, the pressure will decrease over time.
Pressure control
For visual monitoring of pressure in the heating network, dial pressure gauges with a Bredan tube are most often used. Unlike digital instruments, such pressure gauges do not require electrical power. Automated systems use electrical contact sensors. A three-way valve must be installed at the outlet to the control and measuring device. It allows you to isolate the pressure gauge from the network during maintenance or repair, and is also used to remove an air lock or reset the device to zero.
https://youtube.com/watch?v=nV52-7Vu7DI
Instructions and rules governing the operation of heating systems, both autonomous and centralized, recommend installing pressure gauges at the following points:
- Before the boiler installation (or boiler) and at the exit from it. At this point the pressure in the boiler is determined.
- Before and after the circulation pump.
- At the entrance of the heating main into a building or structure.
- Before and after the pressure regulator.
- At the inlet and outlet of the coarse filter (sludge filter) to control its level of contamination.
All control and measuring instruments must undergo regular verification to confirm the accuracy of the measurements they perform.
Reasons for the drop in performance
A decrease in coolant pressure in the heating system may be due to one of the following reasons:
There are leaks
Part of the working environment can leave the system in several ways:
- Through a crack in the expansion tank membrane. The leaked coolant remains inside the tank, so the leak is hidden. To check, you need to press your finger on the spool, through which air is pumped into the expansion tank. If water flows from it, the assumption can be considered confirmed.
- Through a safety valve when the coolant boils in the boiler heat exchanger.
- Through microcracks in devices (special attention should be paid to areas affected by rust) and loose connections.
Air was released from the coolant, which was then removed through an automatic air vent
In this case, the pressure drops soon after the system is filled. To avoid such problems, water should be deaerated before pouring into the heating circuit, which reduces the amount of dissolved air by 30 times. It is also very important to fill slowly, from the bottom and only with cold water.
The heating system contains aluminum radiators
Water that comes into contact with aluminum breaks down into its components: oxygen reacts with the metal, forming an oxide film, and the hydrogen released is removed through an automatic air vent.
This phenomenon is observed only in new radiators: as soon as the entire surface of the aluminum is oxidized, the water decomposition reaction will stop.
The user will need to make up for the lack of coolant, and will no longer have to deal with this problem.
Reasons for a sharp increase in pressure
There may also be several reasons causing an excessive increase in pressure:
- Boiling of the coolant in the boiler tank (this sometimes happens in solid fuel boilers, the thermal power of which cannot be reduced too quickly).
- Formation of a difficult-to-pass area, for example, due to the appearance of an air lock, scale overgrowing of pipes or clogged filter. In front of such a section, a backwater appears, the pressure in which may be too great.
The gasket in the make-up valve may wear out or become jammed, as a result of which the pressure in the heating circuit reaches the same value as in the water supply system.
Control methods
The pressure in the system is monitored using pressure gauges. They should be installed at the following points:
- At the entrance to the boiler and at the exit from it (modern heaters have built-in pressure gauges).
- At the lowest and highest points of the system (for houses with several floors).
- In branching areas: after tees, in manifolds, after two- and three-way valves.
Pressure gauges allow you to monitor pressure visually. And to reset it at a critical value, safety valves are used. Such a device must be installed on the supply pipeline immediately after the boiler - the working medium is discharged through it when it boils in the heat exchanger.
Typically this safety valve is classified as a so-called safety group, which also includes a pressure gauge and an automatic air vent. In addition, diaphragm expansion tanks are equipped with relief valves.
In addition to relief valves, bypass valves are used. Such a valve is installed on the bypass, through which the coolant can bypass the circuit. If a blockage or air lock forms somewhere in the circuit, and because of this, backpressure (increased pressure) occurs in the previous section, the bypass valve is activated. The pump begins to pump the coolant through the small counter “boiler - bypass - pump - boiler”.
Without such a fuse, the pump would be overloaded due to the formation of backwater and would soon fail.
To ensure proper coolant pressure in the system, it is necessary to maintain the correct pressure in the air chamber of the expansion tank. Typically it is 1.5 atm. If the value is lower, the membrane may rupture; if it is higher, the coolant pressure will also increase.
Leak test
To check the tightness of pipelines, a procedure called pressure testing is performed.
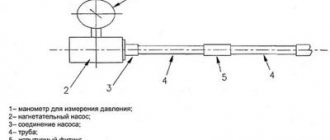
- A pressure tester - a pump with a pressure gauge - is connected to the emptied system through a special pipe.
- Air is pumped into the system until its pressure exceeds the operating pressure in the heating system by 20%.
- The system is left under pressure for several hours. If it falls, then the system is leaking. Leaks can be detected by the hissing of air or by applying soap foam to the connections.
Pressure testing of heating systems of private houses, with a relatively small volume, can be performed using inexpensive manual pressure testing machines.
Uneven heating of the heated room
In order to solve this problem, we take temperature measurements along the perimeter of the room or building.
The main reason for uneven heating of the room:
- Heating devices are placed incorrectly.
- Contamination of pipelines and radiators.
- The appearance of air pockets in the heating system.
Solutions:
- Flushing the heating system with acid solutions.
- Replacement of heating devices.
- Reconstruction of the heating system.
If you have questions or need help, call 8(499)490-60-60. We will advise, help, and advise.
Possible faults and corrective actions
Significant pressure drops in the heating system when the boiler operating temperature changes can be caused by incorrect calculation of the volume of the expansion tank and the pressure in its air chamber.
Leaks are usually found at threaded connections and are due to insufficient sealant. It will be easier for a beginner to achieve the tightness of such a connection using the Tang it Unilock sealing thread. In case of some “overdose”, unlike tow, it does not cause destruction of the screwed-on part.
In polypropylene pipelines, leaks often occur due to improper welding technology.
For example, some users weld pipes without a coupling - just butt welding.
Such a connection is very short-lived and breaks down very quickly under pressure.
Incorrectly made or defective connections must be cut off and replaced with high-quality ones.
If the water used as a coolant has not been desalted, the heat exchanger will have to be descaled over time. To do this, the boiler is disconnected from the heating circuit and washed with special reagents, for example, Antiscale. The entire heating system can be subjected to such flushing, but due to its complexity, this task should be entrusted to professionals.
Spring safety valves can stick, so they must be opened periodically using a special lever.
In the USSR, the issue of reducing the cost of construction, including the organization of the heating system, was especially relevant. It was at that time that the Leningradka heating system for private and apartment buildings was invented. Let's consider whether it is relevant today.
In what cases is a hydraulic arrow needed for heating and how it functions, read this article.
Testing and acceptance of heating, ventilation and air conditioning systems into operation
Reliable and efficient operation of heating, ventilation and air conditioning (HVAC) systems depends on the quality of the design, installation and operation. The presence of errors at any stage of the systems life cycle can significantly affect the indoor microclimate parameters and, as a result, human well-being and productivity.
The main stages in the operation of HVAC systems are:
- adjustment, adjustment and adjustment of operating modes;
- acceptance into operation;
- Maintenance.
They can be divided into documentary and technical (practical) parts (Table 1). That is, this is the maintenance of documents that allow us to highlight and delimit the areas of responsibility of the performers, and the actual work associated with setup, adjustment, repair, etc. Documents increase the level of responsibility of work performers.
In this article we will talk about the process of accepting heating, ventilation and air conditioning systems into operation.
Commissioning of HVAC systems is usually carried out after completion of installation or major repairs. Actually, the acceptance process is the transfer of the heating system by the installation contractor for operation to the customer. This process is similar to buying any thing, all the details are important here: quality, price, appearance, etc.
Also important when accepting HVAC systems is:
- availability of technical and operational documentation (approved projects with working drawings, explanatory notes with changes adopted during installation, acts and protocols justifying the changes adopted, acts of hidden work, acts of pre-launch tests and system adjustments);
- quality of work performed;
- compliance of the installed system with the design;
- efficiency of the system (indoor microclimate).
If changes were made during installation work, it is advisable to coordinate them with the design organization and the customer.
Before the representative of the customer and the contractor get together and sign the acceptance certificates, it is necessary to carry out all the necessary activities. The main activities associated with the adjustment and adjustment of heating, ventilation and air conditioning systems are: comparison of design and actual indicators; tests; adjustment; setting operating modes; control of indoor microclimate parameters.
So, let’s sum up the interim results when accepting HVAC systems into operation and note the important actions.
1. Necessary testing and adjustment of systems. They will ensure a uniform and required microclimate in the premises, which means good health and mood of the customer.
2. Checking the quality of the installation performed. Poor-quality installation can be immediately visible by a number of signs: it is impossible to adjust the system, bring it into working mode, it is inoperable, has a terrible appearance and naturally causes aesthetic discomfort. If the installation mistakes did not show themselves initially, then problems will appear in the future, for example, due to the presence of leaks.
Poor installation means inoperability or poor performance of the system and guarantees dissatisfaction of the customer, who spent money and, under the most unfavorable circumstances, wants to return it.
3. Registration of the process of commissioning HVAC systems. Signing the acceptance certificate, which is the milestone after which the performer of the work receives money and a burden of responsibility for the performance of the system.
Tests of ventilation and air conditioning systems are carried out when they are put into operation, after installation, overhaul and during the operation of these systems. The frequency of periodic testing depends on the purpose of the premises (and the requirements placed on them) that serve the systems.
The purpose of any test is to test something under “extreme” conditions - increased load, pressure, temperature, flow, etc. The minimum goal of this activity is to determine whether the system being tested works. In relation to heating, ventilation and air conditioning systems, the inspection is carried out in order to evaluate their parameters. Moreover, from the point of view of operation, the main quality is efficiency. For example, in heating systems, efficiency is determined by a comfortable temperature, in ventilation systems - by the cleanliness of the air and its standardized mobility. The criteria for evaluating air conditioning systems are comfortable temperature, relative humidity, cleanliness and standardized air mobility. If these parameters do not correspond to comfortable ones, then the system is ineffective or ineffective.
In table 2 presents a general classification of HVAC system testing.
In accordance with [1, 2], tests are classified according to the following main characteristics:
- by purpose - pre-launch, acceptance, operational;
- content - technical and efficiency;
- by volume - individual, autonomous and complex.
Pre-launch tests precede the commissioning of systems and are necessary primarily to check the operability of the system, compliance of the actual operating modes with the design ones and for setting up the systems. This may include: hydraulic, thermal tests of heat exchange equipment (air heaters and air coolers), individual tests of equipment, etc.
Acceptance tests are needed to verify the operation and efficiency of systems. They are carried out by a special commission. Based on the test results, an acceptance certificate is drawn up.
Operational tests are carried out primarily to check and monitor the operating status of systems. Based on the results of these tests, operational adjustment of the system can be carried out.
Technical tests are aimed at recording and monitoring the main indicators of the system.
Efficiency testing is a test of compliance between actual and required microclimate parameters.
Individual tests are a test of the technical characteristics of a piece of equipment.
Autonomous tests check the technical characteristics of the system.
Comprehensive tests are carried out to verify the effectiveness of the entire complex of systems. Technical testing of HVAC systems includes:
- hydraulic (hydrostatic) heating systems and other piping systems; the purpose of these tests is to control the tightness;
- thermal testing of heating systems is monitoring the uniform heating of heating devices and the temperature difference of the coolant;
- aerodynamic testing of ventilation and air conditioning systems - testing directly the ability to provide the required air distribution throughout the premises and the tightness of the air ducts.
The presented list is far from complete - measurements of other system parameters (temperature, pressure, flow, speed, concentration) were “left out of the picture”.
We will provide a detailed description of these and other tests in subsequent articles. As you can see, the process of accepting systems into operation is important for both the customer and the contractor. After all, high-quality work on setting up systems is the key to the success of the people in the room, the customer, as well as the success of those performing design and installation work.