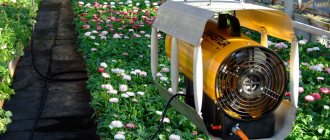
Halogen lamp heater
The simplest stove is assembled using just one 1 kW halogen lamp.
To do this you will need three things:
- sealed metal container or galvanized barrel, can, etc.
- brick
- 1000W halogen
Place this lamp inside the container on a brick and close it, so to speak, “the blower.”
The heating temperature of the surface of the walls with a container size of 400*400*600mm will reach up to 80 degrees. The maximum temperature of heated floors does not exceed 30C.
Eighty is definitely a bit much, so it’s better to take one 500W halogen or connect two in series at 1kW each. The heating of the stove walls will be optimal - 60 degrees.
To fix the lamp, use a special ceramic socket holder.
It's ceramic. The brick on which this “beast” lies heats up to 300 degrees!
As you understand, the wires for connection must be thermal.
If you open the “vent” of such a heater, the picture from the inside will resemble a miniature nuclear reactor, with one single fuel element - a halogen element lying on a brick.
Moreover, due to the low power, it is all connected through a regular socket with a plug. You will be shocked how much heat this design can generate.
By the way, it is very convenient to dry clothes and shoes on it.
There is just one big BUT. This is the lifespan of such a light bulb in a confined space without normal cooling conditions. I can assure you that he will greatly disappoint you.
Making your own inexpensive heater
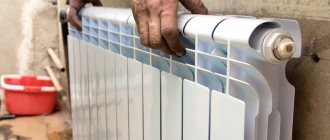
The basis of the emitter is usually lamps or filaments that are heated by electric current. But there is a more productive option - using a heating radiator. The battery emits radiation that spreads in all directions.
For best results, use foil after smoothing its surface for higher reflection. Stick it on the walls behind radiators and radiators. Heat supposedly directed at the wall will be reflected in the opposite direction, heating only the room. This simple trick increases heat output by 20%.
Advice: it is worth noting that an alternative to foil can be thermal insulating reflective screens made of penofol, covered with foil on one or both sides.
Using devices available in the home
If you still have an old Soviet reflector, you can safely use it to make an infrared heater. In addition to it, you will need:
- steel rod,
- reflector,
- nichrome thread,
- dielectric made of refractory material (for example, a ceramic plate)
To make a heater with your own hands, you must follow the instructions.
- Remove dirt from the surface of the reflector.
- Measure the length of the spiral wrapping around the reflector cone.
- Check the cord, coil activation terminals and plug for damage.
- Cut the steel rod to a length equal to the length of the spiral.
- Wind a nichrome thread onto the rod, marking 5 turns for every centimeter.
- Slowly remove the rod from the wound thread.
- Place the spiral on a dielectric (for example, a plate) so that the turns do not touch.
- Connect the ends of the spiral to an electrical source.
- The heated spiral is compactly placed in the grooves of the reflex cone.
- Connect the contacts to the spiral ends.
As a result, you will notice that the nichrome thread heats up better than the spiral installed in the device before making changes. An effective emitter that reflects energy from the reflective walls and directs it to bodies that absorb heat is ready.
Using foil and glass
To do this you will need:
- paraffin candle,
- device for installing a candle,
- EDP glue (Boxidka),
- aluminium foil,
- two glasses of the same size,
- sealed material
- wire with a tip in the form of a plug,
- cotton napkin,
- cotton buds.
Manufacturing instructions.
- Remove dirt, paint and dust from the glass surface.
- Light the candle and place it in the tray.
- Holding the glasses in your hand, pass them over the flame so that they smoke evenly. To do this, it is recommended to cool them a little in advance. The resulting dark soot will become a conductive element.
- Draw straight lines around the perimeter of each glass using cotton swabs. The result should be a frame of clean strips 0.5 centimeters thick.
- Measure the width of the dark soot rectangles.
- Cut out two similar rectangles from foil, which will serve as electrode strips.
- Place the first glass so that the smoked side is on top.
- Apply glue to its surface and distribute the edges of the foil so that they extend slightly beyond the glass.
- Place the second glass on top with the smoked side inward so that it fits tightly to the adhesive surface and press carefully to secure the effect.
- Apply a little sealant to the glass joints.
- Check the design for power level. Not exceeding 100 W per sq.m. The heater can be safely connected to the electrical network using a plug with a wire.
- To connect to the network, take a block of wood with two metal plates, which are reinforced at both ends. A 12 volt plug must be soldered to one of them. Place the block on the glass so that the foil extending beyond the edges of the glass is pressed tightly against the metal contacts. Your efficient and powerful electric heater is ready.
Tip: to correctly calculate the power of a device, you need to use a multimeter to measure the resistance level of the layer that conducts electric current. Considering the dependence of the current on the load, it is better to use stable parameters - a constant voltage of 220 V and the formula N=U*U/R, where N is the desired power indicator, U is the electrical voltage and R is the resistance. For example, with a resistance of 24 Ohms, using the formula N=220*220/24, the result is 2021 W. This power is enough to normally heat a room with an area of approximately 20 square meters. m.
When obtaining a higher indicator, it is necessary to increase the resistance, and at low power, increase it.
What to do if the power of the heater made does not meet the required parameters? It is necessary to calculate this indicator, taking into account the area of the room (for example, 15 meters) at the rate of 100 W per square meter. m. It turns out 15*100=1500 W.
With a constant resistance of 220V, derive the required indicator using the same formula: R=220*220/1500=32 Om. Considering that you previously got 24 ohms, the resistance should be increased. This means that it is necessary to reduce the width of the sooty strip on the glass and calculate it using the formula R=I*p/S, where R is the resistance, I is the length of the current-conducting layer (constant value), p is the resistivity (constant value), S is cross-sectional area of the layer (directly depends on the width, a wide layer has a smaller area, a narrow layer has a larger area).
Thus, to calculate the required resistance value, it is necessary to select the desired width of the smoked strip, but for this you will have to disassemble the glass device.
Manufacturing from laminated plastic
To make your own infrared heater, you will need:
- 2 pieces of laminated paper, each 1 square meter,
- glue box,
- copper plates,
- graphite powder,
- plug and cord,
- wood.
First you need to mix graphite with glue until a thick mass with a high degree of resistance is formed. Then apply a mixture of graphite and bauxide onto the plastic using zigzag strokes, placing the rough side on the table. Prepare the second plastic in the same way, and then glue the two sheets together, pressing them tightly together. On the plates on opposite sides you need to fix the copper elements with glue.
A frame is made from wood into which the device must be inserted, which then must be thoroughly dried. Next, you need to measure the resistance and calculate the power in the same way as in the previous version, except that here the resistance depends on the amount of graphite powder in the glue - the more of it, the higher the resistance, and vice versa. After you have reached the required power, you need to connect the structure to the network, after connecting it to the plug.
How much light and heat does a light bulb provide?
Therefore, we will consider another more efficient and durable design, assembled on the basis of simple incandescent lamps.
An ordinary light bulb with an incandescent filament is the most accessible source of not only light, but also heat. Of its entire radiation spectrum, we see only a small part.
Everything else is hidden from us in the infrared region.
As an efficient light source with its efficiency of 3%, the light bulb is no good.
But if we consider it from the point of view of heat, then the efficiency is already approaching 100%.
How to increase the efficiency of the light? For example, you can increase the voltage.
However, at the same time, its lifespan will sharply decrease. She will live with you for literally a few hours.
But if you do the opposite, that is, reduce U=220V by half, this will sharply reduce the light output by five times. But at the same time, almost all the useful energy will go into the IR spectrum.
Of course, it will not increase, and its overall level will fall from its original values. However, the level of the visible spectrum will drop even more. The whole point here is that your assembly should primarily heat, not shine.
The most important and significant advantage of this is the increase in lamp life to almost 1 million. hours (over a hundred years).
That is, you buy it once and you can use it for the rest of your life! How can you reduce the voltage at home without any regulating devices, like LATR?
Serial connection of light bulbs
Very easy. Simply connect two light bulbs of the same wattage in series and the voltage across each will be cut in half.
They will of course shine dimmer.
How will the power consumption of such a combination of light sources change? Measurements can be taken with a multimeter.
Let, for example, at a constant voltage of 240V, for two 100-watt light bulbs the current is 290mA.
Based on the formula for calculating power, we find that:
P=I*U=0.29A*240V=69.6W
As you can see, consumption has dropped. But at the same time, the heat dissipated per watt of power has increased.
Optimal heating power
To assemble a lamp heater, it is best to use 150W models. Just note that after the introduction of a law prohibiting the production of conventional incandescent lamps of more than 100W, they began to be sold under the name “heat emitters”.
With their sequential connection scheme, even two copies, you can immediately feel the radiated heat. At the same time, they do not blind the eyes.
The current in such a circuit at the same voltage will be 420mA. This means that two lamps consume about 100 W in total, and most of them are used for heating.
You can compare what power infrared heaters are sold for and what area they are designed for. The ratio for conventional models is 100W per 1m2.
Oil radiators have almost the same indicators.
That is, in any case, watts turn into heat. Only specialized infrared models will have more directed radiation to a specific point or area, while your homemade product will have a wider angle.
By the way, these 100 W/m2 are taken from SNiP for premises insulated according to all standards. This is the optimal power for all heaters in central Russia.
For northern latitudes, including cold, uninsulated garages, the values will be higher. If, for example, the heat loss in a garage is 1000 W/hour, and you heat it at 300 W, then your temperature will never rise.
But if the ideal heat loss is close to zero, then 100 W will be enough to create a bathhouse inside.
This power also depends on the height of the ceilings (the average calculated one is up to 3 m).
Video on the topic
It is quite possible to make a practical and convenient heater with your own hands, without resorting to the help of specialists. To heat the air in rooms, various devices are used. They are distinguished by many parameters, the type of heating element, power and the use of additional functions, such as equipping the device with a fan. These parameters also affect the prices of these devices. In order to save money, you can make the device yourself.
Assembling a homemade infrared heater
Based on all this, we need to assemble our heater from light bulbs. Let's move on to practice.
If your work area that needs to be heated is 3-4m2, then assemble a 300W heater.
This will require 6 lamps with a power of 150W. That is, three serial pairs that will produce 100W each.
They are assembled on a frame made of metal or aluminum corner.
Sources of light and heat in the frame should be placed according to the diagram below.
In this case, select the distance between adjacent bulbs such that you can easily replace a burnt-out bulb with a new one. Even after a hundred years.
A gap of 1 cm between the flasks will be enough for this. The frame parts are connected to each other with bolts or rivets.
Next, you will need to fasten two aluminum strips inside it, on which the reflector or reflector will sit. These strips will add rigidity to the entire structure.
Now the most important thing is to make the reflector correctly. The usual parabola shape is not very effective.
Models in the form of a biparabola cope much better with their responsibilities. Here the whole difference is in the reflection of the rays, which in the second case for the most part do not bounce back into the lamp, but go out.
Aluminum cans are ideal as a material for manufacturing. Cut off the bottom and top of the jar.
And you unfold the walls and bend them in the middle. At the same time, leave a margin of 1 cm on one edge for another bend. You somehow need to connect the halves of two cans together.
1 of 2
You fasten them together with rivets. To avoid tearing the thin aluminum in this process, first place washers on both sides.
As a result, you should have a one-piece reflector made of 4 cans.
Next, place the reflector on the frame and also install rivets. First in the center on the side, and then along the edges.
Well, don’t forget about the two stripes in the middle of the frame.
Now you need to insert the light bulbs themselves into this structure. At the same time, do not allow them to touch the reflector. There should be a minimum distance of 1.5-2 cm from it.
Here again aluminum will come to the rescue. Namely, thin strips nine centimeters long.
Do not make a mistake when marking the places where the cartridge is attached to the strip, otherwise you will not be able to bring the power wires inside.
Attach the strips to the frame and install the cartridges on them.
After this, you can screw in the light bulbs themselves.
All that's left is to connect the wires.
Making an IR heater from an old reflector
To make such a device you will need the following materials:
- old reflector;
- fireproof dielectric (if it is missing, then a regular plate of any diameter made of glazed ceramic will do as a replacement);
- steel rod;
- nichrome thread.
Work must be performed in the following order:
- Initially, you should clean the old reflector from adhering dirt and dust.
- Inspect the power cord and plug for mechanical damage, and also check the integrity of the terminals connecting to the spiral.
- Measure the length of the old spiral (wound onto the ceramic body) and take a steel pin equal in length.
- A nichrome thread must be wound onto the rod with a distance between turns of 2 mm.
- Upon completion of winding, you should remove the spiral from the base and lay it (the main thing is that the turns do not touch each other) on the dielectric.
- The ends of the spiral should be connected to electric power from an outlet and checked for functionality.
- A heated spiral of nichrome thread should be placed in a recess in the ceramic cone of the future heater and connected to the power terminals.
These are the steps you need to take to make your own version of an IR heater from an old Soviet reflector.