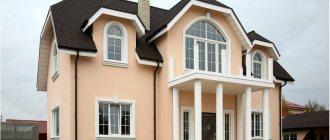
The attractiveness of the city's external appearance depends on the rapid development of modern construction technologies, which make it possible to bring the most daring ideas to life. Colorful or, on the contrary, restrained, but stylish facades of buildings are the calling card of not only each district, but the entire city as a whole. Ventilated curtain facades will help improve the appearance of buildings.
Ventilated facades not only give their “carriers” a bright and amazing image, but also eliminate many significant shortcomings that arise during the construction process or after a significant period of operation.
What is a ventilated façade?
The external cladding of buildings plays a decisive role in modern architecture and the assessment of urban landscapes, and also performs an important function of protecting structures from negative environmental influences.
In particular, the external surfaces of buildings are subject to numerous types of influence: mechanical, chemical, thermal, hygrometric (air humidity) and anthropogenic.
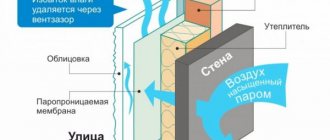
Ventilated facade (hinged ventilated facade)
is a unique building cladding design that is attached to the load-bearing outer wall of the structure using profiles and special bolts. The design of the ventilated facade itself consists of several layers, between which there is a small air space. It provides air exchange and protects walls from moisture accumulation.
Recommendations for the construction of a facade
Scheme of the plinth structure of a ventilated façade with various fastening units.
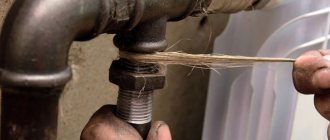
In general, the construction of ventilated facade structures is not particularly difficult. But in order to ensure that after finishing the house does not look rickety, and that the heat insulator is securely fastened to the wall and, therefore, properly performs its functions, you must not brush aside recommendations that at first may seem insignificant. Any work begins with the preparatory stage. When preparing to install a ventilated façade, you need to:
- clean the walls from dust, dirt, paint, crumbling fragments of plaster and parts protruding from the surface;
- door and window openings are freed from ebbs and platband slopes;
- depressions and cracks on the surface are sealed with mortar;
- the wall is treated with a primer;
- the sheathing is installed level and plumb to ensure an ideal plane (it is better to create a system of sags stretched along the perimeter of the wall through steel rods of threads driven into its corners, connected by transverse cords).
Remember!
Thermal insulation device for the base of a ventilated facade.
- If the insulation is carried out with mineral wool, then the distance between the guide profiles should be slightly less than the width of the insulation sheet.
- Before laying the insulator, set a level starting bar, which should correspond to its thickness.
- Start insulation in those places where the use of whole pieces of insulation is required, laying the fragments last.
- Do not allow gaps between adjacent insulation sheets.
- The glue that will hold the insulation on the surface will not be able to cope with the task on its own, so additionally fasten the insulation with disc dowels (the method of fastening is described above).
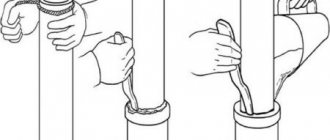
Not every wall can boast of an ideal vertical or even surface. Based on this, it is often not worth wasting cubic meters of solution on its leveling, because the costs will be “cosmic”. After rough preparation of the wall, you can build a vertical plane from the profile using U-shaped fasteners. This is where the sag system comes in handy. Using the threads as a guide, attach the beam or profile to the U-hangers. You can use a factory hanger (Fig. 3) or make it yourself.
The main thing is to ensure that it is securely fastened to the wall with dowel nails. The pitch between U-shaped elements should not exceed 400 mm.
https://masterfasada.ru/youtu.be/r41PqejuxnE
Design Features
Let's look at the layers of the hinged ventilated system:
- protective and decorative material;
- frame with fasteners (subsystem for a ventilated facade);
- insulating layer;
- the ventilation gap is the same air space that we wrote about just above.
Insulation layer
consists of heat, steam, or waterproofing material (can be combined). It is attached directly to the walls using mechanical bolts, since construction adhesive may not provide good adhesion to uneven surfaces. The insulating covering consists of mineral fibers, polystyrene foam or polyurethane foam.
The choice of insulating material depends on the following operational requirements:
- thermal insulation;
- waterproof;
- fire resistance;
- sound insulation.
Air gap
between the insulation and the outer cladding must be adequately sized to ensure effective air circulation. Typically the thickness ranges from 40 to 100 mm. To ensure good air flow inside the gap, ventilation openings with protective grilles must be installed at the bottom and top to prevent foreign objects from entering the structure.
Mounting frame (subsystem)
consists, as a rule, of extruded aluminum elements: brackets, racks, cross members, anchor bolts and rivets. In addition to the strong connection of all layers, the frame performs the function of transferring the weight of the facing slabs to the walls of the building and preventing vibrations.
Acceptance by supervisory authorities and the customer
| № | Index: | Permissible deviations: |
| 1 | Deviations from the design position of alignment axes and elevations | |
| 1.1. | Deviation from the design position of the alignment axes | +/- 10 |
| 1.2. | Deviation from the design position of elevation marks | +/- 10 |
| 2 | Deviations from the design position of the guide | |
| 2.1. | Deviation from verticality or horizontality in the plane of the wall | 3 |
| 2.2. | Deviation from verticality or horizontality perpendicular to the plane of the wall | 1 |
| 2.2. | Deviation from the design distance between adjacent guides | 20 |
| 2.3. | Deviation from alignment of guides adjacent in height | 2 |
| 2.4. | Deviations from the design gap between adjacent guides | +5; -0 |
| 2.5. | A ledge between guides adjacent in height | 4 |
| 3 | Deviations from the design position of the facade and its elements | |
| 3.1. | Deviation from verticality | 2 per 1m length |
| 3.2. | Deviation from flatness | 5 per 1 m length 5 per 1 floor |
| 3.3. | Ledge between adjacent sheets | 4 |
| 4 | Deviations from the design size and position of the gap between sheets or cassettes | |
| 4.1. | Deviation from the design gap size | +/- 2 |
| 4.2. | Deviation from the design position of the gap (from verticality, horizontality, from a given angle) | 2 per 1m length |
| 4.3. | Deviation from the design position of fasteners | 5 |
Similar articles
- Subsystem for ventilated facades: composite...
ventilated facade
system is a structure assembled from the outside of the building walls and consisting of
facade
cladding, guide profiles and
facade
brackets interconnected. Read more - Bracket for ventilated facades - what is it...
Facades
of public buildings.
Bracket for ventilated facades
- what is it, functions, types,
installation
and
...
Because
on the facade
; wind vortices freely penetrate into the interior
of the ventilation façade
and create pressure on the back side
of the façade
. Read more - Galvanized facade profile for ventilation façade...
Facades
of public buildings.
Galvanized
façade ventilation façade
: types, coatings,
installation
.
...
The length of the profile for
ventilated facade
ranges from 1 to 6 meters. Read more - Basic things about hinged ventilated facades
What is
a ventilated facade
(VF) - a modern technology
for installing
the latest facing materials on
...
ventilated facades
are divided according to the method of fastening.
There are many types of cassette facades
. Read more - Installation: ventilated facades made of fiber cement...
The ventilated facade
made of fiber cement boards is a rectangular cladding element with decorative finishing. Fiber cement is 80 - 90% cement, the rest is water... Read more - Installation of porcelain tiles on a ventilated facade
Installation of ventilated facades
made of porcelain tiles is excellent
... Installation of
ventilated
system can be done at any time of the year, low air temperature only limits the abilities of the installers and does not affect the system. Read more
Ventilated facades: pros and cons
Hinged ventilated facades have a long list of advantages, which has made ventilated facades one of the leading types of building finishing.
Advantages of a ventilated facade:
- a large selection of materials depending on price, flexibility, strength and other factors;
- good level of heat and noise insulation;
- savings on building heating (for a private house and batteries with a thermostat);
- suitable for cladding multi-storey buildings;
- quick installation at any time of the year;
- long service life (up to 50 years);
- fast and local repairs;
- resistance to negative atmospheric changes;
- fire resistance, corrosion protection;
- ease of care.
It is worth noting that if the ventilation façade installation technology is not followed, some advantages may turn into disadvantages. For example, if installed incorrectly, the fire resistance and ventilation of the walls are impaired and the anti-corrosion protection is reduced. Errors in organizing a subsystem can be heard whistling in the wind.
A system of ventilated facades is not a cheap pleasure, therefore, if errors were made during installation, the service life will be significantly reduced, which means you will have to spend money again.
The gap between the structural elements of the ventilation façade.
The substructure elements of almost any curtain wall consist primarily of brackets, profiles, fasteners and cladding hanging elements.
The enclosing structures of buildings during operation are mobile as a result of shrinkage, thermal expansion, vibration, etc. Consequently, certain gaps must be maintained between the elements of the facade substructure in order to prevent their deformation and destruction. The gap between the joints of vertical steel profiles must be at least 3-5 mm, for aluminum systems 8-10 mm. For horizontally located profiles it is slightly less than 2-3 mm for steel and 5-7 mm for aluminum.
Installation of ventilated facades
Installation of hinged ventilated facades is carried out in three stages: installation of the load-bearing frame, laying of the insulating layer and cladding of the frame with decorative material.
- Frame.
The work of the installation team in the case of ventilated curtain facades begins with determining the installation points of fasteners on the surface of the external wall. The frame itself is a series of vertical load-bearing profiles that are attached to the wall using brackets. To reduce the load on the frame, installation of, for example, porcelain stoneware panels requires both vertical and horizontal profiles. - Insulation.
The main principle that must be observed during the installation of insulation is protection against moisture entering the insulating layer. To do this, the insulation is placed in a special moisture-proof bag or covered with a membrane film (some manufacturers immediately produce mineral insulation boards protected from moisture). The insulation layer is attached to the wall in two ways: either it is nailed to the wall using special plastic dowels, or it is simply glued. Usually both methods are used at once.
If the insulation gets wet, it will lose its ability to insulate heat, freeze in the winter and become completely useless.
- Facing.
Here you should focus on the material used and its weight category. As for the typical technological map for installation of cladding, the installation of slabs occurs from the bottom up using fasteners and profiles.
Types of designs
Existing types of ventilated facades differ in the materials used and general installation technology.
Frame option
This is the simplest and most popular method. Its peculiarity is that metal, wood or combined sheathing is erected along the perimeter of the building. It may include a number of layers that are needed to retain heat, protect the house from excess moisture and improve steam exchange.
An example of a frame-type ventilated facade
When constructing the frame, the following materials are used as external cladding:
- Porcelain tiles. These are products of artificial origin, made from pressed and baked clay. Available in the form of slabs, which are distinguished by their heavy weight and good resistance to impact. The peculiarity of fastening porcelain stoneware is that the elements are installed on the frame using special clamps (brackets). Gaps are formed between the fragments, which contribute to better ventilation. But this option requires enhanced protection against moisture penetration.
- Composite or other types of panels. The production technology allows us to obtain a reliable and lightweight material that has excellent properties. Installation of panels can be done in various ways, which allow you to create an open or closed joint. In this case, open gaps can be equipped with a special moisture barrier.
- Glass panels. They are used primarily when working with multi-story office or industrial facilities. They are difficult to operate, so installation is carried out only by professionals.
Wall cladding with porcelain stoneware, composite and glass panels
Advantages and disadvantages of frame ventilated facades
Frame structures have a number of advantages that set them apart from other methods of creating external cladding.
Advantages:
- Fast construction. If all components are available, installation can be completed in a short time. In addition, if the wall is without significant damage, serious preparation is not needed.
- Protection. The design reliably protects the house from various types of influences, and also increases durability, since there is no stagnation of moisture due to free vapor permeability.
- Decorative. Thanks to the wide range of cladding materials, you can choose an option that will meet all requirements and preferences.
There are also disadvantages:
- The need for clear and correct execution of work. It is technical errors (inappropriate gap size, lack of additional ventilation holes) that lead to undesirable consequences.
- Difficulty when using products laid on glue. Thus, the use of artificial and natural stone or clinker tiles is very difficult. But there is a way out: when choosing such products, the frame is pre-strengthened and sheathed with tile materials. The work must be carried out with special care, because serious requirements are placed on the structure.
In any case, ventilated facades are gaining increasing popularity. This is facilitated by the variety of finishing products and the durability of the surface. With a correctly constructed frame, the external cladding can be easily replaced with a more modern one.
Frameless method
Used when there is no sheathing. This technology involves the use of materials that are installed at some distance from the surface. A classic example is facing bricks. The masonry is mounted so that a ventilation gap is formed. For its operation, areas without mortar are left between the parts in the lower and upper rows of bricks. Often the top row is laid out with a gap, which is covered with a decorative strip.
On a note! This method is more labor-intensive. To obtain a high-quality result, it is necessary to observe many nuances, including the correct distribution of the reinforcement or wire bundle. Therefore, the first option is preferable, especially when doing it yourself.
Scheme of a frameless ventilated facade
How to choose a subsystem?
As we found out earlier, discussing the characteristics and features of the installation of ventilation facades, the efficiency and durability of the entire structure depends on compliance with even the slightest nuances of installing a ventilation facade. Let's look at some of its features.
There are three types of ventilated facade subsystems:
- made of galvanized steel,
- stainless steel,
- aluminum.
Galvanized subsystem
for ventilated facades it is used quite often and is suitable for porcelain stoneware, fiber cement, composite materials, natural stone and siding. Such a frame will cost less and meet all fire safety requirements.
Stainless steel ventilated facade frame
it is more expensive, however, unlike the first type, it is suitable for cladding a house over 50 meters high. The service life of a ventilated facade based on a stainless steel subsystem is more than 70 years.
Aluminum ventilated façade elements
lighter, which allows them to be used in high-rise construction and in the restoration of old houses with exhausted structures. The downside of the aluminum frame is its low melting point. In some regions of the country, aluminum subsystems are excluded from the design of building construction due to violations of fire safety standards.
There are two ways to attach a ventilated facade to the wall surface:
- The system is wall mounted. Suitable for objects made of brick or concrete;
- the system is fixed in the interfloor ceilings. Suitable for houses made of porous materials: expanded clay blocks, foam concrete, etc.
When designing a future ventilated facade, the main thing is that the subsystem frame meets all reliability requirements, individual architectural features and satisfies the owner’s desires in functional and financial terms.
Disadvantages of wood sheathing
Instructions for installing a ventilated facade profile.
It’s worth talking in more detail about the sheathing itself.
For laying insulation and installing a ventilated facade, 2 types of material are used - wooden beams and a metal profile. True, the use of wood blocks is limited by certain conditions. Thus, they should not be used when cladding plinths (high humidity), or creating a system with insulation thicker than 50 mm (unjustified cash costs for timber, overall heaviness of the structure). In addition, when choosing wood for lathing, you need to pay attention to how dry it is. Insufficiently dried beams can subsequently cause deformation of the finishing layer of the ventilated facade. On the other hand, lathing made of bars is ideal for installing ventilated facades in wooden houses.
How to choose insulation?
The main function of the insulating layer is to prevent heat loss. Low thermal conductivity can reduce heat loss in the house.
The following materials are used for ventilation façade insulation:
- mineral (stone) wool of medium and high density,
- expanded polystyrene and similar materials.
Mineral wool insulation
It is characterized by high fire resistance and resistance to any weather conditions, environmental friendliness and moderate cost of the material.
Insulation based on polystyrene foam
will be more expensive, however, it also has an important advantage - polystyrene foam is easier to install at high altitudes, since it is very light.
There are polystyrene foam insulation materials marked “C” (“self-extinguishing”) or “F” (“facade”). “C” lights up for 4 seconds. "F" - no more than 1 second.
Air gap and fire safety
The rise of air in the ventilated gap occurs due to a phenomenon called the draft effect. A similar effect occurs in an ordinary chimney. In the event of a fire, the ventilated air gap creates an open path for latent fire to advance behind the cladding (Figure 4). The wider the air gap, the greater the threat it appears to pose from a fire safety perspective.
To prevent the spread of fire through the air gap, special fire barriers are installed in it. The wider the air gap, the more difficult and expensive it is to install fire barriers in the façade.
Figure 4—Flame propagation along the air gap of a ventilated curtain façade [10]
Price issue
To understand approximately how much money will be spent on cladding a building with ventilated facades, the cost of materials for the ventilated facade and installation work are taken into account.
In the first case, special attention should be paid to all components of the structure itself: insulation material, frame system with all the necessary parts and fasteners, facing and decorative layer, etc.
Installation includes installation of scaffolding, laying of each layer, securing layers, additional roofing and decorative work. Even if we are talking about a ventilated facade for a private house, you should also contact specialists to avoid the consequences of poorly performed work.
The price of one square meter (m2) of facing material averages from 500 to 1,500 rubles. Frame - up to 1,000 rubles per m2. Insulation - from 500 rubles per m2. Installation services (depending on complexity) - up to 2,000 rubles per m2.
An unprofessional approach and seemingly insignificant errors can lead to dire consequences. The work of the qualification team in this case means significant financial savings.
Cost of installation of a ventilated façade with insulation
| Works | Unit | Price |
| Porcelain tiles (clinker tiles) | sq. m. | from 1200 rub |
| Composite panels | sq. m. | from 1200 rub |
| Fiber cement boards | sq. m. | from 1200 rub |
| Profiled sheet | sq. m. | from 1100 rub. |
| Metal cassettes | sq. m. | from 1200 rub |
| Stone | sq. m. | from 2100 rub |
| Siding | sq. m. | from 700 rub |
Additional services
| Service | Unit | Price |
| Preparing the area for work (cleaning, preparing a site for storing material) | — | 500 rub |
| Removing electrical wiring to a temporary support | — | 1500 rub. |
| Installation of metal scaffolding | sq. m. | 85 RUR |
| Manufacturing and installation of wooden scaffolding | sq. m. | 220 rub. |
| Installation of support platforms | sq. m. | 230 rub. |
| Transferring drainage system pipes to scaffolding | p.m. | 180 rub. |
| Installation of protective construction film on windows, doors, roofing and decorative elements | sq. m. | 80 rub |
| Cleaning walls from dirt and dust | sq. m. | 65 RUR |
| Roof overhang lining | p.m. | 680 rub. |
| Installation of lighting fixtures | PC | 700 rub |
Call! Every day from 9:00 to 20:00
Permission to install a ventilation façade
The question of whether it is possible to finish a building with ventilated facades affects the safety of life, health and the environment.
Before January 1, 2010, there was a system for obtaining a state license. Today, to control the work of specialized organizations, there is a so-called SRO permit.
SRO (self-regulatory organization) approval is a certificate that allows you to carry out certain types of work and provide services. Construction companies must first obtain this permit, since their activities involve capital construction and fall into the category of high-risk working conditions.
According to the order of the association “Association of General Contractors in Construction”, namely clause 12.10 “Work on thermal insulation of buildings, building structures and equipment”, when carrying out work on thermal insulation of an object, SRO approval is required. Modern ventilated facades, since they include insulation in their design, also require permission for installation.
Possible difficulties
When drawing up a work project and calculating the size of ventilation gaps, inconsistencies may arise due to the design features of the building. For example, when performing calculations for finishing buildings of old buildings that are more than a dozen years old, due to shrinkage of the wall plane, deviations from the vertical and horizontal surface may occur. To compensate for these deviations, special extensions are used, which are placed on the bracket and thereby regulate the extension from the wall.
Accordingly, when designing, it is necessary to take this coefficient into account and level the surface by adjusting the ventilation gap. Therefore, creating an optimal distance from the vapor-permeable membrane to the surface of the facing material is not applicable for all types of buildings.
Supply ventilation in a house with a ventilated façade
A ventilated facade solves the problem of external negative influences on the walls of the building, but does not in any way affect the ventilation in the apartment.
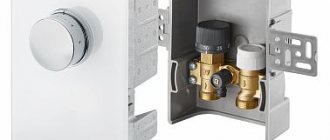
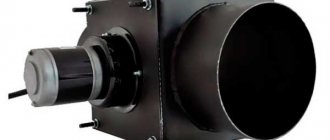
To organize ventilation in an apartment, you need to ensure air flow and exhaust. Without inflow there will be no draft, which means that the ventilation holes in the bathroom and kitchen will not be able to exchange air in the house. A breather, a fresh air ventilation device with an air purification function, will help solve the ventilation problem and improve the microclimate in the apartment.
The breather takes fresh air from the street, cleans it of contaminants, heats it to a comfortable temperature and delivers it indoors. With the help of a breather you can ventilate the room without opening the windows. Thanks to the recirculation mode, the device will clean the air from dust, harmful gases and odors inside the room.
Installation of a breather in a house with a ventilation facade is carried out in two ways:
- The air duct is brought out to the facade facing slab, while only the outer wall of the building and the thermal insulation layer of the suspended ventilated facade system are drilled. The external tiles of the facade remain untouched. With this installation, air is taken from the air gap between the heat-insulating layer and the facade tiles. Thus, air constantly enters the gap through the existing joints between the facade tiles.
- If air intake must be carried out directly from the street, then in addition to drilling the wall and thermal insulation layer, drilling of tiles (for example, from porcelain stoneware or other finishing material) of the ventilated facade is carried out.
Installation of a breather in a house with a ventilated facade is non-standard and an additional fee is provided for it in accordance with the price list. In addition, to perform such an installation, you need to understand whether it is possible to remove the tiles for drilling yourself. If it is not there, then the services of industrial climbers will be required to remove the tiles and install them in place after completion of the work. In particularly difficult installation cases, the tile may burst, so it is advisable to have a replacement one.
Each installation of a breather in a building with a ventilated facade is unique. We recommend that you consult with our specialists about the features of installing the device in advance. Consultation is free.
Curtain façade system - step-by-step installation
Correct calculation of load-bearing elements and the overall thermal efficiency of the system is very important, but its high-quality installation also plays an equally important role in the durability of the structure. We present to your attention step-by-step instructions that will tell you what technological operations should be performed and in what order.
Table 2. Installation of a suspended facade.
| Steps, photo | A comment |
| Step 1 – marking the mounting points for the brackets | Using geodetic instruments and a level, the installation points of the brackets are determined and markings are made. The first vertical row of the frame should be located at a distance of 10 cm from the corner. The step between the two belts depends on the configuration of the cladding elements, but on average it is 60 cm. |
| Step 2 - Drilling Holes for Anchors | After marking is completed, begin drilling holes for installing dowels. When a ventilated facade is mounted on brick walls, it is very important to drill so that the attachment points do not coincide with the masonry seams. From the dowel to the horizontal seam (spoon) there should be at least 2.5 cm, and to the vertical (butt) seam - 6 cm. Note! When facing facades made of hollow bricks or blocks, special spacer fasteners or chemical anchors must be used. |
| Step 3 – cleaning the holes from dust | To obtain high-quality fasteners, it is very important to clean the holes from dust. All means are good for this. Builders have special devices; at home you can use a special attachment on a vacuum cleaner. |
| Step 4 - driving the anchor dowel | A dowel is driven into the cleaned hole, into which an anchor bolt will be installed a little later. |
| Step 5 - installation of paronite gasket | To avoid the formation of cold bridges, shock-absorbing and heat-insulating layers in the form of paronite gaskets are installed at the junctions of the brackets. |
| Step 6 - hanging the bracket | The bracket is hung and secured with an anchor, which is first driven in with a hammer... |
| Step 7 - tightening the anchor bolts | ... and then tightens it with a screwdriver. If it is intended to do double insulation, an additional component is immediately mounted on the support brackets, which will provide the required overhang. |
| Step 8 – slots in mineral wool boards | Now you can begin installing the thermal insulation. The plates are placed on brackets, for which slots are made in them corresponding to the shape and location. |
| Step 9 – placing the slab on the bracket | The plate is placed in its regular place, after which a pressure washer is put on top of the protruding part of the bracket. |
| Step 10 - joining the plates | The insulation is installed from the bottom up, with joints spaced similar to brickwork. It is very important that there are no through seams more than 2 mm wide between the thermal insulation elements. |
| Step 11 - installation of accessories | You can ensure the necessary shift of the seams by starting one row with the installation of a whole slab, and the next - with a half. They are easy to cut with a knife and should not be broken or torn. Note! At the corners of the building, serrated dressing of the seams should be observed, when the end of one slab overlaps the end of another. |
| Step 12 - drilling holes for the disc dowel | Now the plates need to be secured mechanically, for which holes are drilled again - this time for mushroom dowels. |
| Step 13 - securing the slabs | Typically, a slab measuring 1.2 * 0.6 m is attached at five points - in the corners, at a distance of 5 cm from the seams, and in the center. The half is secured with four dowels. |
| Step 14 - installation of the second layer of insulation | If it is intended to install a double layer of insulation, the slabs are taken of different densities. Less dense ones go to the first layer, and they are fastened not with five, but with only two dowels - diagonally. The slabs of the top layer will be more dense and are fixed, as expected, in five places. |
| Step 15 – installation of the “sled” connecting element | This system provides for the installation of a slide - a connecting element of a U-shaped configuration, and the bracket itself in this case has this shape. There are two holes diagonally on the back of the profile for fastening the posts with rivets. Note! In systems from different manufacturers, this node may look slightly different. |
| Step 16 - installation of the profile rack | The next stage is the installation of supporting guides, which most often also have the letter “P” in cross-section. This profile is attached to the bracket on the sides behind the shelves and through the back. Note! There are, of course, stainless steel systems, but they are very expensive. Most often, galvanized steel is used to make profiles. It itself is not afraid of corrosion, but during installation it is necessary to cut the elements and drill them for rivets, as a result of which the protective coating is damaged. Private traders do not pay attention to such “little things”, but professionals immediately cover the cut areas with paint. |
| Step 17 – joining the profiles at the ends | When joining profiles at the ends, a gap must be maintained to compensate for the linear expansion of the metal, which is at least 8 mm. |
| Step 18 - installation of clamps | In accordance with the format of the facing modules, fastening elements - clamps - are installed in the right places. They may look different, depending on the cladding option. |
| Step 19 - facing | The last stage is hanging decorative material. There is a gap of about 10 cm between it and the insulation. You can’t do more, because with strong wind pressure such a facade will hum strongly. If it is less, the moisture simply will not have time to be completely removed, and the insulation may rot. |
If you noticed, our instructions skipped the installation step of the diffusion membrane. And that's why.
How does hydrophobized insulation work?
The membrane is not a mandatory element of the cake; its presence or absence depends only on the properties of the insulation. In this case, hydrophobized mineral wool was used for insulation - a basalt-based material impregnated with a water-repellent composition. Such cotton wool is not afraid of moisture, but at the same time it perfectly passes steam through itself, allowing it to freely penetrate into the ventilation gap.
Prices for composite panels
Composite panels
Nominal air gap width - a compromise of factors
Thus, when choosing the optimal air gap width, the following must be considered:
the nominal gap should not be less than 6 mm to ensure effective breaking of the capillary movement of moisture into the building and drainage of liquid water;
the nominal gap should not be less than 20 mm to ensure that the wall can deviate from the vertical within normal construction tolerances;
increasing the width of the gap does not increase the wall’s resistance to heat transfer;
excessively increasing the gap increases the risk of flame spread in a fire;
the greater the width of the gap, the greater the overhang of the brackets, the greater their thickness, quantity, weight and cost;
the wider the air gap, the less effective the equalization of pressure outside and inside the cladding, and, consequently, the greater the amount of water that penetrates behind the cladding.
Sources:
1. German association of manufacturers of suspended ventilated facades - https://www.fvhf.de/Fassade/VHF-System/Aufbau-und-Technik.php
2. DIN 18615-1:2010 Cladding for external walls, ventilated at rear - Part 1: Requirements, principles of testing
3. ETAG 034 Guideline for European technical approval of kits for external wall cladding, 2014
4. TR 161-05 Technical recommendations for the design, installation and operation of suspended facade systems, 2005 5. Project NOSTROY (2014) Curtained facade systems with an air gap. Recommendations on selection criteria, design, design, repair and operation
6. SP RK 5.06-19-2012 Design and installation of curtain facades with an air gap, Republic of Kazakhstan
12. EN ISO 6946-2008 Building components and building elements — Thermal resistance — Calculation method
LLC "Alyukom" Moscow, st. Nagatinskaya, 16, building 9, office 2-5
Tel.: +7 (495) 268 0444 E-mail
Production and warehouse: Kaluga region, Maloyaroslavets, st. Kaluzhskaya, 64.
The procedure for carrying out installation work
The technology for installing and insulating ventilated facades is as follows:
- Preparatory work. At this stage, crumbling and weak plaster is knocked down; if there is destroyed brickwork, it must be restored. The prepared wall is marked, maintaining the standard distance between the brackets for fastening - the horizontal distance should be in the range of 400-600 mm, vertically 800-1400 mm.
- Manufacturing and installation of the sheathing frame for cladding. The frame elements are mounted directly onto the wall using screws. The parameters of fastening elements are determined at the calculation stage. It should be borne in mind that it is forbidden to drill holes for dowels in hollow bricks and building blocks using a hammer drill. After installation, the brackets are aligned into a single working plane.
- Laying thermal and waterproofing. At the stage of thermal and waterproofing, the slabs selected on the basis of thermal engineering calculations are attached with mushrooms or stickers, depending on the selected material. Laying starts from the bottom row and continues from bottom to top. When performing double thermal and waterproofing, after installing the insulation, a material is laid that protects the sheets from moisture - this layer is also secured using disc-type dowels.
- Installation of a ventilated facade system. L-shaped strips are installed on mounting brackets using screws. After installation, the surface of each plank is leveled into a single surface. At the final stage, the cladding is attached. Bones, aluminum panels, siding, porcelain tiles, fiber cement and asbestos cement panels, natural stone, granite and so on can be used as finishing materials.
In general, the installation of a ventilated facade is a complex technological process, which often requires the use of special equipment. That is why the installation of facade systems should be entrusted to specialists.
Price list for turnkey facade installation
| Name | Without insulation | 50mm | 100mm |
| — Profiled sheet, rub/m2 | 2215 | 2500 | 2610 |
| — Metal siding, rub/m2 | 2715 | 3000 | 3110 |
| — Porcelain tiles, rub/m2 | 3045 | 3330 | 3440 |
| — Fiber cement panels, rub/m2 | 3175 | 3460 | 3570 |
| — Metal cassettes, rub/m2 | 3415 | 3700 | 3810 |
| — Composite cassettes, rub/m2 | 3520 | 3805 | 3915 |
| — Planken, rub/m2 | 4815 | 5100 | 5210 |
| — Clinker tiles, rub/m2 | 5245 | 5530 | 5640 |
| — Aluminum cassettes, rub/m2 | 5440 | 5725 | 6835 |
| — Natural stone, rub/m2 | 6090 | 6375 | 6485 |
| — HPL panels, rub/m2 | 6860 | 7145 | 7255 |
| — Terracotta panels, rub/m2 | 7815 | 8100 | 8210 |
| — Lamellas, rub/m2 | 9215 | 9500 | 9610 |