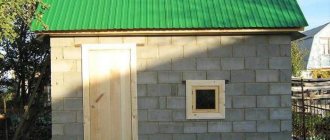
From the point of view of creating the required microclimate and the durability of the building, the use of brick for the construction of a bathhouse is economically justified. Whatever the insulation of a steam room in a brick bath, the requirements for moisture transfer and permissible moisture accumulation are met in almost 100% of cases, regardless of the chosen insulating sandwich design. Even if the principle of a consistent increase in vapor permeability in the direction from the steam room to the street is violated, the high level of permissible moisture accumulation in the brick compensates for this deficiency. However, in addition to optimizing moisture transfer, there are a number of other specific requirements for the insulation of brick baths, which will be discussed in the article.
Location of the main heat-insulating layer
Load-bearing walls made of brick are distinguished by high thermal conductivity and heat capacity, acting in these properties as the complete opposite of log houses.
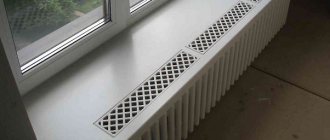
We insulate a brick bath from the inside, only at the stove we do not forget about fire safety
Unlike thermal insulation of residential premises, it makes no sense to insulate a bathhouse made of ceramic or silicate bricks from the outside. For buildings with periodic heating, heat capacity plays a negative role, since it requires more time to heat. For this reason, the main thermal insulation layer in brick baths should be placed exclusively as part of the internal sandwich.
Wall sandwich scheme
You can find recommendations for insulating brick baths using internal masonry made of wooden beams with a cross-section of 100×100 mm, on top of which a layer of mineral wool is mounted. This begs the question: why bother with brick at all, if the first layer of such insulation is a strong enough wall for a one-story building? This scheme is not feasible from an economic point of view.
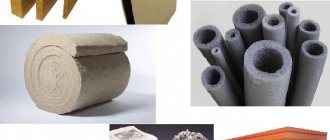
How to insulate a brick bath without investing extra money and effort into it? The correct solution from all points of view is the use of three materials: a waterproofing membrane, insulating wool and an infrared screen made of aluminum foil. Taking into account air gaps, the layers in the sandwich should be arranged in the following order from the inside to the outside of the bath:
Insulation scheme for a brick bath
- decorative interior finishing (lining, tongue and groove board, etc.);
- gap 1 - 2 cm;
- folgoizol, oriented with the reflective side inward;
- mineral wool (slabs or rolled material 10 cm thick);
- waterproofing membrane.
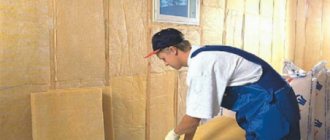
It is easy to insulate a brick bathhouse from the inside with your own hands without the involvement of specialists. To do this, it is quite enough to confidently use a drill, stapler, hacksaw and screwdriver, as well as have a sufficient amount of free time. First, a membrane is attached to the load-bearing wall. Then a vertical sheathing is installed, the thickness of which is equal to the insulating layer or exceeds it by 1 - 2 cm. Cotton wool is placed inside the sheathing, after which foil insulation is attached to the beams with a stapler. It is better for the stripes to overlap. The joints of the foil material are insulated with special tape. A horizontal strip is placed on top of the infrared screen, which serves as a support for the finishing and a base for the formation of an air gap.
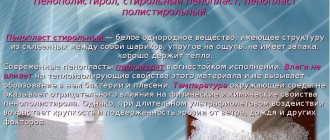
Expanded polystyrene can be used as the main heat-insulating layer if two conditions are met:
- As an infrared screen, a material is used that has an internal surface made of foamed polyethylene with a thickness of at least 1 cm.
- An air gap of at least 2 cm must be maintained between the surface of the screen and the polystyrene foam boards.
Due to these measures, penoplex or polystyrene foam does not heat up to the permissible limit of + 75 °C, even if the temperature in the steam room reaches temperatures above + 90 °C. The slabs are glued to the inner surface of the brick wall, and the waterproofing membrane is excluded from the sandwich.
Insulation of a brick bath: methods
Today, owners of a brick bathhouse can choose between several methods of internal wall insulation with final finishing either with tiles or lining. Let's start with the method where plaster is used:
- The first layer on top of the brick wall is to waterproof it, for example, using bitumen mastic. For this purpose, talc, asbestos and lime are added to the mastic. The resulting mass is applied directly to the walls.
- Then the surface is plastered, and expanded clay and finely chopped slag are mixed into the plaster solution.
- A lathing is placed on the layer of plaster, between the bars of which fiberglass is laid - a non-flammable heat insulator, similar to asbestos, but environmentally friendly.
- A layer of insulation is placed on the fiberglass - for example, basalt or kaolin wool.
- Then everything is covered with a vapor barrier, for example, foil or foil fabric.
- All that remains is the finishing layer - the same lining, for example. It is mounted on a sheathing with a ventilation gap.
Tile option:
- waterproofing;
- sheathing;
- insulation between the sheathing posts;
- vapor barrier;
- reinforcing mesh;
- plaster;
- tile.
Method without plaster:
- The first layer on top of the inner surface of the wall is waterproofing - either film or the one described above.
- The sheathing is made of timber with a section of 5x5. The step between the beams is equal to the width of the seal minus 1 cm, so that it lies tightly in the spacer.
- Fiberglass is attached to the sheathing without tension.
- Insulation, for example, basalt wool (not containing phenolic impregnation) is laid in the remaining spaces between the posts in two layers, shifted by half the width in the second layer, so that cold bridges do not appear. The total insulation layer is 10 cm.
- A reflective vapor barrier is placed on top of the insulation, for example, simple foil for the steam room and Penofol for other rooms. The vapor barrier is overlapped and sealed with aluminum tape.
- If the finishing is done with clapboard, then there must be a ventilation gap between the foil and it. To do this, a sheathing is made of bars of the required cross-section, on top of which the lining is attached.
The essence of internal insulation is shown using the example of a foam block wall; the principles are the same.
IMPORTANT! Metal fasteners will last longer if you use galvanized nails, screws, etc.
Another way is to build an additional wall from timber:
- The first layer on top of the brick is sheathing.
- Waterproofing is attached on top of it.
- A wall is erected from 10x10 cm timber, self-tapping screws are used for fastening.
- The sheathing is again placed on top of the timber.
- It is covered with fiberglass fabric with a slight sagging.
- Insulation is placed in the gaps.
- It is covered with a vapor barrier, for example, foil.
- A ventilation gap is made using a sheathing onto which the lining is nailed.
Useful video
Here is a new material that sounds tempting, but has not yet been tested by many years of use. There is some risk.
Correction of insulation and ventilation due to efflorescence
Efflorescence can be removed with special means
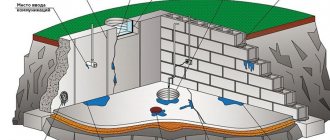
In itself, efflorescence on brickwork is not a problem for a load-bearing wall, but it may indicate improper operation of the insulation scheme, leading to disruption of moisture transfer. In winter, the partial pressure of gases dissolved in water increases. The capillary movement of liquid through the thickness of the brick increases in the direction from heat to cold. Internal condensation and capillary flow cause waterlogging of the layer located 2 - 3 cm from the outer surface of the wall.
At sub-zero temperatures, waterlogging is not noticeable due to freezing of the brick on the street side. In the spring, the condensate accumulated over the winter begins to intensively release on the surface, taking with it water-soluble salts.
If efflorescence forms equally on all walls, then the reasons may lie in the quality of the brick, the composition of the mortar, or a violation of masonry technology. However, in the case of localization of salts on individual walls of the bathhouse and their sections, it makes sense to revise the insulating sandwich, provided that the influence of the unsuccessful design of ebb tides on the process is excluded. This must be done in order to level the operating mode along the entire load-bearing perimeter to increase the service life of the building.
On a wall with intense efflorescence, you should:
Add foil insulation
- add foil insulation if it has not been installed previously, or eliminate possible defects in this layer (for example, poor-quality sealing of joints);
- provide a ventilated gap between the vapor barrier and the main thermal insulation;
- add an exhaust vent.
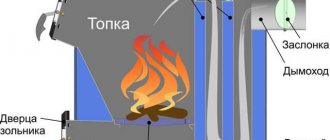
Insulation of the floor and ceiling of a brick bath
Making load-bearing walls from brick does not carry any conclusions regarding the method of insulating the floor and ceiling. The design of thermal protection of horizontal planes depends solely on the design of the foundation, subfloor, ceiling and under-roof space. Let's consider only the most common design options for these surfaces in brick baths.
Concrete subfloor on the ground
Installation of heated floors in baths on the ground
Today, the most popular option for insulating a concrete floor in a bathhouse is the use of 10 cm thick expanded polystyrene slabs. There is no need to install waterproofing between the insulation and concrete, provided that the joints of the EPS slabs are carefully sealed. A reinforcing mesh is laid on top of the expanded polystyrene and a 3-5 cm thick screed is poured on top. On top of the screed, if non-waterproof concrete was used for it, waterproofing is installed and a plank floor is installed. In dressing rooms and rest rooms, it is recommended to cover the floor with ceramic tiles. To eliminate cold bridges, the finishing screed along the perimeter of the walls must be insulated from the base with a vertical layer of polystyrene foam.
The second common method of insulating a concrete subfloor is the use of expanded clay backfill. Since a significant thickness of this material is required (at least 20 cm), beams of the appropriate cross-section impregnated with a composition that prevents rotting are installed on top of the concrete. After backfilling, finishing logs are placed on the timber to install the plank floor. With such a scheme, two types of membranes must be laid under the finished floor - windproof and waterproof. An air gap of at least 5 cm must be provided between the expanded clay layer and the wind protection.
Internal ceiling insulation
Insulating a bathhouse ceiling with mineral wool
Further (in the upward direction), provided that a plank ceiling is used, the main heat-protective layer is located - mineral wool or expanded polystyrene. A layer of waterproofing is laid between the mineral wool and the boards.
Regardless of the design of the ceiling and the type of under-roof space, the two internal layers of thermal protection for the ceiling are no different from the equipment of the walls. This is a lumber finish and a foil infrared screen located taking into account the air gap relative to the cladding.
External ceiling insulation
If the ceiling is made of large-section wooden beams (at least 30 cm), the main insulating layer is located on the side of the roof space. Expanded clay or eco-wool is poured between the beams. Another common option is to use cellular concrete screeds filled with sawdust or straw. A layer of waterproofing material must be laid on top of the backfill insulation.
Basic technologies for internal wall insulation
Insulation options that are suitable for bathhouses under construction are not suitable for thermal protection of bathhouse buildings in which a major renovation of an old bathhouse is being carried out. But the sequence of work in both cases has much in common.
When insulating a brick bathhouse from the inside, the scheme stipulates that work must begin with the floor covering. Thermal protection of the floor is necessary, since a person moves on its surface barefoot, which means it must be heated as much as possible.
Before you insulate a brick bathhouse from the inside with your own hands, you should create an air gap between the foundation of the building and the floor covering. This will ensure sufficient thermal insulation.
When creating a gap, support beams are installed at the base of the room, and expanded clay is poured into the spaces between them, the layer of which should be approximately 2 times the thickness of the walls in the building. Logs made of wooden beams are mounted on top of the supporting elements, which are pre-dried and treated with antiseptics.
After completing the thermal insulation of the floor, they begin to create protection for the walls. Before insulating a brick bathhouse from the inside, in order to prevent the growth of bacteria, the walls are impregnated with special agents. This procedure is required only for the treatment of certain rooms - these are shower rooms and steam rooms.
There are features regarding how to properly insulate a brick bathhouse (the walls in it):
- To reduce the degree of heat loss, gaps between windows and walls are eliminated using polyurethane foam.
- The frame on which the sheathing is mounted is constructed from wooden beams and fixed directly to the brickwork.
- It is undesirable to use metal profiles and hangers in work, since they have the property of conducting thermal energy.
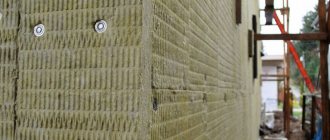
- Mineral wool or polystyrene boards, used as insulation, are placed in the cells that make up the sheathing.
- Thermal insulation material is fixed to the masonry with dowel umbrellas or special adhesives are used.
- Before applying the thermal protection, bath walls made of bricks must be treated with a penetrating primer.
After completing the fixation of the main thermal insulation material on the walls, you need to lay a vapor barrier layer made of kraft paper, or foil film or other materials. Reliable vapor barrier of a sauna steam room is simply necessary.
You need to know how to properly insulate a steam room in a brick bathhouse, since in a particularly humid room the kraft paper will get wet and will soon become unusable. For such places, foil-based film is best suited.
If necessary, a counter-batten can be placed on the sheathing beams, as a result of which a gap will appear between the outer sheathing and the vapor barrier layer. Then the clapboard is nailed to the counter-lattice.
Thermal insulation of bath walls
You can preserve heat inside the bathhouse by making an additional wall from timber or laying a thick layer of insulation. To erect a wooden partition, you will need timber treated with a special compound that protects against moisture. Process technology:
- The sheathing is fixed to the brick wall.
- Using a stapler, the waterproofing film is fixed.
- A wall is mounted from 10x10 cm timber, the lumber is fastened with self-tapping screws.
- The second tier of the sheathing is being filled.
- The roll of fiberglass is secured to the racks with brackets. The material does not stretch and is fixed with sagging.
- Insulation is placed between the guides under the fiberglass. The insulation can be mineral wool or penoplex. The last option is suitable for all rooms except the steam room.
- Foil is attached to serve as a reflector of heat and moist steam.
- The final cladding of the walls with clapboard is being carried out.
The second option involves replacing an additional wooden wall with a layer of insulation. The sequence of work will be as follows:
- A waterproofing film is fixed to the brick wall.
- A wooden beam 5x5 cm, treated with an antiseptic, is stuffed vertically. The distance between the posts is chosen to be 1 cm less than the width of the insulation, which will allow the material to be laid tightly and not create cold bridges.
- Insulation with a thickness of at least 10 cm is laid.
- A waterproofing sheet is attached over the material.
- The second layer of sheathing is made of timber, similar to what was used previously.
- Fiberglass fabric is loosely attached to the posts.
- Insulation boards are tightly inserted into the gaps between the sheathing beams and covered with fiberglass.
- Next, a layer of material that reflects thermal radiation is secured with a stapler. For a steam room, only basalt wool is suitable as insulation; the insulating layer is made of aluminum foil, which does not release harmful components when heated. In other rooms, penofol can be used for insulation and waterproofing, which reflects up to 90% of radiation and is designed for temperatures up to 100ºC. The foil material is glued at the joints with aluminum tape.
- The walls are being finished with clapboard. The boards are attached at a distance of 1–1.5 cm from the aluminum layer. This air gap is necessary to ventilate and separate the wood and aluminum foil, which are heated to high temperatures.
Wall decoration with clapboard
Internal wall cladding is made from lining of various types of wood. For steam rooms with high temperature and humidity, linden, cedar, and larch are used. They have low thermal conductivity and high resistance to moisture. The rest room is lined with pine boards; the wood has a pleasant appearance, and when heated, it distributes healing substances.
The total layer of the insulating structure should be about 22 cm, then it will serve as effective thermal insulation. You can use several types of insulation in the pie; closer to the brick walls, where moisture can penetrate, it is more correct to lay polystyrene foam boards.
We invite you to familiarize yourself with How you can paint the inside of a bathhouse: do-it-yourself painting instructions, videos and photos