Features and characteristics of ecowool
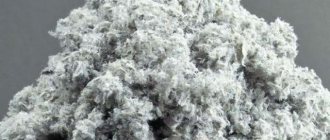
The material is produced from paper industry waste and waste paper. Representing a loose powder, ecowool contains 80% cellulose, 12% antiseptic (boric acid), 8% antiprene compounds - they are needed to reduce flammable properties. The use of ecowool is indicated for buildings of any type: residential, industrial, public. The material is considered environmentally friendly and harmless to human health.
Product characteristics:
- Noise absorption. A 15 mm thick layer of ecowool eliminates noise up to 9 dB, which is why the material is used in airports and stadiums.
- Low consumption. To install insulation per 1 m3, 28-65 kg is enough to achieve high-quality insulation of the ceiling, wall panels, and floors. Such a large “range” of numbers is explained by the choice of application technique.
- Harmlessness. To choose the “cleanest” material, give preference to borax as an antiseptic and antiprene - ammonium sulfate has a strong smell.
- Versatility. Ecowool is used in buildings made of any material, it qualitatively seals cracks of various sizes and fills inter-slab seams and joints.
- When using a seamless installation option, the owner saves a lot on energy. There will be no cold bridges, which means the house will not freeze even in the most severe cold.
- The low cost of the material will not increase the cost estimate for repairs, and allergies to paper raw materials are extremely rare - ecowool can be used in homes with high requirements for the cleanliness of products.
Advice! If the ceiling is processed using equipment from below, then the material consumption is up to 65 kg/m3. It is impossible to do less so that voids do not form.
It is permissible to lay insulation at sub-zero temperatures, but the installation involves a large amount of paper dust, so personal protective equipment is needed and you will have to work indoors. Experts recommend avoiding the use of insulation when finishing areas of chimneys and fireplaces.
Advantages and disadvantages of the material
The production of the material is based on the use of fluff pulp with the addition of natural minerals as antiseptics and fire retardants. All components are non-toxic, do not contain volatile components and are harmless to humans .
Cellulose insulation has an elastic, elastic consistency and practically does not shrink. The capillary structure of the material does not disturb natural ventilation, allowing the ceiling to “breathe” .
The main advantages of the material:
- Soundproofing. Ecowool is an excellent soundproofing material. A layer 10 cm thick can absorb noise up to 60 dB.
- Ecological properties . Cellulose insulation consists of 81% natural material - recycled paper. Waste paper with significant plastic impurities is not used in production. The antiseptic additives present in the composition are also safe for health.
- Biostability . The material is a reliable protection of the ceiling surface from rot, mold, the spread of fungal damage, rodents, and insects.
- Thermal insulation . Due to the small size of the fibers and the adhesive consistency of the composition, ecowool effectively resists air movement. When the relative air humidity changes, the top layer of insulation is moistened and the lignin of wood fiber raw materials is activated. In this regard, the fibers of the upper layer stick together and a thin crust forms . The crust prevents the free circulation of air through the insulation, thereby increasing its thermal properties.
- Fire resistance . The presence of fire retardants in the form of salts increases combustion resistance. This is a low-flammability, non-flammable material. Without constant exposure to an open source of fire, self-extinguishing occurs without the release of toxic gases.
- Economical . Ecowool is not an expensive insulation material. Its installation technology is waste-free. If installed correctly, energy savings on heating will be 30%.
- No shrinkage . Cellulose fibers have elasticity and resilience. Therefore, ecowool does not shrink and the thickness of the layer is maintained.
Attention! A significant amount of thermal and sound energy is transmitted through the voids and gaps of the ceiling. Ecowool insulation will fill the smallest depressions and create a reliable insulating layer.
Disadvantages of ecowool:
- The hygroscopicity of ecowool reduces its thermal insulation properties. This can be avoided by ensuring the layer is ventilated so that the material can release moisture into the atmosphere.
- Installation of cellulose insulation requires special equipment. The work can be done manually, but professional equipment allows you to meet the standards of proper installation and improves the quality of the final result.
- When laying dry, dust is generated and work should be carried out using a respirator.
- The wet laying method increases the time of work, since drying of the layer lasts on average 60 hours, depending on the conditions.
- It is not recommended to place ecowool close to chimneys or fireplace pipes. Under the influence of elevated temperatures, the material may gradually smolder. Therefore, it is necessary to provide insulation from the chimney with asbestos-cement or other fire-resistant materials.
Properties and manufacturers of the material
The best conditions, betting odds for sporting events and this is all in one application, you can follow the phone link absolutely free and receive a bonus using the MyAndroid promotional code.
Manufacturers provide ecowool with the following properties and technical characteristics:
- Environmentally friendly. Increased, contains no formaldehyde.
- Thermal insulation. Average thermal conductivity coefficients are 0.032-0.041 W/mS.
- Noise insulation. The noise absorption level of a layer of 50 mm thickness is up to 63 dB.
- Vapor permeability. The ability to bind moisture up to 30% of the weight of the product, releasing steam to the outside without losing the quality characteristics of the material. No additional vapor barrier materials are required.
- Fire resistance. High, does not support combustion, does not form a flame up to +1300 C.
- Resistance to parasites. The use of antiseptics as product components gives ecowool high resistance to bugs, mold, rot, and fungus.
- Shrinkage. The material is springy, has minimal shrinkage properties and can be laid on any surface.
Products are sold in bags. Weight 50 kg. Price 3-5$. There are few manufacturers that have good reviews: Ekovata LLC, Promekovata LLC, Ekorema, Equator LLC.
Positive and negative aspects of ecowool insulation
Ecowool is a loose mass. The material is widely used due to a number of advantageous characteristics:
- The created “pie” increases the sound insulation of the living room.
- By following the laying regulations, the material does not shrink and remains elastic, maintaining its quality for a long period.
- Ecowool contains additives that prevent the formation of fungus.
- The material prevents the actions of rodents.
- Virtually no heat is lost, while having its own humidity level of 20%. This allows you to reduce the cost of additional vapor barrier, because When insulating with ecowool, it is not needed.
- The cavity is filled 100% with material. There are no cold bridges.
- A mechanical procedure for laying granular mass through the use of special devices.
To obtain high-quality results in insulating the ceiling with your own hands, it is enough to familiarize yourself with the technological process.
Features of the technology of insulating a wooden ceiling with ecowool
Before starting work, you need to choose an application technique. Most often, the insulation layer is laid out from the attic side, but work can be done in living rooms using technological holes inside the sheathing. Ecowool is well suited for an additional insulating layer in sheathed structures.
If the master is familiar with the technology of insulating the ceiling with mineral wool, he can handle ecowool.
Proper insulation of the ceiling in a private house with a cold roof
The following layout methods are distinguished:
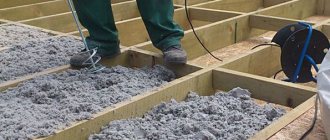
- The dry version can be manual or using an automatic device, for example, nozzles for uniform spraying. The result is a high-quality layer that seals all cracks and fills voids. After application, the material is covered with cellophane or a membrane to remove dust. The manual technique requires final compaction.
- The wet version is spraying powder mixed with water or glue. This way the product is evenly distributed over the entire surface and fills even small cracks well. If the ceiling is insulated indoors, then the water-adhesive option is much better. The result is a durable, elastic layer.
- The mechanical method involves the use of a compressor. The unit allows you to supply the composition to a height of up to 30 m and a distance of up to 150 m. With a compressor power of 3-6 kW, it is necessary to tighten the waterproofing, then apply the composition, filling all the voids under the film.
When choosing an application technique, the master needs to evaluate his strength, ability to handle units and the area of the room.
Diagram of a ceiling with insulation
When considering the arrangement of the ceiling, you need to take into account the purpose of the insulation. If work is being done to lay insulation on the roof or attic, then schematically the layers look like this: insulation, waterproofing, vapor barrier. When working in the attic, the material does not require protection from moisture, and if it is indoor insulation, the layer is covered with a membrane to minimize external influences.
Selecting layer thickness
It all depends on the application option:
- dry version from the inside - a layer of 150-200 mm, from the attic side - 300-400 mm;
- wet version in a private house - layer thickness up to 100 mm, in multi-storey buildings layer 100-150 mm.
The consumption can be calculated using the formula: the covered area is multiplied by the density of the product. Manual laying - density 30-35 kg/m3, mechanical - 40-45 kg/m3.
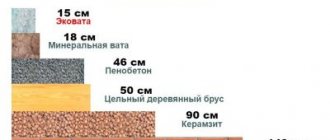
On a note! When thinking about what layer of mineral wool is needed to insulate the ceiling, take note that the thickness of a layer of ecowool of 150 mm corresponds to: 50 cm of wooden beams, 46 cm of foam concrete blocks, 18 cm of a layer of mineral wool, 90 cm of expanded clay backfill, 146 cm of brickwork. In terms of insulation, ecowool outperforms almost all known materials.
Methods for insulating the ceiling during outdoor work
The process looks like this:
- Lay a thick film on the base and fasten it with a stapler. A vapor barrier is not required, but it is better to tighten the membrane to further reduce heat loss. The material is laid out overlapping, the edges need to be well secured.
- Pour the powdered product into the container so as to fill the container volume by a third. Then you need to loosen the ecowool, achieving a 2-fold increase in volume.
- Pour the insulation material into cells or onto the subfloor of the attic, constantly compacting it (preferably with a sheet of plywood). The thickness of the compacted layer should be approximately 200 mm; if it is the floor of a multi-storey building, then the thickness should not be more than 150 mm.
Particular attention is paid to corners and joint areas; here it is permissible to slightly increase the layer thickness (by about 5-7 mm). After laying out and compacting, moisten the ecowool from a spray bottle so that the lignin contained in the material becomes elastic and, when dry, tightly adheres to all the elements. All that remains is to dry the layer, tighten it with a vapor barrier membrane so that the edges of the membrane extend 150-200 mm onto the walls. Cover the backfill in the attic with boards or flooring.
Insulating the ceiling in a private wooden house with sawdust
On a note! When using a wet layout, it is necessary to constantly moisten the powder substance to achieve an even layer.
Ecowool insulation from the inside
Working with your hands is extremely difficult, laying out will be difficult and long, so insulating the ceiling of a house with your own hands from the inside requires a compressor. In addition to the complexity, with manual work it is impossible to achieve an even layer application; untreated areas will remain, which will increase heat loss.
The insulation is laid out before the ceiling is finished; it is necessary to make holes in the cavities, into which a hose supplying the composition is then inserted - this is how high-quality filling of the space is obtained. To increase flexibility and give the layer strength, part of the water is replaced with glue, then ecowool powder is added.
Stages of work on internal insulation:
- prepare the surface, treat the wood with compounds against combustion and rot;
- caulk the cracks of the monolithic coating;
- wet spray the first layer mixed with glue (PVA or regular tile adhesive is suitable);
- Apply a second layer dry, this is necessary for tightly sealing cracks and areas with difficult access.
Work inside is carried out using a wet method, so above-zero temperatures are important; moreover, at sub-zero temperatures, the layer will not dry out, but will freeze. Sometimes the shape of the room differs from the standard one; in these cases, experts advise using only the wet spray option - this makes it easier to achieve continuous coverage of the surface and uniform distribution of insulation.
Tools and materials for work
When choosing tools, focus on the spray method. For the mechanical method you will need:
- automatic blow molding unit with agitator;
- hoses;
- pumps (for water-adhesive compositions);
- blowing nozzles;
- rollers.
For manual layout you will need:
- container for loosening;
- drill with attachment for loosening;
- vacuum cleaner (preferably a powerful garden one);
- scotch;
- hose.
The materials you will need are: ecowool, glue (PVA, tile), water, vapor barrier membrane, thick film. Don't forget about personal protective equipment.
Step-by-step instructions for manual installation of ecowool for insulation
Manual laying of ecowool on the ceiling is recommended only for small rooms with an attic above it. The use of blowers is unprofitable.
Technological stages of insulation with bulk mixture:
- The base is covered with a vapor barrier material and fixed with a construction stapler. Although ecowool can function even in a wet state, the film will not be superfluous, because... improve performance. The canvas is overlapped by 15 cm.
- The insulation mixture is poured into a container of appropriate size. It must be filled one third full. After this, the ecowool is loosened using a drill and a whisk. As a result of the actions, the volume will increase by 2 times.
- The insulation is poured into prepared cells and compacted using a sheet of plywood. Please note - if the attic space is cold, then the layer thickness should be at least 20 cm. To treat the ceiling between floors, the layer should not exceed 15 cm.
- The corners of the structure are carefully processed. Due to the fact that ecowool compacts well, it is necessary to fill the corner joints with a reserve.
- The material should be moistened with plain water from a spray bottle. This allows lignin (part of ecowool) to soften, after which it sticks together, forming a dense crust. These actions are dictated by protecting the composition from air with high humidity.
- After the coating has dried, a vapor-permeable film is laid on it with an overlap of 15 cm on the wall, incl. to adjacent canvases.
- When using the attic, an additional flooring for movement is installed.
Important information: Board material (plywood, chipboard, board, etc.) is fixed to the joists on the side of the living space. In this case, the material must meet the following parameters: ability to withstand the weight of ecowool; no gaps in the design; installation of jumpers between beams.
The cost of insulating the ceiling with ecowool
If installing insulation on the ceiling with your own hands is impossible, you will have to turn to professionals. The estimate for the work includes not only laying out the material in the chosen method, but also a number of additional works: processing the base, purchasing consumables, strengthening the floors if necessary, and other services. The cost of the service starts from $20 per 1m2.
On a note! If the ceilings are not very high and it is necessary to make high-quality sound insulation, it is better to spray ecowool from the inside of the room, but lay out a mineral wool sheet from the side of the attic - such a “pie” will absorb almost all noise and well protect the building from frost.
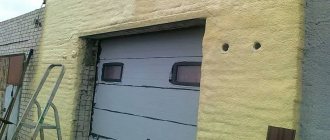
Roof insulation with ecowool
At the preparatory stage, the roof is waterproofed and the load-bearing capacity of the rafter system is checked.
If necessary, it is reinforced with wooden beams and metal profile structures. The attic is cleared of debris, and protective screens are installed in places where cables are laid to ensure access to them after laying the wool. Before blowing, you should analyze all the spaces that need to be filled: those formed by the side rafter beams (the thickness of the layer will be identical to the width of the rafters), the upper windproof plate, the lower vapor barrier . The insulator exerts a certain pressure on the base, so it is important to check the gap between the vapor barrier membrane. Lay only high-quality material on the timber and without sagging
The counterbar should create a gap of 45 mm. At the bottom, the material is fixed with a 20-40 mm beam.
Prices for different types of bars
Bar
Layer cake when insulating the attic
Insulating the attic roof requires compliance with the following rules:
- thermal insulation must be protected from excess dampness;
- ventilation in this technology is mandatory;
- The cotton wool is laid in a uniform monolithic layer.
The roof pie consists of a roofing covering, frame, waterproofing layer, ecowool, vapor barrier and finishing material from the inside. The geometry of the roof is quite complex, so wet technology is recommended. Insulation instructions:
- Cover the roof frame with film. At the joints, the sheets are connected with construction tape.
- Spray a layer of ecowool on the surface. It is applied from bottom to top to prevent the top layers from slipping.
- After the insulation has completely dried (up to 2 days), it is covered with a vapor barrier film. The canvases are secured with a stapler.
- The roof is sheathed along the sheathing with plasterboard, siding, and wood.
Features of attic insulation
Necessary materials
First of all, to insulate the ceiling and the space between the beams in the house from the inside and outside, we will use a layered structure. Each layer of our pie plays a strictly defined function. List of layers used:
- Vapor barrier layer
- A layer of waterproof, high-density thermal insulation
- Waterproofing layer
- Layer of main insulation
- Waterproofing layer
Vapor barrier layer
Glassine or plastic film can be used as such a layer. Its function is to prevent the penetration of water vapor from the living space into the ceiling.
A layer of waterproof, high-density thermal insulation
This layer consists of 50 mm thick foam plastic slabs. It is a reliable insulation material for the ceiling in a wooden house.
Polystyrene foam has a high water-repellent property and a very low thermal conductivity coefficient. It plays the role of the last line of defense against low temperatures.
Foam boards
Layer of main insulation
Mineral wool made from basalt fibers is used as the main protective layer. Thanks to the interweaving of basalt threads, this ceiling insulation retains a huge amount of air.
In addition, basalt fibers have a low thermal conductivity coefficient. All this prevents precious heat from evaporating. Mineral wool is produced in rolls or mats 50 mm thick.
Waterproofing layer
This is a layer of the same material as the vapor barrier layer. The difference lies in the function performed - to retain water in case of possible roof leaks.
Tools for getting the job done
To insulate the ceiling in a wooden house you will need the simplest set of tools:
- Wood hacksaw
- Knife
- Hammer
- Construction stapler (can be replaced with a hammer and small nails with a wide head)
As you can see, such a set can end up in the workshop of almost every home craftsman.
Important to remember! Insulating a wooden ceiling with mineral wool will require the use of a respirator, safety glasses and gloves. Dust from basalt fibers is hazardous to the respiratory tract and can cause irritation to the skin and mucous membranes of the eyes.
Work order
Installed vapor barrier
You are in the attic and all the necessary materials have already been raised there. Now let's look at how to properly insulate the ceiling. The first step is to attach the vapor barrier layer.
If you use polyethylene film (reinforced is recommended), then it is laid out over the entire area of the attic. The film should fit tightly to the beams and the space between the beams, and extend onto the walls with an overlap of at least 10 cm.
A stapler is used to fix it. If it is necessary to lay a new strip of vapor barrier, then make an overlap of at least 10 cm onto the adjacent strip.
After installing the vapor barrier, they begin laying the foam. This material, necessary for ceiling insulation, is usually produced in slabs measuring 1 m x 1 m. For installation, it is marked and cut with a knife so that the slab lies between the beams with force.
A gap of 1 cm is left between adjacent foam plates. Later it is filled with polyurethane foam. It will securely fasten the plates together and eliminate small cracks through which heat can escape.
Mineral wool is laid on top of the waterproofing. It is recommended to lay two layers. The second layer should overlap the joints of the first. The level of insulation should be equal to the height of the floor beams.
https://youtube.com/watch?v=790sgi2anTc
The main insulation is covered with a layer of waterproofing. If you plan to use the attic as a living space or storage, you can immediately lay a floorboard or cover the floor with plywood slabs.
Insulation from the outside is complete, you can begin insulating the ceiling from the inside. To do this, a board or beam with a width of at least 50 mm is attached to the ceiling to the ceiling plank.
Then, between the boards, waterproofing is installed on the ceiling and the insulation is attached to the ceiling (it is laid in the space between the boards). From above, everything is covered with a layer of vapor barrier and a finishing ceiling (plasterboard, plastic, fabric or PVC film).
Now you know how to insulate the ceiling of a wooden house. This ceiling will reliably protect you from the cold and will last at least 30 – 50 years.