Vladimir Sadovsky
Winter cold poses a great danger to water supply systems, especially when it comes to private homes located outside cities and large settlements. Due to poor thermal insulation, pipes may freeze, which will result in a cutoff in water supply. The deeper the pipes are laid, the less susceptible they are to the harmful effects of cold weather. To avoid such situations, it is important to consider a high-quality protection system. The best option is a self-regulating heating cable, which is guaranteed to save pipes from ice jams.
What is a self-regulating wire
Structurally, a self-regulating cable is a flexible wire through which electrical energy flows. This is what causes it to heat up. To prevent the process of increasing temperatures from leading to fire or failure of the cable and nearby objects, the product is able to independently regulate its power depending on the ambient temperature. A simple relationship is observed: the lower the mercury column, the hotter the cable. The surprising thing is that the heating process can occur exclusively in a specific area where it is needed. If any part of the cable is at room temperature, then the power will be lower, and accordingly, the product will not heat up.
If we consider the design of the heating wire globally, we can distinguish three main components:
- conductors made of various metals through which electrical energy flows;
- a “smart” matrix of polymer substances that forces the cable to adapt to the ambient temperature and regulates the process of heat generation;
- an insulating shell consisting of many layers.
The main element that explains the principle of operation of the heating cable is the polymer matrix. Thanks to its presence, the wire exhibits self-regulating properties. The matrix consists of small particles, so its individual elements regulate heating independently of each other. This way, you don’t have to connect various sensors and other electronics to properly regulate the temperature.
Another useful cable option is that you can choose the length you need. Take regular scissors and cut the product where you need it. Connect to the network, as a result it will work without changes. Similar to self-regulation at every centimeter, the cable elements function and work independently of each other. An accidental break will not lead to failure. But such situations are rare, since the cable design is characterized by increased strength.
The main useful properties of a heating cable include:
- Increased resistance to mechanical stress. This is due to the presence of high-quality multilayer insulation.
- Resistant to moisture. It can be used in the water column without any problems. The main condition for this is to perform high-quality insulation using heat-shrinkable tubes.
- Economical. Since the cable independently regulates power, the product never works “just like that.”
The high strength is due to the multilayer structure, with the first two layers consisting of copper conductors and a polymer matrix. Already on top of them is installed insulation made of different materials (for example, fluoropolymers or polyolefin).
After this comes a layer of armor, which is used as copper braiding. Finally, an additional polyolefin layer is placed on top of it all. This design significantly increases the endurance and strength of the product. The copper braid also functions as a shield against electromagnetic radiation.
How to choose the right one
High-quality thermal insulation will help get rid of the constant struggle in winter with frozen pipes. The appearance of a sufficient number of high-quality heating cables will once and for all help cope with the task. Some people think that using such a modern and practical device will be expensive and you can do without it, but this is not the case.
Many people prefer another method - deepening the trench. But in this case, it is not always possible to dig a trench two meters deep. This may require enormous physical effort. Sometimes in the process of work you can stumble upon hard rocks and stones. Therefore, it is much easier and faster to install a special heating cable directly inside the pipes (an efficient heater). This way you can avoid additional efforts to dismantle the structure and its difficult deepening and putting it in order.
Note! Professionals recommend using high-quality heating cables purchased from trusted manufacturers. This modern and necessary device is suitable for heating water supply and sewerage systems and preventing roof freezing.
You might be interested in this: Checking phasing
Wire calculation table
In the latter case, the cable is laid in places where icicles and ice cover form. Thanks to this, there is no need to regularly clean the roof. The main element of the underfloor heating system is also the heating cable.
Before you buy a certain amount of cable, you need to decide which type is suitable for solving specific problems and tasks in heating and water supply. The entire variety of this product differs according to five main characteristics:
- type. The cable can be self-regulating, resistive. In this case, the operating principle of both heaters is the same. Heating occurs due to the current that flows through the internal conductors;
- based on external insulation material. Many companies offer practical cables with a special polyolefin coating. For a cable that is to be used for industrial purposes, fluoropolymer insulation is perfect in all respects and features. If the cable is laid in the internal cavity of water pipes, then it is better to choose a food coating;
- by the absence or presence of braid. The braid makes the product strong and resistant to mechanical stress. The screen performs the grounding function. The absence of this element indicates that the product is cheap;
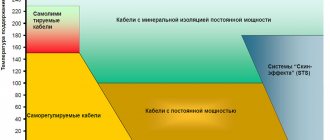
- by temperature. There are low-, medium- and high-temperature heaters. Low-temperature elements heat up to a temperature of 65 ° C, their power does not exceed 15 W/m and are excellent for heating pipes of small diameter. Medium-temperature conductors heat up to a maximum of 120 °C, the power reaches 10-33 W/m, and are used to prevent freezing of medium-diameter pipes. High-temperature thermal cables have the ability to heat up to 190 °C and have a power density from 15 to 95 W/m. This type should be used for industrial purposes or in the presence of large diameter pipes;
- by power. The power characteristics of the heating device also play a big role in the choice. If preference is given to a low-power conductor, then you may simply not achieve the desired performance and results of proper functioning of the product. Exceeding the established values will result in large and unnecessary energy consumption.
Type and length
There are many options for insulating pipes outside. Installation can be done on your own. With a self-regulating wire power of 10, 16, 24 V per linear meter, the heating filament of the cable from the GWS line can have a length of up to 100 m. As a rule, a system is used whose length is no more than 20 m.
Approximate length of heating cable
Note! Many manufacturers suggest paying attention to ready-made systems with a length of 5, 10, 20 m.
Power
The choice of the appropriate power level directly depends on the diameter of the heated pipe. According to the recommendations of professionals, for pipes with a diameter of 15-25 mm, a power of 10 W/m is sufficient, for a diameter of 25-40 mm - 16 W/m, for a pipe with a diameter of 60-80 mm - 30 W/m, for those exceeding 80 mm in diameter - 40 W/m.
Price
Cost is another important factor influencing the choice of product. You should not purchase a suspiciously cheap product. This will lead to negative consequences. Perhaps the manufacturer is trying to hide the obvious shortcomings of the proposed product with a low price.
Important! Before purchasing, be sure to carefully read the product documents. You should trust only well-known and trusted sellers who value their reputation.
You may be interested in this. Features of the PPV wire
Operating principle and scope
The main difference between a self-regulating wire and cables of resistive and zonal operating principles is the design.
The resistive product operates on the principle of a boiler, so it is prohibited to shorten it. In this case, the conductors are the heating elements.
The zone heating wire can be cut into pieces, since its design involves the placement of parallel wires. A heating element consisting of high-resistance wire is placed between the cores. In certain areas, the wire comes into contact with the current-carrying conductor, which ensures heating in a specific section of the circuit.
As for the self-regulating cable, it differs from the previous two in the presence of a polymer matrix. The main elements are hidden under the braiding and protective screens - two current-carrying copper cores and a heating matrix. When examining the latter, you will find ordinary polyethylene. In fact, this device made it possible to create unique and modern heating elements. The matrix is a semiconductor that changes properties depending on the specific air temperature.
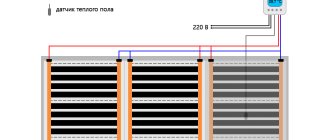
Example with heated floors
Self-regulating cables can be used to create heated floors. In the bathroom, the floor temperature will be lower, since heating equipment is usually installed in other rooms. The “degree” is also reduced by the fact that the floor in the bathroom or toilet is usually made of ceramic tiles, which are a “cold” building material. The temperature difference is not limited to this: at one end of the room it can be higher, at the other, which is closer to the windows, lower.
In this case, when using resistive or zone conductors, you will not be able to achieve a comfortable balance. The only way to do this is to divide the rooms into parts depending on the floor temperature under normal conditions, but this is a labor-intensive and painstaking process that involves installing thermostats and heat sensors.
The self-regulating wire eliminates the need to use such elements. You can place it over the entire surface of the floor, while the polymer matrix will take care of itself to create a uniformly heated floor surface. A simple but understandable example: you came home from the street and left your shoes, soaking wet, on a specific area of the floor. The self-regulating cable will detect a cold snap and begin to heat this area more strongly than others. This will happen until your boots warm up to the required temperature. And you will go outside in warm shoes! If there are no boots, then the cable does not heat up as much, which means energy savings occur.
Plumbing example
To prevent water from freezing in extreme cold, a self-regulating cable is used to wind the water valve. The valve is a structure of complex geometric shape, due to which the product cannot be in direct contact with every part of the metal. Zone and resistive wires will heat not only the valve, but also the environment.
If you install a self-regulating cable, the heating process will occur only in places of contact with metal. The principle of operation of the product is based on the efficiency of heat transfer: the more pronounced it is, the more the wire heats up. It is clear that upon contact with cooled metal, the thermal output will be much higher. This leads to an increase in the efficiency of the self-regulating wire compared to other heating analogues.
Example with roof heating
The roof is susceptible to icing in random areas, so it is impossible to determine a specific one. Thus, when using a zonal or resistive heating cable, you will have to lay it over the entire surface of the roof. This will significantly increase energy consumption.
Use a self-regulating cable with a semiconductor matrix, due to which only the area of the roof that freezes and where icicles can form will be heated. Moreover, after it is heated, the cable operates at half power for some time, so the efficiency of its operation is much higher.
Classification
Heating cable for roofing
Depending on the heat release pattern, heating cables are divided into 3 groups:
- resistive;
- self-regulating;
- with mineral insulation.
Resistive heating cable can be:
- linear (single, two or multi-core);
- zonal.
The operating principle of a resistive type heating cable is based on the voltage drop in the core when an electric current passes through it. If there is only one core, there is no protection against electromagnetic radiation. If there are two or more wires, one of them carries the current. The length of the linear electrical cable can be different; cutting during installation is not allowed.
Resistive cable
Zone electrical cables are sets of resistor sections that are connected to the cores in parallel. During installation, cutting into sections 1.5-2 meters long is allowed.
A self-regulating heating cable is similar in design to a linear zonal one.
Self-regulating heating cable
The main difference is the replacement of the insulating material with a polymer matrix, which increases resistance when current passes.
The self-regulating cable changes temperature depending on environmental conditions: if it gets warmer, the matrix reduces the heating level.
Important advantage! During installation, cutting into lengths of 20 cm or more is allowed.
Mineral insulated cable consists of a copper core encased in powdered magnesium oxide insulation, encased in a sheath of stainless steel, copper or cupro-nickel alloy. Magnesium oxide ensures the stability of the system due to tightness, minimal linear expansion, resistance to mechanical damage, electromagnetic waves, and ultraviolet radiation. The service life reaches 60-80 years.
Main types of heating cables
There are two main types of heating cable - resistive and self-regulating. Each of them will be discussed below.
Resistive wire
The principle of operation of a resistive cable differs from a self-regulating one. The inner and outer surfaces of the pipeline are wrapped with cable, after which temperature sensors are installed. A thermostat is connected to the circuit, which receives readings from sensors. It is triggered by the slightest temperature fluctuations, however, the action threshold can be set manually. If the air temperature drops, the thermostat is activated, starting the heating of the resistive cable. Electricity begins to flow through the cable, which leads to the release of heat and heat exchange with the water supply. As soon as the pipes are heated to the required temperature, the cable automatically turns off.
Structurally, a resistive cable consists of insulated metal cores. Heating occurs along the entire length of the product, but without temperature control (thermostat), the device can burn out. To increase heating efficiency, water pipes are additionally insulated in order to reduce heat losses and achieve energy costs. Any materials that do not conduct heat can serve as insulation. For example, mineral wool.
Self-regulating wire
The self-regulating cable was developed as an alternative to the resistive version. It has the best technical characteristics and properties. The product can be used for heating water pipes, roofing or forming “warm floor” systems. Structurally, the device consists of two copper conductors located separately from each other, with polymer insulation that can respond to any temperature fluctuations and change resistance. This value increases or decreases in proportion to the ambient temperature, which leads to an increase or decrease in current strength.
The polymer matrix is able to respond to temperature changes at each individual point of the cable. Thus, the temperature will be different in each area. The product is characterized by efficiency and safety due to high-quality and durable insulation. The service life can exceed 20-30 years.
Recommendation. The self-regulating cable can be cut into pieces of arbitrary length and connected separately from each other. This does not in any way affect the performance and efficiency of the product as a whole.
Step-by-step instructions for installing a heating cable in a pipe
Before purchasing a cable, you need to determine its quantity. The size of the product is equal to the length of the pipe for which the cable is selected. Along with it, it is important to buy additional materials used in the installation process. These include a set of couplings, an oil seal and a section of wire with a Euro plug.
Important! It is necessary to pay special attention to the quality and reliability of the cable. It is better to give preference to the option with a metal braid inside. The water pipe requires a top layer of insulation made from food-grade material. To correctly enter the cable, you will need a tee.
For the self-regulating cable to function, a power supply is required, so a separate line is allocated for it. And, despite the presence of double insulation on the heating wire, it is necessary to include an RCD and a circuit breaker in the connection diagram, protecting this line in case of accidental damage to the shell.
Preparing for installation
Self-regulating cable systems fail not only from constant switching on and off. This mainly happens due to improper splicing with the power cable and poor-quality termination, which leads to a short circuit.
Kit for coupling the heating cable during installation inside the pipe
It is necessary to carry out insulation according to all the rules, using proven consumables. Poor quality couplings may occur. Also, a lot depends on the professionalism of the master himself.
To prepare the heating wire for installation work, you need:
- Perform end seal.
- Place the pass-through kit on the cable.
- Splice the supply wire with a plug with a self-regulating section.
Connection to the power grid
After all the installation work has been completed, there is only one step left - connecting to the electrical network. For this, experts recommend using a separate line. It is important to take care in advance and equip this line with a 10 mA RCD, which will protect against current leakage in case of accidental damage to the wire. The RCD will simply de-energize the line, preventing electric shock to the owner of the object.
Note! The connection process is simple - you need to plug the Euro plug located at the end of the power wire, which is connected to the heating wire, into the socket. Temperature control is carried out automatically.
What power is required for a heating cable for a water supply system?
The choice of specific power of the product depends on many factors, including the region of residence, the principle of laying the water supply system, the diameter of the pipes used, the presence or absence of insulation and the method of installing the heating element (inside or outside the pipe). Each manufacturer offers detailed product characteristics and tables that describe the dependence of cable consumption per meter of pipe. The table is generated separately for a specific wire model (power).
If there is average insulation of the water supply using 30 mm polystyrene foam shell, in a temperate climate, it is enough to use a cable with a power of 10 W/m to heat each meter of pipe from the inside. For external heating, products with a power of at least 17 W/m are suitable. The closer to the north, the higher the power of the wire.
Heating cable service life
Find out more
The service life of a heating cable depends on the quality of the semiconductor matrix material, the rate of its degradation, the so-called “matrix aging”. In fact, the cable works for 10-15 years, but gradually the power of the cable decreases as a result of the matrix losing its conductive properties.
To compensate for this process, a 30-40% power reserve is included during cable production. The wear rate of the matrix depends on several factors, the determining factor being the number of system starts and “cold starts”. The ideal mode of operation of the heating system is temperature maintenance, namely, switching on at the beginning of the season and constant operation in normal autonomous control mode. More details
Laying and connection
Installation of the heating cable can be carried out in two ways - external and internal. In the first case, installation takes place along the pipe (the product can be attached with electrical tape or wrapped around the water supply), in the second, it is laid inside.
Hidden installation inside the pipe
Internal installation is not suitable for all pipes. It is important that the diameter of the water supply is at least 40 mm. With a smaller value, due to its dimensions, the cable will interfere with the free flow of water. It is also difficult to place heating on an overly long route. Therefore, a self-regulating cable is suitable for sections several meters long.
It is much easier to install on vertical sections of pipes, moving from top to bottom. To perform the procedure, use a tee and a sealing sleeve, which prevents the wire from slipping. In some situations, indoor installation is more rational than outdoor installation.
Placing the wire inside and connecting it to an AC source is not difficult. Much more difficult to assemble. Use the instructions with the sequence of actions described below:
- Remove insulation.
- Unravel the braid.
- Remove the corner.
- Prepare the sealing sleeve.
- Frame the coupling using a hair dryer.
- Glue the ends of the coupling together.
- Put on the cap.
- Strip the sealed end.
Open outdoor installation
To perform linear installation of a self-regulating cable along a pipe, less effort will be required. The wire can be fixed to the pipe using plastic clamps that can withstand high temperatures or fiberglass self-adhesive tape. Fastening elements must be installed at a distance of at least 30 cm. The use of metal parts is prohibited. To calculate the length of the wire, you don’t need to be a mathematician: it should be equal to the length of the pipe that you plan to heat.
Brief instructions:
- Secure the cable to the pipe.
- Apply aluminum tape or install clamps.
- Install insulation.
- Fix it on the pipe.
If the pipes are immersed in the ground, then the cable is placed somewhere on the side, and not above or below.
In addition to linear installation, spiral installation can be used. In this case, the cable is wound around the pipeline along its entire length, using a uniform pitch. The advantage of this method is that it ensures maximum contact with the pipe surface, the disadvantage is that the consumption of materials increases. This option is suitable for pipes of medium or large cross-section, which are used in sewer and drainage systems. However, it is often used to heat ordinary water pipes.
Outdoor installation
Installation of the heating cable for the water pipe is carried out externally over the entire surface. Before installation, metal pipes are cleaned of rust, dirt, and traces of welding. The surface of the pipes should not have elements that can damage the heating wire. The heating cable is laid on a clean surface and fixed every 30 cm with special clamps.
Note! When laying two cables, they are installed in the lower cold part of the pipes without touching. If more than three cable threads are laid, then most of them are placed at the bottom, and there should be no contact here either.
External installation of heating wire
There is another installation method - spiral installation. You need to be careful when doing this, as repeated bending can damage the cable. You can gradually unwind the coupling by winding the freed cable around the pipe.
You may be interested in this All about corrugated pipe
To heat a plastic pipe, metallized tape is first glued, which increases heat conductivity and the quality of the heating process. The peculiarity of the installation is that valves, tees and other plumbing devices require more heat. Therefore, when installing on each of them, it is necessary to wind several loops on them, without bending the heating cable too much.
Important! It is not recommended to use mineral wool to insulate pipes, as it absorbs moisture. In the cold, wet cotton wool freezes and crumbles.
For this, a special type of insulation is used - polystyrene foam, made in the form of pipe elements and called shell. It has good insulation properties and does not absorb moisture.
Thermal insulation of heating cables
Regardless of the type of heating wire used, it is important to ensure high-quality insulation. Thermal insulation materials are installed externally, covering the heating elements and the water supply as a whole. If you do not do this, the cable will heat not only the pipes, but also the surrounding air. The thickness of the thermal insulation is selected depending on external factors.
Polystyrene foam and polyethylene foam are considered reliable and long-proven insulation materials. They are characterized by resistance to moisture and provide protective shock absorption for the pipe. On the other hand, it is important to guarantee the protection of the insulation materials themselves, which is why “pipe-in-pipe” designs are often found. A water pipe installed in the ground or outside is wrapped with insulation and then placed in a larger diameter pipe.
How to choose a heating cable?
It is worth considering the following factors to avoid mistakes when choosing a thermal element.
Difficulties in carrying out
Many people think that such guides are an irrational choice. Installation and operation will be too expensive, so they will not pay for themselves. But in some situations this is a vital necessity, regardless of the existing difficulties.
- For owners of private houses who are interested in heating pipelines.
For water supply and sewerage systems to heat the roof. The systems are installed where the most water appears. Thanks to this, the roof will remain dry, and it will be possible to install a “warm floor”.
- Commercial buildings. Especially when it is necessary to develop a fire extinguishing system.
- Industry, if the work involves hazardous conditions when plumbing type equipment is used.
Additional selection tips
There are several features that consumers need to consider:
- Power is supplied to both ends. Only in this case the water supply works normally.
- Creating a strong magnetic field during operation. You can’t stay near him for a long time, otherwise the person’s health will deteriorate.
- But the power indicators are high.
- Flexibility, which is characteristic of any thermal wire.
- The cost remains relatively low.
- High performance indicators. If all requirements are met, the service life will be several decades. Even if this is the internal view of the products.
But the length of such products is strict and limited. Another serious drawback is the impossibility of carrying out high-quality repairs without serious labor costs. Moreover, local. Finally, it is necessary to use thermostats, without which the temperature does not change.
Self-regulating heating cables have many more positive aspects:
- Extended service life up to 40 years.
- No need to use temperature sensors. Including when there is a plastic type of models.
- The matrix stops operating the module if the temperature is 85 degrees or higher.
- Tight installation in the pipe due to the flat shape.
- Easy cutting.
- No additional maintenance requirements.
- Damage does not appear even due to overlap.
- Simple adjustment that you can do yourself.
- The energy consumption is not that much.
- The cable is able to withstand any fluctuations in the environment.
- Reliability. This is especially important for those who have a summer house.
Only self-regulating heating cables are suitable if the temperature of the pipelines constantly changes. The energy efficiency of systems increases if the insulation materials are chosen correctly from the very beginning. When winding, it is clarified in advance to what extent the material can be bent. This will allow everything to heat up efficiently.
Separately, buyers need to find out whether the system requires additional insulation. Depending on the length and heat loss of the pipes, a suitable conductor is selected.
Might be interesting
Thermal insulation
How to insulate a roof from the inside and not make mistakes?
Thermal insulation
Roofing and drainage: heating rules
Thermal insulation
Insulated Swedish stove: pros and cons
Thermal insulation
Penoizol: self-production
How to check the heating cable?
There are two main ways to solve this problem:
- Circuit measurements for resistance in the case of a resistive cable. The insulation circuit is checked separately.
- The self-regulating heating wire is tested by connecting the heating system to an electrical circuit.
Advantages and disadvantages
Let us highlight the main advantages of a self-regulating cable:
- Possibility to cut into pieces of arbitrary length (usually at least 20 cm). The properties and characteristics of the product will not change. There are no unheated areas on the surface. Similarly, there are no areas with excessively high temperatures.
- During the installation process, wires or segments can be crossed with each other. It is even recommended to do this when heating water pipes. The cable will not overheat and therefore will not fail.
- Even in the event of a break, the wire remains operational. A break in the current-carrying conductor does not lead to failure: up to this point the cable continues to function.
- When heating pipes with this cable, you can use elements located inside. This leads to increased efficiency.
- There is no need to use heat sensors or thermostats. The cable is connected directly to the voltage source or through a switch.
Not without its shortcomings. The main one is the cost of the product. Depending on the modification, with identical power and length, a self-regulating cable can cost two or three times more than a resistive or zonal product.
Another significant disadvantage is that it takes longer to heat a very frozen area. In other cases, its power may simply not be enough. Thus, the self-regulating wire is designed to constantly heat, maintaining the nominal temperature. On the other hand, low energy consumption allows this to be done without significant costs.
The third disadvantage is the high load at startup. Consider a cable with a power of 50 W/m. When such a cable is connected to the network, the load on it will be up to 100 W. This will happen until the cable heats up to the set temperature. This may take from one to five minutes. After this, if the wire is not disconnected from the network, the load does not exceed the specified value.
How to connect the heating cable?
Coupling, connecting to power parts is the work that takes the most time and effort during installation. The processes are easy to implement yourself, but you must follow the included instructions exactly. You must also treat electricity with respect, following all safety rules in order to work safely with your own hands.
Coupling of self-regulating cables requires a set of the following devices:
- The power cable must be two or three wires. Selected depending on the presence or absence of braid.
- Office or household well-sharpened knives. It is better to take small tools.
- Construction hairdryer. It can be replaced by a regular lighter, but only as a last resort.
- Pliers.
- Set with heat shrinks, crimp terminals. This is especially necessary if there is an external type of installation.
First, prepare the power cables by carefully removing part of the insulating layer. Approximately 1 cm is removed from the insulator of each wire. The main insulation up to 5 centimeters long is removed from the wire that is used for heating. You need to separately unwind the braided wire that is intertwined and wound around the inside of the cable. After completing this action, the material is again collected into 1 core. Such products simplify grounding.
The double layer of insulation is removed, stepping back from the edge by about 2 cm. Usually, under this layer there is a self-regulating matrix. It is also cut out with a knife, leaving 2 copper strands along, with a length of no more than 1.5 centimeters.
The yellow-green wire is bent on the three-core power cable in the opposite direction. This part is used when connecting grounding. At the next stage, the twisted braid of the grounding cable is connected to this yellow-green wire. Oversized heat shrink tubing helps secure all products, including the self-adjusting device.
Two other wires are connected to the two copper conductors of the heating cable.
When connecting elements to each other, you can follow these instructions:
- Crimp sleeves are taken from the installation kit.
- On the one hand, copper sleeves are placed on the copper conductors of the heating cable, on the other, on the exposed part of the power wire.
- Then everything is crimped using pliers. Then everything will be fine with the self-regulating cable.
Insulated sleeves help securely fasten the main wires, after which the joint is closed with smaller heat-shrink tubing. The structure is heated in any convenient way until it decreases in size. The connection is securely fixed during the process due to the glue that is released during processing.
Using the remaining shrinkage, the second end with which the tape is equipped is insulated. The cable is cut lengthwise and in half. The main thing is that the copper cores are not exposed, so they do not go too far into the structure. Use a knife to cut off one of the resulting halves. The second is left in its pure form. Then the cable cores will not short-circuit with each other. Heat shrink is applied to the end of the cable and a hair dryer is used to heat it. For tight gluing, you can crimp the tip using pliers. In this case, the self-regulating type of system is sealed.
Manufacturers
Ensto stands out in the domestic electrical products market, offering customers a wide range of self-regulating cables of various lengths and modifications. At the customer's request, the wire can be cut into lengths.
Among the more budget-friendly cable options, which are not inferior in quality to previous products, we can highlight the products of the Devi company.
Principle of operation
The operating principle of the design is described by the Joule-Lenz law, which states that with a uniform electric current along the entire length of the circuit, heat will be generated in any section. The higher the resistance in this area, the stronger the heat. In other words, the principle of operation is similar to an electric heater: a current flows through a conductor, which generates heat. It will be stronger if the resistance of the conductor and the strength of the electric current are greater.
DIY heating cable: manufacturing instructions
In addition to using factory models, you can make a heating cable yourself. This does not require any special skills or knowledge:
- First you need to come up with an alternative to the product. Many installers recommend using a “field vik”. We are talking about a telephone cable used in military field conditions. The official marking is P274-M. The advantages of the product include small diameter, rigidity, endurance and insulation strength. The latter property allows the product to be used in conditions of high humidity.
- Please note that this cable cannot be compared with store-bought and factory analogues. It will not perform the function of self-regulation, and the isolation will not be food-grade. If you plan to use the wire only occasionally (at the dacha in the winter) and lay it inside pipelines, then you can do without the listed properties.
- When installing the field switch, separate it into separate wires. Bend one conductor in half and twist it in the opposite direction. At the open ends, the cable entry must be sealed. To do this, you can use a hose flange. To improve the tightness, you can take a fitting and thread the wires through it.
- Next, fill the fitting with epoxy glue and flatten it. To strengthen the connection, put on a union nut.
When choosing a self-regulating heating cable, you need to be careful. Study every detail, use the tips outlined above. There is no need to buy an overly powerful product for small areas, since the excess energy will be wasted, and you will not even know what you are paying for. Moreover, the efficiency of the cable will be similar to that of a wire with optimal power.
Installation of resistive heating cable
Infrared heater: energy consumption
Resistive heating cables are mounted on short sections of pipes of small diameter (up to 40 mm). A single-core product requires looping using a coupling or extending the supply wire to create conditions for supplying voltage from both ends. This complicates the connection of the heating cable. In a two-wire product, voltage is applied to one end, which simplifies installation.
The advantage of the resistive option is low price, the disadvantage is the impossibility of installing the coupling with your own hands and high energy costs. Knowing how this type of heating works, the question arises of how to control it. In order for the system to operate without human intervention, automatic control is required. These are additional costs, which can also be considered disadvantages.
Installing a resistive cable
This type of heaters cannot be cut; you can connect 2 pieces together. It is necessary to remove small sections of the protective sheaths, wrap the braid, remove some insulation, and connect the wires by crimping or soldering.
Important! The best insulating material is heat shrink tubing.