Installing a pump for a stable water supply to the house requires connecting additional fittings. A check valve for the pump is installed in the water supply system or on the suction pipe lowered into the well - a small but useful device.
Do you want to equip your pumping system with check valves yourself, but don’t know how to do it correctly and which valve is suitable for these purposes?
We will help you understand the issue - in this material we suggest that you familiarize yourself with the design, operating principle of a check valve, and the main types. We will also provide step-by-step instructions for installing it.
Purpose and principle of operation of the valve
A check valve, like any device for a water supply system, is installed to protect the network from any changes in flow parameters. Simply put, so that water is supplied constantly, without stops or breaks, in the required volume.
A narrower purpose of the valve is to organize the movement of water in one direction and prevent its return movement.
Manufacturers of pumping stations equip the kits with a valve, and if this element of shut-off valves is not available, then they insist on its mandatory purchase
The problems solved by installing such a valve on the pump line:
- stabilizes the pressure and pressure of water when moving from a well or well;
- organizes the supply of water in the right direction - from source to consumer;
- keeps the highway constantly full;
- protects equipment from pressure surges, force majeure situations and unscheduled repairs.
The operating principle depends on the type and design of the valve. Let's consider it using the example of a device intended for insertion into a pipe.
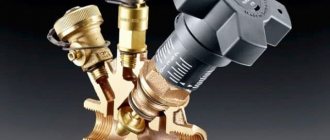
The simplest model for plumbing, made of brass and stainless spring steel. Connection method: coupling, thread: internal. Designed for temperatures up to +110 ˚С
The main design elements of a check valve are two working parts: a seat and a shut-off element . A spring is used to return the locking element to its original position.
The principle of operation of the check valve is simple. When liquid flows in the forward direction, from the source to the internal networks, the valve plate moves inside the housing, opening a gap for water. If the liquid moves in the opposite direction, the shut-off element is pressed tightly against the seat and completely blocks the flow area.
The locking element has several design options: cylindrical spool, cone, ball, plate. Accurate contact with the saddle during reverse movement is ensured by additional guides
Without check valves, when the pump is turned off, the liquid, according to the laws of hydrodynamics, would go back into the well or well.
Choosing an installation location
The content of the article
1 Selecting an installation location1.1 How to determine the suction depth1.2 Safety considerations1.3 Convenience and operating conditions2 Connecting a pumping station2.1 Water supply from a well for permanent residence2.2 Connecting a pumping station to a water supply2.3 Connecting to a well3 Starting a pumping station
Pumping stations are installed near a water source - a well or a well - in a specially equipped pit - a caisson. The second option is in a utility room in the house. The third is on a shelf in the well (this number will not work with a well), and the fourth is in the underground.
Installing a pumping station in the underground - the noise from its operation may be too audible
How to Determine Suction Depth
When choosing a location, they are primarily guided by the technical characteristics - the maximum suction depth of the pump (from where the pump can lift water). The thing is that the maximum lifting depth of pumping stations is 8-9 meters.
Suction depth - the distance from the water surface to the pump. The supply pipeline can be lowered to any depth; it will pump water from the level of the water surface.
Wells often have a greater depth than 8-9 meters. In this case, you will have to use other equipment - a submersible pump or a pumping station with an ejector. In this case, water can be supplied from 20-30 meters, which is usually sufficient. The disadvantage of this solution is expensive equipment.
Suction depth is a characteristic that determines the installation method
If you are just a meter short of being able to install conventional equipment, you can install the station in a well or above a well. In the well, a shelf is attached to the wall; in the case of a well, the pit is deepened.
When making calculations, do not forget that the water level “floats” - in summer it usually drops. If your suction depth is on the verge, there may simply be no water during this period. Later, when the level rises, water supply will be restored.
Security Considerations
Another point that must be taken into account is the safety of the equipment. If you plan to install a pumping station near a permanent residence, there are fewer problems - you can choose any option, even in a small shed. There is only one condition - it should not freeze in winter.
Installing a pumping station in a barn is suitable for permanent residence and insulation/heating conditions for the winter
We recommend: Do-it-yourself sewerage: diagrams and installation process in a private house
If this is a dacha where people do not live permanently, the matter is more complicated - you need to arrange a room that does not catch the eye. The safest way to install a pumping station is in the house. Although they can take it away in this case too.
The second place where you can install a pumping station is a buried camouflaged caisson.
Installation diagram of a pumping station in a well
The third is on a shelf in the well. Only in this case there is no need to make a traditional well house. You need a steel lid that can be locked with a reliable lock (weld hinges to the ring, make slits in the lid on which to hang the locks). Although, a good cover may also be hidden under the house. Only the design needs to be thought out so that it does not interfere.
Convenience and operating conditions
Installing a pumping station in the house is good for everyone, except that the equipment is noisy during operation. If there is a separate room with good sound insulation and this is possible according to the technical characteristics, no problem. Often a similar room is made in the basement or on the ground floor. If there is no basement, you can make a box in the underground. Access to it is through the hatch. In addition to sound insulation, this box must also have good thermal insulation - the operating temperature range starts from +5°C.
To reduce the noise level, the station can be placed on thick rubber to dampen vibration (created by the cooling fan). In this case, it is even possible to install it in the house, but the sound will certainly still be there.
Caisson made of concrete rings
If you choose to install a pumping station in a caisson, it should also be insulated and also waterproof. Usually, ready-made reinforced concrete containers are used for these purposes, but a caisson can be made from concrete rings (like a well). Place the ring with the bottom down, and the ring with the lid on top. Another option is to build it out of brick and fill the floor with concrete. But this method is suitable for dry areas - the groundwater level should be one meter below the depth of the caisson.
The depth of the caisson is such that the equipment is installed below the freezing level. Insulation foam polystyrene. Better - extruded. Then at the same time you also get waterproofing.
For a caisson made of concrete rings, it is convenient to use a shell (if you find a suitable diameter). But you can also slab polystyrene foam, cut into strips and glue it. For rectangular pits and structures, slabs are suitable that can be glued to the walls using bitumen mastic. Coat the wall, apply insulation, you can additionally secure it with a pair of nails/dowels.
1
Design features and purpose of the check valve
The device is small in size, but without it it is impossible to maintain water pressure in the system. It belongs to those pipeline fittings that are designed to prevent changes in the direction of fluid flow. You can find pumping stations whose models include a check valve. It usually comes complete with a suction hose. But most products are supplied without this part; it must be purchased separately. The principle of operation is similar to the well-known ventilation valve: it allows flow in one direction and blocks it in the other.
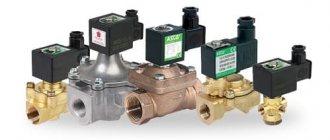
There are quite a few types of check valves. For household use:
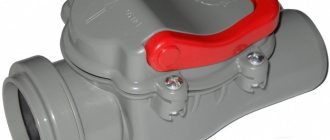
1. Spring couplings. They consist of two parts connected by a thread and a rubber gasket installed between them.2. The same, but with a brass spool having a spherical shape. They are characterized by high throughput.3. Combined spring valves, including a Mayevsky valve through which air is released. Thanks to such devices, system maintenance is simplified.4. Spring with polypropylene body. Installed on a water supply system made of similar material.
Installation location: supply line, entry into the autonomous system directly behind or in front of the pump. Depending on their location, check valves are either bottom or pipeline. The former protect against the return flow of water raised from the source when the equipment is turned off. The latter prevent pressure drop in the system. If there is no valve at the very beginning of the suction pipe, then when the pump stops, the water flows back and air pockets form in the line. When starting “dry,” the seals are destroyed, and then the wet electric motor burns out.
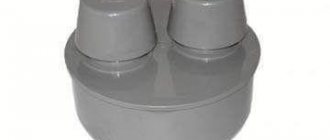
Pumping station with bottom valve
Modern pumps are protected from such dire consequences, but older models are not immune to this. But all the same, after each stop the station will have to fill in water - that’s how it’s designed. Installation of shut-off valves on the fence pipe is mandatory. This simple mechanical device is necessary, because no electronics can overcome the force of gravity, under the influence of which liquid flows from the pipes if there is no check valve.
Pipeline shut-off valves play a slightly different role. It is intended to protect not the pump, but the water distribution system in the house. By blocking the flow, it does not allow it to return to the accumulator, maintaining the pressure. Installation of a pumping station without a check valve at the outlet causes water hammer and the device operates in abnormal mode. Installing a shutter increases the reliability and efficiency of the water supply system, extends the service life of plumbing equipment and household appliances.
Check valve sizes depend on the application:
standard - used in almost all water supply systems; miniature - installed inside the water meter outlets; small - located at the outlet of the meter; large - made of cast iron, used in industrial systems.
The part is cast from brass: the metal is resistant to salts, minerals and acids that are dissolved in water. The material for other elements is copper and zinc or special polymer compounds. All gaskets are rubber or silicone. Stainless steel devices are also sold. They are highly expensive due to their strength and increased resistance to corrosion. If you have the opportunity to purchase such a part, you should not pay attention to the price - it lasts a very long time. Brass has to be replaced or repaired quite often.
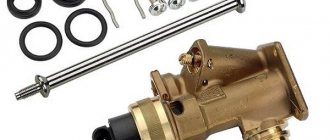
Device for pumping station
The scope of application is not limited to the pumping station. In everyday life, a check valve is used:
on cold and hot water risers, if the apartment is in a high-rise building; in heating devices - a boiler, electric or gas water heater; for autonomous heating of a private house; they are equipped with sewage systems to prevent emergency situations.
We recommend
Check valve in a pumping station - how to install it correctly with your own handsAdjusting a pumping station with your own handsHow to choose and install a check valve on your hood yourself
Types of back-locking devices
Based on the installation location, all check valves intended for pumping equipment are divided into two categories:
- for installation on the suction pipe of a surface pump or through an adapter to a submersible pump;
- for installation on a pipeline.
The former prevent the reverse movement of water and ensure that the system is constantly filled, the latter regulate the pressure in the water supply.
We recommend installing both types of check valves, since the functions of the devices are different. The valve on the suction hose additionally protects the pump from “dry running”, prevents the occurrence of air locks, that is, it is responsible for the serviceability of the pump. Even if the equipment is initially equipped with a dry-running protection option, thanks to the check valve you will not have to constantly add water.
Installing such a valve at the suction point is a mandatory step. But to stabilize the pressure in the system, a similar device is mounted in front of the pumping station or in front of the hydraulic tank, if it is located separately
Valves, which are installed on the pipe in the internal wiring of the house, prevent the return of liquid to the outside - to the pump or well. They maintain the required water pressure and regulate pressure. The main function of pipe models is considered to be the protection of pumping and plumbing equipment from sudden pressure surges and water hammer.
Check valves for well pump
Check valves installed on the suction line are called bottom valves. They are used in a set of pumping stations to prevent water from draining from the network back into the well and maintain pressure at the required level.
The models differ in design. Typically, spring valves are used, less often - flap valves. If for spring ones the main working elements are a spring and a disk that blocks the flow, then for casement ones there are 1-2 doors that open under the pressure of the liquid.
The method of connecting the device to a pipe or hose also varies. More often, products with a coupling method of fastening are used, less often - with a flange .
A popular type of valve for submersible pumps is a spring device with a coupling mounting method. Installation is carried out on a HDPE pipe using a threaded connection
To prevent the valve from becoming clogged and sediment from the bottom of the source moving further into the pumping equipment, a filter with a fine mesh is installed underneath it.
Types of Pipe Check Valves
Depending on the installation conditions and the characteristics of the water supply system, valves are installed that differ in design, size, material and method of fastening. Some are intended for small-diameter pipes and domestic use, others for centralized water supply.
Let's look at the main classifications of check valves for water.
Classification #1 – by type of locking element
The part of the valve inside the body, responsible for closing the cross-section, comes in different configurations.
Based on the locking element, the following types of devices are distinguished:
- Lifting , in which the shutter device moves up/down depending on the presence or absence of water pressure in the pipe. The spring is responsible for the dynamics, and the spool acts as a shutter.
- Rotary , also equipped with a spool - a flap or “petal”. When the pump is turned on, it folds back and clears the way for liquid; when turned off, it slams shut, blocking the cross section.
- Double-leaf , blocking the path of water flow with two connecting doors.
The movement of the locking element occurs parallel, perpendicular to the axis or at an angle, so manufacturers recommend installing some devices only on horizontal pipes, others on vertical pipes as well.
For domestic use, it is advisable to purchase spring valves, which are characterized by a simple design and ease of installation. If you decide to equip your pumping system with check valves yourself, we recommend this model.
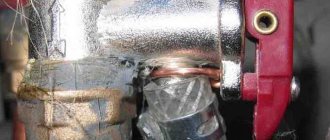
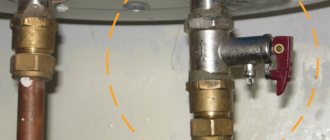
A sample of a spring valve installed in the boiler piping and preventing water hammer. A pumping station is connected to the system, pumping water from the well
The design of the spring valve consists of the following elements:
- brass body (steel, polymer), consisting of two parts - a base and a cover with a saddle;
- a disc-shaped element with a rubber seal that rests on the seat;
- rod , which performs the functions of centering and holder;
- a spring to return the locking element to its initial state.
Valves such as rotary valves are almost never used in domestic water supply, but are often used for industrial pipelines, the diameter of which reaches 0.5 and even 1.5 m.
Classification #2 – by type of fastening
Tapping into a pipe is carried out in various ways, which are chosen depending on the pipe material and installation conditions.
Four types of valves are recognized as the most acceptable:
- flanged;
- wafer;
- coupling;
- welded
In systems associated with pumping stations, it is advisable to use a coupling type with a spring mechanism and simple installation. But in more “serious” networks, for example, for water supply equipment in an apartment building, all of the above types are successfully used.
Image gallery
Photo from
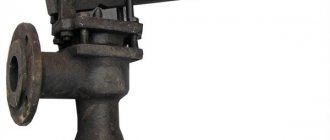
Flanged Cast Iron Industrial Models
Wafer Disc Valves
Coupling devices for tapping into home pipelines
Welding models
If you decide to install a check valve in your home pumping network, you should choose a coupling model. Devices can be purchased in specialized stores at prices ranging from 40 to 600 rubles. Product sizes – 1ˮ, 1/2ˮ, 3/4ˮ.
Classification #3 – based on material of manufacture
Valve bodies are made from materials that reliably protect the internal mechanism and do not deform from the influence of the external environment and liquid flowing through pipes.
A check valve for a pipe can be:
- steel;
- cast iron;
- bronze;
- brass;
- plastic.
Products installed near centrifugal pumps in the heating system must be metal, since plastic is not intended for hot water.
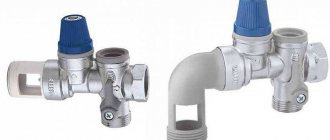
Sample of brass OK, universal for use. It is installed on both metal and plastic pipes. The product does not rust bends, does not change technical characteristics over time
Cast iron valves are characterized by heavy weight and roughness of the material. But they are not used for equipping autonomous home networks, but are installed only for industrial use on large-diameter pipes.
Plastic devices are lightweight and inexpensive, and installation is very quick. But they cannot be applied to serious home water supply systems.
Polymer products are suitable for polypropylene pipes in networks with low water pressure - for example, for watering a garden or pumping water to a bathhouse
The internal parts - seat, valves, stem - of valves are made of polymers, stainless steel or aluminum. They are durable and resistant to corrosion. The active element, the spring, is made of special spring steel , which has an extended service life.
In valves installed on centralized pipelines and industrial facilities that can withstand heavy loads, plastic or rubber seals .
Check valves for heating, where they are installed, application diagrams
Check valves prevent fluid from flowing in the opposite direction when the operating mode of the system changes. Experts note that in amateur circuits, check valves are often found in places where they are not needed, cluttering the circuit, increasing its cost, and disrupting normal operation. When and where check valves are installed, what types are found...
Disc valves
The direct flow moves the disc away from the seat, the fluid passes along the contour of the disc. The reverse flow forces the disc against the ring (seal).
The valve is simple and cheap, but at the same time it is quite sharp in closing with the formation of micro-water hammers, which is not critical in most schemes. The device creates noticeable hydraulic resistance to forward current, which can be found out from the characteristics of the device. The structures are non-removable, non-repairable, cheap and compact, and are widely used in networks with low (up to 3 bar) pressure.
Ball
Ball check valves are similar in design to disc valves, only the cross-section is covered by a rubberized ball. Options - with horizontal movement of the ball, or with lifting. Their cases are usually collapsible, so they can be serviced and cleaned.
But the disadvantages include the direction of installation - it requires a vertical installation, in which the ball lowers to the seat under its own weight when the liquid flow is not large enough. There is also some massiveness of the structure and increased opening pressure. Therefore, they are not used in gravity flow schemes.
Reed check valve
The petal here is the plate that covers the section, but this time it is fixed to an axis and can be folded back.
- Single-leaf - with one petal on an axis located on the side of the section. The liquid throws the petal to the side, opening the cross-section. The reverse flow presses the plate into its original position. Here the rotation can be spring-loaded.
- Double-leaf petals are placed on an axis running through the center of the pipe and they recline in different directions.
Both options are characterized by increased hydraulic resistance to direct flow, some design complexity with an increased price. But at the same time, the ease of opening of a springless valve allows it to be used with low flows, for example, in gravity circuits.
Lift valves
Another valve design is very common. In it, the poppet valve moves along a vertical axis. The valve rises with direct flow, but falls when it weakens under its own weight.
The products are characterized by maintainability, they are easy to clean, and work quite reliably. But at the same time, they create increased flow resistance, and their installation is only possible in a horizontal pipe (or in a position close to this), with the valve body turned straight up.
Division of valves by mounting method.
- Coupling valves are used for small pipe diameters, up to and including 50 mm. They are distinguished by extreme low cost and ease of installation. On metal threads, the best sealant is the same flax with lubricant.
- Flanged ones are mounted on flanges to large diameter pipes, starting from 40 mm, using bolts and rubber and silicone gaskets between the flanges.
- Welded. Metal weld-in valves are rare, so this most likely applies to products in polypropylene bodies.
Plastic check valves will be the cheapest, but they are also not practical. It is better to install American ones and a metal check valve with a thread. Stainless steel remains the most durable and durable.
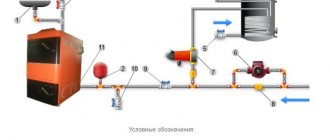
Schemes - how check valves are used
In heating and water supply systems, check valves are installed in parallel branches, in which reverse flow of liquid is possible when the regime changes in neighboring ones.
The simplest example: many circuits with pumps from one pipe. When any pump is turned on, the pressure in the neighboring ones will change - where the reverse flow of liquid is undesirable, a check valve is installed there.
The most typical widely used circuits are with check valves.
- Connecting a backup boiler that turns on automatically without human intervention. A typical scheme for combining a solid fuel boiler and an electric boiler. A check valve prevents fluid from moving through a parallel boiler while one is running. There should be valves with minimal resistance to fluid movement, but possibly with greater opening force.
- Another typical option is to install a solid fuel boiler pump while maintaining the possibility of gravity flow. A large diameter non-return valve in the gravity pipe will prevent the stream from short-circuiting when the pump turns on (automatically). A valve with easy opening is appropriate here to ensure gravity flow, and the large diameter eliminates its local resistance.
- Connecting the recharge of any heating system from the water supply. In principle, a check valve here is not so necessary... it is installed in case the pressure in the water supply suddenly disappears while filling the system. Without noticing this in time, you can release all the coolant back into the water supply...
- A check valve is always installed as part of the water supply for the pump, preventing the pipeline from draining by gravity back to the source.
How to install a check valve for a pump
It remains to note the basic rule of installation - on the body of any valve there is an arrow indicating the direction in which the liquid moves freely, in the opposite direction the valve will automatically close...
How to make your own check valve
Recommendations for installing such a valve
Let's consider one of the options for installing a check valve - on the Aquarius submersible pump. The device is connected directly to the pump. As soon as the unit stops working, the valve shuts off the water so that it does not drain back down. Thanks to this, the line is constantly filled with liquid.
The procedure for connecting the bottom check valve:
Image gallery
Photo from
Step #1 - Preparing the Check Valve
Step #2 – attaching the adapter
Step #3 - valve installation
If there is no arrow on the check valve indicating the movement of water, you can try to blow it out. The valve is screwed to the pump on the side from which it is freely blown.
There are several rules regarding the location of the valve inside the well. If it is installed on a surface pump pipe, then the distance to the bottom must be at least 0.5 m. The manufacturer indicates the exact parameters in the technical data sheet. Also maintain a distance to the surface of the water - at least 0.3 m.
If a check valve is installed in a water supply system powered by a pump inside the house, then the main thing is to choose the right location. Usually two devices are installed - separately on the hot and cold water lines
We recommend that you follow the following order: install a ball valve at the inlet, then a strainer, followed by a meter, and only then a check valve.
Some metering devices are equipped with built-in valves, but they are not very reliable, so it is better to play it safe and install a separate device.
Check valve installation rules
There are two options for installing a check valve on a water supply system if it involves a pumping station:
- in front of the pumping station;
- immediately after the ratchet on the suction pipe.
The second option is considered the most optimal, because installing a check valve in front of the station can lead to a limitation in the volume of water required to be discharged into the suction pipe and subsequently captured by the pump when it is turned on.
In this case, along with the working medium, the pump can capture a portion of air. This leads to noise in the pipeline and the expulsion of the air plug when the water tap is opened.