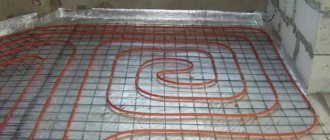
Quite new equipment for heating rooms. Previously used only in commercial premises, today they are increasingly used in residential buildings for heating panoramic windows and metal-plastic entrance doors. Thanks to the use of convectors, cold air is effectively cut off from living areas, additionally heats the room and eliminates the appearance of condensation on double-glazed windows. Condensation most often forms on large double-glazed windows, and this can also occur at relatively high air temperatures in the room. Condensation creates many problems, and not only aesthetic ones. Water flows down and further onto the floor; constant humidity destroys the flooring material and contributes to the appearance of fungi and mold.
Convectors built into the floor
Significantly increasing the temperature in the room to prevent the appearance of condensation is not economically profitable, especially nowadays with the high cost of energy resources. Convectors built into the floor solve all problems with minimal financial losses.
Trench convectors
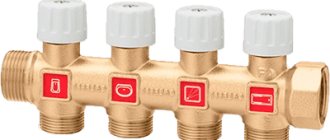
Components of built-in convectors
Reliability and long service life are largely due to the simplicity of the equipment.
Convector design
Regardless of the models, they all consist of several elements.
- Housing (box). Made from galvanized or alloy steel sheets with a thickness of 0.5 mm. Some models are coated with polymer powder dyes to increase resistance to corrosion processes. The body is laid flush with the finishing coating, precise adjustment of the spatial position is carried out by special screw devices. Inside the box there is all the equipment, water shut-off and control valves, electrical cables, etc. The specific list of elements depends on the type of convector. The dimensions of the housing vary widely, which allows them to be installed under various types of floors. The appearance of the case does not matter; it is completely hidden by the decorative grille.
- Heat exchanger. There may be a water radiator or an electric heater. To increase heat transfer, special technical solutions are used or the number of radiators is changed.
- Decorative lattice. It is made of stainless alloys, alloy steel, and there are options made of wood. Through the decorative grille, cold air enters the convector and heated air is removed. The grille is double-sided; after critical wear on one side, it turns over.
Heating adjustment is carried out using manual or electromechanical devices, heat exchange is done using a natural or forced method.
Floor-mounted convectors, design
Floor-mounted convectors KBE
Prices for convectors built into the floor
convector built into the floor
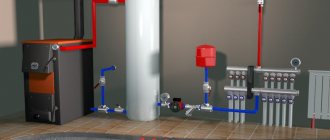
Heating systems - design and types
Two main types of equipment have been developed, which fundamentally differ in the type of coolant. The first uses prepared water, the second uses electricity.
Installation with water coolant
A water heating installation is a heat exchange unit with a circuit made of a U-shaped copper tube. To increase heat transfer, aluminum fins are mounted on the tube. The materials are inert to corrosion and are designed for decades of trouble-free operation.
Heat exchange circuit - the convector is connected to the circulation heating system. This can be a centralized or individual network (local boiler in a private house or in a public building). The device is placed in an aluminum case, installed in a prepared niche.
A protective and decorative grille is mounted on top. It can be made of metal, polymers, decorative wood, etc. The choice of material complements the developed room design. The operation of the installation is controlled automatically, which includes a control unit and a thermostat.
The heating element increases the temperature of the air, which, for natural reasons (convection), rises, displacing the cold flow. Thus, the heat exchange process is carried out.
To increase power, the design is supplemented with a fan - it almost doubles the operating efficiency (with unchanged overall dimensions). The fan organizes and directs the flow in the desired direction. The only drawback of this design is increased noise, but it is successfully combated by installing moving elements on vibration-absorbing supports. When the temperature sensor is triggered, the fan and heating element are turned off. When the temperature drops below the set limit, the cycle repeats.
Electric convector
In a heating device of this type, the coolant is electric current. A dry heating element is used as a heating element, which also has fins to increase the heat transfer area.
Steel, copper, ceramics, and aluminum are used for manufacturing. All elements have a dark matte heat-resistant coating, so they are absolutely safe and not visible through the decorative grille.
The heating is controlled by a processor that receives a signal from a temperature sensor and changes the parameters within set limits. This equipment is easily integrated into a “smart home” scheme, freeing owners from worries about controlling the system.
Like any powerful electrical equipment, the convector must be grounded. The heating element is equipped with protection against overheating and power surges.
Tips for choosing convectors
It is advisable to make the decision to install a convector at the stage of planning the flooring. What parameters should you pay attention to when selecting a heater?
Case material
If the device will be installed near the entrance doors, then it is advisable to choose a model with a stainless steel body. The fact is that during the winter period snow can get into it, high humidity and elevated temperature accelerate the oxidation processes of the metal by an order of magnitude. There is a lot of moisture in indoor pools, bathrooms, etc. Even high-quality galvanizing cannot withstand such difficult operating conditions for long. One more thing. A decorative closing grill rests against the body. If it is subject to significant loads, then the housing must be selected from thick, durable materials; it is to this that the loads are subsequently transferred.
Convector with stainless steel body
Case dimensions
Manufacturers offer products of various lengths, widths and depths. How do these parameters influence the choice of a specific convector?
- Length . It is desirable that it be equal to the width of the window or doorway. If such options cannot be found, then professionals recommend installing two convectors in a row, their total length must meet the requirements described above.
- Width. It does not have any particular influence on the technical parameters; when selecting a model, it is recommended to pay attention only to the interior design of the room.
- Depth. A very important parameter. For residential premises, it is recommended to buy low convectors; they are much easier to install on thin floors of buildings.
Keep in mind that the linear dimensions of the case depend on the number and capabilities of the equipment and elements installed in it.
Built-in convectors KBE with two-row six-pipe heat exchangers (without fan), characteristics
Trench convectors KBE 110 mm high
Heating method
Convectors can have water or electric heaters. Electric ones can be installed on all types of floors, they have completely autonomous control. Water, respectively, only in rooms with floor heating systems. This somewhat worsens the technical characteristics of the devices; the temperature of the coolant depends on the temperature in the overall system. This feature limits the possibility of built-in convectors.
Water trench convectors
Another difference between water and electric types of convectors. Electric ones can be installed at any convenient time; to do this, you only need to partially dismantle the flooring. It is recommended to install water systems only simultaneously with the installation of a floor heating system; if this condition is not met, the combined system will not function.
Convector with heating elements and fan
Radiator dimensions
The efficiency of heat transfer depends on two factors: materials of manufacture and surface area. All manufacturers use materials with maximum thermal conductivity during the production of devices; there is not much choice here. Changing heat transfer is mostly done by adjusting the size and number of radiators. But this parameter must be consistent with the size of the windows or doors.
Dimensions of JAGA Mini Canal trench convectors
Ventilation type
Air can pass through the heat exchanger due to natural movement or with the help of electric fans. The first option works more reliably; convectors can be installed in any premises, including those without electrical wiring. The disadvantage is the insignificant power of the convector, and the change in heat transfer occurs outside the user’s wishes.
Convector with fan
Forced ventilation is performed using axial or radial fans. The air flow speed does not depend on external conditions; the convector can change its performance taking into account the specified modes. Disadvantages - the installation process becomes somewhat more complicated, and the noise in the room increases. Keep these device performance characteristics in mind when making your selection.
Grill type
In most cases, gratings are made of durable metal alloys. They can be rolled up or stationary. When choosing, it is recommended to pay attention to two parameters: physical strength and appearance. The greater the load on the floor covering, the higher the strength of the lathing should be.
Grilles for trench convectors
Decorative grilles
Operating pressure
For private residential buildings, this indicator does not matter; the pressure in water supply networks for various purposes does not exceed 3 atm, and the minimum operating pressure for all types of convectors is never less than 10 atm. As for apartment buildings, buy devices with maximum pressure testing values. Before the start of the heating season, water supply systems in houses are tested with high pressure; convectors must withstand it.
Additional control and monitoring equipment
To control and change operating modes, electromechanical or mechanical instruments and devices are used. The elements are located directly in the housing, and control can be from a remote control. Electronic models allow you to program not only the temperature, but also the frequency of on/off. The choice of convector type depends on the wishes of use and the operating characteristics of the room.
In what rooms are water convectors used?
The installation of floor convectors or in-floor devices has significant differences. These operations must be performed professionally, taking into account the characteristics of the heating system, the technical requirements of the devices and the design of the room. The most effective use of this type of heating is recognized in rooms with the following characteristic features:
- French glazing - high, floor-to-ceiling windows, quickly cool in winter, cold air blows from them, and this effect can be compensated for by the rising flow of warm air;
- panoramic and stained glass window designs of a large area - like French windows, they serve as a source of cold flow, which can be intercepted by warm air in order to evenly distribute heat throughout the room;
- exits to loggias with single-chamber double-glazed windows, terraces, winter gardens - a convector device creates the effect of a thermal curtain in the zone of cold penetration;
- rooms of a non-standard configuration, with high ceilings, where the phenomenon of a thermal plug occurs near the ceiling, which causes a significant difference in temperature vertically.
The thermal performance of convectors corresponds to that of radiators, but due to air mixing, heat spreads quickly and evenly. This helps to quickly warm up the room and reduce the cost of heating large spaces with spacious windows.
Brief list of manufacturers
To make your choice easier, we suggest familiarizing yourself with the most well-known manufacturers of convectors; their products have positive reviews from numerous consumers.
| Brand name | Technical specifications |
Verano | Manufactured in Poland, can be with natural or forced convection. The thickness of the aluminum radiator plates is 0.22 mm, the steel frame is coated with zinc-magnesium. The diameter of the main copper tubes is 15 mm, body dimensions are from 100×50 mm to 200×100 mm. It is equipped with aluminum, wooden or stainless steel gratings. |
Kermi | They can be with or without fans, the depth of the box is 18–35 cm, the width is 9–20 cm. It is used as additional heating of the room, installed near entrance doors and stained glass windows. The small installation height allows the devices to be mounted on thin interfloor ceilings. |
Mohlenhoff | German convectors for in-floor installation. They can have radial and tangential fans, and there are electric heating options. Depth 7–19 cm, width 18–41 cm. A wide range of models makes it possible to increase the scope of use of the equipment. Maximum pressure 16 atm., working pressure 10 atm. They can function in one- and two-pipe heating systems. |
Jaga | The box is made of galvanized steel, width 14–42 cm, depth 6–19 cm. Manufactured in Belgium, small dimensions significantly expand the scope of use. They can have natural or forced ventilation of the heat exchanger. Service life is at least 30 years. |
Kampmann | Hi-End devices operate with forced or natural ventilation. Manufactured in Germany, the company was founded in 1972. Depth 9–20 cm, low noise fans. The heat exchanger has aluminum fins and can withstand temperatures up to +120°C. |
Minib | Produced in the Czech Republic, they have a reduced height (from 5 cm), which allows the devices to be installed on thin flooring bases. The box is made of stainless steel. They have a wide selection of decorative grilles. |
Heatmann | During manufacturing, the most modern technologies are used, due to which the efficiency is significantly increased. Convectors are manufactured in Germany, the frame is made of powder-coated galvanized steel. Width 10–42 cm, depth 8–20 cm. A wide range of sizes allows consumers to choose the best option, taking into account the size of the room and the specific installation location. There are options with natural and forced ventilation of the heat exchanger. |
Itermic | The devices are manufactured by a domestic company, the casing is made of galvanized steel, there are options with and without fans. Depth 7–19 cm, width 20–40 cm. Heat exchanger tubes are copper, aluminum lamellas. The thickness of the lamellas is 0.5 mm, the diameter of the tubes is 16 mm. Designed for working pressure 15 atm., pressing pressure 25 atm. There is manual or automatic control of operating modes. |
Varmann | They are widely used in Europe and our country, the casing is made of galvanized steel, and electric heater options are available. They can work both for heating and cooling a room with natural or forced convection. Depth 9–20 cm, width 14–37 cm. |
Polvax | The manufacturer is a Polish company; they may have one or two heat exchangers, which increases heating performance. Housing made of alloy sheet steel, depth 7–34 cm, width 18–38 cm. Tube diameter 22 mm, coolant temperature up to +90°C, operating pressure 10 atm. |
Each company produces a wide range of equipment according to technical characteristics, which makes it possible to find the most suitable convector option, taking into account the maximum number of different factors.
Water heating convectors built into the floor
Some owners of private houses, when equipping their homes, abandon traditional radiators and choose instead water heating convectors built into the floor. This relatively new type of heating device will not spoil any interior style, and, in addition, is perfect for rooms and halls with walls with panoramic glazing.
Water heating convectors built into the floor
In fact, convector heating devices cannot be fully called a new invention. They have been installed for quite a long time in the vestibules of large department stores or hotels, creating powerful thermal curtains against the penetration of cold air. Even today, such convectors have not lost their relevance, and they are equipped with entrances to office centers and other buildings with large areas and frequently opening entrance doors. The intensity of the heated air is such that, rising upward, from the floor to the ceiling, it completely blocks the entrance, and the cold air does not have time to get inside the building.
Over time, such devices “migrated” to residential private houses, becoming the main or additional source of heating.
Functions of floor-mounted convectors
For what reason are convectors being increasingly installed instead of the usual radiators, and what functions are assigned to them? There are several answers to these questions:
- The convector, using a thermal curtain, creates the most effective protection against cold air flows coming from door and window openings. For example, the walls of a house with panoramic glazing definitely require a thermal curtain, otherwise the room will quickly cool down.
In-floor heating convectors help to minimize heat loss through windows and doors, creating a kind of curtain against the penetration of cold
- This device is capable of creating comfortable conditions for a person to stay in it even in a large hall with a high ceiling.
- For some rooms with a large internal volume, convectors become the only possible effective source of heating, since they are able to evenly distribute heated air throughout the entire space, thanks to additional air supply.
- If the convector is installed along a glazed wall or window, then it effectively resists the formation of condensation, and therefore the accumulation of dampness on slopes, which is fraught with the formation of mold.
- Any of the radiators is less efficient than a convector, and is not able to create a proper barrier to the cold from a window or a constantly opening door. In addition, a battery installed near a transparent wall will significantly spoil the view, for which, in principle, the panoramic glazing was installed.
Basic convector design
The word "convection" comes from the Latin "convectiō", which means transfer. In the case of such heating devices, we are, of course, talking about intense flows of warm air, which receives heat from the heating circuit pipes laid below, through which the coolant circulates.
The design and operating principle of the convector are quite simple and understandable
Modern floor-mounted convectors are improved, aesthetically pleasing and compact devices. If we compare with another hidden heating system - water-heated floors, then converters certainly win, primarily in terms of simplicity of design. In addition, they differ somewhat in the principle of operation. The heated surface of the “warm floor” mainly works for direct heat transfer, and convection in this case is quite weak. Convectors actively heat the air and promote its free and directed flow into the room. In addition, the dense warm upward flow creates a reliable barrier against the penetration of cold from the outside and maintains a comfortable temperature in the rooms.
Scheme of the movement of convection air flows through the room
Warm air rises up along the wall, panoramic glazing or window, then passes along the surface of the ceiling to the opposite wall of the room, after which it falls down and enters the convector again, repeating the cycle. This air circulation maintains approximately the same temperature both near the floor and under the ceiling - usually the difference is only 2-3 degrees.
Prices for built-in convectors Breeze
Built-in convectors Breeze
The trench convector has a fairly simple basic design, which includes the following parts and components:
Basic device of the simplest floor convector
1 – metal casing of the convector;
2 – holes in the housing for connecting pipes with plugs;
3 – mounting brackets or legs necessary for installing the device and adjusting its height. They can be as shown in the figure, or adjustable - screw type (pos. 3a in the figure below).
4 – radiator-heat exchanger, connected to the heating pipes, when air passes between the plates it receives the necessary heat.
5 – outer decorative frame.
6 – upper decorative grille.
Convector with built-in fan and adjustable screw feet
In addition to the listed parts of a simple convector, it can be equipped with shut-off and control valves (item 7), a thermostat, and also a fan for forced creation of air flow (item 8).
To understand the purpose of each of the elements, you need to consider them in more detail.
- The convector body is usually made of stainless steel. It is built into the floor, the surface of which rises to a certain height. Therefore, floor planning and installation of the convector must be carried out simultaneously.
- The heat exchanger installed in the housing consists of a copper pipe and heat exchange plates, usually made of aluminum, since this metal provides maximum heat transfer. The heat exchanger pipes are connected by line to the heating circuit pipes. Typically, shut-off and control valves are installed between the supply line and the heat exchanger.
Convector heat exchanger
Aluminum plates are firmly connected to the convector pipeline using soldering, which is performed using a special solder containing silver. This ensures that losses during direct heat transfer are minimized, and in addition, thermal expansion when heated does not make such a connection of elements less reliable.
- In the upper part of the case there is a seat for installing a frame and a decorative grille, which covers the internal space of the device with an installed heat exchanger. The grille is strong enough to support the weight of a person and can be rigid or rollable. It can be made of stainless steel, high-strength plastic or hardwood.
The grille can be rigid or rollable
- The fan is installed in convectors with forced air circulation function. In recent years, manufacturers have been placing increasing emphasis on the production of just such devices - they are characterized by higher efficiency
- The convector is often equipped with a valve to release air, since air pockets can form in the heat exchanger pipe. A floor-mounted heating device is located at the lowest point of the heating circuit, however, the possibility of such a plug still remains. The valve is able to remove air, establishing normal coolant circulation.
- Some modern convector models are equipped with a thermostat with a remote sensor or a thermostat with a servo drive, which allows you to maintain the set temperature for heating the air in the room. In other, more affordable devices, the above-mentioned manual valves or ball valves are installed for adjustment.
- Holes for pipe connections allow connections from both the front and side of the convector body.
- The housing of many convectors has special pipes to which, if necessary, supply air ducts are connected, for example, if, for the purpose of additional ventilation, air is taken from the street.
The convector may have a pipe for connecting an additional air duct
- Sometimes the convector is equipped with several heat exchangers connected in series (they are called two-level). Such options are selected if a model with increased thermal power is needed. Another option is that each of the heat exchangers has its own connection pipes.
Similar models, differing in the number of heat exchangers
In this case, they can be connected in parallel or used in different circuits - one of the heat exchangers may not be involved in heating, but, on the contrary, connected to the cooling and air conditioning system used in the summer.
Types of floor convectors
Today there are three main types of convectors on sale, operating on the principle of natural and forced air circulation.
- Convectors with natural air circulation (KVE) have already been discussed above. In this option, heated flows rise upward without additional influence, in accordance only with the laws of physics, due to the difference in the density of warm and cooled air.
Of course, the process of such circulation is quite slow. But the device does not require connection to the power supply, and does not make any noise.
- In-floor water convectors with forced air circulation (FAC) are equipped with a fan and heat the room more efficiently, since the flow of heated air is forcibly directed upward, moves more intensively in space, and, without having time to cool completely, is again supplied for heating.
Tangential fan…
Tangential fans with a characteristic elongated cylindrical shape, installed in the structure, usually operate on a voltage of 12 volts, which is safe when operating the device.
... and its typical place in the design of a convector operating on the principle of forced circulation
This type of convectors today is the most popular for installation both in private homes and in various public buildings.
- Double-circuit convectors, with air heating and cooling functions, are the third type of device. Purchasing such convectors, and organizing their connection to heating and cooling circuits, is quite an expensive pleasure that not everyone can afford, so the demand for them among private developers is quite “modest”.
Convector with double-circuit heat exchanger
This system can well be called “winter-summer”, since in winter the air is heated by the hot coolant circulating in the heat exchanger, and in the summer, when the rooms need to be cooled, cooled liquid passes through the secondary circuit pipes, helping to create a cooler atmosphere in the room . Thus, this type of convector works like a kind of air conditioner.
Prices for built-in convectors Techno
Built-in convectors Techno
In addition to dividing convectors into types according to functionality, the devices have significant differences in other parameters:
- Height, width and length of the device.
- Power depending on the size and number of heat exchangers.
- The convector is equipped with additional control and automatic adjustment devices. Very often, when purchasing a convector, it is suggested that you purchase such devices yourself - these can be built-in or remote temperature sensors, thermostatic valves (taps) with manual preset or servo drives, wall-mounted fan control units, etc.
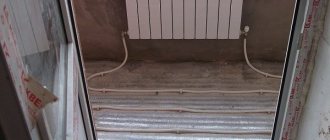
Features of installation and piping of in-floor convectors
These heating devices can be installed in the floor of almost any room used for various needs. Since stainless steel is used in the manufacture of convector housings, they can be installed even in wet areas of swimming pools, saunas and bathrooms. To get a quality connection, you should follow some recommendations when installing the structure.
An underfloor heating convector is installed in a niche made in advance when arranging the floor or cut out in the right place. Another option is to install the device under a raised floor, which is raised above the base (ceiling) to the level of the decorative grille of the heating device.
One of the schemes for installing the device is in a niche prepared for it in the floor
When preparing a place for a convector and during installation, some rules should be taken into account.
- If a niche is installed in the floor (item 1), then it should be wider than the convector body by 5÷7 mm in each direction along its entire perimeter, and by 100 mm on the pipe supply side. (b mouth = b to + 10÷15 mm). The depth of the niche (h mouth) taking into account the thickness of the finishing floor covering (item 5). It should be 10÷15 mm greater than the height of the device (h k).
- The convector is precisely positioned until complete stability and the desired height are achieved, using adjustable supports (item 3) or special brackets. The device must stand very stable, and for this, after installing and connecting the pipes, it is recommended to fill the remaining space between the body (item 2) and the walls of the niche with a fixing mortar (item 4).
- After laying the finished floor, the narrow gap between the finishing coating and the decorative frame can be filled with silicone sealant (item 6).
- Another option is when the convectors are installed and pre-tied, and then the floor is filled to the required height with a screed (taking into account the thickness of the future floor covering).
The convector is installed and connected before screeding the floor
- The piping of a convector installed in a floor niche is done with metal-plastic pipes, since they may have to be bent.
- The pipes are embedded in a concrete covering or covered with a raised floor, and they should not have any connections in this area. For this reason, metal pipes are not suitable for this purpose, as they will be unreliable in operation.
- If the surface is raised by a raised floor, then any pipes for connection can be used, but it is still better to use metal-plastic or polypropylene.
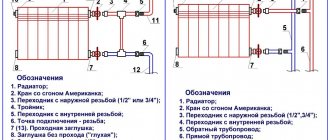
- The connection of the circuit pipes connected to the convector and its copper heat exchanger is usually made inside the housing using American union nuts, sometimes using high-quality flexible connections (stainless corrugated pipes).
The technical documentation of the convector must indicate the diagram of the device connecting unit
- If a convector with forced circulation is installed, you will need to connect the device to the power supply. Therefore, it is necessary to carefully consider the connection and cable routing scheme. In addition, you should consider the location for mounting the fan control unit and transformer, since tangential fans that use a safe voltage of 12 V are usually installed in convectors. In this matter, the manufacturer’s recommendations should be taken into account, and it is better to use the services of a professional electrician.
Video: animated example of installing a simple convector followed by pouring a floor screed
Other types of water heating convectors
In addition to the floor-mounted convectors under consideration, there are other varieties that are slightly different in design and installation location - these are floor-mounted and wall-mounted units. It’s also worth saying a few words about them.
Floor convectors
Floor convectors work on the same principle as in-floor convectors and have a similar design. The device is equipped with adjustment elements and can also operate on the principle of natural or forced circulation. These heating devices differ, essentially, only in the installation location, and are equipped with stable legs for placing them and securing them to the floor.
Floor convectors are certainly easier to install and connect to the heating circuit
Typically, floor convectors are compact in size, but despite this, they have good heat transfer and are built into the heating circuit instead of conventional radiators.
If the house has panoramic glazing, but it is raised from the floor to a certain height, then floor convectors are ideal for creating a thermal curtain. The devices will prevent condensation from appearing on the glass and the formation of mold spots on the walls around the windows.
You might be interested in information about what a heated floor scheme looks like
Wall convectors
The wall-mounted version of convectors is hung on special brackets. Heating devices are light in weight, so their installation is quite simple and can easily be carried out by one specialist. In addition, due to its low weight, such a wall-mounted convector can even be hung on a plasterboard partition between rooms.
Compact wall-mounted water convector
Wall-hung convectors come in various shapes and sizes, but the most popular are narrow convectors that protrude from the wall by only 70÷100 mm, as they are excellent for rooms with a small area.
“Warm baseboards” with water heating can also be considered a type of wall convectors. They are distinguished by their compact dimensions in height and thickness, characteristic elongated shape, and are usually installed along the external walls of the room, directly above the usual baseboard or even instead of it.
A very convenient new product among heating devices - “warm baseboard”
Floor and wall convectors can have a side or bottom connection, and are selected according to this criterion depending on the supply of heating circuit pipes.
The main advantage of such convectors over in-floor convectors is, of course, much simpler installation, which does not require large-scale general construction and finishing work.
"Pros" and "cons" of water heating convectors
Like any heating devices, convectors have their advantages and disadvantages.
The “advantages” of convectors include the following qualities:
- Rapid heating of the room due to the uniform distribution of heated air flows throughout it.
- Savings on energy bills, since efficient heating of rooms is ensured by filling the system with a small amount of coolant, heated to only 60 degrees.
- The light weight and simple design of wall or floor convectors makes their installation simple and accessible even for non-professionals.
- By installing in-floor or narrow wall-mounted convectors, replacing more bulky radiator designs with them, you can free up a lot of usable space in the room,
- Convection currents from convectors installed under the windows prevent the formation of condensation on the glass, thereby protecting the room from the appearance of mold stains, which are very difficult to get rid of.
- The modern and neat appearance of all types of convectors allows them to be used in any interior style.
- Convectors are able to withstand coolant temperatures reaching 90 degrees or more. This thermal endurance is especially useful for installation in buildings located in regions with very low winter temperatures.
- The pipes of the in-floor convector are completely hidden, and the outer part of the device itself (the grille) never heats up to dangerous temperatures. Therefore, the likelihood of getting burned is eliminated, which indicates their safety for small children.
- Convectors practically do not dry the air in the room. Heated masses, due to the fact that they are in constant motion, are enriched with moisture. If it is necessary to increase the humidity in the room, you can place a container of water on the convector grille. Some models have built-in capacity for these purposes.
The disadvantages of such convection heating devices include the following:
- If convectors are installed in the premises as heating devices, then wet cleaning will have to be carried out much more often, since the circulating air will carry a lot of dust with it from the floor surface. Since circulation will take place constantly, the air in the room will be filled with dust, which is very dangerous for people prone to allergic reactions.
- Convectors with natural circulation are ineffective for heating rooms with high ceilings, since due to the slow movement of air, the entire volume of the room will not be fully heated. If the ceilings are too high, then you should only choose devices with a built-in fan.
- Natural circulation will not be effective even if a forced ventilation system is installed in the room. In this case, the air heated by the convector will simply be drawn out through the ventilation ducts.
- An obvious disadvantage is the complexity of installing in-floor appliances, since for them you need to build a niche of the required size in the floor and lay grooves for pipes and cables, or raise the floor to the height of the convector body.
You may be interested in information about what a bimetallic radiator is
Criteria for choosing a water convector
To choose the right one of these heaters for a specific room, you need to rely on several criteria:
- In order for heating to be effective, you need to correctly calculate the power of the heating device for a specific room - the convector, acting as the main heat source, must be able to maintain the required comfortable temperature and completely compensate for heat losses. It is generally accepted that the norm is 100 W per square meter of room, with a ceiling height in the room of no more than three meters. However, in reality everything may look slightly different. Such a calculation does not take into account the climatic conditions of the region of residence, the characteristics of the room, which may have one or several external walls, access to the street or to an unheated balcony. The ratio of the area of the room to the area of its glazing has a very serious effect on the level of heat loss. Even the location of the room relative to the cardinal points can make adjustments.
To make it easier to calculate the required total thermal power of convectors, we recommend using the convenient calculator located below.
Calculator for calculating the required thermal power
Go to calculations
The power value obtained as a result of calculations will help to correctly select the optimal convector model. If you plan to install several devices, spaced, for example, along windows or external walls, then their total thermal power will be taken into account.
Prices for built-in convectors Varmann
Built-in convectors Varmann
Another nuance - the passports of convectors often indicate several values of thermal power, depending on the temperature regime in the existing heating system. This must also be taken into account when choosing the appropriate model.
- The second most important parameter, which, by the way, is directly related to the power of the device, is the linear dimensions.
Before purchasing a convector, you must carefully measure the space allocated for its installation on the wall or floor. If, to install a device built into the floor, the finishing surface will have to be raised to a certain height, then it must be measured in advance and calculated what height of the convector body is permissible.
If you decide to cut a niche for a convector in an already finished floor, you should determine in advance the permissible depth of the selected space under the floor - it may happen that a reinforced concrete floor slab will prevent this.
Convector models can vary significantly in size, heat output and appearance
The dimensions of built-in convectors can vary over a very wide range. So, their length can be from 800 to 5000 mm, width - from 180 to 380 mm, and height from 65 to 250 mm. Small heating devices are equipped with one heat exchanger, and even up to four can be accommodated in the housing of a powerful device.
- In order for the convector to serve for a long time, it is necessary to choose a device with a body that is made of stainless steel or has a reliable anti-corrosion coating.
- Such devices are usually designed for operating pressure in the heating system up to 16 atmospheres, and test pressure (pressure testing) - 20÷25 atmospheres.
- An in-floor convector is usually designed for a coolant temperature of up to 90÷95 °C, when heating the body no more than 60 °C. The passport may also indicate the maximum permissible temperature - as a rule, the upper threshold is 115 - 125 ° C.
- The volume of coolant will depend on the number and size of heat exchangers. Usually this volume is small - from 0.8 to 2 liters.
- If you purchase a mounted convector, then you should pay attention to its weight, which will depend on the volume of the heat exchanger and the size of the device. In addition, you need to take into account the weight of the coolant after filling the system - so that there are no problems with attaching the convector to a “weak” wall.
- When purchasing a heater for rooms with high humidity, such as a swimming pool, greenhouse and the like, a thermostat with a remote sensor is desirable in the convector, which will allow you to remotely set and control the temperature and humidity conditions. In addition, convectors for wet rooms must be equipped with a special tube to drain condensate that will accumulate in the housing.
- And, of course, an important selection criterion is the price of the device. Alas, it’s impossible to call her short. So if you have finally decided to install this type of heating devices, it is best to opt for reputable companies that provide their products with warranties. Such companies include “VARMANN”, “PRIMOCLIMA” and “KZTO Radiator” (Russian production), “EVA” (joint Russia-Sweden), “MINIB” (Czech Republic), “MOHLENHOFF” and “SIEMENS” (Germany) .
It is not recommended to purchase products from dubious manufacturers. The matter is very serious, and in the event of an accident with a low-quality trench convector, the considerable funds spent on purchasing the device and on its rather complex installation will not justify themselves. You can find out about a mini brick stove for a summer cottage by following the link.
Prices for convectors Varmann
convector Varmann
You may be interested in information about what a thermostat for radiators is
Video: in-floor convector KPT.306.1000.125
Assembly of heat exchanger elements
Step 1. Bring the box indoors and open it. Before opening, pay attention to the top and bottom, otherwise there will be difficulties when removing parts of the convector. Check the contents. Inside the housing there should be a heat exchanger, adjustable legs, adjusting bolts and washers, a decorative grille, connecting, shut-off and control valves.
Unpacking the convector
Checking the completeness
Step 2. Take two valves out of the package, unscrew the connecting nuts with fittings.
ADN15
VDN115
Step 3. Screw a special thread onto the thread for sealing, the number of turns is at least 5–8.
Winding the thread
Important. The thread must be wound along the thread; while tightening the fitting, it should be tightened and not loosened. This is a very important condition; if it is not met, water leaks will certainly occur. You will have to disassemble the already installed convector and eliminate the problems.
Step 4. Hold the outlet of the heat exchanger pipe with one wrench, and with the second, screw the valve tightly into place. The valve inside has a hexagonal key hole. There is no need to apply too much effort; the thread reliably copes with its task. Use the same method to assemble the device’s faucet.
Screwing the valve
Crane assembly
Tap connection
The heat exchanger is ready. It is advisable to first test the tightness of the connections. To do this, you can connect it to the water supply using flexible hoses and open the water supply. Everything is normal - you can start installing the case.
Advantages and disadvantages
Hidden installation convectors are very popular when organizing progressive heating in houses or buildings with a design solution for organizing spaces. In this case they are most effective. The equipment has advantages and disadvantages that you should be aware of before making a decision.
Advantages
- Compared to circulation heating radiators, convectors maintain temperature more accurately and heat rooms faster. This is especially noticeable in equipment with electric coolant.
- The presence of a fan and well-thought-out fins saves up to 25% of energy resources.
- Thermal barriers are created with the directed movement of warm air masses.
- The protective grille does not heat up above 400 C, so the installation cannot cause harm to residents and pets. It can withstand up to 200 kg, children can run and jump on the surface.
- For non-standard layouts, corner or radial elements are installed.
- For electric convectors, there is no need to lay a pipeline system and allocate a special place for the boiler room.
The converter built into the floor also has disadvantages
- For electrical equipment, this means high energy consumption. It is economically justified to use these installations for heating houses or apartments with an area of up to 150 m2; for large buildings, systems with water coolant are used.
- The systems are installed in specialized recesses. It is advisable to provide for them at the design stage of the building or before the start of reconstruction.
- Equipment operating on the convection principle raises dust, so the grilles and housing should be cleaned periodically. A standard household vacuum cleaner will handle this task.
To select equipment, you can use several principles:
- an electric convector built into the floor is suitable for small cottages and apartments with standard ceiling heights;
- if the building is large and has an autonomous boiler, you should install equipment with a water coolant - it will cope with the task more efficiently.
These are progressive, economical systems that will provide heat to any building. To ensure comfortable living and working conditions, it is necessary to pay attention to technical parameters.
Housing installation
Step 1 . Screw the adjusting screws into the threads and open the holes for supplying pipes to the floor heating system. They are closed with removable flaps.
Adjustment screws
Holes for pipes
Step 2. Install the housing at the installation site, use a bubble level to install it in a strictly horizontal position. This is a very important stage. If the heat exchanger is at an angle, then there is a high risk of airing it, as a result it will not work at full capacity. In addition, the grate will not be located in the same plane as the flooring. Check the position in several directions, constantly tighten or unscrew the adjusting bolts.
The body must be leveled horizontally
Important. When installing the housing, take into account the zero level of the floor covering. It is in this plane that the decorative grille of the convector should be located.
Take into account the zero level of the flooring
Step 3. After installing the housing, you need to fix its position. To do this, use adjustable legs made of perforated steel plate. Fix one end to the body using bolts and washers, and the other to the base of the floor. To fix it to the base, you need to use dowels of the appropriate length and diameter. After fastening, check the position of the device again and, if any deviations are found, correct them.
Adjustable feet
Screwing a bolt into a dowel
Step 4. Place the heat exchanger in the housing; there is a special place for it. Insert the plastic pipes of the floor heating system into the holes, measure their length and cut off the excess with a special pruner.
Trimming excess pipe
Step 5. Using a special portable welding machine for plastic pipes, heat the ends and attach them to the tap and valve fittings.
Heat
Connection
Step 6. Using a nut, screw the elements to the heat exchanger, while constantly holding the fittings with a second wrench. It is made of stainless alloys, and they have low physical strength. Exceeding the maximum load can cause cracks. Another unpleasant property of such alloys is their low resistance to metal fatigue. This means that even not very strong tightening forces, applied over a long period of time, cause cracks to appear and the metal “gets tired.”
Heat exchanger connection
The faucet handle is screwed on
Step 7. Connect electrical cables to the module. For this purpose, a terminal block is installed; the connection diagram is in the instructions for using the device. The module automatically supports user-specified convector operating modes. When connecting the power, you must turn off the network; all work must be carried out in strict accordance with the requirements of the PUE.
Connecting electrical cables
Step 8. If you fix the convector body with cement-sand screed or polyurethane foam, be sure to insert special spacers into it to prevent deformation.
Decorative convector grille installed
We looked at an example of installing a convector with hybrid heat distribution; the device is connected to a common floor heating system. The coolant temperature in the convector is the same as in the system, which somewhat limits the capabilities of the equipment.
Installation
Installing an in-floor convector involves some difficulties, so you need to follow the recommendations and strictly follow the installation instructions. For equipment with different coolants, specialized circuits have been developed that ensure maximum operating efficiency.
Water convectors
The installation location is selected according to the project:
- A niche for installing equipment is formed with gaps of 50 - 100 mm from the overall dimensions of the device.
- The distance from the window is 100 - 150 mm, in length - up to 300 mm from the walls.
- The circulation system is formed from flexible reinforced hoses or rigid pipes (they will be laid in a concrete screed).
The circulation system and power cable for the fan are supplied, which are prescribed by the installation diagram.- The floor is poured taking into account the prepared niche.
- The device is installed in the cavity and aligned in all directions using adjusting bolts.
- The device is fixed, heat and sound insulation is performed.
- Flooring is being installed.
- The equipment is connected to the circulation system and power cable.
- The equipment starts up and is brought into operating mode.
- Control over the parameters is transferred to automation.
- All cracks are sealed with a liquid insulator, and a decorative grille is installed.
The heating system is ready for operation.
General tips for installing a convector after installing the final flooring
Such situations may arise during construction work; the installation location of the convector should be provided during the installation of the flooring and heating system. The dimensions of the recess must correspond to the dimensions of the housing with a margin of 2–3 cm around the perimeter; the length of the plastic pipe outlet must guarantee trouble-free connection of the device. They are always made with a reserve, the excess length is then cut off.
Installation diagram of convectors, indicating the dimensions of the niche for equipment
Niche for in-floor convector
It is recommended to install the convector at a distance of no more than 30 cm from the window, otherwise the double-glazed windows may fog up - warm air will not heat their surface. The thickness of the thermal insulation layer under the convector body should be adapted to the overall height of the finishing coating; it is advisable to use the same thermal insulators as under the main floor surface.
It is recommended to install the convector at a distance of no more than 30 cm from the window or door
Most convectors have a right-hand standard connection, but you can change it yourself or, at the time of purchase, select the type that matches the existing wiring. Place the fans in the housing on the side of the window or doorway; they should capture cold air. Due to this placement, the efficiency of the device increases and the microclimate in the room improves.
It is imperative to connect the Mayevsky tap to the heat exchanger; it is located at the coolant inlet. The Mayevsky tap allows you to vent the convector; failure to perform this operation may cause the device to malfunction.
Mayevsky crane
The power connection is carried out according to the diagram, and the fan rotation speed can be changed with a potentiometer. After completing the electrical installation, all open connections must be covered with special sealed covers. Make sure that the rubber gaskets do not have mechanical damage. Mount the controller to the wall at a height of approximately 1.5 m from the floor, this position is convenient for use.