Why is this necessary?
Dismantling is necessary in the following cases:
- In case of intersectional leaks of a cast iron battery at a short distance from the connections. If there are many sections, the length of the radiator wrench is often not enough to reach the required pair of nipples on the side of the blind plugs. The only solution is to disassemble the radiator from the supply side;
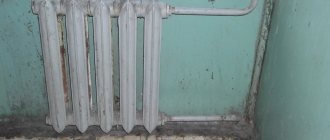
Leaking between sections is a typical disease of cast iron batteries.
- In case of fistulas on the connections to the radiator. To replace the hose (on threads or welding), you need to completely remove the heating device;
- When replacing radiators with new ones (with higher thermal power or more aesthetically attractive);
- When restoring radiators by annealing them;
Cast iron sections clogged with petrified silt can be brought into working condition by heating them (for example, in a fire) and tapping them with a wooden or rubber mallet. The burnt dirt is poured out through the collectors. Of course, after annealing, the intersection gaskets must be replaced.
- When renovating a room. Plastering a wall or wallpapering behind a radiator, you will agree, is quite problematic.
To wallpaper a window sill niche, it is better to remove the battery.
Dismantling process
Disconnection from the system
After preparatory work to shut off the flow of coolant, the water remaining inside the pipes of the blocked section is drained. Then you can proceed directly to dismantling, which is carried out in the following order:
- In the lower part of the radiator, in the place where the pipes are connected, 2 plugs are completely screwed in using a Phillips screwdriver.
- Using an adjustable wrench, unscrew the fastener connecting the supply pipe to the battery. You will have to put in some effort, but the work should be done carefully so as not to damage the thread.
- The locknut is first unscrewed by hand approximately halfway, controlling the release of water with your hand. It is necessary to ensure that the coolant flows in a small stream and does not gushing out in all directions.
- A container is placed under the water, and the previously tightened plugs are unscrewed.
- The radiator is slightly raised on one side, ensuring maximum water drainage from it.
- The battery is removed from the mounting brackets on the wall, for which it gradually rises up and moves towards itself.
- All battery mounting parts are dismantled.
When carrying out dismantling work, the following important nuances should be taken into account:
- Inside the radiator after shutting off there is a sufficient volume of water that can flood the neighbors below. Work must be carried out carefully, preventing it from spilling on the floor.
- It is advisable to dismantle the battery during the summer period, when heating is not required, so as not to cause disturbance to neighbors, and all work should be carried out slowly and carefully.
- To avoid damage to the taps and threads, it is recommended to place a wooden block under the battery before starting dismantling, eliminating the risk of it falling.
It is easy to remove the old heating battery with your own hands. It is important that the system is turned off by a specialist, and that the dismantling itself is carried out carefully, in compliance with recommendations and safety measures.
Can you see everyone?
Why are we talking about different ways to dismantle radiators?
How do they differ in connection methods?
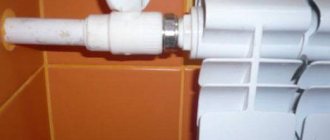
- Fittings used. Traditionally, for the installation of Soviet-style cast iron radiators, a combination of a conduit (a pipe with a long thread) and a lock nut were used; now the batteries are more often connected with American ones - quick-dismount fittings with union nuts;
The photo shows the connection of an aluminum sectional radiator by an American woman.
Connection on the lines.
- The location of the connections relative to the radiator. The connection can be one-way or two-way. This is important when installing on squeegees: one of the radiator plugs through passage will have a left-hand thread.
A special case
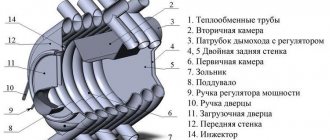
- In many houses built in the 80s and 90s, convectors are used as heating devices. The convector is a coil made of a steel pipe of the same diameter as the riser, with fins that increase heat transfer. The typical method of connecting a convector and a steel line is a butt weld.
The heating device is connected to the riser by welded seams.
Turning off the coolant supply
Let's move on to practice.
Before removing the radiator, you need to turn off the heating and drain the water. How to do it?
I will analyze the heating shutdown in an apartment in an apartment building. It is difficult to give any general recommendations for autonomous heating systems due to their individuality.
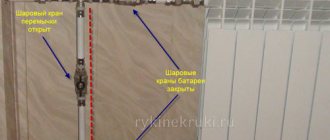
The simplest scenario is to turn off the water using valves, ball valves or chokes installed on the supply lines. It is enough to close the shut-off valves on both connections - and you can disassemble the connections on the radiator plugs, after first placing a basin or other container under them to drain the water.
A jumper must be installed between the connections with shut-off valves. Without it, a closed throttle or tap will stop circulation throughout the entire riser. Very soon your neighbors will come to you and begin to loudly question your high moral qualities.
Correct connection: shut-off ball valves on the connections and a jumper between them.
If the connections do not have shut-off valves, you will have to look for and reset the riser. It’s worth making a short lyrical digression here.
In apartment buildings with standing wiring, two bottling layouts are used:
- Top filling means supply to the attic. Risers connect it to the return bottling located in the basement or subfloor. Each riser operates independently of the others and is switched off at two points - below and above;
A pair of heating schemes with top filling.
- In a house with bottom filling, the supply and return wiring is done in the technical basement. The risers are alternately connected to both bottlings and connected in pairs by jumpers on the top floor of the house. Accordingly, two risers will have to be turned off - supply and return.
To determine the type of wiring, look into the basement. If there are two horizontal pipes in thermal insulation along the perimeter of the house, you have a bottom fill, and one has an top fill.
Bottom filling: both return and supply lines are laid around the perimeter of the house.
First, find your boner. In the basement it is easiest to navigate along the flights of stairs between the entrance and the first floor landing, in the attic - by the windows of the apartments. Further actions depend on the type of bottling.
Top filling
In the case of top filling, the shutdown procedure will be as follows:
- Turn off the attic valve. Do not unscrew the plug;
The outlet of the riser from the supply bottling in the attic looks something like this.
- Turn off the valve in the basement;
Riser and return flow in the basement.
- Unscrew the plug one or two turns and wait until the pressure of the stream of water hitting the thread drops. This will ensure that the shut-off valves are in full working order;
- Unscrew the plug completely. The water hanging in the riser will flow out after you open the line to the radiator.
Bottom filling
Here are instructions on how to turn off the heating riser in a house with bottom filling with your own hands:
- Shut off your riser and the two adjacent to it;
- Unscrew the plug one or two turns;
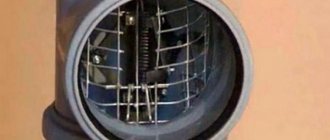
If instead of a plug there is a sump on the riser, the task will be greatly simplified.
- Open the valves on adjacent risers one by one. This way you will identify the boner associated with yours;
- Fully open the valve you don't need. Close the riser connected to yours;
- Unscrew the plugs on your riser and the risers connected to it.
Results
Dismantling heating radiators is not such a difficult process if you know the theory of how to do it correctly. In any case, scheduled work must be performed outside the heating season. Touching the heating system in the middle of winter is a necessary necessity.
To ensure that the performance of the heating system does not suffer, all necessary preventive measures must be taken in a timely manner. Therefore, it is better to take care of new radiators or clean old ones before the heating season begins. This applies to any work related to heating, both in private households and in apartments.
It goes without saying that replacing batteries in an apartment or house cannot be done without dismantling the old heaters. This difficult work must be done, otherwise the installation of new radiators will not be possible. There is a lot of information on how to remove a heating radiator, however, first of all, it is worth thinking about the people around you, especially if we are talking about an apartment building. You cannot replace radiators out of the blue. To do this, it is necessary to obtain destruction, as well as coordinate the procedure with utility services.
In addition, replacing heating batteries, or rather its preparatory stage, cannot be carried out independently, since the shutdown of central heating must be carried out exclusively by utility service specialists. However, not only the Gorvodokanal should be aware of the work being carried out; other housing offices should also be notified. Silence can lead to far from happy consequences. Independently turning off central heating, information about which will not be available in housing offices, will lead to a fine, the payment of which will fall on the shoulders of the violator.
Successful negotiations with neighbors will allow us to achieve the best option for carrying out the work, since their consent will allow for a complete replacement of pipes from the junction of the neighbors below to the junction of the neighbors above. This outcome of the negotiations will save time and also allow the work to be completed as quickly as possible. However, if the negotiations have a negative outcome, there will be nothing left to do but cut the pipes directly at the risers. In a word, dismantling batteries is an excellent opportunity to replace old pipes with polypropylene analogues. Among their advantages are ease of installation and dismantling, as well as low weight but high strength.
After all the preliminary work has been carried out and the services have shut off the heating, the old battery can be dismantled. However, this applies to an apartment building. In a private house, things are different and much simpler. In this case, it is necessary to carry out the shutdown without notifying anyone about it, and you can begin to remove the batteries and then replace them with Global heating batteries, or some other brand.
Goodbye America
How to remove the battery installed on American models?
Extremely simple:
- Unscrew the American nuts with an adjustable, open-end or pipe wrench. The threads on them are ordinary, right-handed;
Installing and dismantling the radiator on American models takes no more than a couple of minutes.
- Pull the line away from the radiator plug a few millimeters;
- Remove the radiator from the brackets.
The only problem that may arise during dismantling is the significant force required to release the steel connections when connecting diagonally. In this case, slightly tilt the radiator on the brackets, and the American ones will come apart.
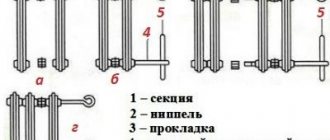
The procedure for unwinding the right-hand radiator section
How to disassemble a right-hand type bimetallic heating radiator:
- The key is inserted so that its “blade” fits into the upper hole: there is a special groove there for fixation.
- Next, applying force, turn the tool counterclockwise. As a result, it is necessary to move the nut out of place.
- At this stage of disassembling the bimetallic radiator, you will need the above-mentioned rod. It is inserted inside the ring on the nipple key, thus creating a lever. This will significantly facilitate the work, the implementation of which will require significant effort.
- After making two full turns, the key must be moved to the lower section of the radiator. After this, the procedure is repeated.
- Having installed the key on top again, make two turns: the sequence of actions is repeated until the section is completely unscrewed. This algorithm of actions, how to disassemble an aluminum heating radiator, allows you to protect yourself from distortions.
Sgony
How do you remove a radiator that is connected to the connections by means of leads?
- Using a pipe wrench No. 1 - No. 2, tighten the lock nuts on the connection. The locknuts always have right-hand threads, regardless of their location relative to the radiator;
- Bend the locknuts to the end of the threads of the bends. If layers of paint and rust prevent you from doing this, pre-heat the liner with a hair dryer, a blowtorch or an improvised gas burner from a spray can and an attachment for it;
On the left is the initial position, on the right is the locknut bent along the thread.
- Remove the remnants of compressed winding from the threads (usually old threads are wound with plumber's flax soaked in red lead). This can be done with a flathead screwdriver or a knife;
- Straighten and drive the radiator plugs after the locknuts. With a one-way connection, both passage plugs have a right-hand thread, but with a diagonal connection, one of the passage plugs is left-handed. The reverse thread is indicated by the letter “l” on the plane of the second plug located on the same side of the radiator.
The letter "L" indicates a left-hand thread.
To unscrew the cast iron plug, use a pipe wrench #3-#4. If it does not move, warm up the manifold of the first section. Next, thermal expansion will play on your side: the diameter of the collector will increase slightly, and the thread will move out with little effort.
Be prepared for residual water and dirt to leak out of an opened battery.
I emphasize: it is not the plug that needs to be heated, but the section.
When unscrewing the left plug, an unpleasant surprise awaits you: by rotating it, you will simultaneously screw the squeegee into the radiator. If there is a threaded connection on the supply side, do not unscrew the radiator cap, but unscrew the fitting from the coupling or angle. It will go into the hole in the plug, and then, after dismantling the heating battery, it will come out without any effort.
Diagonal connection on spigots. On the left, you do not need to unscrew the plug, but disassemble the thread closest to it on the liner.
What to do if the bottom of the cast iron plug breaks off, but the thread remains inside the section?
- Warm up the collector;
- Place the chisel on the cast iron part tangentially as it is being unscrewed, and turn it several turns with hammer blows;
- When the edge of the thread appears from the manifold, unscrew it with pliers.
Often the long thread at the end of the liner near the locknut turns out to be corroded by rust or decorated with a fistula. What to do in this case?
We will need:
- Brass or cast iron coupling of the appropriate diameter;
Brass coupling. Size - 1/2 inch.
- Short drive with long and short threads. Better - brass. Yes, its price is two to three times higher than that of a steel part, but this is compensated by its almost unlimited service life.
Brass squeegee DN 15.
The method for repairing the liner is extremely simple:
- Cut off the thread from the eyeliner, leaving only the first five threads;
- We drive the thread with a die;
- We reel in;
For heating, I use plumbing linen impregnated with quick-drying organic solvent paint. It prevents organic fiber from rotting at low temperatures and burning out at high temperatures.
The condition of dye-impregnated linen after several decades of service.
- Screw on the coupling;
- We screw the wound short thread of the drive into the coupling.
Cast iron battery
In many apartments of old houses, it is the cast-iron battery that needs to be removed, so the first thing you have to do is contact the housing office or the building manager. This must be done because you will have to drain the water from the heating system, and this can only be done by an appropriate specialist.
After you have agreed to lower the system on a certain day, you need to prepare the tool. You will need:
- pipe wrench number 3, in order to unscrew the locknuts and fittings (special nuts that connect a pipe of a larger diameter to a pipe of a smaller one);
- pipe cutter or grinder for cutting pipes;
- hacksaw for metal;
- hammer;
- chisel;
- metal brush to remove rust;
- blowtorch or industrial hair dryer;
- basin for water;
- rags.
After all the tools are prepared and the water has been drained from the system, we proceed to dismantling.
- It should be remembered that if there is no water in the system, this does not mean that the battery is completely dry. This is why we need a basin and rags. They should be used to remove remaining water from the radiator after dismantling.
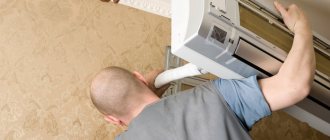
- As a rule, old radiators are covered with more than one layer of oil paint. And not only the radiators themselves, but also all the fasteners. To remove the paint, use a blowtorch or hair dryer. We need to burn off the old paint on all joints.
- After this, we finally clean the connections with a wire brush.
- Now, using a pipe wrench, unscrew all the nuts. It is this period of operation that is the dirtiest, since the remaining rusty water will pour out of the radiator. You should be prepared for this.
- It may turn out that even after burning the old paint, it will not be possible to unscrew the nuts on the supply pipes. Especially if the radiator has not been cleaned for 10 years or more. In this case, you will have to use a pipe cutter or grinder and cut the supply pipes immediately in front of the radiator.
- The cast iron battery is held on the wall by special brackets. You need to lift it up and remove it. If the battery consists of 3-5 sections, you can carry out a similar procedure yourself. If there are more sections, you will need help: cast iron radiators are very heavy.
Welding
To dismantle the convector, its connections are simply cut at right angles to the longitudinal axis using a hacksaw or a grinder with a steel circle.
A grinder will significantly speed up the dismantling of the convector.
To connect a new battery, you will have to cut new threads on the connections.
This is done like this:
- Using a file or grinder, we make an entry for the die - we remove a gentle chamfer at the end of the pipe;
- Lubricate the end of the pipe with any oil (for sewing machines, motor oil, even sunflower oil). Lubrication will reduce the force required for cutting and eliminate the appearance of scoring on the thread;
- We put the die on with the holder facing forward;
Die with frame - holder.
- We clamp the liner with a pipe wrench and use it to compensate for the torque while cutting the thread. Otherwise, there is a very real chance of tearing off the riser from the radiator installed on squeegees or American ones in the next apartment;
When cutting a thread, hold the liner or riser.
- We press the die with maximum force to the end of the pipe and rotate it. The clamp is only needed when cutting the first thread; then you only need to rotate the die.
After cutting the first thread, you don’t have to press the die.
Having cut five threads on one eyeliner, repeat all operations on the second. The work is done.