How does an oil heater work?
To determine a breakdown, it is worth knowing the principle of operation of the device. It includes the following components:
- Housing - it includes an accordion with technical oil. In addition, most devices contain a small amount of air.
- Heating element - present at the bottom of the device and is responsible for heating the oil. Typically this device includes 2 spirals. This is required to regulate the power of the device.
- Control and safety unit. There is a thermal relay on top that does not touch the body.
- Fuse – used to turn off the device in case of failure. First of all, it is required in case of oil leakage. Fuses are either disposable or reusable. The first option is of a wire variety, the second is considered bimetallic.
- Switches - each of them has several wires. This is phase, neutral, grounding.
The design of a simple oil heater
It is good to cover an oil heater with clothes to dry. The only type of device where the owner will avoid fatal consequences. The only thing is that on the side of the accordion container there is an extension equipped with electronic filling; avoid covering the compartment. The oil heater device includes the following elements:
Emergency shutdown sensor (thermal fuse, relay)
- A container filled with oil. Appearance - like an accordion, heating up to a decent temperature; wait a moment to touch it with your hand. When it comes to drying items, don't be afraid to place heat-resistant items. The container is sealed, but there is 15% air inside. Try placing the oil heater upside down, tilt it on its side, and return the load to the wheels. Hearing dull blows frighten mice: air bubbles burst inside. Water is not used by the heater, it will quickly evaporate, corrosion of the housing will become significant, the manufacturing technology would require the complete exclusion of air from the working fluid (water + oxygen = the most powerful oxidizer of living nature). The coefficient of thermal expansion of the most common liquid on the planet is ten times higher than that of steel. It's not good if the tank ruptures.
- The lower part of the end of the accordion contains a heating element, to which the electronics compartment clings. The oil heater does not have a pump and works by natural oil recirculation. The current starts from the heating element upward, then at the opposite end of the battery the liquid descends. While working, it emits audible spiral vibrations under the influence of alternating voltage. The effect is irreversible and is caused by the influence of the Earth's magnetic field. The boiling point is above 100 ºС (150-200), avoid touching the container, the liquid is not brought to a change in phase state due to the prohibition of using water: the container will burst. A double heating element (two spirals) will allow you to more flexibly regulate heating.
- There is a thermal fuse located not far from the heating element. The device will prevent a fire from happening if the oil suddenly leaks out and the temperature relay breaks. An oil heater would work hard when the copper heating element began to melt. The oil will leak out - the high temperature through the housing will cause the stuck thermal fuse to trip. The structure is divided into bimetallic (reusable) or wire (disposable). The photo shows the presence of a clearly blackened tablet above the heating element: a thermal fuse (see the first photo of the review), or a thermal relay (determined by the design).
How to disassemble a radiator
To repair the heater, you need to identify the cause of the breakdown. To do this, it is recommended to disassemble the device. First you need to prepare everything you need:
- an object for prying off the plastic panel - it is desirable that it has a wedge-shaped shape;
- screwdriver;
- alcohol or cologne;
- tester;
- sandpaper;
- soft napkin;
- brush;
- needle file
Before starting disassembly, the device must be disconnected from the power supply. Connecting a disassembled device is strictly prohibited. All heater models are different, so there is no standard algorithm for carrying out the procedure. However, there are several options for solving the problems.
First of all, you should carefully study the device control panel. If there are screws or mounting brackets, it is recommended to remove them.
But most often a spring latch is used to secure the plastic panel. In this case, you should touch the surface with a plastic object or a product made of another material. This must be done very carefully to avoid damage to the case. By touch you will be able to determine the area where the latch is located. If you press harder on this area, you will be able to bend it.
If you have little skill in disassembling equipment, it is worth photographing the entire shooting process. It is recommended to lay out the bolts and nuts as disassembly progresses. This will help to reassemble the device after the process is completed. Experts advise not to rush into disassembling the device. Some problems can be identified without looking inside the device.
Malfunctions of oil heaters
Analysis of device failure is carried out using special tools:
- pliers;
- screwdriver;
- soldering iron;
- ohmmeter;
- solder;
- alcohol;
- knife;
- rags.
To work, you will need a set of certain tools.
There are a number of typical heater malfunctions. Weak or excessive heating indicates a breakdown of the thermostat. Traces of oil on the housing portend depressurization of the radiator. A blown fuse indicates a malfunction of the electric drive. The reasons are determined by “dialing” the device’s microcircuit.
The heater does not turn on
In this case, a thorough external inspection of the power cord is carried out. The wire may fray at bend points. If the cord is in order, check the integrity of the plug contacts.
A visual inspection of the electrical wiring of the device modules will help identify problems.
If no visible defects are found, use an ohmmeter to test the cable.
When repairing an oil heater with a fan, the connection points of the wires to the busbars are also inspected. If the terminals are burnt out, they are replaced with new ones.
The device measures the presence of current in the network throughout the entire circuit.
Darkening indicates a short circuit. Burnt out parts are removed or cleaned from carbon deposits on batteries. The contacts are cleaned with sandpaper and wiped with alcohol.
Attention! The heating appliance must be kept clean. Dust and debris, accumulating on the walls inside the case, can get onto the terminals and cause a short circuit; the debris is removed with a vacuum cleaner.
Damaged busbars are replaced; if there are no new elements, they are cut out of a sheet of brass to the size of the old terminals. If the bimetallic plates are damaged, they are replaced with new ones.
The radiator gets very hot or does not heat well
These polar faults indicate one problem - a breakdown of the thermostat. The module is removed and inspected. If the settings are lost, the armature stroke is set to 1.5-2.5 mm. If the damage cannot be eliminated, the part is completely replaced with a new one.
After installing the module, close the box and check the functionality of the device
Oil leak
If a leak is found on the body of the oil heater, depressurization of the metal body has occurred. To eliminate the problem, perform a visual inspection at the leak site. If necessary, drain the oil and solder with silver solder. Fill the system with water and check the device for leaks. If the housing does not allow liquid to pass through, drain the water and turn on the device to dry. Then fill with oil heated to 90 0C.
If the housing leaks at the joint, seal the joint with heat-resistant sealant. Attention! It is not recommended to mix oil, since it is not known what type of oil was filled in previously, synthetic or mineral.
If a significant amount of oil is lost due to a leak, it is completely replaced with transformer oil.
Extraneous noise
Crackling in the radiator occurs for several reasons:
- When assembling the device in a damp workshop, water could get on the internal walls; when heated, it turns into a gaseous state, producing noise.
- When carrying an oil heater, oil is mixed with air, and when heated, these bubbles begin to come out and burst, producing a crackling sound. When heated, the noise disappears.
- A constant crackling noise is evidence of an electrical fault. In this case, they find the cause and eliminate the breakdown. This heater must not be used.
Also, when heated, parts expand and change in size, which leads to cracking; when fully warmed up, the noise will disappear
Bimetallic plate
A constant crackling sound indicates a malfunction of the thermostat. A bimetallic plate changes its linear properties when heated and cooled, since it consists of two types of metal. If the contacts are fixed too rigidly and do not allow the plate to bend freely, they are loosened so that they do not short-circuit.
DIY troubleshooting
The oil radiator is a non-separable structure, so you must not break the sealed housing of the device when trying to replace a faulty heating element. Self-repair of an oil heater is only possible at the level of the cord, plug and control unit. To the delight of home craftsmen, the most frequent breakdowns occur in these places. In order not to get confused in spare parts, it is recommended to group all fasteners and parts and take step-by-step photos while working - this will make it easier to assemble the device in reverse order.
The heater does not turn on: procedure
First of all, the cord is inspected and carefully palpated, trying to detect any kinks. If the cord has been in a bent state for a long time, most likely a defect has formed in this area. The plug, if its design allows, is disassembled and the integrity of the contacts is checked. Most often, the problem is hidden at the point where the pins of the plug meet the ends of the current-carrying wires of the cord.
If there are no visible signs of failure on the cord and plug, you should use a special device - an ohmmeter and “ring” the cable. It is also necessary to inspect the connection of the electrical wire with the power supply terminals and check the condition of the unit by first removing the decorative cover of the front panel. Detected carbon deposits are removed by thoroughly cleaning the elements. Loose fasteners are carefully tightened, restoring contacts. If you have a new power cord with a socket in stock, you may notice an aged cable with it.
In order not to disassemble the power supply a second time, it is recommended to immediately inspect the thermostat. To gain access to this module, you need to slightly lift the armature of the device and inspect the contacts. Darkening indicates that there was a short circuit in the electrical appliance. Its consequences can be easily eliminated by cleaning the electrical contacts with sandpaper and treating with alcohol. Small debris generated during the cleaning process is removed from the unit with a vacuum cleaner.
Can an oil heater explode?
Oil is not a flammable liquid, so there is only one answer: oil units do not explode. If the thermostat breaks, such an electric heater will overheat, the housing will depressurize, and hot oil will leak, which can cause a fire.
An oil heater may cause a fire.
There are rules for operating oil structures:
- Do not use the devices in bathrooms or other rooms where there is high humidity.
- It is prohibited to cover the heater with fabrics. Overheating will occur and oil will begin to leak.
- The device should be located at a distance of half a meter from the wall, since there is a thermal relay that turns off the device in order to protect it from overheating.
- The heater must be positioned vertically during operation, because inside it is not completely filled with oil. If you put the device down, the heating element will be exposed, which will lead to depressurization.
- Do not move the unit by pulling on the cord. It will come off and there will be a short circuit.
- The cord should not come into contact with a hot surface, as this will cause the insulation to melt.
- In winter, the unit should be kept only in warm rooms.
- Do not use the device with a broken overheat sensor.
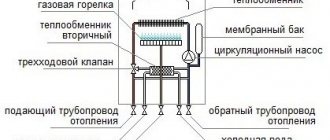
Oil radiator design
Different models of heaters may have different numbers of heating elements, thermostats and switching devices for connection and connection. They also have forced airflow systems installed to enhance convection and increase heat transfer.
The heating elements are placed in a durable, oil-filled, sealed housing with fins, coated with a durable dielectric powder coating. The switches are attached to the heater from the outside. All connections of heating devices and external control elements are connected through a sealed coupling.
The oil heater circuit is designed as follows: the power wire with a plug is connected through switches and a thermal fuse to the heating elements. In this case, the thermal fuse ensures a break in the supply circuit in the event of emergency overheating of the device. The latest models of oil heaters are also equipped with a position sensor, which turns off the device if it falls or critically deviates from the operating condition.
What kind of oil is poured into the oil heater, the efficiency of the oil heater
Many people are interested in what kind of oil is poured into a floor-mounted oil heater. Transformer oil is poured into the sections. It is heated by a heating element and circulates. The oil temperature can reach one hundred degrees Celsius.
The heat output of the heater is very high. To increase efficiency, fans are installed on radiators, and special water evaporators are installed to prevent the air in the room from drying out.
The efficiency factor (COP) of the oil heater is 80%. With proper operation, the service life of a floor oil heater is more than twenty years.
The oil heater contains transformer oil
How to choose a device?
Heating problems in the cold season can arise both for residents of city apartments and private country houses. The problem that arises must be solved in an emergency mode using electrical equipment.
Why not take care of buying an oil heater in advance? These devices are very reliable and safe to use. The heating elements are closed, so there is no risk of fire. These designs were invented a long time ago, the principle of use has not changed.
The latest models have added several new features:
- light indicators;
- timers;
- fans;
- humidifiers;
- thermostats;
- overheat shutdown sensors.
Oil heaters are divided into several types:
- Floor-standing. These are the most common radiators.
- Wall flat. They consume energy very economically.
- Tabletop. These are low-power devices and have low heat transfer.
Some models have a fireplace effect. They operate silently and quickly heat the room. They have drafts installed on both sides, so the heated air circulates very quickly.
Modern models have blocks with programs and timers. If there is such a block, you can set the on and off times. As a rule, new units are controlled remotely and have an emergency shutdown sensor.
Oil heater does not take up very much space
When choosing a device, consider the following factors:
- Power. This is the main indicator. A power of 1 kW is enough to heat a room of 10 square meters. meters with a three-meter ceiling. If there are windows or doors, then we add 0.2 kW for each element. In a room from 30 sq. meters you need to install several such devices.
- Dimensions. This indicator depends on the number of modules: the more modules, the larger the structure, the power of the device increases and the area of the heated room increases. This must be taken into account when choosing such equipment.
- Design features. This refers to additional functions that improve the ease of use of the device and increase the quality of its work. For example, the presence of a network indicator, temperature control mode, etc.
- Manufacturer. The manufacturer should also be taken into account. Brands that have been on the market for a long time are well-known and recognizable. They guarantee the quality of their products and long service life.
When choosing a heater, you need to take into account that the more functions installed on the equipment, the more expensive its cost and the more energy it will consume. Also, brands from well-known manufacturers are more expensive. You need to determine the optimal price for yourself, and also take into account the functionality of the device. This will allow you not to make a mistake in your choice.
Oil heater repair
The older generation remembers that previously, the accompanying documentation for all electrical appliances always included a detailed diagram, thanks to which it was possible to repair the product with your own hands.
Modern instructions, as a rule, do not contain such explanations. But you shouldn’t despair, an oil heater is not a spaceship and it’s quite possible to understand it.
Location of nodes.
Common breakdowns
Important: do not be alarmed if the oil radiator clicks when heating up or after shutting down. When the technical oil inside the unit heats up or cools down, slight crackling is normal. Plus, the thermostat can make such sounds. In some cases, installing the device on a solid, level surface solves the problem.
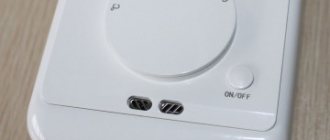
- If the sensors on the control panel of an electrical appliance do not show signs of life, then first of all you need to make sure that the outlet is working properly . A large load entails burning of the contacts. The next number is the fork, here the reason is similar. After making sure that the socket and plug are in order, you need to check the mechanical integrity of the wire itself, chafing, creases, squeezing;
Schematic diagram.
- If the indicators light up, the fan spins when it is on, but there is no heat, you need to check the operation of the thermostat . Such things often cannot be repaired, the price is low and such relays are available for sale. Unscrewing a couple of fasteners and reconnecting the terminals is not difficult;
- In the case when the unit heats up normally, but does not turn off after heating, the reason must be sought in the thermostat . As in the case of a thermostat, the thermostat cannot be repaired; it is immediately replaced with a new one. Despite the fact that the device seems to be working, you should not delay replacing the thermostat. Heating elements, operating in constant overload mode, will quickly burn out, and this is already serious;
- If the wires and automation are normal, you need to check the serviceability of the heating elements . A “broken” heating element can only be replaced if the possibility of dismantling is provided. In inexpensive models, the heating elements can be tightly sealed into the housing; here it is already cheaper to buy a new heater;
Diagnostics of the heating element using an ohmmeter.
Fault repair
Advice: although the oil radiator circuit diagram is relatively simple, if you decide to fix the unit yourself, you should not rely on memory. All disassembly actions must be recorded on paper or video, in order to subsequently return everything to its original state.
Repairing a socket, plug or cord is extremely simple. The socket or plug is unscrewed and if carbon deposits are detected, all burnt parts are removed and sanded. The cord is simply inspected and “ringed” using an ohmmeter.
Types of faults and their elimination
Typical heater malfunctions are as follows. When the device is connected to the network, automatic protection is triggered on the distribution panel. This is a sign of a short circuit. Repair of oil heaters in this case is carried out by determining the location of the short circuit and eliminating the cause of the short circuit. If the device does not heat or heats poorly, there may be many reasons. You can find out why the device does not work by testing the circuit and identifying the faulty element.
Traces of oil on the body and floor will indicate a leak in the seal. It is necessary to find the location of the leak and restore the integrity of the housing. To fix a heater, you will need some tools, but they are fairly common and are likely to be found in any home.
It is necessary to consider each of the possible breakdowns in more detail.
Repairing oil leaks
If an oil leak is detected on the device body, you need to find the leak, weld it or solder it. In the latter case, you should use silver solder; you cannot solder with plain tin. Leaking oil will not allow the leak to be properly soldered, which means you will have to drain the oil and only then carry out soldering using a torch. Then you should check the tightness of the soldering area by filling the heater with water. After making sure that the liquid does not leak out at the leak site, it must be drained and the heater dried by heating.
After all the water has evaporated, you can pour oil into the heater. Before pouring, the substance should be heated to 90°C. If there is a significant leak, the entire volume must be changed, using transformer oil if possible. When filling the heater, you must leave room for thermal expansion. Adding another oil is strictly prohibited, since the brand of the original product is unknown, you can accidentally mix mineral with synthetic. The entire volume of oil must be replaced.
Extraneous noise
Noises in the heater can be either periodic or constant. The source of noise after switching on may be water that entered the oil in the form of steam during assembly due to high humidity in the workshop. When water heats up, it changes from a liquid to a gaseous state and produces a crackling sound.
Another cause of noise when turned on may be bursting air bubbles. This happens when the heater was moved and the oil was swirled in it. After warming up the device, these noises disappear and do not pose a danger for further operation. A constant crackling sound is the cause of a malfunction in the electrical part of the heater. It should be found and eliminated, since such a device cannot be operated.
The heater may also crackle due to the linear expansion of parts whose dimensions change when heated. This is also not dangerous, in addition, the sounds disappear when warmed up.
Electrics
If the oil cooler stops working, this is most likely due to problems and malfunctions of the electrical part. The check should begin by removing the cover covering the heater's electrical circuit. After this, use a tester to check the serviceability of the power cord. The faulty element is found by calling one by one. Then you should switch the tester to resistance measurement mode and check the condition of the conductors. If the resistance of at least one conductor differs from zero, the plug or wire is replaced.
It will not be possible to repair the electrical part, except for the cord, at home. It is necessary to remember, or better yet, photograph the order in which the terminals are connected, and then remove the faulty sensor. You need to buy the same one in the store and install it in place of the old one.
Bimetallic plate
The bimetallic thermostat is located next to the heater mode control keys. It consists of a rotating handle connected to a moving contact and a bimetallic plate. It consists of two different metals and is capable of changing its linear dimensions depending on temperature, and when the ends are rigidly fixed, it can bend and make a contact.
The serviceability of the bimetallic thermostat is checked by connecting it to a tester. By gradually turning the heater temperature control knob, the resistance at the relay terminals is measured. The resistance should be 0 at all positions of the regulator. Otherwise, you need to wipe the contacts with alcohol or sand them with sandpaper (zero). If the manipulations do not lead to normal operation of the regulator, it should be replaced.
Thermal relay
The number of these elements depends on the connection diagram of the heating elements and the set of heater modes. In most cases, the device has 3 operating modes and 3 self-resetting thermal fuses, while 2 heating elements of different power are installed.
Thermal fuses are located in fiberglass protective tubes. By checking the resistance of each of them, you can determine the serviceability of the elements. If there is a malfunction, the thermal relay must be replaced. After performing repairs, you should check the circuit resistance in each mode of operation of the heater.
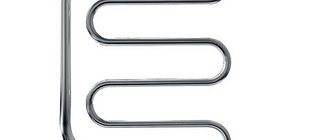
Failure of the heating element
A heating element (tubular electric heater) for an oil heater consists of a shell - a tubular metal body, a nichrome spiral and quartz sand that insulates the spiral from the walls of the tube. The tube is sealed at both ends with bushings through which the heating coil leads are connected. They have no polarity and are connected to the network randomly.
The most common malfunction in a heating element is a break in the spiral heating element (nichrome thread). To check, you need to touch the tester probes to the terminals of the heating element in resistance measurement mode. When multimeter 1 appears on the display (resistance is infinity), a broken thread is diagnosed.
If it turns out that the heating element for the oil heater has burned out, then repairs will be required, which will be very difficult. This is a search for a heating element of the required configuration and power, pressing it out of the body with the accompanying process of draining the oil, replacing the heating element, adding oil, sealing, etc. It is easier to buy another heater, since repairs will cost almost the same amount.
How to assemble an oil heater yourself
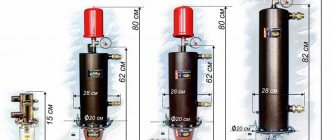
Making such a unit at home is not difficult. Moreover, the design of the oil radiator is the same everywhere, the difference lies only in the power of the equipment and the dimensions of the device body.
Depending on the size and required power of the device, from 1 to 4 heating elements can be installed in it. Often, one heating element is enough for a household heater.
Standard electrical diagram of an oil radiator.
As for the case itself, the choice is huge. Most often, standard cast iron, aluminum or steel batteries are used for this purpose. But you can also use a regular metal gas cylinder, a pipe of suitable diameter, or even a tightly sealed pan. The main thing is that the heating element does not touch the body.
Don't forget about the oil itself. As a rule, it is recommended to use any purified technical oil. But electrical transformer oil is considered the ideal option. This composition is already adapted to work at high temperatures.
The price for it is quite high and can take up to half the budget, so you need to approach the choice of case volume carefully.
Types of heating elements.
It is most convenient to make a heater from a standard cast iron battery MS-140; it has an acceptable cost, plus there are ready-made heating elements and related accessories on the market adapted for this model.
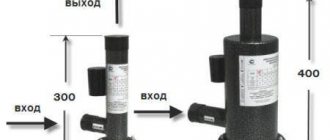
As already mentioned, the heaters are mounted at the lower end of the unit. The housing must be grounded; on the opposite side of the structure, a ball valve and an oil radiator drain hose are installed below. This is especially true for volumetric heaters with a heavy body, where draining the oil, if necessary, is difficult due to the high mass.
Radiator sketch.
Since we are talking about a heater based on MS-140, the upper hole of the battery, which is located above the heating element, is closed with a plug. And above the drain valve, the hole is closed with a plug with a Mayevsky valve built into it, so that, if necessary, the pressure can be relieved.
Important: regardless of the size and volume of the heater, its oil fill should be within 85%. The remaining 15% will be used to compensate for oil expansion when heated, plus in large units it is advisable to install an additional expansion tank.
Characteristics of different models of heaters.
The video in this article shows the intricacies of assembling the heater.
Reasons for decommissioning an electric heater
Regardless of the quality, sooner or later, almost all electric heaters begin to heat poorly, do not turn on, or no longer heat at all. Repairing an electric heater yourself is not very difficult, since this class of devices is often not considered a complex device. In everyday life, people use a wide variety of electric electric heaters: electric infrared fireplaces, convectors, fan heaters and a variety of oil radiators. For all such devices, regardless of design features, the heating element is nichrome.
It should be noted that the simpler the design of the heater, the longer such a device will work, and it will be easier for the husband to figure out the breakdown and repair it.
Device
For quick and effective repairs, first of all, you need to understand how the heater works. Regardless of the type of such devices, they all have basic common elements. The heaters are equipped with one or two key switches with which you can select one or two heating elements that will heat, as well as lamps indicating the operation of the heating element. The heating element may have not two contacts, but three, with two separated heating coils inside.
Immediately after the power cord and plug there may be a protective thermal fuse that will automatically turn off the heater after overheating, for example, if you cover the convector on top with a towel. There may also be a tilt sensor that will work if, for example, the convector falls or overturns. In addition to the thermal fuse, there may also be a “circuit breaker” - an overload current fuse, for other emergency situations.
Diagnostics and troubleshooting of the heater
Any diagnosis begins with disassembling the heater, but before disassembling it, you must turn it off and pull the plug from the socket. We unscrew the screws of the housing, most likely the control panel housing. Having reached the connecting control panel with the thermostat, thermostat and other elements, we begin the test by testing the power cord. Next, we check the operation of all control keys and toggle switches by ringing them with a tester. Then all serial circuits. Thermostat
is checked by a tester and it should show zero resistance (short circuit) or close to zero on the contacts, this will indicate the serviceability of the thermostat.
In addition to the serviceability of the heater elements themselves, the cause of the breakdown may also be poor and unreliable contact of the conductors; over time, due to the difference in materials, they oxidize and rot, so attention should also be paid at this point. Then the protective elements are checked: position sensor and thermal fuse.
Thermal fuse
they call the tester; in a serviceable and cold state, there should be zero resistance (short circuit) on its contacts. There can be several such thermal fuses in one housing and, as a rule, the larger the housing, the more thermal fuses it contains. It should be noted that the thermal fuse may be working (functional), but due to severe contamination of the filters and convection holes, they can immediately trip and turn off the heater.
What is a position sensor
, so this, in most designs, is some kind of weight that, when the heater is tilted or dropped, acts on a mini switch that already opens the voltage.
A working position sensor, in the normal vertical position of the heater, should have zero resistance (short circuit) on its contacts. The main decisive point will be checking the heating elements
. In large heaters there are usually several of them, most often there are two. And often the reason for insufficient heating of the room is the failure of one of the heating elements. In most cases, the heating element cannot be repaired and is replaced with a similar one. How to check the heating element? The resistance at its contacts may vary, depending on the specific device, but it should definitely ring. Approximate resistance values can be in the range of 20 - 100 Ohms.
Main malfunctions of heaters
The heater does not turn on.
There may be several reasons. The socket, plug and electrical cord must be checked. Then disassemble and make sure there is mains voltage inside the device; it is best to use a 40W test light for this. The voltage is checked in the series circuit, thermal fuse, thermostat, thermal switch, heating element. The test under voltage should be carried out carefully or use the resistance testing method (with a multimeter) without voltage.
The fan heater turns on but does not heat.
The heater blows air but does not heat it, this situation clearly indicates a malfunction of the heating element, one of the sections of the spiral may be damaged, it is necessary to carefully inspect the entire length of the nichrome conductor, and also ring the heating element itself with a tester, the resistance should be somewhere around 70 Ohms . In the event of a visible break or burnout of the nichrome conductor, you can try to restore it by slightly pulling the broken conductors towards the center and carefully twisting them together with a reserve, then securely inserting the “connection” back, but so that it does not move or close during operation randomly onto adjacent turns of the spiral. Also, the reason for this operation may be a thermal fuse or bimetallic plates of the thermostat. In a cold state, they must be closed; sometimes it becomes necessary to strip them to improve the reliability of contact. Serviceable bimetallic plates should open from the heat of the soldering iron.
Additional tips and tricks
To ensure that the device lasts as long as possible, it is recommended to follow these rules:
- It is forbidden to dry clothes on an oil heater. It will dry fairly quickly, but this will cause damage to the device. This is due to overheating of the elements of the device.
- The surface of the oil heater may be very hot. To prevent accidental burns, it is recommended to install a special protective shield on the device.
- The device should be wiped clean from dust as often as possible. This will help avoid overheating and increase heat transfer. In addition, dust can cause a bad smell in the room.
- It is prohibited to use this heater in rooms with high humidity.
- The device dries out the air greatly, so it is prohibited to use it in very small rooms.
- The device may only be used in a vertical position. If the unit has been stored horizontally, it should be held vertically before turning it on. Thanks to this, the oil will fall down, eliminating the risk of overheating of the heating elements.
- It is prohibited to use adapters to connect the heater. This will create incomplete contact. As a result, the device may turn on and off periodically. As a result, it will simply fail.
- It is not recommended to leave the device turned on when leaving home. Do not place the device near upholstered furniture or curtains.