Preliminary information
Requirements for planted crops
- expediency;
- rationality;
- profitability.
So, expediency.
Do you need this or that culture? And where will you put the surplus if it is formed due to incorrectly planned planting volumes? Rationality implies the correct determination of the timing and volume of planting, and the use of optimal agricultural techniques. When choosing a crop, it is necessary to determine in advance how realistic the owner’s capabilities are to create optimal conditions for growing a given sample.
Expediency and rationality are also ensured by the correct choice of the variety of crop being grown. By correctly selecting the design and arrangement of the greenhouse, and rationally planning the change of plants in the greenhouse bed, you can achieve effective year-round operation of this green conveyor.
Recent posts Chainsaw or electric saw - what to choose for the garden? 4 mistakes when growing tomatoes in pots that almost all housewives make Secrets of growing seedlings from the Japanese, who are very sensitive to the soil
There is probably no need to explain what profitability is. This criterion is important for those who decide to make income from the greenhouse. Greens and flowers, in terms of profitability, are almost the same. But greenery is the solution to the problem of winter vitamin deficiency, flowers are bright shades in the autumn and winter landscape, joy and a peaceful atmosphere in the house.
Classification of crops
Crops grown in greenhouses can be divided into types:
- greenery;
- vegetables;
- roots;
- fruits;
- berries;
- medicinal plants;
- flowers and other ornamental plants.
When organizing a rational process, plants planted in greenhouses are classified into the following groups:
- Predecessor crops, which serve as early-ripening cold-resistant vegetables and herbs. Examples: early carrots (early), radishes, spinach, dill.
- Main crops. They can be tomatoes and cucumbers, sweet peppers and eggplants.
- Intermediate crops serve to fill the space not occupied by the main plantings. As it grows and develops, the main culture gradually replaces the intermediate one. This technique ensures rational use of greenhouse space.
- Winter crops. Examples: sorrel, chicory, parsnip.
In addition to plant foods, medicinal and ornamental plants can be grown in a greenhouse. Both for yourself and, especially, for sale. Examples: roses and peonies, dahlias, nasturtiums, asters.
Greenhouse greens: what are the benefits?
Among the main advantages of growing greens indoors:
- Diversity of cultures. In a greenhouse you can grow onions and garlic, dill, parsley, lettuce, cilantro, spinach, and herbs. These crops have similar requirements for agricultural technology and get along well in common beds.
- In a greenhouse it is possible to grow very capricious crops with increased requirements for temperature and humidity levels.
- Heated shelters make it possible to harvest crops all year round, even in winter and autumn, when vitamins are especially needed.
- Indoor soil makes growing safe; greens are rarely affected by insect pests.
- Greens can be grown in shelving, hydroponic or aeroponic ways, saving scarce space and reducing costs.
- It is easy to care for plants in a greenhouse, maintaining normal levels of heat and humidity. Organizing drip irrigation, automatic ventilation and lighting accelerates the growth of greenery and reduces the amount of work required.
Before you think about building a greenhouse for greenery, it is worth considering some disadvantages:
- A properly equipped facility is not cheap.
- In cold climates, maintaining a winter greenhouse will cost a significant amount. It is worth considering the costs of electricity, plumbing, and structural repairs.
- Annual soil replacement is required. With year-round operation, the top layer of soil will have to be replaced every 3-4 months.
- Indoor soil requires an increased amount of fertilizer.
Types of warm beds
Based on the principle of heating the soil and the root system of plants, warm beds are divided into three types.
- “Biological” warm beds . As a source of elevated temperature, they use the process of decay of various vegetation residues and animal waste. There are many subtypes of warm beds using “biofuel”, differing in their design and filling.
Types of warm beds with compost
Laying cables for arranging an electric heated bed
Making a warm bed using a heating cable
Prices for heating cables
heating cable
Construction of warm beds with subsoil pipes
Important! Regardless of the principle of operation, for any warm bed it would not be superfluous to install thermal insulation from below (and in some cases from above). This will prevent heat from rotting cables or pipes from being wasted in the frozen ground.
This article will focus on warm beds using “biofuel”, as they are the most common at the moment. They are easier and cheaper to install compared to other options.
Warm organic beds
According to their design, warm beds operating on rotting are divided into four subtypes.
- Recessed - under them, the turf is removed from the soil of the greenhouse, a sufficiently deep trench is dug and filled with several layers of organic material so that the upper boundary is at ground level or slightly higher.
Trench with organic matter, high and raised beds
The main options for warm beds working on rotting
The best option would be a raised warm bed - it is the easiest to arrange, it does not require digging a trench, and it will lose less heat due to contact with frozen spring soil. In addition, due to the relatively small volume, the warm bed in the box warms up much faster.
Beds in a greenhouse 3 by 6
The beds in a greenhouse 3 by 6 meters have their own design nuances. It is necessary to rationally use the entire area of the greenhouse, and be sure to provide free access to every bush, plant, and branch. In addition, the conditions for the plants themselves must be the best - so that there is enough light and nutrition.
Growing cucumbers in a greenhouse in winter: the best varieties for indoor ground
It is convenient to grow cucumbers in a greenhouse that do not produce long vines. Such plants are compact, delicate stems are not damaged during care and harvesting
It is worth paying attention to varieties and hybrids with a short growing season that do not require pollination. There are a lot of suitable options, it is recommended to try several varieties and choose 2-3 of the most suitable ones
- Valaamsky is a very productive early ripening hybrid, suitable for temperate and cold climates. The fruits are very tender, without bitterness, rich green in color with small black tubercles.
- Suomi is a hybrid suitable for winter cultivation and easily tolerates slight drops in temperature. The fruits are small, neat, and almost never outgrow. They have a pleasant, not watery taste.
- Bouquet is one of the earliest varieties; the hedgehog can be harvested a month after the seedlings are moved into the ground. “Bouquet” fruiting is characteristic, producing several fruits from each leaf axil.
- Sarovsky is a productive hybrid, characterized by endurance and productivity. “Bouquet” option, which gives high yields of medium-sized, even and very tasty cucumbers.
- Okhotny Ryad is an early ripening hybrid with an extended fruiting period. The fruits are small, elongated, very delicate in taste.
Joints
The complete process of transforming a greenhouse for the harsh winter season involves sealing the joints. According to many experts, they are the main cause of heat loss. Through small holes between the finishing materials used in the construction of the structure, cold air enters inside. Both film and glass greenhouses need sealing.
The presence of joints leads to drafts, which negatively affect the process of fruit ripening. Even if a hydraulic barrier was used when creating the heifer, it is recommended to carry out an additional procedure for sealing the joints.
What is needed for the job?
The modern market offers a huge variety of sealants that are ready for use immediately after purchase. However, most of them do not form a dense coating. The main reason is poor tolerance to the vagaries of weather and sudden temperature changes.
Experienced specialists praise mastics (thiokol and polysulfide mixture). They are perfect for sealing small seams and cracks. Special components in the composition of mastics allow it to be used in a wide temperature range: from frost to heat. Proper use guarantees excellent results. Rubberized gaskets will also do an excellent job. They can be different, with a dense outer layer or have a porous structure. This is an excellent choice for sealing a greenhouse on a metal frame or when working with a strip foundation.
Additional heating tools
The range of opportunities for owners of greenhouses and greenhouses is enormous. Using heating equipment, you can easily create ideal temperature conditions inside the structure. Devices of this type can be used both for stationary buildings and for greenhouses attached to the walls of cottages or houses.
Autonomy. Gas equipment
Buyers have the opportunity to purchase heating equipment that operates autonomously. Gas is used as a resource. Such devices are designed for installation in stationary greenhouses. To install heating, you need to connect it to a common gas pipeline. This complex process should only be carried out by professionals. In addition, the additional branch requires appropriate permission.
If it is not possible to connect the system to a gas pipeline, you can use cylinders, but this is not the most economical and convenient option. Gas runs out quickly, and you have to constantly spend time purchasing new cylinders. As practice shows, one container lasts less than a month.
Electricity
The second option is electric heaters. Such equipment has its pros and cons. The main advantages are safe use, compared to gas heating, simple operation and installation. The disadvantage is that to heat the air in a large greenhouse, you will need several devices. Don't forget about electricity costs. Using standard household appliances will not lead to the desired result, since they are not designed to be used 24 hours a day. The equipment will not cope with the constant load and will quickly become unusable.
Insulation of polycarbonate structures
Polycarbonate greenhouses are becoming more common. They can be found in various regions of our country
Polycarbonate is durable, reliable, practical and, most importantly, cost-effective material. It is great for creating greenhouses for various plants
The more severe the climate in a particular region, the more seriously you need to take the process of insulating a building. This will help to significantly increase the yield and growing season of flora representatives.
Sheet polycarbonate, which has become widespread as a material for greenhouses, boasts excellent thermal insulation. This is the first advantage of this finishing material, because the main task of the greenhouse is to create comfortable conditions for plants and their development. The second thing to note is transparency. The sun's rays pass through the walls unhindered. Don't forget that light also gives warmth. The material will help save money spent on using lighting equipment.
To achieve maximum heat retention, it is recommended to opt for a three-layer coating. The design includes two layers of polycarbonate and an air layer as an addition. The optimal thickness of the outer sheets is about one and a half centimeters, 1.5 cm, and the inner layer is 4 mm. To reduce heat loss, experts recommend using polycarbonate sheets together with rubber seals.
Foundation
Be sure to pay attention to the lower part of the structure, including the foundation. It should be laid in the same way as when working with greenhouses made of other materials.
The depth should not be less than the freezing depth of the soil. When arranging foundation blocks, it is necessary to use roofing material; it is laid on top of the foundation. Additional insulation is also carried out from the inside. In this case, you will need a 40 cm layer of sand and polystyrene foam.
Greenhouse placement
Smart placement will help save heat inside the greenhouse, which will also save heating and maintenance costs. There are several rules that should be followed when choosing the location of the greenhouse.
Sun. An area illuminated by natural light is the best place to place a greenhouse. Natural light and warmth are essential for the harvest.
- Area. In the northern regions, greenhouses must be directed in the direction from east to west.
- Shadow. Shading of the structure should be minimized as much as possible.
- Block. The house, trees and other additional buildings in the yard can be used as protection from wind and drafts.
Additional Methods
There are many other ways to insulate a greenhouse.
Beds. Experienced summer residents and gardeners recommend using high beds. The optimal figure is 40 centimeters.
Foundation
The basis of the structure - the foundation - plays an important role in maintaining heat inside.
Sellers of greenhouses made from polycarbonate greenhouses claim that they are lightweight and do not require a foundation - they can serve as timber or just soil. But if the owner wants his greenhouse to effectively retain heat, then a reliable insulated base is needed.
Base insulation
Insulating the base of a greenhouse consists of two points:
- warm foundation;
- soil thermal insulation.
If the greenhouse is located without a foundation - from below, a small distance is created between its covering and the soil, since it is impossible to perfectly level the site. The soil not only gives off heat during the day, but also takes it away at night - the structure cools down faster. A concrete or timber foundation will help prevent this. So, the most popular materials were:
- concrete - a strip of concrete is poured, which is lined with foam plastic on the bottom and sides;
- beam - the greenhouse is installed on beams with a large cross-section.
Creating and pouring a concrete foundation
A platform of strip concrete base along the perimeter will protect the interior from environmental influences and increase the frost resistance of the structure as a whole. The depth of the foundation is determined by the level of soil freezing - in most cases, 50–60 cm is enough. You can create the foundation yourself using the following steps:
- marking corners, measuring diagonals;
- a cast-off is installed - this is a wooden structure with fishing lines to determine the external and internal boundaries of the base;
- the soil is removed to the required depth (at least to the freezing depth);
- at the bottom there is a cushion of sand, or best of all, several layers - for example, sand or gravel. The layer will protect against deformation and create additional insulation. An excellent solution would be to backfill layers of waterproofing film, which is applied to the bottom and walls of the pit.
The trench is ready - they are making formwork. It is a simple structure made of wooden planks and panels. Its height is determined by the planned thickness of the foundation. It is desirable that they be equal - this will make it more convenient to compact and level the concrete mixture. The next stage is reinforcement. It will achieve high strength and is created with steel and iron rods, they are laid evenly or a reinforced mesh is made. Its elements are connected using knitting wire or welded into a solid structure.
Kneading and leveling
Concrete is mixed. The following composition is suitable: one part cement, two parts sand, four parts crushed stone. As a rule, the volume of water should be half the volume of cement. The concrete should not be too thick or too thin. Lightweight concrete can also be used for a greenhouse. The concrete mixture is poured evenly throughout the formwork.
If its surface is painted with water-based paint or lubricated, for example, with used machine oil, it will be easier to remove after the solution has hardened. It is necessary to use all the concrete at once: the solution is never left “for later”.
The concrete is leveled and compacted using a special vibrating device or a simple board with a handle. It is imperative to release the accumulated air - to do this, the mixture is pierced with metal pins.
The foundation can be covered with roofing felt (additional waterproofing), exposing it from the inside, and making a 20-25 cm canopy on the outside. Foam plastic is also laid around the perimeter of the foundation from the inside and covered with a layer of sand 40 cm thick - this will additionally protect from moisture and cold.
Insulating the base with foam plastic
It’s even easier to create a warm base for a foam structure with your own hands. This is a cheap and accessible material; it can perform heat preservation functions. It must be taken into account that such a foundation will not last long - it is much less effective and of high quality than a concrete foundation.
To prevent it from deteriorating, it is advisable to pack it in plastic before laying it. Mice love this material: they do not eat it, but gnaw holes and place their homes there. To protect such a foundation, you can create a perimeter of 1/4 or ½ brick. Foam glass is a good substitute for polystyrene foam - it is not afraid of moisture and rodents, but is more expensive.
Strengthening the greenhouse
Even if the installed greenhouse seems reliable enough for wintering, it requires some strengthening. How to do this correctly?
You should start by cleaning the inside of the greenhouse, cleaning and leveling the soil, ensuring the soil surface is dry. After this, they begin the main stage - installing supports. They are usually made from boards or timber, as wood is strong and durable. These structures will not only support the frame but also prevent it from deforming.
Supports are divided into transverse and longitudinal. The former are more difficult to manufacture and install and require more material. They are installed on a transverse frame made of arcs. Longitudinal supports, accordingly, are placed along the greenhouse structures. The first option is more reliable than the second, especially with significant greenhouse dimensions. Recesses must be made on the supports at the points of connection with the frame arches to prevent sliding and collapse.
The soil in the greenhouse must be dry before strengthening in order to be less subject to freezing and thawing during temperature fluctuations. Changes in the condition of the soil lead to swelling. Accordingly, installed supports can press on the surface of the frame from below and damage or destroy the greenhouse. Therefore, even installing supports does not fully guarantee the safety of the greenhouse during the problem season.
Additional protection
If the greenhouse is located near the permanent residence of the owners, then caring for it even in the snowiest winters is easy. It is necessary to remove snow from the surface in a timely manner by sweeping or tapping on the side walls so that it falls off naturally. You should also make sure that an ice crust does not form, preventing the snow from melting.
If the greenhouse is located on a summer cottage, then, if possible, you should come there at least several times a season, especially after heavy snowfall. In this case, you need to check the condition of the supports and carry out cleaning.
It should be noted that the greenhouse design requires additional protection from the wind. Polycarbonate is a lightweight material, so the greenhouse must be additionally strengthened to the ground during installation. This can be done using a capital foundation or special fastening brackets.
If you follow all the rules for strengthening the greenhouse and proper care for it, it will last a long time and will help in growing an environmentally friendly, abundant harvest.
Arrangement of the basement
Step 1. Prepare the required number of bricks. Lay them “dry” on the foundation to estimate the layout of the plinth.
Step 2. Prepare the solution.
Step 3: Start styling. Build the base using the “half brick” method. Control the position of the bricks using a level and tensioned threads.
Laying the plinth
Using a building level
Work on laying the plinth continues
Brick laying options
Bricklaying
Step 4. After installation, remove excess mortar so that it does not spoil the appearance of the base.
Removing excess solution
Step 5. Insert anchor bolts from above into the joints or into the holes drilled in the brick. In the future, the latter will be used to fasten the glass greenhouse frame. In this case, choose places for the bolts a little to the left or to the right of the location of the vertical post. The interval is from 1 m, but not less than 2 anchor bolts on each side of the greenhouse.
Location of anchor bolts
Step 6. Place a waterproofing layer of roofing felt or similar material on top of the brick.
As a material for the plinth, in addition to brick, you can use foam concrete blocks or their analogues.
Brick prices
brick
How to insulate a polycarbonate greenhouse from the inside in two layers of film
Air is the best heat insulator. Therefore, we need to secure the second layer with bubble wrap along the inner arches of the greenhouse. We choose the densest and cheapest material. Insulating a polycarbonate greenhouse in two layers with bubble film gives the effect of a thermos and reliably retains expensive heat.
Tip 3: Buy film with large bubbles, as shown in the photo in rolls of 100 m2.
Before installing the second layer, take a transparent sealant and seal the overlapping areas of the outer polycarbonate layer.
On the arches inside the greenhouse, it is necessary to secure the film with wire as shown in the photo. We choose the step by eye. The main thing is that the material fits tightly to the arches. Don't forget about overlap.
Video: Option for insulation with a second layer of film
Nowhere without a vestibule
It is impossible to properly insulate a polycarbonate greenhouse without a vestibule at the entrance. In this place there will be a container for watering, an electrical panel, an automatic watering system and a small table for gardening tools.
We make an opening for the door (frame) from 50mm x 50mm timber and attach it to metal structures. The door is knocked down from the same timber and secured to the frame with hinges. For rigidity, we mount a jumper in the middle of the door.
It wouldn’t hurt to buy and glue rubber seals for the doors.
The vestibule lintel and the door are sheathed with 4mm polycarbonate along the second arch. We fasten it, like the second layer in the greenhouse, with screws.
Using transparent sealant we go through all external joints.
A cheaper insulation option is regular film
How to insulate a greenhouse
How to insulate a greenhouse
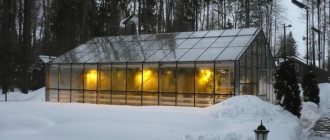
A greenhouse is a necessary structure for every gardener. Thanks to it, you can grow plants not only in the warm season, but also harvest in winter. Of course, it is not always possible to plan the frequency of use of a greenhouse in advance, and a summer greenhouse is completely unsuitable for winter conditions.
Based on this, the gardener will need to think about insulating the greenhouse. To do this, there are a number of more or less effective measures, thanks to which you can use the greenhouse in winter.
Internal insulation work
Insulation and treatment of joints do not always solve the problem of heat preservation - the cold still penetrates through the greenhouse material itself, no matter how high-quality it is. Its windows must remain transparent, so coatings that transmit light well are used for internal insulation.
The standard method is to line the space from the inside of the structure with plastic film: a glass/air/film layer is formed that will prevent heat from escaping. Polyethylene is also used externally in the same way.
Installation of an additional layer
In addition to polyethylene, you can use another layer of polycarbonate; sheets of thinner thickness than those that make up the greenhouse are suitable. In this case, a three-layer coating is formed: two layers of material and a layer of air. The standard thickness of external sheets is 16 mm, internal - 4 mm.
You should know that simple polycarbonate does not hold heat well. For greenhouses, the ideal material would be cellular polycarbonate - it works much better as an insulator. Sheets of this material are easy to cut, drill, and are quite flexible.
A few nuances of installing an additional layer:
- the hole to be drilled must be at a distance of at least 40 mm from the edges of the sheet - this way the material will not crack;
- the hole should be 1-2 mm larger than the thickness of the screw;
- For fastening it is better to use a special thermal washer; you can make it yourself. It consists of a sealing washer (made of rubber material), a plastic washer, a self-tapping screw (sold separately), and a thermal washer cover.
Beautiful examples
Design solutions for large winter greenhouses exceed all expectations of private home owners. A winter greenhouse can instantly transform from a place for growing plants into a chic place to relax with a book and a cup of hot tea in your hands. However, one does not exclude the other.
A white frame greenhouse with a high gable roof and glazed windows can become an excellent greenhouse that can accommodate not only small bushes of delicate plants, but also short trees. The brick foundation makes this structure more reliable, and the shape of the roof will not allow the weight of snow to accumulate for a long time. The glazed surface will allow you to enjoy daylight all year round.
A metal greenhouse-“hut” with glass walls will be a wonderful decoration for a winter hunting lodge. Water heating (in addition to the wooden interior) will allow you to enjoy green plants all year round. The sharp shape of the roof combined with the beams makes it extremely resistant to winter weather, as well as another design addition to the backyard.
A greenhouse with a stone foundation and a metal frame will become a wonderful childhood memory of an old country courtyard, where a beautiful structure could be a winter greenhouse and a beautiful palace at the same time.
For an overview of the winter greenhouse, watch the video below.
Self-construction
In order for the independent construction of a greenhouse to be successful, you need to think through everything in advance. At the initial stage, it is necessary to make drawings and select a location for the building. On the sketch you need to accurately indicate its parameters, as well as the location where the structure will be located.
When choosing a place to build a greenhouse with your own hands, you should take into account such factors.
- Sunlight. Plants in a greenhouse need the maximum amount of daylight. The most convenient location for this will be the location of the building from west to east.
- Wind protection. When constructing a greenhouse, you can provide protection from strong winds.
- Convenient approach to the building. Sufficient operating space should be prepared to allow access to the greenhouse with carts and buckets.
When starting construction, you should dig a pit - its depth should be at least 2 m. When choosing the size, take into account that the length of the structure can be arbitrary, and the width should not exceed more than 5 meters. If you choose other parameters, for example, build a structure 6 meters deep, then the heating of such a structure will be uneven, which will greatly increase heating costs.
The edges of the pit should be leveled for subsequent pouring of concrete. The frame of the future greenhouse structure is installed on the concrete foundation. When the foundation construction work is completed, they proceed to the construction of the base for the structure, and thermal insulation is fixed on top. A polycarbonate roof is installed on a metal base.
If the greenhouse is installed in the northern regions, then foil is used to insulate it, which is used to cover the walls in several layers. Such insulation is done only in the cold season.
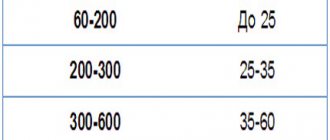
If you make heated floors, you can install heating in the greenhouse. The optimal temperature for plants should be maintained in the greenhouse room from 25 to 35 degrees Celsius, while the humidity in the greenhouse should be taken into account. A prerequisite must be constant ventilation in the room. If all requirements are met, optimal conditions will be created for the operation of the greenhouse all year round.
When installing a roof, polycarbonate is more often used - with a sheet length of 12 meters, a flat surface is created, which eliminates the appearance of joints, as a result of which drafts will not appear in the room. To prevent corrosion, all fastening parts are pre-lubricated.
Complex and more effective methods of insulating greenhouses and greenhouses
To harvest crops during the cold season in regions with harsh winters, it is necessary to use more effective methods of insulating greenhouses. Such methods include building a foundation, electric, gas and water heating, etc.
Foundation as a method of insulating a greenhouse
If you initially plan to use the greenhouse during the cold season, we recommend building a foundation under the structure.
Before installing the greenhouse, you can install a foundation on which the structure will rest. When properly organized, it will not only help maintain the temperature inside, but also protect against rodents. To ensure high-quality protection against freezing, a depth of 50 cm is sufficient. However, before insulating a polycarbonate greenhouse using a foundation, it is important to determine the depth of soil freezing.
A strip foundation based on one of the following materials is used as a base:
It is recommended to reinforce a concrete foundation made using formwork with iron rods. Instead of regular drainage, it is better to lay a layer of sand under it. If the main part of the structure is formed independently, at the design stage it is possible to provide for the presence of a vestibule to minimize heat loss.
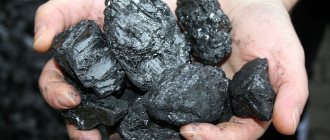
Heating greenhouses with a stove
For full year-round use of the greenhouse, additional heating must be provided. To do this, you can use autonomous heating using a kerosene stove or a compact potbelly stove.
It is recommended to install the stove at the end of the structure, and build the chimney horizontally. To do this, you can use metal pipes or make brickwork. It is important not to forget to make a lift in the place where the chimney connects to the vertical riser of the stove.
If the greenhouse is located close to the house, it makes sense to connect it to central heating.
Water insulation of greenhouses
Water heating of greenhouses is an excellent way to improve stove heating. How to do it? It is necessary to install a water heating boiler on the stove, and run pipes from it to a water tank.
Next, you need to loop the pipes and, of course, make wiring around the perimeter of the structure. This way the greenhouse will be heated evenly.
Electric heater for greenhouses
You can also heat the greenhouse using the principle of a warm floor using an electric cable, which is located under the soil layer. This type of heating heats from below. In addition, electricity will come in handy when heating the greenhouse with infrared heaters, which are usually mounted on the ceiling.
When designing electric heating, it is important to provide good insulation of the wire, since condensation or water during irrigation can lead to a short circuit in the network if a low-quality insulated wire is used.
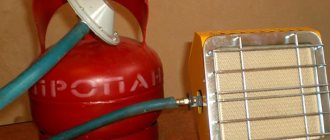
Insulating a greenhouse with gas burners
An alternative way to heat a greenhouse can be a system of gas burners evenly distributed throughout the structure. To heat a small greenhouse, it is enough to use burners with gas cylinders, but when heating a large greenhouse, be sure to connect the gas heating system to the gasification system of the house.
In addition to the obvious heating function, such systems are useful in that they produce carbon dioxide, which is necessary for plants. To ensure that gas and heat are evenly distributed throughout the greenhouse, you can use fans.
Strong arguments in favor of PENOPLEX®
Do not forget one very, very important point: you will spend this amount on insulating the base only once during the entire life of the greenhouse, since PENOPLEX is a truly durable material. Biostable (unfavorable for the development of dangerous and harmful microorganisms, fungi and mold), chemically and physically neutral. Eco-friendly (its use in greenhouses is safe) - allows you to grow useful and healthy products, creates favorable natural conditions for them.
And the last, but compelling argument in favor of this method of insulating greenhouses. This is not a dacha initiative of local “Kulibins”, but a proven technology that has long been successfully used by the agricultural leaders of the industry.
Insulation using this technology is also used for industrial greenhouse complexes. As a clear example, I will cite the illustrative experience of the Maysky agricultural complex in the Republic of Tatarstan. The productivity of industrial greenhouses with a total area of more than 50 hectares today is more than 15,000 tons of vegetables (cucumbers, tomatoes, peppers, eggplants and others).
How and with what to insulate your greenhouses is up to you. But do not forget that the stingy pays twice: by choosing low-quality materials from an unknown manufacturer, you risk simply throwing money away, leaving greenhouse plants without protection from the cold.
Features of insulating a polycarbonate greenhouse for the winter
You need to think about insulating a polycarbonate greenhouse even during its installation or construction. Care should be taken to ensure that the plants being grown are not exposed to cold air currents penetrating from outside, and that their root systems do not suffer from the cold emanating from a frozen foundation or ground.
Did you know? The first large greenhouse structure to use forged steel for the first time was the Palm House or Palm House, located in the UK. Its construction lasted from 1844 to 1848. The greenhouse contains 70% of all palm trees known to scientists today.
Insulation against drafts
When building a greenhouse structure, sealing is very important, namely sealing all cracks, holes, and joints through which cold air can penetrate. The simplest and most effective insulation option is sealant treatment. It is poured into all existing cracks and holes.
A cheaper, but not as durable option is insulation with construction tape.
Gaps at joints can be sealed in two ways:
- Using a U-shaped polymer profile.
- Using a viscous sealant or mastic.
When building a greenhouse, you need to make sure that it has a vestibule that will not allow cold air to enter the room when the doors are opened. In such a vestibule you can later install a stove for heating.
If you have the opportunity and the means, then it is possible to mount the walls of the greenhouse in 2 layers, leaving an air gap between them. This method will significantly reduce heat loss.
Reliable insulation from drafts using the above methods will allow the use of a greenhouse structure in areas with warm and mild winters, where the air temperature does not fall below +5°C. In colder conditions, in addition to these, additional insulation methods must be used.
Important! When fastening parts during the installation of the greenhouse, in order to avoid large holes left, you should choose self-tapping screws that will completely cover the holes for them.
Insulation of the foundation and blind area
A properly executed foundation in itself can already make the greenhouse warmer, preventing plants from coming into contact with frozen soil. However, when using a greenhouse structure during frosts, it also needs to be insulated with improvised or special means and materials.
Most often, polycarbonate greenhouses are installed on a strip base. In this case, before laying it, it is necessary to determine the level of soil freezing. It is to this depth that the foundation should be installed. On top of the foundation you will need to lay thermal insulation material, for example, glass wool, foam glass, mineral wool.
The most modern material, which has received many positive reviews, is extruded polystyrene foam. It is laid after the concrete pour has hardened. A layer of sand is covered on top and fertile soil is placed. The same material is also good for insulating side surfaces.
You can see what it looks like by looking at the diagram:
With a block foundation, you need to cover the blocks with roofing felt, and insulate the internal space with foam plastic or a 40-centimeter layer of sand.
Soil insulation
There are several ways to insulate the soil. The simplest is biological, when self-heating organic substances are added to the soil, for example, manure with sawdust (300 g / 1 m²), humus. For biological substances to burn, the soil must be moist, with a neutral or slightly acidic pH level, and contain nitrogenous compounds.
Soil insulation can also be done by installing high beds. Compost is poured into the bottom layer, and the beds are made 40 cm high.
Also, the soil will become warm if sawdust is added to it. The soil needs to be removed by 30 cm, a 5–10 cm layer of sawdust treated with fungicides should be added, watered with slaked lime and a 30 cm layer of fertile soil should be laid.
Important! The introduction of organic matter into the soil must be done correctly, maintaining the required time frame between soil preparation and planting. It should be remembered that organic substances can heat up to +60...+70°C, which means they can burn the root system.
You can also use the most well-known method of insulating beds, which is more often used in open ground, but is also quite suitable for protected ground - covering with agrofibre or film
You can also use the most well-known method of insulating beds, which is more often used in open ground, but is also quite suitable for protected ground - covering with agrofibre or film.
Insulating a greenhouse without a foundation
1. Put it in order. At this stage, we clean and remove everything inside the greenhouse that is left from the summer season (hoses, garters, garden tools). We clear the external surfaces of snow and make a comfortable approach.
Let's start the experiment
2. We connect a temporary cable with a socket (carrying) and connect the light (days are short in winter) and pre-purchased infrared heaters. Read below about the choice and advantages of infrared heaters. If you haven't bought them yet, you can install a heat gun.
We hang an electrical panel. The Balu infrared panel is already in the greenhouse. A meter - let’s see the costs
Our task is to warm up the soil inside the greenhouse and create comfortable conditions for insulation
3. How to insulate the ground in a greenhouse. As soon as the soil warms up, you need to dig a pit 2.5 meters wide, 2 meters long, 40-50 cm deep. We discard the soil in the greenhouse for backfilling. If the structure does not have a concrete foundation, you need to dig pits near the walls carefully, avoiding the places of arched supports.
4. For the winter version of the polycarbonate greenhouse. We lay 10-20 mm penofol on the bottom with foil up and on top, in the same way waterproofing (for example, roofing felt) is overlapped. Please note that waterproofing and penofol should be adequate for the walls of the pit.
5. Cut the Penoflex insulation to a greenhouse depth of 40-50 cm and press it against the walls of the pit. Waterproofing and penofol should fit Penoflex from the inside. We go through the junctions with the greenhouse and the cracks with polyurethane foam.
6. We backfill and proceed in the same way to a new section of 2.5 x 2 x 0.5 m. See advice above.
Many websites post information about the need for a strip foundation for a greenhouse. From an aesthetic point of view, this is correct, but at the same time expensive. The arched structure is made of profiled pipe. The weight of a 2.5X6 meter polycarbonate greenhouse is only about 70 -80 kg.
A strip foundation is required and serves as a retaining wall if you are deepening the greenhouse inside.
If we consider a standard structure, without pits, then it is quite enough to install the arched structure in the standard way - on the ground. And this will not prevent you from growing cucumbers and tomatoes even in January and February.
A set of measures - how to prepare a greenhouse for winter
Experienced gardeners know that proper preparation of a greenhouse for winter is the key to a bountiful harvest in the future. Whether it is a seasonal or year-round greenhouse, after harvesting the crops you need to:
- Tidy up the soil.
- Perform preventive maintenance on the structure.
- Strengthen the structure.
Thoroughly clean, wash, treat the frame and covering material with disinfectant compounds
Particular attention should be paid to soil neutralization
Advice: In order to avoid plant diseases and the appearance of pests, according to reviews from experienced greenhouse growers, it is recommended to completely replace the top layer of soil 150-300 mm.
Watch some useful tips on how to prepare a greenhouse for winter; the video will help you determine the necessary set of measures to care for the structure and soil.
https://youtube.com/watch?v=SdxBIAWzPMU%3F
spring-cleaning
Check the structure for cracks, breaks, etc. damage; if defects are found, seal them with sealants and apply a patch. Preparing the greenhouse for winter in the fall begins with thorough cleaning:
- Take out tools, trellises and other equipment.
- Clear the soil of cucumber, tomato tops and other plant debris.
- Hose the surface.
- Dissolve household chemicals in warm water and wash the walls and roof with a rag.
- Use a brush with soapy water to clean the joints and interfaces between the frame and the covering material.
- Rinse the greenhouse with plenty of water.
- Open the windows and doors for ventilation.
In order not to deteriorate the light-penetrating properties of the covering material, the greenhouse should be washed with soft rags and brushes; the use of abrasive pastes and highly alkaline preparations is not advisable.
Preparation of the greenhouse includes a thorough visual inspection of the structure; if the structure is on a metal frame, all scratches should be cleaned, degreased and covered with a new protective layer of primer, then paint. Wooden elements absorb moisture and often fungus appears on them; if blackening is detected, wash the area with bleach, dry, soak in a saturated solution of copper sulfate, treat with antiseptics, and apply a pore-blocking layer of primer.
It is better to wash surfaces with a stream of water under pressure.
How and with what to properly treat a greenhouse
The next stage of proper preparation of the greenhouse for winter is disinfection of the structure. The choice of composition for processing depends on the materials from which it is made. A frame made of PVC and metal pipes can be treated with a vinegar solution: dilute 100 ml of essence in a bucket of boiling water. To prepare a wooden base for winter, it is better to treat it with a 10% solution of copper sulfate or Bordeaux mixture based on lime milk. You can prepare the composition yourself, according to the recipe: quench 2 kg of lime with a bucket of water, let it sit for about a week and add 100 g of dry copper sulfate.
The glass and film coating should be washed with soapy water and rinsed with clean water. It is recommended to treat the carbonate coating with potassium permanganate diluted in water.
Helpful advice: It is recommended to wash the film for the winter, dry it, remove it, carefully fold it and store it in a dry, warm room until the next season. When preparing a greenhouse for winter, be sure to use personal protective equipment when working with chemicals.
How to prepare a greenhouse in the fall - features of the prevention of wooden structures
Caring for wooden structures covered with glass and film differs from how to prepare a polycarbonate greenhouse on a metal base for winter. One of the most effective methods of disinfection and pest control is considered to be fumigation of a room with sulfur bombs; this method of treatment can be used in wooden buildings, but is prohibited for use in products with a metal frame.
Fumigation when preparing a greenhouse should be carried out in a sealed room. Close the doors, vents, and ventilation holes tightly, check the tightness of the joints and fit of the greenhouse elements, if necessary, seal the cracks with sealants and seal them with tape to avoid drafts. Place sulfur bombs on metal pallets at the rate of 50-150 g per 1 cubic meter, distribute evenly over the entire floor area. Set fire to the sulfur, close the doors tightly, and leave for 3 days. After which the wooden greenhouse is ventilated.
Preparing the greenhouse, the photo shows the process of fumigation with sulfur bombs
Requirements for winter greenhouses
How do winter greenhouses differ from summer ones? Why is their construction so much more expensive? To find answers to these questions, you need to consider the processes occurring in the greenhouse in winter.
DIY winter greenhouse
Heating
In a summer greenhouse, the main heating occurs due to the energy of the sun. During the day, the soil and greenhouse structures receive a large amount of solar heat; during the night they gradually release it. Thanks to this, fluctuations in night and day temperatures are insignificant, and the plants feel comfortable. Even in cloudy weather, solar energy is sufficient for heating due to the long daylight hours.
In winter, especially in northern latitudes, the sunny day is short, and the sun itself is low above the horizon most of the day. The sun's rays pass through the soil casually, practically without heating it. During the night the soil has time to cool completely, and in cold weather it freezes. For this reason, the energy of the sun is not enough to warm up winter greenhouses, and they have to be equipped with heating systems.
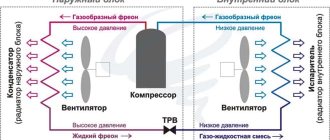
Heating system in a greenhouse
Winter greenhouses can be heated in different ways: using stoves, water heating radiators, electric and gas heaters. The choice of method depends on the resources available to you and the area of the greenhouse. The main condition: the power of the heating device must be enough to heat the winter greenhouse in the coldest months.
Insulation
Heating a greenhouse will be effective only if it is well insulated.
Ways to reduce heat loss:
- deepening the greenhouse into the ground;
- construction of blank insulated walls;
- use of double glazing or polycarbonate with a thickness of 10-25 mm;
- maximum sealing of joints and cracks.
Recessed greenhouses have excellent thermal insulation characteristics, but have a number of disadvantages, which are listed below.
Scheme of a recessed greenhouse frame
- For good thermal insulation, the structure must be buried below the freezing depth of the soil, which for temperate latitudes is about 1.5 m, and for colder regions - up to 2 m. Preparing a pit of such a depth increases the estimate.
- Buried greenhouses cannot be installed in areas with high groundwater levels, otherwise a drainage system will be necessary.
- To construct the walls of a recessed greenhouse, high-quality moisture-proof concrete is required.
All these measures increase the cost of a buried greenhouse and complicate the technology for building it yourself.
Recessed greenhouse
Stages of installation of a recessed greenhouse
Stages of installing a recessed greenhouse (continued)
Blind insulated walls can be made of foam concrete, thermal blocks or wood. In this case, the insulation is polystyrene foam - it is easy to install on the walls, it is not afraid of moisture and does not rot. To insulate the soil, use an insulated blind area with a width of at least 0.5 m.
Note! Insulation of greenhouse walls is carried out only from the outside!
Insulation of greenhouse base with polystyrene foam
The covering of the greenhouse also matters. It should transmit light well, but at the same time provide good thermal insulation. When using glass, double or triple glazing is required with a distance between panes of 10-30 mm.
Greenhouse with double glazed windows
When using polycarbonate, special profiles must be used. They will allow you to insulate the internal honeycombs and create a sealed air layer, the thermal insulation properties of which are quite high. Polycarbonate with a thickness of 10, 16 or 25 mm can be laid in one layer. With a polycarbonate thickness of 4 or 6 mm, double skinning is required.
Winter greenhouse made of polycarbonate
Note! Film for winter greenhouses can only be used in regions with rare snowfalls. With a heavy snow load, it stretches and breaks.
Prices for foam plastic
Styrofoam
Watering and humidification
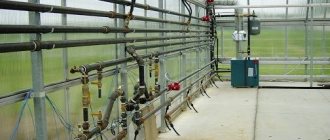
Water is necessary for the successful growth and fruiting of any greenhouse crop. With a large greenhouse area, the volumes of water used will also be impressive, so the source of water supply must be selected at the stage of laying the foundation.
If you plan to draw pipes from a water supply system or a well, they need to be laid at a considerable depth (at least 1 m for the southern regions and at least 1.8 m for the northern regions). For large greenhouses intended for growing products for sale, it is advisable to make a well right next to the structure or in the vestibule.
Water treatment system in an industrial greenhouse
To heat water, you can use containers with a volume of 0.2 to 1 m3. They are usually installed at some elevation - this creates the necessary pressure in the irrigation system. It is better to place the containers in the northern part of the greenhouse so as not to shade the plants. The water in them is heated under the influence of sunlight; it is also possible to equip the containers with heating elements for artificial heating.
Irrigation system in a greenhouse
Note! A container of water is a good heat accumulator. Heating up during the day, it gradually cools down at night and gives off heat to the air, which helps reduce temperature fluctuations.
Ventilation
A ventilation system is a prerequisite for the successful growth of most crops. Due to ventilation, excess heat and moisture are removed from the greenhouse, oxygen and carbon dioxide are exchanged. Air exchange in greenhouses is ensured using forced or natural ventilation systems.
Most often, vents are installed in greenhouses for ventilation. They are installed at the top of the walls or on the roof. The higher the window is located, the more effective the ventilation will be: warm air itself rises, giving way to cooler air. They can be opened and closed manually or using an automatic drive.
Automatic ventilation system in a greenhouse
Lighting
In summer, daylight natural light is sufficient for most crops. In winter, plants need additional lighting. For this purpose, gas-discharge lamps DNaT and DNaZ are used in winter greenhouses.
Greenhouse lighting
The minimum illumination rate, and therefore the number of lamps, depends on the plants being grown. In most cases, the total power of the lamps can be calculated based on the area of the greenhouse - 100 W of electrical power is sufficient for 1 m2. For example, for a greenhouse with an area of 20 m2, 2000 W or 5 HPS lamps of 400 W each are required, as well as starting equipment for them.
Sodium mirror phytolamps
Note! HPS and HPS lamps become very hot. They need to be placed under the ceiling in special lamps with reflectors.
Prices for phytolamps
phytolamps
Video - DIY winter greenhouse construction (part 1)
Video - DIY winter greenhouse construction (part 2)
Video - DIY winter greenhouse construction (part 3)
Energy saving screens
Horizontal curtain systems for greenhouses at night are another way to retain heat. A heat shield made of aluminum fiber fabric (ALUMINET) prevents the cooling of greenhouse structures. Under the influence of reflective components (aluminum has a high heat-reflecting ability), the infrared heat of the earth accumulated during the day is returned back to the greenhouse. When using screens with aluminum elements, heating costs are reduced - 50% energy savings are achieved. The greenhouse can be left covered with a heat-reflecting screen for 16 hours, since daylight hours in winter are only 8 hours.
There are other screens with a lower percentage of energy savings. For example, diffuse or shading curtains (such as LS 10) save 40% of energy, and film curtains save 30%. Polyethylene screens are installed permanently.
Horizontal shading is installed in separate sections under the roof of the greenhouse. All sections of the screen are driven synchronously by a special curtain mechanism - a cable drive or rack and pinion drive is used for this. There is also vertical shading, but it is still less common.
Automated curtain systems are suitable for industrial-scale greenhouse structures, and for small greenhouses you can design a screen yourself that will work on the principle of a roller blind. The heat-insulating material is attached to a horizontal shaft (aluminum pipe) with a drum mechanism and wound into a roll. Fastening elements are installed on the other end of the canvas. The shaft with the roll is fixed under the ceiling of the wall opposite to the entrance. As needed, the canvas is unwound under the surface of the greenhouse in approximately 1 m increments. All components of such an energy-saving roller blind can be found freely available at any hardware store.