↑ Country shower
For some reason, there is such a stable idea about the design of a country shower:
Rice. 1. The scheme is not the best
Water is somehow drawn into the tank, the entire structure is heated in the sun (some craftsmen install a heating element in the tank) and then the heated water is taken out through the lower outlet (what else?). In this case, the coldest water from the lower layer is drained first, and then it comes to the hot water. There are designs on different types of floats to which a water intake hose is attached.
In addition to the above, there are also disadvantages: - the need to replenish water as it is consumed; — the need to ensure that the heating element (if any) is immersed in water; — the water pressure is determined by the height of the tank installation. The advantages include low cost and ease of manufacture.
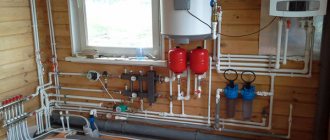
Making the body of an indirect heating boiler
Collapsible tank with a flange at the end.
The body of an indirect heating boiler is made of steel, any kind. The water temperature will be up to 70 degrees, so the walls can be thin, but there will still be no deformation. There is no need to brew a barrel from scratch; you can take an old gas cylinder and use it to make an indirect heating boiler with your own hands.
If you want the BKN to be able to be unscrewed to clean or replace the coils, then you need to weld a large diameter flange on one end. But this is not necessary; basically everyone makes non-separable tanks. You need to cut holes in the housing for:
- heating supply and return;
- DHW supply;
- DHW circulation;
- recharge from the water supply;
- heating element;
- magnesium anode;
- temperature sensor.
A magnesium anode is needed even if you do not plan to install a heating element in the BKN. It will protect the tank from corrosion, and accordingly, the service life will increase significantly.
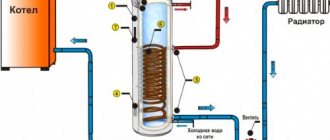
BKN scheme.
The heat exchanger must be placed either along the entire height of the tank or at the bottom. The DHW supply is at the top, and below it is the circulation pipe. The water supply comes in at the very bottom. The heating element and magnesium anode must also be placed as low as possible so that the heating element is always in the water, otherwise it will burn out. The temperature sensor should be placed somewhere in the middle of the tank.
Metal pipes with ½ or ¾ inch external thread are welded to the DHW supply and circulation holes, water supply make-up and temperature sensor. In this case, the diameter of all should be the same. The anode pipe must be larger; a specially made cap will be screwed onto it. A regular bolt is welded to this cap, onto which the anode is then screwed. The thread of the lid is packed with tow.
The heat exchanger can be secured in two ways:
- a copper or brass pipe is inserted into the hole and secured to the body on both sides with nuts;
- the steel pipe is welded into the body - there should be threads on the pipe on both sides.
The second option is simpler to implement and more reliable. In both cases, the heat exchanger is screwed onto the outlets from inside the tank. For the heating element, you need to weld a nut of the required diameter to the prepared hole in the housing from the outside. The heating element can be changed without problems, as well as the anode.
It is not necessary to drain. If there is a need to drain the water, this can be done through a tee installed on the water supply from the water supply. There is nothing complicated in such a harness.
To hide the contour, you can use a decorative cover on the heating pipe, which can be easily removed if necessary.
There is a lot of useful information about attaching steel heating pipes to the wall on this page.
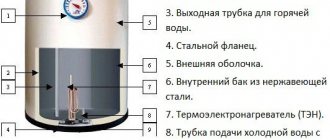
↑ Electric boiler - what's inside?
At the same time, household electric boilers of various sizes and manufacturers have firmly entered our lives.
We are already accustomed to them and practically do not think about it - what is inside? And, actually, nothing special. Thermally insulated tank and heating element with temperature regulator. Water supply/outlet fittings are welded into the bottom of the tank: a short one for supplying to the lower part of the tank, a long one for taking out from the upper part. And the cost of this device is about $100, and a heating element with a thermostat costs $5 - $10, the rest is a branded tank. The tank can withstand a maximum of 5 years of use, after which rust turns it into lace (I've seen enough of that). Moreover, in my memory, I have never had to change the heating element or thermostat. At first I installed used boilers at the dacha - they served there for some time, then another idea came.
Insulation of an indirect heating boiler
A homemade indirect heating boiler is charmingly insulated. We recommend using several materials. To begin with, the body can be coated with heat-insulating paint. It contains hollow ceramic microbeads that retain heat. In addition, the insulating paint protects the tank from corrosion, which is also useful.
Paint alone will not be enough; in addition, the tank must be insulated with mineral wool. For these purposes, only glass wool is suitable, as it is elastic. You need to wrap foil or Penofol over the fibrous insulation.
You can do everything faster and easier by using Polinor - an insulation similar to polyurethane foam. By the way, polyurethane foam will also work. When using these materials, you can do without heat-insulating paint, although it will not be superfluous.
↑ Idea embodied... in a balloon
We take an old propane cylinder of 50 liters (I bought it at a scrap metal collection point for about $5 - of course, in national currency at the exchange rate). We wash off the remnants of propane and odorant (a vile activity - “Fairy”, a large amount of running water, fresh air and common sense to help). In the lower part we cut out a hole into which we gas-weld a threaded sleeve for the boiler heating element (you can find it on the market or order it from a turner). The heating element will be mounted vertically, just like on a “branded” boiler. In the side part of the cylinder we weld a ½” bend at a height greater than the height of the heating element installed in the cylinder. This is done in order to avoid installing a check valve.
Rice. 2
The thermostat is not shown in the picture - it is inserted into the heating element. We do not install a valve because when supplied from a garden tank, there may be insufficient water pressure to “press” this valve. We will supply cold water to this flow, it will go down to the heating element. Using a clamp, we attach the hot water extraction hose to the upper valve (the upper fitting has a left-hand thread). Blue arrows indicate the path of supplied water, red arrows indicate the path of heated water taken away.
If for some reason the water disappears from the system, the heating element will always be immersed in water, which will protect it from failure during electrical heating. Excess water that expands when heated will exit through the inlet pipe into the system.
Rice. 3
In normal mode, the cylinder is always filled with water.
We paint the cylinder matte black without primer and hang it (we place it, hold it, and the height of the installation does not matter) in the sun in a suitable place with the tap up, the heating element down, and mount it like a regular boiler. We get free hot water for almost the entire summer! From my own experience, I will say that I had to turn on the electricity in the shower tank (covering the tank with a blanket) somewhere in mid-September and later. You have to keep the kitchen cylinder on (I have 2 - in the kitchen and in the shower) - in the kitchen you need hot water more often. I intend to connect it to the yard lighting circuit breaker (I have a free group of contacts there), only the other way around - in the evening the boiler will turn off, and at dawn it will turn on. But all the same, the cylinder will stand in the sun - after all, it’s a freebie!
IMPORTANT!!! Never forget about grounding! In my shower boiler, despite the existing grounding, I always turn off the electricity when someone is using the shower. The kitchen boiler must also be GROUNDED!!!
I don’t know how it is in more northern regions - everyone can decide for themselves. In the end, you can build him a “fur coat” from fiberboard with polyurethane foam or other heat insulator - it’s still cheaper than a “firm” one. When the cylinder rusts, we unscrew the heating element from it, disconnect the hoses and hand over the cylinder to a scrap metal collection point, and immediately buy another one for ourselves (“metalworkers” sell metal at a slightly higher price than they accept). I don’t think it will be as common as the “brand” one - after all, the metal of the cylinder is thicker, and of better quality
. It’s also not easy for criminals to steal this cylinder - the cylinder itself weighs 22 kg, and there is 50 liters of water in it, and to drain the water, you need to disconnect the hoses, turn it over - in short, it’s a hassle!
I described the use of a propane tank
because they are more common. You can use other cylinders, receivers and other scrap metal.
That's all, really. SUMMER IS COMING SOON!!!
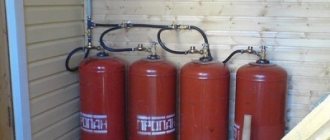
Boiler from a gas cylinder
First, look at what kind of boiler was made by Oleg Telyatnikov, the author of the channel of the same name. He used a gas boiler for his water heater. And in the second part of this article there is another development, which explains the mechanism of action of the heater.
This publication was prepared based on materials from the “Hot Master” channel. The cost of a homemade boiler is estimated to not exceed 1000 rubles, including all materials and labor. Even including the hoses that come from the water heater. To manufacture the structure, a used gas cylinder was used, to which tubes were welded with the help of a welder (in any section of the housing department where a mechanic repairs the heating of houses). We also need: a half-inch piece of water pipe, as long as the thickness of the cylinder; small threaded piece. All this is sold separately in the store, you can find it.
This is a gas cylinder. He should lie on his side. A nut is welded into it on one side (from the end), from the back, more towards the bottom. Same as the locknut on the heating system. It can also be found in the housing department. A nut is welded into which a replaceable heating element is screwed in well, which is sold in the store in various configurations, both with and without a regulator. The master has already changed the heating elements in his boiler several times.
When you replace the heating element, you can purchase a regulator if your boiler is boiling, or without it if it does not heat. The adjustment device itself looks extremely simple. You can set the lamb to the temperature you need. The boiler will give the desired temperature.
DIY electronics in a Chinese store.
A nut is welded, a hole is cut, and an interchangeable heating element can be screwed in. Let's discuss the connection system. The water supply to the boiler should occur as follows. It should be horizontal, in no case standing, because the heating element produces a certain amount of scale, which falls off in the form of shells and a pile of scale forms under it. As a result, it prevents the heating element itself from calmly cooling, dumping excess temperature into the water, and it quickly burns out.
If the tank is horizontal, then it should be located on the floor or in a kitchen cabinet. It is enough to move or roll a little or put it on the “butt” and then the scale will slide off and will not interfere with replacement. A replacement heating element costs from 300 to 700 rubles.
Tank, used gas cylinder. The welders to whom you take it, taking precautions (they know what to do), will process it. They will weld a threaded hole, a tube, and cut a hole. This is the hot water outlet. And the tube will simply be welded on top. The cold water supply must be a pipe in a pipe. That is, one pipe is welded, welded into a cylinder. You can simply lower one pipe almost to the bottom with a threaded end and connect the supply hose. But in my second cylinder I made it so that there was a second pipe on top so that there was always air in it.
The pipe prevents the supply water from cooling the cold water in its very mass. The cold one should be fed into the boiler in its lower part and not mix at all with the already preheated one. It should slowly rise to this heating element and warm up. If you simply cut two of these short ends into this one, and cold water flows freely through the hot water, it will naturally stir it and it will not turn out evenly hot.
Next from 5 minutes in the video