What type and method of insulation to choose
It is necessary to take into account first of all the purpose of the balcony room. If the loggia is not used year-round, the main task is to reduce heat loss from the living space. In this case, it is enough to insulate the side adjacent to the room.
When the loggia is intended for storing vegetables, all walls are insulated. The room does not need to be maintained at room temperature. Therefore, it is enough to choose a material that provides an average level of thermal insulation. Read more in the article “aluminum windows for the balcony.”
High demands are placed on insulation materials used on a balcony that is used year-round or combined with a living room. A thick layer of high-density insulation is required. All surfaces are insulated and it is checked that no drafts pass through the windows.
The specifics of installation work are determined by weather conditions. Insulation materials can be used at sub-zero temperatures. But for polyurethane foam, glue and solutions, you need to take into account the temperature conditions specified by the manufacturer. Frost-resistant products are more expensive.
If fire safety plays an important role, it is necessary to choose fire-resistant building materials. Mineral wool is considered the most resistant to open fire; penoplex has the least resistance. Another parameter is the budget. It determines the choice of insulation and the area covered by it. If funds allow, it is better to entrust construction work to professionals. Otherwise, you will have to purchase additional tools.
What are the requirements for insulation?
The following are desirable characteristics for wall, floor and ceiling cladding.
High-quality insulation must have the following properties:
- Light weight - this parameter is important so that a high load is not created on the balcony slab.
- Fire safety and environmental safety.
- Small volumes - the material will not take up much space in a cramped room.
- Possibility to carry out installation without the help of specialists.
- Affordable price.
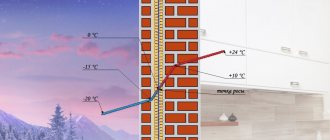
Why does the question arise: what thickness of polystyrene foam is needed to insulate a balcony?
Scheme. What thickness of polystyrene foam is needed to insulate a loggia or balcony: layers needed
It should be noted that doubts begin to creep in absolutely rightly , because a balcony or loggia is non-residential premises (as a general rule). This logically prompts the question of what thickness of foam for insulating a balcony is optimal. Nobody wants to overpay and at the same time be left with nothing . We wrote earlier on our blog about the thickness of foam plastic for apartment insulation, you can read our article separately and leave a comment. With a balcony, the situation is different, because if no one lives there, then there is no point in spending a large amount of money on purchasing polystyrene foam of high density and thickness.
if you look at the situation through the eyes of facade insulation companies, the thickness of foam plastic for balcony insulation is usually indicated at 50 mm, the density is standard
In general, we agree with this practice, but it is worth noting that for most cases even such a layer may be too large. The key point that needs to be taken into account when considering the question of what thickness of polystyrene foam is really needed for insulating a balcony is whether that very balcony is heated or unheated.
How thick is polystyrene foam needed to insulate a heated balcony?
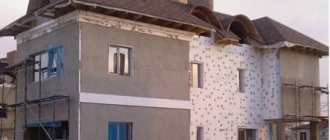
Photo. What thickness of polystyrene foam is needed to insulate a balcony from the outside - photo from the outside, work process
Very often, apartment owners in multi-storey buildings strive to “expand” the place and area of residence , and glaze balconies and loggias in order to use them as living quarters. This is a very common and completely justified practice. In some housing complexes (especially modern ones), loggias are generally included in the area of the apartment and have panoramic glazing. Of course, in the latter case, we are not talking about insulating the balcony, but as an example, everything is very clear.
If your balcony or loggia is “part of” the apartment , and you actively use it for spending time, the answer to the question of what thickness of polystyrene foam is needed to insulate the balcony is as follows:
exactly the same as for the entire apartment
If you have not insulated your balcony or loggia with 50+ mm foam plastic, and the rest of the apartment is well insulated, and in addition, there is free access there, you will lose heat quite a lot. Plastic windows on a loggia or balcony will not solve your problems. This happens because balconies and loggias usually have very thin walls and serious heat loss passes through them.
In this case, it is necessary to properly insulate the loggia or balcony according to the standards of the apartment as a whole. So, what thickness of polystyrene foam is needed to insulate a loggia in an apartment? Exactly the same as for the entire apartment, and if it was not insulated, then at least 50 mm thick.
What thickness of polystyrene foam is needed to insulate a closed loggia?
If a balcony or loggia is not used as a living space, then insulating it “to the full” does not make any sense. More precisely, we can say that this will not produce results. When answering the question of what thickness of foam plastic is needed to insulate a loggia when it is isolated, it should be noted
up to 50 mm, and in many cases even around 25 mm
Such figures are based on the fact that the loggia or balcony will not be heated . The specified thickness of foam for insulating the loggia will be quite appropriate. Thanks to this insulation, it will be possible to significantly reduce the heat loss of the apartment through the balcony or loggia, and on especially cold days to form an air “barrier” that protects the apartment from frost. At the same time, you can successfully store various things there without fear for their safety.
How thick is the foam for insulating a balcony from the inside?
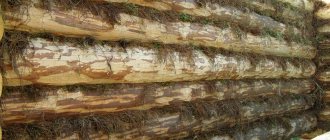
Photo. What thickness of polystyrene foam is needed to insulate a balcony from the inside - a visual view
One of the nuances of insulating a balcony is not only the choice of polystyrene foam, its thickness, density, but also the method of carrying out such work. Many contractors insulate balconies from the inside. At the same time, in terms of the problem of how thick the foam is for insulating a balcony - they indicate a thickness of 10 cm (i.e. 100 mm). It cannot be said that this approach is “not correct”, because returning to the issue of insulation, one must first of all proceed not from whether the insulation will take place from the outside or the inside, but from the purpose of this balcony or loggia. If they are heated, you can insulate them with foam plastic up to 100 mm thick; if not, you can do much less.
at the same time, when discussing how thick foam plastic is needed to insulate a loggia, we must not forget about the volume of the room , which is usually small...
When considering the topic of what thickness of foam to choose for insulating a loggia, many refer to the need for insulation of 100 mm, forgetting that similar indicators will be achieved at 50 mm , but the owner of the premises will lose useful volume and will pay much more for everything together.
Related article: Do-it-yourself insulation of a loggia in a panel house
Insulation for balconies and loggias - types and properties
Insulation materials differ not only in cost and thermal insulation properties. When choosing, you must also take into account the installation method and the load created. Some building materials are only suitable for loggias with a solid concrete base.
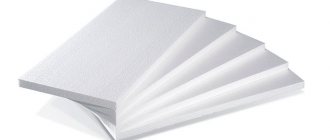
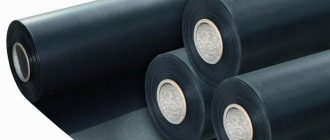
Expanded polystyrene
Sheet high-strength material that resists open fire well. It provides a high level of thermal insulation and is at the same time resistant to prolonged exposure to moisture. Not affected by mold fungi. Available in the form of sheets that are easy to cut. But when burned, it can release life-threatening hydrocyanic acid.
Balcony insulation with foam plastic
This lightweight building material has high thermal insulation and sound insulation properties. It is affordable, and installation can be done on your own, without the help of professional builders.
Polystyrene foam has been tested by time; it has been used for insulation in both apartments and country houses for decades. It is easy to cut and is not afraid of high humidity and temperature changes.
Mineral wool
It is produced from rock melts, less often - from metallurgical slag. It has a structure with many small fibers.
Advantages of mineral wool:
- It is a non-flammable building material and does not deform when exposed to high temperatures.
- Due to the fact that there is air inside the pores, heat does not pass through the cotton wool.
- Fungus resistance.
- Low degree of shrinkage - the sheet retains its original shape.
The main disadvantage is the lack of resistance to moisture. If the insulation gets wet, it will lose its properties. To avoid getting wet, it is important to take care of waterproofing the balcony. Another drawback is that to install mineral wool you will have to build a frame from timber.
It can be used on unheated balconies, but there should not be high humidity in the room. Installation requires knowledge in the construction field; it may be difficult for a beginner to work with mineral wool.
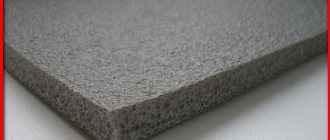
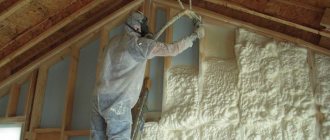
Polyurethane foam or PPU
This low-flammability material is sprayed onto the walls using a special gun with a hose connected to a pressure-injecting unit. It can be easily sprayed onto any surface, including wood, metal and concrete. Can be used at temperatures from -150 to +140 degrees.
Polyurethane foam does not react with other materials, so they do not corrode when in contact with it. For installation you will need to call specialists. When exposed to fire, polyurethane foam does not melt, but forms coking coal. This means that in the event of a fire it will not become a source of fire. Even when heated to 80 degrees, it does not produce toxic fumes.
The advantage of polyurethane foam is that when sprayed, a seamless coating is obtained. As a result, there are no cold bridges and no need to fill the cracks with foam. You can choose how thick the layer to apply and thereby adjust the degree of insulation. Two centimeters of polyurethane foam have the same heat-saving properties as a half-meter brick wall.
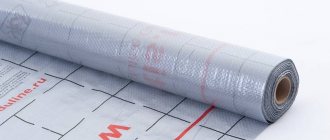
Penofol
Usually consists of two layers - penofol and a reflective aluminum substrate. Varieties are produced where there is a third layer - aluminum foil or a self-adhesive backing. Polystyrene sheet has excellent thermal insulation properties. The aluminum backing reflects heat into the house.
Thin penofol does not take up extra space. Therefore, there will be room for heated floors, built-in furniture, and a suspended ceiling. Penofol can be installed separately or together with other insulation materials. For maximum insulation, it is advisable to choose a variety covered with foil on both sides.
Penoplex or extruded polystyrene foam
Produced from polystyrene by extrusion. The insulation is resistant to mechanical loads, heat-intensive, and does not accumulate moisture. Penoplex is environmentally friendly and has a long service life. To insulate a home, sheets 4-6 centimeters thick are used. In terms of insulation efficiency, they are superior to mineral wool and polystyrene foam.
Read more in the article “How to insulate a balcony with penoplex.”
Expanded clay
This bulk material is porous granules of baked clay. It is used only if they want to insulate the floor on the balcony; the recommended fraction size is from 10 to 20 mm. With its help, you can improve not only thermal insulation, but also sound insulation. The only condition is the presence of double-glazed windows, otherwise the sound will pass through the windows strongly.
For thermal insulation, a layer at least 10 cm thick is required, which means that the ceiling height will decrease. Granules strongly absorb moisture, and wet expanded clay loses its valuable properties. Therefore, it is advisable to put waterproofing on top of the expanded clay.
Advantages and disadvantages
Foam insulation, which is well known to everyone, is white slabs of foamed plastic (filled with gas). It’s not for nothing that this building material has remained so popular for several decades - in addition to the low price tag, it has a lot of additional advantages.
Easy to install. Thanks to its light weight and plasticity, this material is very convenient to work with: it can be easily lifted to any floor, it can be freely cut into any pieces of shape and size, and even a beginner in the repair business can handle the installation. For insulation, you can use glue, dowels and special polyurethane foam.
Durability. Foam plastic easily tolerates temperature changes from heat to frost, practically does not absorb moisture, and does not deform over time. In addition, the structure of the material does not allow mold and fungi to penetrate inside. This is especially convenient for subsequent cladding of the loggia with wood: the service life of the finishing coating will be increased.
Related article: Do-it-yourself floor insulation on a loggia
Excellent insulating properties. Foam insulation helps keep the balcony warm even in the cold season and provides good protection from street noise and moisture. At the repair stage, such insulation usually does not require the mandatory installation of a vapor barrier film.
The main disadvantages of foam plastic as a building material are low strength, flammability and low adhesion to the surface (additional fastenings are needed), but they can be easily eliminated during the repair process.
Good to know! During installation, insulation always requires additional finishing (lining, PVC panels, decorative plaster, etc.), so the likelihood of damage is reduced to zero. In addition, modern fire-resistant or self-extinguishing foam virtually eliminates the possibility of fire.
Which material to choose
If a high level of sound insulation of the balcony is not required, it is enough to purchase inexpensive polystyrene foam. The density of the foam is only 10 kg/m3, it is lightweight and does not create a large load. Penoplex is a little more expensive, it is stronger and more effective than polystyrene foam. Mineral wool has better performance, with which you can turn a cold loggia into a room for year-round use.
But the prices are higher, and additional costs will be required for the purchase and installation of vapor barriers.
Penofol or isofol are effective and inexpensive building materials. They are recommended to be combined with other insulation materials, or laid in several layers. The reason is the insufficient thickness of the roll materials. If we compare a layer of polyurethane foam and polystyrene of the same thickness, then the first option has higher thermal insulation properties.
But the installation of polyurethane foam must be carried out by specialists, whose services will have to be paid separately.
Preparation
Before carrying out work, it is necessary to prepare the balcony. The number of preparation stages is determined by the state of the building, the building materials used and the selected installation technology.
Preparatory work includes the following steps:
- Cleaning things and furniture from the balcony.
- Removing or installing new fencing is usually required in older buildings.
- Construction of a parapet or its strengthening. It is convenient to use foam blocks for construction.
- Sealing cracks. In most high-rise buildings, the loggias are not initially glazed, but even after glazing there are many gaps left. They can be located at the junction of the slabs, between the floor and the wall. They should be sealed with foam.
- Strengthening and leveling the concrete slab.
After completing the above operations, installation begins. This may require preliminary installation of waterproofing.
Processing and finishing stage
When insulating a balcony with foam plastic with your own hands, it is important to know how to insulate the ceiling and floor of the loggia.
When treating the ceiling, you must first remove unevenness and cracks, which a high-quality putty will help you with. Next, the bars are fastened and leveled horizontally - here you will need a building level. It is during this period that wiring is laid if electricity is planned.
In the space located between the bars, you need to secure the foam sheets using mushroom dowels. If cracks are found, they can be quickly sealed with polyurethane foam. The vapor barrier film is secured to the bars with a stapler. When this work is completed, they begin to install sheets of plasterboard, on which, if desired, you can glue wallpaper, plastic ceiling panels, or simply paint them.
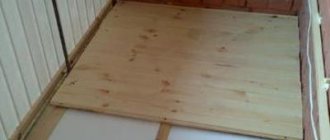
When insulating the floor, a so-called multi-layer “pie” is created. This design will provide reliable protection from moisture and cold air.
Installation of foam plastic for floor insulation is carried out after installing the wooden frame. There will be a layer of insulation in the space between the bars. To insulate the floor, it is recommended to purchase an extruded type of foam, which boasts an increased degree of density with a minimum width of the sides. After the cracks are filled with foam, a layer of vapor barrier should be laid on the floor surface. To get the best effect, you can lay plywood with moisture-resistant characteristics or OSB on the joists, and then apply the finishing coating. When using penoplex to insulate the floor on a loggia, the finishing coating can actually be laid on the surface of the sheets. When choosing ordinary foam plastic for the floor, this possibility is not considered.
Installation
The sequence of actions is slightly different for different insulation materials.
Typically the following steps are followed:
- Laying waterproofing – protects against moisture penetration. It is important to remember that dampness can penetrate micropores in a concrete slab. To avoid this, it is recommended to first coat the walls with a primer. If mineral wool is used, it should be covered on both sides with a waterproofing film.
- If the frame method is chosen, the racks and crossbars are screwed on.
- Next, the insulation is installed. With the frameless method, it is glued without first performing waterproofing.
- A membrane, film or penofol is laid on top. The insulation of the PPU loggia is carried out by professionals using specialized equipment.
- The floor on the balcony is being insulated.
- The final stage is finishing the balcony with plasterboard or clapboard (for more details, see the article “how to cover a balcony with clapboard with your own hands, step-by-step instructions”).
Insulation materials produced in rolls are attached directly to the wall. Tile materials, for example, polystyrene foam or polystyrene foam, are installed in several ways. The sheet can be glued with glue or attached with dowels. In this case, space is saved, since there are no gaps between the heat-insulating building material and the wall.
The second method, which is used most often, is fastening to a wooden or metal sheathing.
The insulation is cut according to the cell size, usually it is 60x60 centimeters. The resulting parts are placed inside the cells. When using this method, condensation does not form on the walls; due to the air gap, the level of thermal insulation is higher. You can screw the trim to the sheathing - plasterboard, hardboard or clapboard.
Two ways to install sheet or roll insulation
If you use the frame method, you will first have to secure wooden posts or a galvanized profile. Most often, wooden racks are used, since they can be selected according to thickness, and they are cheaper. The vertical elements are connected by crossbars. To make the structure, a 50x50 cm beam is suitable. Then you need to lay thermal insulation material inside the frame.
Do-it-yourself insulation of a balcony with polystyrene foam can also be done using a frameless method. It is easier to secure the sheets with glue; there is no need to install racks. Due to the absence of a frame, there are no cold bridges formed in places where the wood is not covered with insulation.
Only rigid material can be attached directly to the wall. In this case, the mineral wool will not hold. It is important to remember that the absence of a frame leads to increased loads on the thermal insulation. Over time, the sheets will begin to deform and their properties will deteriorate.
Preparatory work
Before insulating a balcony with foam plastic with your own hands, you must carefully prepare all surfaces and the room. To do this, you need to clear the loggia of construction and other debris, dismantle all clotheslines, shelves, protruding fasteners, take out the garbage and thoroughly vacuum the balcony with a construction vacuum cleaner.
It is also important to remove the old finishing coating (linoleum, lining, plaster, etc.). If there are noticeable cracks, holes and other deformations on the floor, you will have to level the surface using a wet or semi-dry screed. In conclusion, it is necessary to treat the walls with a deep penetration antifungal primer - it strengthens the walls and provides additional protection against moisture and mold.
The technology for insulating a balcony with polystyrene foam includes 2 fastening options: using glue and fasteners (mechanical method). Depending on this, you will need the following tools and materials:
- foam insulation;
- drill with a nozzle for mixing glue;
- the glue itself and a container for diluting the composition;
- putty knife;
- perforator;
- plastic dowels + screws;
- stationery knife;
- reinforcing mesh;
- wooden logs;
- vapor barrier film (if necessary).
Balcony insulation with foam plastic
This type of thermal insulation is recommended to be installed at temperatures ranging from -5 to +30 degrees. To securely fasten it, it is recommended to use glue and fasteners. An adhesive is applied to the sheets and then pressed against the wall.
Typically, builders glue the foam using a gun filled with polyurethane foam. One cylinder is enough to treat 10 square meters.
Dry adhesive mixtures are suitable for insulating a balcony with polystyrene foam inside and out; they can be used to attach the sheets to a wooden sheathing. But dry mixtures are not suitable for fastening to concrete.
It is not recommended to use liquid nails; they do not create sufficient fixation. But nails harden quickly, so they are often used in combination with long-drying foam or glue. In this case, you will not have to put up supports to prevent the sheet from falling before the foam hardens.
To secure the foam securely, it is advisable to use fasteners. They can be combined with glue or used instead. For this operation, a mushroom dowel is used, which does not cause deformation of the thermal insulation.
Insulating a balcony with polystyrene foam step by step:
- Select the dowels according to their length - they must pass through the material, a layer of glue and old plaster. Next, the fasteners penetrate the concrete to a depth of at least 50 mm, and the curvature of the wall must be taken into account. Typically, for foam plastic 50 mm thick, a dowel 110 mm long is enough.
- Holes are drilled in the foam that will be used for fixation. For 1 m2, six holes are enough - four in the corners and two in the center.
- Screw the mushroom dowel using a screwdriver; if fasteners with a nail are used, it is simply driven in with a hammer.
After installation, it is recommended to cover the foam with a mesh and apply reinforcing glue on top. You can attach trim on top of it. It is advisable that the reinforcing adhesive be made by the same manufacturer as the fastening adhesive.
When insulating a floor with polystyrene foam, logs from timber are first installed, then sheets are laid between the sheathing. The remaining gaps are sealed with polyurethane foam. The material should be flush with the wooden beam. The top is covered with plywood.
You can insulate the floor without installing a frame. But in this case, you will have to put a reinforcing mesh on top, and then make a concrete screed. This method is rarely used, since performing the screed requires some skills.
Both frame and frameless methods are suitable for attaching polystyrene foam to the ceiling. If wooden lathing is used, a layer of film must be placed between the frame and the material to avoid the formation of condensation. The foam is cut exactly to the size of the cells, since it is not subject to deformation. If the sheets are glued with glue, several additional fasteners are installed. For finishing you can use sheets of plasterboard.
Materials and tools used for insulating balconies and loggias with foam plastic
Independent insulation of a loggia or balcony with polystyrene foam can only be carried out indoors. For outdoor work, it is advisable to invite a team of professionals. If work is carried out at high altitude, specially trained industrial climbers will be needed, and risking your life without the proper skills and reliable equipment is not the best decision. If you plan to insulate the balcony inside, it is impossible to imagine performing the work without pre-prepared tools and materials.
What materials need to be prepared:
- Sheets of foam plastic, the consumption of which must be calculated according to the internal area (+ 10-15% of the reserve to the total quantity).
- Fastening dowels with a wide head (“umbrellas”).
- Adhesive composition, if work is carried out using this method.
- Deep penetration primer.
- Reinforcing mesh, the consumption of which also depends on the area being treated.
- Wooden beams for sheathing (if the sheathing installation method is chosen).
The choice of materials is influenced not only by cost, but also by the reliability of the chosen brand. It is also worth paying attention to the expiration date of consumables, because this factor often causes premature wear of the installed surface.
Required tools:
- Hammer.
- Electric drill with mixer attachment.
- A stationery knife with a long blade for cutting foam.
- Notched trowel for applying adhesive.
- A regular spatula for surface preparation.
Don't forget about protective gloves, glasses and overalls. It is advisable to carry out all work in the warm season, because at sub-zero temperatures the adhesive composition will not acquire the required strength.
The set of necessary equipment will vary somewhat depending on the chosen installation method. A hammer drill and fasteners are necessary when fastening with self-tapping screws. If the glue method is used, these tools are not needed, but there is a need for spatulas and an attachment - a mixer for a drill.
Balcony insulation with penofol
It is convenient to work with rolled insulation; it is easy to cut and does not crumble. Balcony insulation with penofol is carried out at any time of the year, regardless of temperature. Work begins with cleaning the wall of old wallpaper, eliminating cracks and leveling. All cracks must be filled with foam or sealed with cement mortar.
Penofol is attached to the wall using self-tapping screws. If double-sided material is used, it is important to secure it so that the foil is on top. The joints must be glued using foil tape. When insulating a loggia with penoplex and penofol, the foil material is secured with a second layer, attached to the sheathing.
The floors need to be cleaned and leveled (for more details, see the article “how to level the floor on a balcony”). Before installing penofol, it is advisable to put another insulation, since the slab conducts cold very well. To do this, you will have to lay down timber and make a sheathing. Then fill the gaps with polystyrene foam or polystyrene foam, pour polyurethane foam into the cracks. Penofol is placed on top with the foil side up. Sheets of plywood are screwed to the sheathing.
Insulation of the loggia with penofol - after leveling, the floor is covered with penofol in two layers. The insulation will be held on wooden slats. The first layer is mounted using transverse slats, the subsequent one - using longitudinal ones. It is important that the last layer extends a few centimeters onto the walls. It will be convenient to attach the trim to the slats nailed on top.
Step-by-step instructions for insulating from the inside
Insulation of a balcony or loggia with polystyrene foam occurs taking into account the features of its design.
If the load-bearing surfaces, such as walls, parapets and ceilings, have a concrete or brick surface, then the work should not cause significant difficulties.
If they are covered with grating, additional work will be required to construct a load-bearing surface for installing foam plastic.
Surface preparation
Before you begin insulation, you must:
- Clean the surface of all unnecessary elements. These could be shelves, flower pots, ropes, etc.
- Remove all debris and remaining plaster.
- Disinfect the surface using an antifungal primer.
- All cracks must be sealed with polyurethane foam, and the excess must be cut off after drying.
- All construction debris must be removed.
- Afterwards the surfaces are waterproofed (at least the floor)
Ultimately, the balcony must be absolutely clean, and all defects must be corrected. In this case, nothing can interfere with the repair work. Now the balcony is completely ready for repair.
Balcony insulation with mineral wool
Work is carried out only if there is glazing. If you are insulating a balcony with mineral wool yourself, you must first install a wooden sheathing. For its manufacture, timber with a thickness of 50 to 100 mm is suitable.
Thus, it will be possible to leave a gap between the insulation and the wall. Due to the air gap, the degree of thermal insulation will increase. It is inconvenient to use a metal sheathing; in this case, the cells should be 1 cm smaller than the insulation being laid. Then, after shrinkage, the mineral wool will not fall out.
It is important to install the material in the correct sequence - first the ceiling, then the walls, and the final stage - the floor.
First, a vapor barrier is stapled to the joists - this is a standard film 200 microns thick. Mineral wool is attached to the walls and ceiling using a mushroom dowel. For installation on the floor, you must use special glue. To increase the thermal insulation properties, it is advisable to lay sheets of insulation in two layers according to the principle of brickwork.
The mineral wool must be laid tightly so that there are no gaps. Another layer of vapor barrier is attached to the top. Next, the trim is attached; floorboards or plywood can be placed on the floor.
Do-it-yourself insulation of a balcony with polystyrene foam
Insulation of a loggia or balcony with polystyrene foam can be easily done with your own hands. Before starting work on insulating the loggia, we install the balcony frame and prepare the surfaces that will be insulated.
Surface preparation
Adhesive for expanded polystyrene
Before insulating a balcony or loggia with expanded polystyrene, it is necessary to repair and prepare all surfaces. Only after this should we begin insulating the loggia with polystyrene foam.
Preparation stages:
- We carefully inspect all surfaces for smudges and yellow-brown spots.
- We remove the swollen, peeling layer of building materials.
- We treat the surface with an antifungal compound and prime it to increase its strength.
- If the balcony is leaking, we find even the most microscopic cracks and fill them with polyurethane sealant.
- If the cracks are large, we widen them with a grinder, look at the condition of the reinforcement, remove rust from it, and cover it with an anti-corrosion compound. We wet the cracks (for better adhesion with foam), fill them with polyurethane foam, when the foam dries, cover them with sealant.
- If desired, you can align the walls and ceiling. If the surface is not leveled, the finishing will hide all defects.
For insulation, you can use types of polystyrene foam:
- Styrofoam;
- penoplex;
- foil polystyrene foam.
Sheathing the ceiling
We begin insulation work from the ceiling. The optimal thickness of the insulation sheet for finishing with clapboard or plastic is 50 mm with a density of 15 kg per square centimeter. Under the putty, insulation with a density of 25 kg per square centimeter is used. On the top floor, you can perform external insulation of the top slab and insert insulation under the roofing material.
Stages of indoor work:
- We mark the locations of the fasteners, install hangers for fastening metal profiles (when installing wooden sheathing, mark the installation locations of the sheathing).
- We treat the surface with a special glue, in a dotted manner, and apply a strip of glue along the edges of the sheet. We glue the insulation, pressing it tightly, hold it for several minutes, and strengthen it with self-tapping screws.
- If plaster is to be applied on top, after the glue has hardened under the polystyrene foam, glue the reinforcing mesh onto it.
- If the finishing is done with wooden lining, plastic or MDF panels, we attach a vapor barrier layer to the foam plastic.
Materials with a foil surface have good quality characteristics; they simultaneously have thermal insulation and vapor barrier properties, and are attached with the foil side facing out.
Wall insulation
Following the ceiling, we insulate the walls. The internal wall that adjoins the room does not need to be insulated. But if you insulate, then the room will be warmer, and if you do not insulate, then the heat from the radiator in the room will pass to the balcony, and it will be warmer on the balcony. For more information about insulating walls with polystyrene foam, see this video:
We insulate the walls according to the same scheme as the ceiling; we begin to attach the sheets from the bottom level. These works are performed easier and faster due to the fact that the work is not done at height.
We lay the insulation tightly to each other; if a gap has formed between the sheets, blow it out with foam. We cut the outer slabs to the required size with a stationery knife. If the sheets do not fit together in the corners, fill the gap with foam. The last step is to insulate the window slope.
The best option for a vapor barrier material is penofol on an adhesive base, with a top foil layer. The edges of the penofol are glued end to end and insulated with foil tape. If penofol does not have an adhesive base, it is secured with special glue.
We attach the outer trim at a distance of 20 mm from the foam foam to form an air gap between the materials. This distance is optimal for the foil layer to reflect heat into the room.
Floor insulation
We lay expanded polystyrene on a concrete screed or between wooden joists, polystyrene foam only between wooden joists. Before insulation, it is necessary to repair the balcony slab; it can be preventive or major, depending on the degree of its destruction. For more information about floor insulation, watch this useful video:
The floor of the balcony should be either at the same level as the floor of the room, or lower.
Stages of work:
- We remove the old covering from the floor, remove all loose, swollen building materials, and remove dust using a vacuum cleaner.
- We inspect the slab. After treating all the cracks (with cement mortar, tile adhesive, sealant), we prime the surface to increase its strength and proceed to insulation.
Insulation using concrete screed
We level the floor using a screed, wait until the screed is completely dry, this can take up to several weeks, depending on the temperature and humidity in the room. On the screed that has dried to the ground, we cover it with a waterproofing layer, lay polystyrene foam on top of it, and a vapor barrier layer.
Then fill the thin screed with a self-leveling mixture or lay an OSB board. We lay the finishing coating on top. This can be laminate (you need to lay a backing underneath), linoleum, parquet, ceramic tiles. For more information about concrete screed, watch this video:
Floor insulation using joists
Wooden logs are attached strictly level to the prepared surface of the slab, and polystyrene foam is laid between them so that there is no gap left at the edges.
All gaps between the floor elements are filled with foam, without toluene in the composition, vapor barrier material, OSB board, floor covering are laid: floorboard, laminate, parquet, linoleum.
Using wooden joists you can raise the floor to the required height.
By insulating the floor, ceiling and walls on the balcony, you can turn it into a full-fledged living space and get a cozy corner for relaxation.
Insulation of the floor on the balcony with expanded clay
First you need to clean the surface, seal cracks and irregularities with cement-sand mortar.
Now you need to set the beacons so that the floor remains level after insulation:
- Screw one screw into two corners of the loggia; it is important that it rises to the height of the expanded clay layer. Typically its thickness is 10 centimeters. A laser level is placed in the center of the room.
- One long strip is placed vertically on each self-tapping screw.
- At the point where the beam intersects with the staff, you must mark a point with a marker. One point is placed in both corners.
- If the mark does not coincide with the beam, you need to screw in or unscrew the screw harder. Thus, markings are made in the remaining corners.
Cement mortar must be poured onto each self-tapping screw. Next, the guides are secured, the beacon is placed on top of the solution and pressed. When it hardens, you can move on to the next stage.
Next, thin layers of expanded clay are poured and each layer is leveled with a rule. This is necessary so that there are no voids left, otherwise in some places the level of thermal insulation will be lower. After backfilling and leveling, a concrete screed is made. Before doing this, it is advisable to spill the expanded clay with cement laitance. If expanded clay is poured inside a wooden sheathing, a screed is not needed. The top is covered with plywood.
How to insulate a balcony with extruded polystyrene foam
Installation is carried out on leveled walls; after sealing the cracks, it is advisable to cover them with a layer of putty.
Balcony insulation with penoplex (expanded polystyrene) is carried out in the following sequence:
- Cut polystyrene foam with a construction knife to the size of the floor, ceiling and walls.
- A foil vapor barrier is attached to the wall. The foil should be on the polystyrene side.
- Glue is applied to the cut parts pointwise, retreating 5 millimeters from the edges. The thickness of the adhesive layer must be at least 2 mm.
- To improve fixation, plastic dowels are additionally attached for thermal insulation. It is recommended to install at least six dowels per square meter.
- Next, install the second layer of vapor barrier.
- After installation, a reinforcing mesh is installed on top of the glue. The cell size should be 5 millimeters. The mesh should not be pressed too hard and should not be buried in the glue.
When the insulation of the balcony with extruded polystyrene foam is completed, plaster can be used as finishing for the walls (for more details, see the article “finishing the balcony with decorative plaster”) or plasterboard. Installation on the floor is carried out only after leveling the slab. After installation, a concrete screed is poured over the reinforcing mesh. The next layer is to apply floor leveler.