A grease trap in the kitchen is one of the optional, but very useful devices. The unit effectively purifies water, which is washed into the drain hole from animal and vegetable fats. Timely installation of a grease trap under the sink will help avoid clogging of pipes and fouling of the sewer system with plaque, and as a result, an unpleasant odor from the drain. The best part is that Plumber Portal knows how to make a grease trap for your sink with your own hands! But first things first.
Design and principle of operation of the grease trap
Every household must have an effective device for cleaning the drainage system, but if such a device has to be used regularly, it is easier to prevent sewer clogging. To do this, household grease traps are installed under the sink and sink.
The design of these devices is very elementary. The device consists of a housing with a partition that divides it into compartments, a flow damper and a gas outlet pipe with ventilation. Depending on the purpose and amount of wastewater, equipment can have various parameters and vary in design.
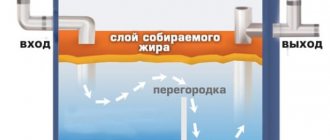
The operating principle is based on the difference in density between water and fat. When the liquid cools, the fat also cools, rising to the surface in the form of lumps. The liquid medium enters the next compartment, and then into the sewer and drain. The fat remains in the first compartment thanks to the partition. When the tank is full, the grease traps must be cleared of the mass of fat, then the device is reconnected to the system for subsequent operation.
The cleaning procedure depends on the type and volume of the model. Household separators are easy to clean with your own hands, but dirt from large containers must be pumped out using pumps.
Advantages of using the device
Such grease traps are used in many catering establishments, industrial enterprises for the production of meat and dairy products, bakeries, canteens of educational and medical institutions, etc. They began to be used in individual households not so long ago, but very successfully.
Many housewives have already managed to appreciate the installed device, identifying the following advantages in it:
- Simplicity of design. Thanks to the elementary mechanism of the grease trap, you can easily make it yourself. The main thing is to find a suitable container.
- Easy installation. Any owner can assemble, install and connect the device to the sewer network using a regular set of tools.
- Minimal maintenance. If you clean the household separator at least a couple of times a month, then there will be no problems with its operation. Only large industrial units require additional preventive measures.
- Efficiency. The device really reliably protects the drain from clogging. The accumulated fat remains in the chamber and does not pass further because it floats on the surface of the water. Only a small fraction of waste can leak into the sewer hole, which is not enough to form a plug in the pipe.
- Possibility of installing several grease separators under the sink. If it is not possible to use one large tank or additional protection is necessary, then you can connect two devices in series, the second of which will be used for wastewater treatment.
Main advantages of a grease trap
- High degree of purification of contaminated water. Thanks to the effective separation of fat in the chambers of the container, water purified from fats and oils flows into the sewer.
- Large selection of grease separators for any volume. On sale there is equipment for small-sized household needs, as well as industrial grease traps for mass production.
- Long service life due to the use of polyethylene and polypropylene in the production of grease traps, which are not susceptible to corrosion.
- Unsurpassed durability of the device and absolute environmental friendliness.
- High equipment reliability. The design of the grease trap includes a system for protecting against grease leakage from the container.
- Easy to install. The grease trap can be installed in any desired place in a matter of minutes, without the help of specialists.
- Silence of the device.
- Cost-effectiveness of equipment. The grease trap operates autonomously and does not require connection to energy sources or other costs.
- Easy to care for. The grease trap must be periodically cleaned of the accumulated fat inside.
In order to use the equipment to its full capacity and be convinced of its advantages, it is necessary to carefully design the grease trap, calculate and select the installation location.
Types of grease traps
Based on the material used, grease trapping devices can be divided into three groups:
- plastic;
- fiberglass;
- steel (galvanized and stainless steel).
Each variety has its own advantages and disadvantages. They are distinguished by strength, durability and cost.
Plastic. Grease traps for household use are usually made of plastic. This is a lightweight, durable and inexpensive material that is resistant to corrosion and chemicals. The advantages of plastic also include ease of maintenance, and the disadvantages are poor resistance to mechanical damage.
There are modifications of different configurations, volumes, with different throughputs. They are purchased for installation in small apartments, private houses, small restaurants, cafes, and pubs. Domestic plastic fat sumps “Fifth Element” have shown themselves to be excellent.
Fiberglass. This option is suitable for autonomous sewer systems of catering establishments, industrial enterprises or large private households, where a device with high throughput is needed. The main advantage of fiberglass containers is their high resistance to external mechanical and chemical influences.
The material is so strong that the equipment can be placed outdoors. Fiberglass separators are characterized by their low weight, ease of installation, use and cleaning.
Steel. More often, grease traps are made of stainless steel; rarely, galvanized steel. The advantages of the material are undeniable: steel is durable, resistant to mechanical damage and chemical attack. Stainless steel devices are more expensive, but they are also of better quality than galvanized steel devices.
Stainless steel has a pleasant appearance, so such separators can be placed not only directly under the sink, but also at some distance from it. These products are impervious to corrosion, so they can last for several decades without repair. The disadvantages include the relatively large weight. In addition, steel grease sumps are more difficult to install than plastic and fiberglass ones.
When choosing an appliance for a specific kitchen, you need to clarify your priorities and focus on the conditions of use.
Methods for installing grease traps
There are two ways to install grease separators - indoors or outdoors. Manufacturers of units often produce one type of fixture - for installation inside or outside a building.
Devices for indoor installation. Models for indoor installation can be located in the kitchen, in a separate room, or even in the basement. It is necessary to select the location space based on considerations of ease of use and maintenance. The best option is to place a grease trap under the sink, but in certain situations this is not possible.
An important factor in choosing a location is the problem of fire safety. If it is not possible to place the mechanism at a sufficient distance from sources of open fire, then it is better not to risk it.
Attention! Fat is flammable, burns for a long time and is difficult to extinguish. If the stove is located too close to the sink, then it is better to place the separator in another room.
Accessories for outdoor installation. Outdoor grease traps are characterized by higher productivity. They are made from fiberglass or stainless steel and buried in the ground. Modifications of the STK series have performed well.
The installation process is quite simple, but involves labor-intensive work - digging a pit, concreting, etc. Therefore, it is better to entrust the installation of the separator outside to specialists. In addition, you should worry about additional devices that make the operation of grease traps easier, in particular, special sensors for monitoring the level of deposits.
Attention! Cleaning an external grease trap is a difficult procedure, and often requires the assistance of a sewer service.
How to calculate productivity?
When choosing a grease trap for installation under a kitchen sink or making the unit yourself, you need to decide on the desired technical parameters. The main characteristic is the peak discharge, i.e. the volume of liquid that the device can pass at one time.
For an ordinary apartment or small private house, a device with this figure of 30-40 l/s is suitable. If we are talking about installing an industrial structure, then it is better to entrust the calculation of technical parameters to professionals.
If you plan to purchase a household device, you can use a simple formula for calculation:
Р=nхPs , where:
P – required device performance in l/s; n is the number of sinks from which wastewater will flow into the grease trap; Ps is the speed at which water will be supplied to the container (it is equal to the speed of water flow in the water supply system and is usually about 0.1 l/s).
Let's look at an example of how to calculate the performance of a fat separator. If one sink is connected, then P=1×0.1=0.1 l/s , i.e. For the kitchen, a household model with minimal performance is sufficient.
Based on the data obtained, you can find out the required container volume. Calculation formula:
V=60xPxt , where
V – required volume in liters; P – productivity; t is the time required for fat to settle, in minutes (most often this period is 6 minutes).
An example of calculating the required volume if the productivity is 0.1 l/s: V=60×0.1×6=36 l.
Having determined the required volume, you can select a finished product or calculate the dimensions of a home-made unit. The best option for a grease trap for washing with a capacity of 0.1 l/s and a volume of 36 l is a capacity of 0.3x0.3x0.4 m.
When choosing a tank, it does not matter whether the height will be 0.3 or 0.4 m. Based on the data obtained, you can develop a sketch, diagram and drawing.
How to install a grease trap under a sink
The operation of any grease trap, both industrial and domestic, is quite simple. Fat is lighter than water, so it gradually accumulates on its surface, forming a film, which in turn is discharged into settling tanks specially adapted for this purpose. As sedimentation tanks accumulate fat deposits, they are mechanically cleaned.
Installation of grease traps
The use of household grease traps allows you to keep your kitchen space constantly clean. In addition, the advantages of grease traps are as follows:
- The use of grease traps allows you to avoid unpleasant odors in the kitchen from the sink;
- When using this equipment, clogging of sewer pipes does not occur. You can read about how to clean a sewer by clicking on the underlined link;
- The ability to purify wastewater by 25-30%.
If you haven’t purchased a grease trap yet, but are just choosing one, here’s what you should know. To choose a grease trap for your sink, you should calculate its performance. To do this, you need to multiply the height, length and width of the sink, thereby finding out its displacement.
In addition, you should decide on the type of grease trap, since it can be storage type or flow-through.
Installing a grease trap
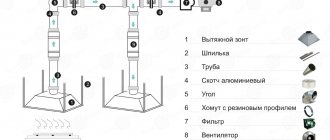
In order to install a grease trap with your own hands, you should carefully study the included instructions for the selected equipment, and also follow the simple tips given below:
1
To install the grease trap, you must choose a hard and, equally important, flat surface. Also, there must be free access to the installation site of the grease trap during operation.
As a rule, the separator is most often installed directly under the kitchen sink, or near the dishwasher.
2. The location for installing the grease trap has been selected, then proceeds to the next step, connecting the inlet pipe to the sewer hose of the sink or any other equipment from which wastewater will be discharged.
3. Then the outlet pipe of the grease trap is connected to the sewer system through a rubber seal.
4. After installing the grease trap under the sink is completed, it must be filled with water to check the tightness of all joints and connections.
5. Next, you can close the upper part of the grease trap with a lid and use the sink.
As you can see, installing a grease trap under a sink is a simple job, which is no more difficult than installing a sololift or other similar equipment.
DIY fat separator according to drawings
To assemble a grease trap for a sink with your own hands, you need to study the drawings in advance. You also need to prepare the following materials and equipment:
- a plastic tank, the dimensions of which may be slightly larger than the calculated ones, but not smaller;
- a low pipe with a diameter of about 100 mm to create an internal partition;
- elbow and PET tee with a cross section of 50 mm;
- a piece of pipe with a diameter of 100 mm, the length of which should be about 2/3 of the height of the box, and a pipe with a rubber cuff of the same length, but with a diameter of 50 mm.
You will also need a standard set of tools. An electric jigsaw or saw is required to make a hole in the housing. Additional materials will have to be purchased: sandpaper, silicone sealant, and adhesive sealing tape.
The main stages of assembling a fat separator with your own hands:
- Cut holes for the pipes in the end walls of the plastic box and clean the cut.
- Glue a piece of pipe with a diameter of 100 mm to the bottom of the container, and when the composition is completely dry, install a piece of pipe with a diameter of 50 mm inside. The distance from the smaller pipe to the bottom should be about 3-4 cm.
- Connect the branch pipe to the drain outlet tee so that the end of the link falls into the outlet hole. The tee hole will point upward. This is necessary for ventilation.
- Connect the inlet elbow to the box and seal it with silicone compound.
- The final touch is to cover the edges of the lid with sealant.
Once the sealing compounds have dried, you can check the operation of the grease trap. It needs to be installed under the sink, connected to the sewer and turned on the water. If the joints do not leak, the device is ready for use.
Important! The diameter of the holes must match the cross-section of the pipes. They should fit very tightly. Slots and gaps are under no circumstances allowed.
Classification of devices by installation type
Having chosen a simple, purely household model of a wastewater separator, in general, you should not encounter any particular difficulties during its installation. However, you will still have to follow some recommendations and rules in order not to experience problems with the operation of the device in the future, as well as its maintenance. So, let's figure out how to install a grease trap under the sink with your own hands?
General recommendations
- Calculations of the power parameters of the fat separator, both operating and peak, should be performed somewhat ahead of the expected water consumption.
- The shelf or area of the floor on which the cleaner container is placed must be horizontally aligned in two planes and not have any bumps or large holes. Preparation of the base for installation is necessary to eliminate the risk of damage to the plastic housing. In addition, if horizontality is not observed, the normal flow of sewage in the direction of discharge may be disrupted.
- The shelf under the sink must be strong enough to support the weight of the grease trap once it is filled with liquid.
- Between the walls of the washing cabinet and the body of the device, it is necessary to leave a free space of approximately 10-20 cm around and at least 10-15 cm on top. Such technological clearances are required for comfortable maintenance of the installation.
- If the design of a grease trap for installation under a sink includes several inlet pipes, then it is important to carefully consider their relative position, taking into account the limited surrounding space.
Installation operations
- After the container takes its installation position, it remains to be connected to the receiving and exhaust lines. Depending on the design solution of a particular grease trap model, its inlet socket can be located either on top or on the side. The siphon drain is inserted into it. Most often this is the end of a corrugated hose, however, it can also be a rigid pipe. The second option is much more complicated in terms of connecting plumbing elements. Therefore, if you install a grease trap under the sink with your own hands, then sometimes it turns out to be easier to replace the rigid siphon model with a corrugated one.
- To connect the system to the sewer, there is a “idle” connecting tube on the opposite side of the grease trap container. A pipe or corrugation is connected to it through a coupling, which is then connected to the sewer lines.
- The sealing rings at the inlet and outlet of the separator, as well as other connections, should be lubricated with plumbing silicone or a special mounting gel. Oils should not be used as they negatively affect the sealing elastomer.
Typically, materials such as
- food plastic;
- fiberglass;
- polypropylene;
- stainless steel.
But in our case, it will be enough to use harmless materials available on the farm. The body of a homemade separator can be made from a plastic toy box with a tight-fitting lid. Standard pipes are suitable for wiring. For input, as well as for output, a new sewer elbow will do, if necessary supplemented with a purchased piece of pipe. The diameter of these links, as a rule, corresponds to the common size of sewer lines for an apartment, that is, equal to 50 mm.
Р=nхPs, where
- P is the productivity of our separator, l/s,
- n is the number of washes in the premises,
- Ps is the water supply speed in the water supply system, which is usually approximately 0.1 l/s
V=60xPxt, where t is the average duration of fat sedimentation, equal to approximately 6 minutes.
Then for our example we get the required volume V=60x0.1x6=36 liters. Now you can select the size of the box you are using. It is easy to understand that, say, the following dimensions are ideal: 0.3 m x 0.3 m x 0.4 m. If you multiply them, you get 0.036 m3 or 36 liters. Moreover, the height of the body can be taken either equal to 0.3 m or equal to 0.4 m.
Next you need to draw a sketch or drawing.
Drawing of a household grease trap
The height of the inlet and outlet openings must be taken constructively, based on the following principle. The center of the outlet hole should be 3 to 5 centimeters lower than the center of the inlet hole. In this case, the input should be located as close as possible to the box cover.
Finally, it’s time to start the main step: assembling a homemade separator.
To work, we will need the following tools and materials (instead of a partition in the structure, you can use a low pipe with a large diameter of 100 mm):
- a box of suitable design dimensions (or a little larger);
- PET type elbow with a diameter of 50 mm;
- PET type tee with a diameter of 50 mm;
- a pipe with a diameter of 100 mm and a length of approximately two-thirds of the height of the box;
- a piece of PET pipe of the same length with a diameter of 50 mm with a mounting extension and a rubber cuff at the end;
- jigsaw or file;
- sanitary sealant;
- sandpaper;
- rubber sealing tape with an adhesive layer.
Let's start creating a homemade household grease trap.
- In the end sides of the box we cut holes for the inlet and outlet pipes using the available tool.
This must be done very carefully, precisely in the diameter of the pipe elements used. Don't forget to thoroughly clean the cut edges. Grease trap manufacturing process - We install and carefully glue a pipe with a diameter of 100 mm to the bottom of the box using sanitary sealant.
- After drying, we install a piece of pipe with a diameter of 50 mm inside the 100 mm pipe coaxially, but so that the fifty-millimeter end does not reach the bottom of the box by three to four centimeters. We insert the drain outlet tee into this pipe from above. The other end of this last link should fit into the outlet hole. And the upper outlet of the tee will turn out to be “looking” at the box lid with its hole. This will be a kind of ventilation.
- Next, we mount the introductory elbow.
- Carefully coat the entry points of both pipes into the box with sealant.
- At the end of the process, we glue the edges of the box lid that connect to the body with sealing tape.
- We are waiting for the sealant to dry. After this, the grease trap is ready for use.
Connecting our separator to the sewerage system is easy. It is enough to install it under the sink. Then you need to pull out the drain corrugation from the main sewer pipe and insert the end of this drain into the inlet elbow of the grease trap. In this case, the outlet tee of the device must be connected to the sewer with another corrugation.
Installation under the sink
While operating the described unit, you can enjoy clean sewer pipes. The main thing is that every two to three weeks, or better yet more often, turn off and completely empty our device, clean it, and then reinstall it into the network.
The grease separator device that we have described here will ensure uninterrupted operation of the installation for a long time, namely for several years. After all, it is not much different from the factory one. So feel free to start making it!
We invite you to familiarize yourself with Equipment for welding polypropylene pipes: main types and selection criteria
A grease trap is a filter whose purpose is to separate fatty deposits and oils from the drain. There are these types of devices:
- household ones, which are installed under the sink;
- industrial, used in enterprises.
The principle of operation of these devices is the difference in the content of water and fat. It’s worth saying right away that particles of fat and oil are lighter than water, so they tend to float to the surface. These inclusions end up in a special settling tank, from which they are simply removed.
principle of fat selection from incoming waste
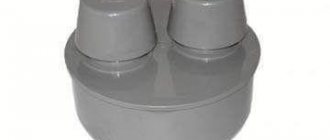
The design of the device is not complicated, so you can make a grease trap with your own hands. So, it includes:
- flasks with compartments for settling wastewater;
- inlet pipeline. which is supplied to the sink;
- outlet pipeline, which is connected to the sewer;
- fat collecting compartment;
- cover to prevent the spread of unpleasant odors.
To extend the life of the device and clean it less often, it is recommended to use bio-enzymes that promote the rapid breakdown of accumulated fat.
Operating principle of a sewer grease trap
The need to install grease traps is explained by many advantages:
- such devices are hermetically sealed, so the possibility of excess liquid entering is completely eliminated;
- using the device, there is no unpleasant odor in the room;
- if you use good quality materials for the manufacture of separators, you can increase the service life of the equipment;
- it is easy to install and its maintenance does not require much effort and knowledge;
- Compared to other filters, this equipment is not expensive;
- Additionally, various sensors can be installed, for example, to monitor fat accumulation.
Generally, only a high-performance grease trap will provide any benefit. To calculate this parameter, it is best to contact specialists who specialize in installing and servicing filters. Otherwise, you can do such actions yourself.
Recommended reading: Country toilet without a cesspool
Since the design of this device is quite simple, it is quite possible to make it yourself. A toy box, a large plastic first aid kit with a lid, or an old canister are suitable for this purpose. First, you need to make a hole in the upper part of the side wall, place an L-shaped pipe in it to introduce the mixture and seal the connection. Then, with your own hands, using a heat gun, attach two partitions at a short distance from each other.
A household grease trap will prevent obstruction of pipes and their breakage, as well as the appearance of a foul odor
The principle of operation of the grease trap is based on the gravitational separation of layers of liquid
Scheme for making a grease trap yourself
Installation under the sink
How to install a grease trap under the sink?
Before installing the unit, you should make sure that it will be placed correctly. It is necessary to ensure normal access to the device for its maintenance:
- There should be a distance of at least 2-3 cm between the body of the grease trap and the walls of the cabinet in which it will be hidden. This is necessary so as not to damage the furniture when the device is turned off for maintenance.
- Place the device only on a flat surface. Distortions will lead to fat pouring into the sewer.
- When installing, you must strictly adhere to the manufacturer's recommendations. The instructions indicate the optimal distance from the grease trap to the stove and other sources of open fire. This point cannot be violated.
- Separators of industrial production are equipped with special fasteners for installation and connection to the sewer.
- After installing the grease trap under the sink, it must be connected to the sewer. To do this, insert a corrugation from the main sewer pipe into the inlet pipe of the device, and connect another corrugation to the outlet tee. Seal the joints with silicone compound or sealing tape.
Attention! Fat thickens and forms a film on water if its temperature is below 40 degrees. It is advisable to install the separator at a distance from the siphon so that the wastewater has time to cool before entering the device’s reservoir.
There will be no problems with cleaning household grease traps. They are small in volume, so they can be easily removed and cleaned by hand. Devices with higher productivity are considered industrial, and to clean them you have to resort to either pumping equipment or special equipment.
Correct installation of a grease trap under the sink ensures clean sewer pipes and efficient operation of the sewer system. If you do not yet have a grease separator in your kitchen, then the editors of the Plumber Portal website strongly recommend that you purchase such a device or make it yourself.
Do-it-yourself grease trap for sewerage: studying the device
Before you start making such a separator yourself, you need to understand what will be inside it. And inside there will be:
- Inlet pipe from where the wastewater will flow into the separator;
- The container is actually the grease trap itself;
- A partition inside the container is used to separate fat from water;
- Tee for removing treated waste.
What might you need to make a grease trap for your sewer yourself? First of all, you need the container itself. A box made of plastic - polypropylene - is best suited, but fiberglass, food-grade plastic and even stainless steel are often used. Buckets and plastic boxes with a tight-fitting lid are perfect, the main thing is that they are airtight.
You will also need polyethylene pipes:
- Elbow diameter 50 mm;
- Tee with the same diameter;
- Pipe with a diameter of 100 mm, 2/3 of a box long;
- Pipe of the same length, 50 mm in diameter, with a rubber cuff and mounting extension;
- Corrugation.