No matter how well the radiators heat, the floors often remain cold, especially on the ground floor. Therefore, the question arises: is a warm floor needed in an apartment, and is it capable of creating a favorable atmosphere in the room?
We will help you understand this issue. Let's consider all the positive and negative aspects of each type of underfloor heating systems, and find out which one is better suited for city apartments.
We’ll also tell you how to make heated floors in an apartment using central heating with your own hands without breaking the law.
Advantages of heated floors in an apartment
Installing heated floors in an apartment has many advantages:
- uniform heating of the room - which creates comfortable conditions;
- heating is carried out from below - this has a positive effect on health;
- suitable for families with children - they can move freely on the floor;
- does not dry out the air;
- does not spoil the interior and does not lead to a decrease in usable area in the room;
- has a reasonable price;
- You can do the installation yourself.
In addition, installing heated floors instead of standard radiators leads to a reduction in dust formation, since there is no static voltage.
Varieties
Today there are several types of heated floors on the market, which differ in the coolant and installation method.
There are heated floors: water and electric. All of them are similar in that the heating element is placed inside the “pie”.
Water
Water floor - you can already understand from the name that the coolant in it is water, which moves through the pipeline. The pipes are filled with screed or laid in a flat way. It is connected to central heating or to an equipped boiler.
More often, such a structure is placed in private homes, as it has a lot of weight. In addition, to connect a heating water floor in an apartment from the central heating of an apartment building, a permit is required.
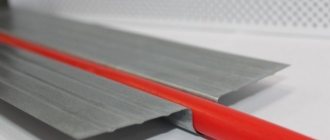
Heating cable or mats
The heat source is the heating cable. It is laid on the floor in accordance with the planned pattern. For such systems, a resistive or self-regulating wire is used. If the first option is used, then a two-wire one is recommended; it does not harm humans.
When laying cable mats, the process is much simpler, since the cable is already fixed to the mesh with the required spacing.
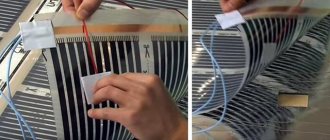
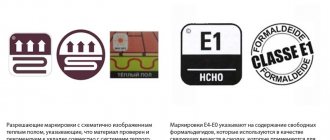
Infrared film
Infrared heating is a thin film with carbon plates inside. The “pie” of such a floor does not have a layer of cement screed, so it heats up quickly, but when turned off, the heat does not last long.
The device is economical and safe, runs on electricity. It is easy to install; in addition, if one strip fails, the entire floor continues to work. Disadvantage: attracts dust.
How to make warm electric floors?
An electric heated floor warms up a room using not water as a heat source, but an electric cable with multilayer insulation. Heating occurs due to the passage of electric current.
Special cables are used in three types:
- Resistive single-core. The cheapest and simplest. Both ends need to be connected to the mains. Creates an electromagnetic field that can affect human health;
- Resistive two-wire. Has heating and current-carrying cores. Connects at one end;
- Self-regulating cable. Special couplings heat up. Doesn't overheat. The most convenient and most expensive.
How to install a warm electric floor?
- Removing the previous coating, leveling the surface using a cement-sand screed;
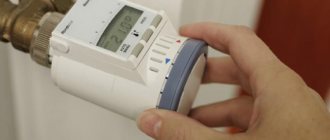
The thermostat should be located at least at a distance of at least 30 cm from the floor, and in rooms with high humidity levels it should be moved beyond them.
- Marking the room. Under no circumstances should underfloor heating be installed if furniture without legs or plumbing is placed on top. It is also important to take into account the distance from the walls and heating elements when calculating;
- Laying thermal insulation. Penofol can become an insulating material in cases where the heated floor is an additional heating system. If the apartment is heated from below, then you can use polystyrene foam with a thickness of 20 to 50 cm. If the floor is installed on a loggia or veranda, then it is better to use mineral wool as thermal insulation;
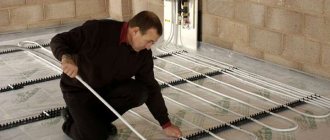
- Placing the electrical cable in a snake pattern.
The cable can be secured in different ways:
- on the reinforcing mesh;
- on a thin layer of screed, to which plasticizer and microfiber have been added;
- use heating mats (fiberglass mesh to which an electrical cable is already attached at a certain pitch) to obtain thin heated floors.
- Installation of temperature sensor. The corrugated tube is laid from the installation box into the heating zone at a distance of 40 cm. The tube should go exactly between the cable, in the center. We close the end of the tube with a plug.
- Introducing the placement of the main elements into the laying scheme.
Don't forget the outlet. It should be installed at a short distance from the floor.
- Test run of the system. Checking the cable resistance and checking the value with the passport data.
Rooms with a high humidity coefficient require grounding of the reinforcing mesh and a grounding connection to the regulator.
- The mixture for the heated floor is poured in a small layer: the solution needs to be cement-sand, with the addition of plasticizers. Or a specialized mixture for underfloor heating screeds.
The first launch of the system is possible only after a month, since the concrete screed will not dry before and may become deformed if turned on early.
- Laying flooring.
To set different temperature parameters for each room, you need to install separate heating systems.
What type of flooring is best to choose for a city apartment?
When choosing a heated floor model for an apartment, you need to take into account the advantages of each system and the design features of the room. You need to decide whether it will be the main heating or additional heating.
The water design is environmentally friendly and economical to operate. Heat transfer is carried out by radiation, so excess positive ions are not formed - there is no electromagnetic field.
But installing it in an apartment has its own difficulties:
- Obtaining permission to install a system in a multi-storey building. After all, installing water heating in an apartment building is dangerous due to the possibility of leakage and flooding of neighbors below, and can also lead to a decrease in pressure in the general system of the house. In addition, this will significantly increase the load on the floors.
- A mixing unit is required, and this is not always possible to do in an apartment.
- During the repair of the general house system, slag will fall into the hydrofloor.
- When carrying out annual pressure tests, the pressure in the system will exceed 6 Bar, and the TP equipment (manifold with flow meters) has a maximum pressure of 6 Bar.
- The temperature of the liquid in the heating system can reach up to 100 degrees, which will negatively affect the equipment.
When choosing an electrical system (see the device, types and installation diagrams), all the previously listed problems are absent: no permit required, no risk of leaks. In addition, such structures are less labor-intensive, and the cost of their construction is lower than water ones. But during operation, electricity bills increase.
Cable-type electric floors filled with screed have less weight, thereby not placing a large load on the floors of the house. Infrared film is ideal for an apartment. It is easy and quick to lay, and it does not take up much usable space.
To summarize, we can say that for an apartment, purchasing and installing an electric floor is a cheaper option, but during operation, a water floor is less expensive.
But with its installation in an apartment building, as mentioned above, there are a number of problems.
Installation technology for electric underfloor heating systems
Installation of the thermostat and formation of a groove for the mounting ends of the heating sections. Here it is important to take into account the diameter of the temperature sensor cable and the dimensions of the cable channels for the main power wire. The thermostat should be located at a height of 30-50 cm.
Installation of the thermostat and formation of a groove for the mounting ends of the heating sections
Surface preparation
The floor is cleared of construction debris, a layer of waterproofing is laid, and a damper tape is fixed along the edges - it will prevent unnecessary heat loss from the walls. We lay these ceilings with a 10 cm overlap on the wall so that they then end up above the finished heated floor - the excess will be carefully trimmed off at the very end of installation.
In order not to “give” heat to the neighbors below or in the basement, we make thermal insulation. Traditionally this is expanded polystyrene or extruded polystyrene foam. For fairly warm rooms, a 4 mm layer of penofol is enough. Insulation is laid over the entire area without exception.
Thermal insulation
Thermal insulation
Marking
Places where furniture, partitions, plumbing and engineering equipment will be placed are separated with tape - these areas are not subject to heating. After this, a drawing must be made based on the technology for laying a specific type of heated floor (heating cable or mats).
Installation. Step by step guide
- Connect the ends of the wiring of the mounting section to the thermostat. Secure the beginning of the cable and the connecting sleeve.
- Begin laying the section, avoiding cable intersections and contacts. The optimal distance between turns is from 8 cm. The laying step is strictly observed along the entire perimeter. The bends are made smooth, without sharp breaks or tension.
Bends are made smooth, without sharp breaks and tensions
Advice! It is very convenient to secure the cable loops with protruding tabs provided on the mounting tape.
It is very convenient to secure the cable loops with protruding tabs provided on the mounting tape
- Install the temperature sensor.
Very important: the sensor is first placed in a corrugated tube without holes so that the screed solution does not penetrate inside; access to the sensor should be as easy as possible (in case it fails).
The end of the plastic tube near which the sensor is located is covered with a plug, the second is connected to the thermostat and inserted into the groove left for it. It is customary to adhere to the bending radius of the tube - 5 cm, and the distance from the wall to the location of the sensor - 50-60 cm. This way, the device will be able to correctly determine the temperature, and if it breaks, you will not have to open the floor.
- Fix the tube with the solution. Keep in mind that the turns should be located at an equal distance from the groove with the tube.
- Connect the sensor and mounting section to the thermostat, check the connections.
- Test the performance of the system. To do this, apply voltage for 1 minute. If everything is correctly laid and connected, the sensor on the regulator will light up and the floor will begin to heat up.
- Turn off the power.
- Draw a layout diagram. You can even take a photo. This will be very useful if you have to make repairs or install additional utilities. On the diagram, be sure to indicate the locations of all couplings and the sensor.
- Make a screed or self-leveling floor. The solution, which must contain plasticizers, is poured to a height of 3-5 cm, and air pockets are not allowed, as they will lead to local overheating.
Make a screed or self-leveling floor
After about a month, the screed will be completely dry and it will be possible to apply a decorative coating on top of it. It is better to use materials with high thermal conductivity - tiles, porcelain stoneware, etc. The main thing is that the efficiency of the heating system is not lost due to the top flooring.
| Distance from walls |
|
| Distance from other heating elements |
|
| Groove parameters for mounted temperature sensor |
|
| Formula for calculating the laying pitch |
|
| Maximum deviation from the calculated laying step |
|
Important points!
- During the installation process, it is better not to step on the cable at all. To be on the safe side, use soft-soled shoes. To move around the room without harming the future heated floor, you can cover the areas with the cable laid with sheets of plywood.
- Careful work with construction tools is a prerequisite. Any mechanical damage to the cable makes the heating system unusable or unsafe.
- Under no circumstances should you turn on the system while the solution is still wet (drying time is 28-30 days)!
Can there be a fine for water heated floors in an apartment connected to central heating?
Is it possible to make a warm water floor from central heating in an apartment, and is it legal - this question often arises among apartment owners? There is no specific clause in the legislation on the possibility of prohibiting the installation of such systems, or on the amount of the fine for their installation in an apartment. But there is an article according to which responsibility for redevelopment in the apartment is assigned.
Therefore, in order not to break the law, it is better to make water underfloor heating legally. It is possible to obtain permission, especially for apartments in new buildings. In them, more often the heating distribution is floor-by-floor, so a permit will be issued.
To obtain such permission you need:
- conduct an examination to determine whether the system will disrupt the operation of all communications at home;
- obtain permission from the heating network and energy supervision;
- make a project and have it approved by the housing inspection.
You should not bypass legal requirements, because one day you will have to face inspection authorities, and then there will be more problems and costs.
Installing a water floor in an apartment
Water floors with coolant inside are a pipeline that is laid on the base and filled with cement screed. Pipes are used from metal-plastic or polymer, diameter 16 - 20 mm. The coolant is water or a special liquid (antifreeze), it is heated in the system up to 50 degrees.
The main components of the structure are pipes with coolant. The “pie” also includes hydro and thermal insulation, elements for fastening, fittings and a control system, it is designed to regulate the volume of coolant.
The floor loops are connected to the manifold, the fluid movement is carried out under the influence of the pump.
We make a water heated floor in an apartment from central heating
Warm floor in the apartment. We connect to the central system.
Installing heated floors from a central heating system in any room, including an apartment, consists of several stages.
You should first make a plan and a pipeline laying diagram - this will greatly facilitate the process.
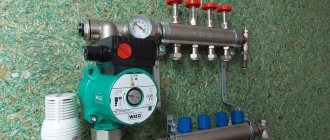
Installation of the manifold cabinet
At the first stage of installing a warm water floor in an apartment, it is necessary to install a collector unit. To do this, a recess is made in the wall in which a metal cabinet is placed.
It is possible to install the distribution unit directly on the wall, but this will spoil the interior of the room. The cabinet contains a manifold with several outlets for the supply and return hoses; the floor circuits will be connected to them.
According to the instructions, the cabinet should be located at a distance of 20 - 30 cm from the surface, in an easily accessible place.
The collector is connected to the central heating.
Preparing the base
Preparation consists of leveling the surface and filling cracks in the base on which the heating system will be installed. Irregularities and differences will negatively affect its functioning.
Small cracks are sealed with cement mortar or a special mixture. The tubercles must be cut off. If there are large differences, it is better to pour a thin leveling layer of screed.
Hydro- and thermal insulation
When the base is leveled, you should proceed to laying the floor “pie”. As a waterproofing product, you can lay a regular thick polyethylene film. It needs to be placed facing the walls, the strips are connected to each other with tape. This layer is very important when constructing a water floor in an apartment, since there is a risk of flooding the neighbors below.
The perimeter of the rooms in which the warm water floor will be installed is taped with damper tape. It is glued to an adhesive layer or fixed with self-tapping screws.
The width should be greater than the thermal insulation and screed taken together, from 100 to 150 mm. The tape is necessary to compensate for the expansion of the concrete solution when heated; it will not allow the screed to crack.
Insulation is laid on top of the waterproofing. It is better to take thermal insulation material with a foil layer. The product is placed with the foil side up, the plates are connected to each other with aluminum tape.
Slabs with bosses are recommended; this will greatly simplify the process of laying pipes. If the thermal insulation material is smooth, then you will need additional reinforcing mesh to which the contour will be attached.
The thickness of the insulation layer depends on which floor the hydrofloor is installed on. If on the first, then the layer should be made thicker.
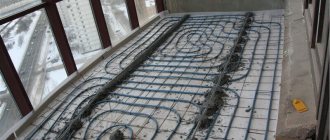
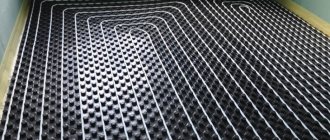
Laying the heating circuit
Laying pipes when installing water-heated floors in an apartment is done in two ways:
- Parallel “snake” - pipes are laid parallel and connected at the edges. Installation begins from the coldest place in the room, since with this method, the greatest heating will be at the beginning of the system.
- Spiral - the pipeline is placed in a spiral, and the supply and return pipes run side by side, while the supply circuit heats the return. The method is recommended for large rooms.
It is better to take metal-plastic or polypropylene pipes, they are flexible and have a long service life. However, they do not have a high degree of thermal conductivity, but it is enough for an apartment. You can lay stainless corrugated pipes or copper. Copper products bend well and are wear-resistant, but have a high price. Corrugated pipes are equal in cost to plastic pipes.
After selecting the pipe material and design, it is necessary to calculate the size of the pipeline. In this case, the laying step is taken into account; not only the number of turns, but also the uniformity of heat distribution depends on it.
The larger the step, the higher the temperature of the coolant should be. In addition, the gaps between pipes in different areas of the room may be different, depending on the desired degree of heating.
The standard laying step in an apartment with a pipe diameter of 20 mm, for a heat transfer of 50 watts per m2, 0.3 meters is recommended. If you want to have a heat output of 80 Watts - 20 cm. Near windows and external walls, the step can be reduced to 0.15 m.
For clarity, let's look at an example calculation. If you have a hall of 30 m2, a heated area of 25 m2 and a laying step of 15 cm, you will need 160 meters of pipeline.
The contour spreads according to the planned pattern and is fixed to the reinforcement with plastic clamps. When using slabs with bosses, the process is simplified, since the pipes are fixed in the grooves.
When placing contours, joints should not be allowed in bend areas of the pipeline.
Connecting and checking the system
Water heated floors in an apartment can be connected in two ways. Let's look at each in detail:
- The first is of the “primary” and “secondary” ring type. Central heating is the primary ring, and the water floor is the secondary one.
If the radiator system is single-pipe, then taps are made on the return pipe of the radiator. It is necessary to strictly maintain the distance between the inserts and from the radiator jumper - 300 mm. Ball valves are installed at the insertion points, and there is also a check valve on the return pipe - it will ensure one-way movement of the coolant in the ring.
Next, a mixing unit with a three-way valve and a pump are installed on the supply pipe to promote liquid circulation.
This connection does not take all the coolant from the general house system, and will not lead to a large decrease in pressure in it. The process is not complicated, the main thing is to get permission - to prove that your floor will not affect the heating of your neighbors.
- The second option is to install a heat exchanger, while the warm water floor operates autonomously. Here, a heat exchanger, which is located in place of the battery, is connected to the supply and return pipes of the comb. The hydraulic resistance of the exchanger is small, so it practically does not affect the overall heating, since water from the riser only enters the heat exchanger and does not mix with the coolant of the heated floor.
The floor system is filled with water from the water supply, and is heated by hot liquid coming from the central heating system through the walls of the heat exchanger. All other elements are the same as in the previous design.
After the collector group is installed, first the floor supply circuits are connected, and then the combs that return to the return outlets are connected.
Before filling the system with screed, it should be pressurized - the structure should be tested under pressure, it should be 1.5 times higher than the working pressure during the day. If after such a check no leaks are detected and everything is working correctly, you can proceed to the next stage.
Filling the screed
For the solution, you can use a ready-made mixture, of which there are now many, with varying degrees of thermal conductivity. Or you can make your own cement-concrete mortar.
The screed is poured when there is operating pressure in the system. The screed layer should rise 5 cm above the pipes. The solution should begin to be applied from the far corner of the room and move towards the door. Each strip must be aligned using a rule.
It is better to install beacons before placing the solution; you can use them to adjust the filling level. When the concrete has set a little, they are removed.
After completing the pouring of the room and leveling the concrete solution, the screed is left until completely hardened. This takes 3 - 4 weeks. Then the floor covering is installed.
Installation of heated floors
On concrete floors
Let's consider the option of installing a heated floor over concrete floors on the very first floor: for waterproofing, you should use polyethylene film, the thickness of which should vary from thirty to forty micrometers.
The top screed should be covered with semi-dry concrete, and the final floor covering should be ceramic tiles. The pipes for the system itself are purchased in plastic, and a metal mesh is used to secure the pipes and enhance the strength of the topmost screed.
Preparing the base
At this stage, all your attention should be paid to irregularities. Although expanded polystyrene has fairly good physical strength, very heavy loads in certain places cause its deformation. That is, the pipeline system itself is deformed, the top tie sags, and unnecessary additional forces are exerted on the crack. In any unpleasant situation, these phenomena can reach quite critical values, and also have a completely negative impact on the final coating of the floor itself. We advise you to carry out the preparatory work as diligently as possible.
There is also one more point that should also be paid attention to in the process of preparing the foundation. We mean the place where the so-called damper tape is fixed on the wall. To avoid the appearance of unnecessary (air) pockets at the junction of the tape itself, the wall itself should be leveled. In this case, you can use a spatula, but if you have quite an impressive amount of experience in construction work, then you can do this with a simple trowel, which will do it at least three times faster.
Laying waterproofing
The next step is insulation and installation of waterproofing. We recommend that you use cheap polyethylene film - this material perfectly performs all its tasks, and, if necessary, has the ability to stretch, which accordingly minimizes the risk of various types of tears.
As we have already told you, the thickness mainly depends on the floor, as well as the climate zone of the residence itself. If you need to create a thermal insulation layer more than five centimeters thick, then we advise you not to purchase one wide tile; the best option would be two thin ones.
You can use very thick slabs to insulate your walls; in this position, they will not be subject to any kind of bending loads at all. As the laws of physics say, two thin plates have a greater margin of bending before cracks appear than one thick one. It is said that the total thickness of either one or two slabs will be equal. Such features make it possible for insulation to compensate in every possible way for the problems of preparing the base. The insulation must be laid with special calculation so that all joints overlap.
Eliminating cracks
If you were unable to carefully and accurately cut the slabs, and you found fairly large gaps in the joints, then you need to seal them with simple polyurethane foam. Most builders recommend fixing a damper tape over the insulation itself directly under the cement screed - this option can solve the problem. However, it would be best and most reliable to fix it until the insulation itself, since it can be sewn up quite strongly, and all the cracks around the perimeter of the entire room can be sealed without the use of this mounting foam.
Advice! There is no need to wait until the polyurethane foam dries to cut it. At the moment when you have poured the first row of insulation, you can immediately put it on the second. Fresh polyurethane foam is considered a fairly good adhesive for foam materials, and quite reliably binds two layers of insulation together, due to which the strength of the first layer can increase.
Installing reflective film
Let's proceed to the third step, namely installing the reflective film. We advise you to buy one that will have markings in the form of squares of five millimeters - this option will help you accurately control the process of laying the pipeline system. A large number of amateurs who give advice claim that they know how this film must be properly sealed with tape around the perimeter and joints, and how much heat savings will ultimately result.
Let us assure you that this is all a lie - in this way it is necessary to seal the hydro- and vapor barrier, the film itself does not have the ability to save heat. If you have laid everything out correctly and carefully (you have installed thermal insulation boards), then you do not need to waste all your time on the process of gluing the film.
Simple teams of builders (hired) are able to do this for one reason only - it is an easy job for which they pay a sufficient amount of money. You should glue the seams if your concrete base does not have a waterproofing made of simple polyethylene film.
As the practice of ordinary accidents with underfloor heating shows, absolutely any waterproofing at such moments has zero effect. The water threshold will increase over time, until it finds a loophole in the defense through which it will force its way up. And water can find a loophole even in the most protected places.
If you have created a truly ideal multi-layer waterproofing and it simply does not go down, rest assured that it will appear at the top. In general, it makes no difference what to repair - the floor of the upper floor or the ceiling of the lower floor. If you detect a leak very quickly, you will thereby reduce the risk of failure of the entire structure, which means the problem will not hit your budget.
If you find that water soaks the walls long enough, then fungus should usually form on them. When installing a heated floor with water heating, the main attention should be paid to the tightness of the system itself, and not to gluing the seams of the film with ordinary tape.
Laying heating system pipes
We move on to the fourth step, namely laying the heating system pipes. We advise you to sketch out a couple of diagrams before the installation process.
This will take a small part of your time, but it will give you the opportunity to avoid all sorts of mistakes. In addition, during the process of drawing up variants of schemes, it is possible to select a fairly optimal placement of contours taking into account the geometry and, accordingly, their length.
Advice! There is correct advice in the world, namely, do not lay pipes under places where there will be furniture, the system will simply overheat and very quickly lose its attractiveness. We recommend that you act as thoughtfully as possible.
The main question is who can give a general guarantee that in the very places where the furniture is located, it will remain permanently, and you simply will not want to do a complete redevelopment of the room or a simple rearrangement of the furniture?
The length of each circuit must take into account the power of your water pump; the characteristics themselves must be indicated in the instructions for use; we recommend that you study them very carefully before starting installation.
Determining water pump performance
Here is a table for determining the performance of a water pump, which depends on the heated area.
Otherwise, there are possible situations when the temperature of your floor in different areas of your room will differ quite greatly, and it is very difficult to achieve the most optimal temperature.
It is possible to fasten pipes in two ways:
, for easier application of staples there will be a grid on the film. The system is also fixed with special brackets. This method is quite good, and the work itself is done very efficiently, and most importantly quickly.
The first is with special staples on a reflective film- The second one goes to the metal reinforcing mesh . It will have to lie on a heat-reflecting film, and the tubes will be fixed with simple plastic clamps. It is known that this method has absolutely no advantages over the first, but it has disadvantages, namely: a high probability of mechanical damage to pipes and an additional increase in installation costs. As a reinforcing element itself in this location, this mesh simply plays absolutely no role. If you look at the building rules, then it must be filled with concrete on almost all sides, which must be at least five centimeters thick, however, in this position, this mesh will work in conjunction, and accordingly, the level of physical indicators of the strength of the screed increases.
Tips and tricks
The durability and safety of using this heating system fundamentally depends on how you connect the piping system.
We advise you never to purchase low-quality fittings, as well as shut-off valves made from fragile, low-quality alloys.
Over time, under the significant influence of the material itself, it develops cracks and breaks. Mostly, leakage occurs in the places where the fitting meets the nut. The crack may not be visible from the outside, and you blame it on a poor-quality gasket.
However, your attempts to tighten the nut are unsuccessful, and you simply break off the thread of the fitting and leave it inside the nut. It is very difficult to remove the breaker; often people simply change the pair. The best option would be the material used to make the fittings, that is, stainless steel; a material such as bronze may also be suitable.
All other alloys that also have color do not need to be purchased. Also, there is no need to skimp on the fittings themselves; their special importance in the heating system itself is very difficult to overestimate.
There is also one more nuance. To seal the connections, use only rubber gaskets; we do not recommend using paronite, it must be tightened incredibly tightly, so not all fittings can withstand this.
And one last important point. These are elements that work in pairs and must be made only of the same material. This is necessary in order to maximally exclude the manifestation of various kinds of critical stresses due to differences in thermal expansion.
Advice on connecting pipes with press fittings! Pipes must be connected to each other using press fittings or crimps.
If it is necessary to connect pipe sections in hard-to-reach places or under the heated floor screed itself, it is necessary to use a press fitting. To use this press fitting, you need a special tool, namely press pliers. The conditions of the press fitting installation process itself allow for hidden laying, or pouring into concrete, which significantly expands the possibilities in the process of designing thermal floors and utilities. Reliability increases, and the amount of fittings used is also reduced, and pipe consumption is correspondingly reduced, which as a result will have a significant impact on the price of the project.
Advice for the step-by-step connection of pipes (metal) with crimping press fittings.
First, the so-called internal chamfer is removed from the end of the metal pipe, a special gauge is inserted into the pipe itself to straighten various kinds of ovality that may appear when cutting the pipe itself;- a crimp coupling is put on the same pipe ;
- Third, a fitting with rubber sealing rings already put on it is inserted into this already calibrated pipe. In order to avoid special electrocorrosion, a special dielectric gasket is also installed in the place where the end of the pipe itself comes into contact with the connecting metal component;
- Fourth, to compress a metal coupling, ordinary press pliers are used with a set of liners with their own dimensions, corresponding to the diameters of the metal pipes. At the end of crimping, two uniform annular stripes should appear, and the metal itself should be arched. The most permitted operating pressure of the transported liquid in the places where the connections are made is up to ten bar.
Basically, only one-time compression of the coupling with press pliers is allowed. It is strictly forbidden to re-compress the coupling.
The fifth step is to check the tightness of the connections.
It is forbidden to carry out final screeding without inspection; everyone must remember this at all times.
Ways to check the system
First you need to disconnect the output and input of the circuit. Place a tee at the input and simply plug the output. Connect a valve and an accurate pressure gauge to the tee.- After this, you need to connect a compressor to the valve, then create a pressure of 2 atmospheres in the circuit itself. An absolutely accurate value must be determined by taking into account the working pressure of the coolant itself. During various tests, the air pressure must be increased two or three times. After pumping air into the piping system, close the valve and then leave the system alone for about twelve hours.
- After this period of time has passed, check the pressure gauge readings - almost any drop in air pressure makes it clear that there is a sign of leakage in the system; it is necessary to locate this location and fix the problem.
If the bleeding is very large, then you can detect it by ear, but if it is unnoticeable, then you need to use soapy water. Using this method, you will detect leaks in the water supply system, and this method is also used in gas pipes.
Final screed
The sixth step will be the final screed. There is good advice from experts to use dry construction technologies.
Wet concrete tends to leak and hardens for a very long time, and also has significant weight. All three of these indicators for your heating system can be disastrous or simply have negative consequences.
The best way to screed is to use a so-called semi-dry mixture. To make it, take the usual proportions of cement and sand (three to one) and mix very thoroughly. You need to do this with a concrete mixer, or you can do it manually. But water must be added very carefully, and in fairly small proportions.
Checking whether your solution is ready or not is quite easy, you just need to squeeze the solution in your hand, if your solution holds together, and at the same time no water passes through, then you are doing great, you can work with your mixture . After this, everything is carried out according to the algorithm already known to you, working with the screed and installing beacons.
The difference between the “pie” of a water floor in an apartment
The hydrofloor “pie” in an apartment is the same as in a private house, the only difference is in thickness, since the level of load on the floors cannot be exceeded.
The design of a heated floor in a house where the insulation layer on the ground floor is 100 mm differs from the apartment in the smaller thickness of the insulating material, 20 - 50 mm is enough - it depends on the floor, the number of external walls and the condition of the house.
If the housing is secondary, then more often a problem arises with doorways - they have a certain height. Increasing the “pie” of the floor will lead to a decrease in the height of the opening. On the primary housing market, you can buy an apartment without partitions and make your own layout.
Where is the best place to install them?
How to make a heated floor? Connecting a heated floor to a heating system without a collector
Since warm floors cost a lot, and not everyone can install them in the entire apartment, you need to decide where to install water heating in the front.
In the bathroom and toilet
The bathroom and toilet are the main rooms where additional heating will be most welcome, since there is a large amount of cold water there, which leads to the formation of condensation.
Warm floors from central heating will protect against high humidity and mold formation. It will create a more comfortable atmosphere during water procedures, because stepping on warm tiles is much more pleasant.
In addition, if the bathroom is warm, the water becomes less hot when used, and this saves resources.
Corridor
Another place where heated floors are often installed is the corridor. Wet footprints, wet rugs and shoes on such a floor will not be a problem; they will dry quickly.
The presence of a thermostat will allow you to set the heating temperature, which will not adversely affect leather shoes. Plus, in cold weather it’s much more comfortable to take off your shoes and stand on a warm surface.
Children's room and bedroom
It is quite logical to want to make a heated floor in a room where children play on the floor, as well as in the bedroom, because getting out of bed and stepping on a heated floor is more pleasant.
But at the same time, there are a number of points:
- any heating device “burns” oxygen, and this in turn negatively affects human health;
- Not all topcoats respond well to heating from below.
In addition, dry air will ruin natural wood furniture.
When deciding to install a heating system in an apartment using central heating, you should think through all the nuances, take into account the pros and cons, and the economic feasibility of this system. And also, in order to avoid problems, the advice of experts is to act in compliance with all legal requirements.
Infrared floors: characteristics and installation
How to make a heated floor in an apartment if it is not possible to carry out global repair work? The way out will be infrared heated floors. They are even less demanding to install and, in fact, plug into an outlet. Film heating systems were originally developed as a product that even a person without experience can handle.
They work due to graphite inserts located in a special film. These inserts generate heat due to infrared radiation, which is why the entire system got its name.
Roll of infrared film heated floor
The advantages of the type include:
- Variability of sizes. You can buy a small rug for your feet, or you can buy walkways to heat the entire room.
- Easy to install. This covering can be laid over the old floor.
- Price. One of the cheapest types.
- Long service life. Unlike water and cable analogues, this system requires little repair: if one strip fails, the others will continue to function.
The disadvantage, like its predecessor, is electricity consumption.
Film floor installation process
The installation process is similar to the cable type with one exception: if necessary, you can lay a film heated floor directly on top of the old floor covering.