Features of attic insulation with expanded clay
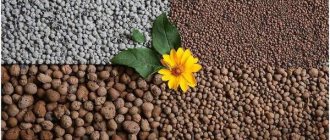
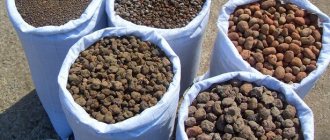
High humidity in the room, mold on the ceiling and walls, cold - this is what awaits a careless owner if the ceiling is left without thermal insulation. All heat from the room will escape through the roof, heating the surrounding space. The problem can be solved with the help of expanded clay - a loose mass made from clay rocks. In the attic you can use granules of the following fractions: sand - particle sizes 5-10 mm; gravel - 10-20 mm; crushed stone - 20-40 mm. Before insulating the attic with expanded clay, fragments of different sizes are mixed, which allows you to fill all the voids. The product is poured only onto the ceiling. The loose mass is considered a universal product and is capable of insulating all types of floors. A limitation may be the load-bearing capacity of the structure. The material is quite light, but with a large layer thickness, a large load will be exerted on the joists and walls. The roof of the upper floor is covered from the inside with other means. The work is easiest to carry out at the stage of building a house. In this case, you can easily waterproof the ceilings of the rooms under the attic and install a ventilation system. In this way, expanded clay is protected from moist air from living quarters, and the ceiling is protected from the appearance of mold and mildew. If insulation is carried out in a residential building, the attic floor must be covered with a vapor barrier film to prevent the loose mass from getting wet. It is not recommended to pour expanded clay directly for another reason. When working with it, a lot of dust is released. In addition, it is formed during operation. An additional layer between the ceiling and the granules will protect the lower rooms from the penetration of crushed fragments. When determining the thickness of the layer, you can rely on the following comparisons: 10 cm of a substance retains heat, like 25 cm of wood or 60 cm of brickwork 1 m thick.
What needs to be done for high-quality ceiling insulation?
Expanded clay can only be laid dry on the ceiling of a house, so you should buy material with a moisture content of no more than 8% and store it in conditions that prevent it from getting wet.
Additionally, using the finished insulation, walking bridges are laid along the outer walls and in the center of the attic. This is due to the fact that expanded clay has low strength; when walked, it cracks, which worsens its thermal characteristics.
Preparatory stage for the start of work
Preparation of reinforced concrete slabs consists of cleaning the surface of debris, applying a primer for better adhesion to the vapor barrier (made from roll bitumen-polymer materials).
Insulating an attic with expanded clay for a wooden floor will require a complex of works to remove old paint and varnish coatings, impregnating the wood with a fungicide if there are visible traces of infection with fungus, blue stains, and mold. Then the boards are primed and coated with an antiseptic and fire retardant. The layer of each composition must dry according to the manufacturer’s recommendation, usually within 2 days. The work is speeded up by the use of modern complex protection solutions with a validity period of up to 25 years.
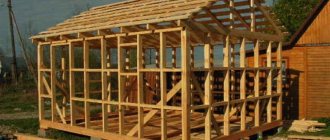
The additional load on the floor will be at least 150 kg/m2, so it is worth calculating the load-bearing capacity of existing structures, and, if necessary, reinforcing them and providing rough flooring for backfilling the heat insulator.
Main stage. Performance
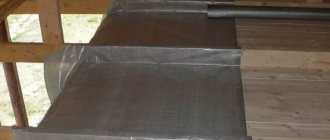
Insulating a ceiling with expanded clay begins with laying a vapor barrier material. Vapor barrier sheets are rolled out onto the prepared surface with an overlap of 10-15 cm.
For slabs made of heavy or cellular concrete, it is advisable to use welded roofing roll materials; they create the highest quality protection of the insulation from condensation. When fusing, non-fire methods of work are used, for example, heating the material with a construction hairdryer.
Under a layer of expanded clay to insulate the ceiling, a multilayer vapor barrier film or superdiffusion membrane is rolled out over wood materials. The panels are fastened together with special double-sided tape; the panels are fastened to the boards freely, without tension, with a construction stapler.
Using a vapor barrier, expanded clay is poured onto the ceiling insulation, alternating fractions and leveling.
Correct closing of insulation
Waterproofing is laid over the heat insulator, protecting it from possible leaks from a faulty roof covering.
If the attic is subsequently planned to be converted into a residential attic or to organize a storage place for seasonal items, expanded clay for insulating the ceiling of a wooden house is covered with a flooring made of boards or fibreboards. The most popular material for this purpose is moisture-resistant plywood or OSB boards, chipboards.
A frame of 75x50 timber is built on the surface according to the size of the slabs or in increments of no more than 500 mm for the boards. The floor material is left loose for a couple of days to acclimatize, then fastened with nails or screws, adjusted to the required size with a jigsaw. A plinth is attached around the perimeter, near chimneys and ventilation pipes. The surface is painted, impregnated with wax or protective compounds.
Thickness of expanded clay layer for attic insulation
Insulation will be effective only if the layer thickness is correctly calculated. The parameter depends on the climatic conditions of the region, the material of the ceiling, and the design of the roofing pie. The minimum layer of expanded clay for insulating an attic is 15-20 cm. However, such parameters are acceptable for buildings located in the southern regions. It is desirable to have a warm roof and a wooden ceiling. Wood also has good thermal insulation properties, which makes it possible to reduce the thickness of the expanded clay backfill.
The thickness of the insulation backfill depends on the climate of the region and the design features of the roof.
For cold areas, such a layer thickness for the attic is unacceptable. The same applies if the floor is concrete and the roof is cold. Effective insulation can be achieved by increasing the layer thickness to 30-40 cm.
When calculating the thickness of the insulation, the strength of the floor is taken into account. Depending on the fraction, the mass of 1 m3 of expanded clay varies from 250 to 450 kg. Expanded clay sand is the heaviest, but it is not needed for insulating the attic. The ceiling must withstand the load at a certain layer thickness.
Why choose expanded clay for insulation?
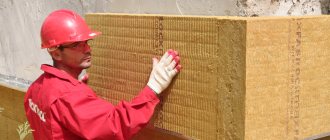
Mineral wool has an irritating effect on the skin and lungs.
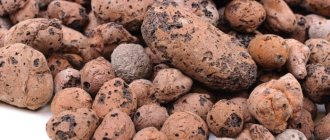
Expanded clay granules are clay processed using a special technology. During the firing process, the raw material acquires a porous structure, and a strong sintered crust appears on the surface of the granules, serving as a protective shell. It does not allow moisture to pass inside the expanded clay ball and makes it stronger.
The raw materials from which expanded clay is made do not pose a danger in case of fire. Ceramics do not burn or melt, releasing toxic substances. This is typical of polymer materials (EPS, foamed polyethylene, etc.), and expanded clay balls are quite safe when heated.
Those who have worked with glass wool or mineral analogues know that thin threads of the material are brittle and form crumbs. Contact with the skin causes itching. Inhalation of dust generated when working with such insulation materials is also harmful. When moisture penetrates into the thickness of the mineral wool layer, the material loses its thermal insulation properties.
Expanded clay granules are not very well protected by their shell from water penetration. For complete insulation during installation, vapor barrier membranes are used. When filled, expanded clay does not form fragments that irritate the skin. When transporting material, a certain amount of relatively harmless dust may be generated, which is retained by the film of the vapor barrier layer.
Unlike natural heat insulators (sawdust, tow, etc.), ceramic balls are not susceptible to the action of fungi and putrefactive bacteria. They do not attract rodents. The laid insulation lasts for decades without losing its properties.
The weight of expanded clay may vary. The mass of 1m³ varies depending on the fraction and density of the material. To insulate the attic, use grades M250-M450. Bulk density from 250 to 450 kg/m³. The fraction of such insulation is 1-2 cm; it is advisable to use a mixture of different granules for backfilling.
The cost of insulating a 30 square meter ceiling with expanded clay. m
When insulating an attic with expanded clay, many homeowners want to know how much such a protective layer will cost. This approach allows you to clarify the estimate and draw conclusions about the need for additional costs or, conversely, savings and the possibility of increasing other expense items. Calculation of expanded clay concrete mixture begins with determining the volume of the base material:
- for effective heat conservation, it is desirable that the thickness of the insulating layer be at least 250 mm - the low weight of expanded clay allows you to not even strengthen the rafters for this;
- the exact thickness of the insulation is calculated based on the minimum outside temperature in winter;
- Having decided which layer of expanded clay is needed to insulate the ceiling of a building, you can find out its quantity, and then the cost.
So, with a thickness of 0.25 m and a ceiling area of 30 sq. m to create an insulating layer you will need 30 * 0.25 = 7.5 cubic meters of material. The average cost of expanded clay, depending on the size of the fraction, is 2000–2500 rubles. cube m - which means that for a 30-meter area you will have to plan on purchasing 15–19 thousand rubles. Taking into account the prices of other materials, the total amount can reach 60–70 thousand rubles, depending on the chosen vapor and waterproofing, performing the work yourself or turning to specialists.
Calculation of the required layer thickness
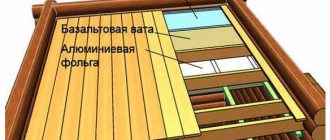
What layer of expanded clay is needed to insulate the ceiling can be easily determined using calculator sites. The required thickness of the heat insulator is calculated in accordance with the average temperature of the coldest five-day period in the area of residence, the type of insulation and its characteristics, and the orientation of the house to the cardinal points. For example, for the Moscow region, when covering with 100 mm timber, vapor barrier with foil and waterproofing with rolled material 5 mm thick, expanded clay as a ceiling insulation will require a layer of 508 mm.
If the attic floor is made of a prefabricated cellular concrete hollow slab, then the expanded clay insulation layer thickness will be 515 mm.
Required materials and tools
To insulate the ceiling with expanded clay you will need:
- expanded clay of different fractions;
- vapor barrier film (type B) or roofing felt;
- vapor barrier membrane (type A or AM);
- timber for laying logs for sealing the insulating layer (not required if the ceiling is hemmed to wooden beams from below);
- antiseptic for treating wooden structures;
- flame retardants - wood fire protection is increasingly used in private construction;
- tape or specialized adhesive tape for sealing seams;
- a thin metal rod for measuring the thickness of the backfill;
- board or rule for leveling expanded clay;
- construction knife;
- construction stapler;
- roulette;
- Chipboard, OSB, plywood for laying over beams or joists for the final floor covering when insulating the attic;
- glass wool or polyurethane foam for sealing cracks in the wall and at the junction of the ceiling and the wall.
Which expanded clay to choose for ceiling insulation
The best thermal insulation properties of coarse gravel granules. However, this does not mean at all that the insulating layer of expanded clay of this fraction has low thermal conductivity. This happens due to the fact that such backfill is not compacted. Therefore, it seems more rational to use smaller fractions of expanded clay.
Through observations and thermal measurements, it was established that the best result is obtained by a layer of expanded clay consisting of 60-70% granules of small (0.5-1.0 cm) and medium (1.0-2.0 cm) fractions with the addition of expanded clay sand with a diameter of 2-3 mm. In this case, the sand is poured in first - it forms a cushion for backfilling the main insulating layer. Some experts approach the problem differently: they believe that regardless of the percentage ratio between gravel and sand, the latter should form a bedding layer 3-4 cm thick.
We insulate the attic floor along the beams
- We will use polystyrene foam and mineral wool as insulation. Using this type as a filling involves a glassine backing that is spread over the surface.
- We measure the distance between the beams. We cut the glassine strips according to the measurements, taking into account that the extra 5 cm around the perimeter will be useful for flooring.
- We distribute the pieces into the space between the beams. Using prepared 10x20mm slats, we attach the glassine to the beam ends.
- Before laying the foam, it should be cut to the width of the beams. We cut the material to fit tightly into the openings
- After distributing the cut slabs, we examine the working area with polyurethane foam in hand, and fill the empty cracks.
- We again lay glassine on top.
At this stage, all that remains is to lay the mineral wool mats, which must reach the edges of the beams. It may take several approaches to achieve the desired height.
If mineral wool is laid in two or more sheets, the previous ones should be secured in such a way that the top layer can hide the joints of the first. This will be provided by the extra centimeters of the perimeter, which are literally tucked down like a closed pie.
Now all that remains is to lay the floor on the beams. Based on information and advice from experts, you can, with the help of simple manipulations, retain heat in the house and provide thermal insulation not only to the ceiling, but also to its entire structural part. The result of your actions will be a dry and warm attic, uniform air circulation and durability of wooden structures. By spending today, you will save yourself from major repairs in the near future.
Technology of attic insulation with expanded clay
The sequence of work when insulating all types of attic floors is the same and consists of three main points: waterproofing the floor, filling the area with loose mass, protecting the coating from roof leakage from above. More details about each operation below.
Selection of expanded clay
Only high-quality material has good thermal insulation characteristics. It is impossible to check the compliance of the declared parameters with the actual ones without the proper equipment, but without a minimum check of the product you should not make a purchase. Pay attention to the following points:
- The properties of expanded clay must comply with GOST 9757-90.
- When purchasing a packaged product, first check the condition of the packaging. The bag must be whole, clean, factory-made. Brown or brown spots on its surface indicate the presence of dust, which is formed after the destruction of fragments.
- Inspect the granules. They must have the correct shape with a smooth change in geometry, which ensures acceptable density and thermal conductivity of the insulating layer. Asymmetrical elements are formed due to a violation of production technology.
- Choose expanded clay with fragments of approximately the same size.
- The particles are fragile, so fragments are allowed in the bag. Their number should not exceed 5% of the volume of the bag. A lot of waste appears due to improper transportation and storage.
- The presence of moldy elements indicates the presence of low-quality components in the insulation.
- Bulk mass sold in bulk must be stored in a dry warehouse. Do not buy an insulator that is lying in the open air. Wet pellets are unable to prevent heat loss.
- Buy expanded clay produced by reputable companies. If you are offered a product from unknown companies, look for reviews about them on the Internet.
For information! Foreign companies sell their products 4 times more expensive than domestic ones.
Preparing for insulation
When calculating the amount of expanded clay for insulating a cold attic, you need to correlate the area of the room with the insulation layer. As a rule, it is necessary to pour at least 16-20 centimeters; accordingly, the area of the room should be multiplied by 0.16-0.2. So, for example, with an area of 20 m2 you will need to buy expanded clay for 3.2-4 m3
When poured in a layer of 200 mm, even the floors of wooden buildings can easily withstand the created load. The exception is buildings with a false ceiling without ceilings (baths and outbuildings are made like this). In this case, it is better not to use expanded clay.
To insulate the attic you need:
- isospan or other vapor barrier membranes;
- dry clay (pre-dried);
- multi-fraction expanded clay;
- in the used attic - materials for flooring;
- garden rake.
It is better to use isospan and analogues as a vapor barrier, but you can get by with roofing material or polyethylene with a thickness of 200 microns. The membrane is securely fixed to the base with a hardware gun. When purchasing isospan, you must also purchase a special tape to hold its flaps together.
Installation instructions for expanded clay
To insulate a cold attic with expanded clay, it is necessary to correctly form a protective “pie” on the attic floor. Perform the following operations:
- Pour clay 10 cm thick onto the vapor barrier film. Knead the soil well, distribute it evenly over the surface and compact it slightly. In combination with expanded clay, it improves the thermal insulation characteristics of the “pie”, and also improves the quality of laying granules. Instead of clay, you can pour a layer of sand of the same thickness on the floor. It needs to be leveled and compacted.
- Install the beacons on the base and align them in one horizontal plane using a building level. They are needed to control the thickness of the coating. The distance between the beacons determines the length of the ruler with which the surface will be leveled.
- Mix granules of several fractions; they will more densely fill the space intended for insulation.
- Fill the fenced area with loose mass 1-2 cm below the level of the upper edge of the shield. During operation, the material can be slightly compacted, which will improve thermal insulation.
- If the upper floor is not planned to be used, cover the granules with a vapor barrier film to protect against possible roof leaks.
- Expanded clay in a used attic must be protected from damage. One option is to install wooden decking and secure it to the joists. When installing, ensure a guaranteed gap between the insulation and the boards so as not to damage the fragments.
For free movement, expanded clay is poured on top with a liquid cement composition. The sequence of work is as follows:
- Prepare a solution of 3 parts sand to 1 part cement. The mixture should be liquid enough to fill the entire area on its own.
- Fill the expanded clay with a layer of 3-5 cm. Apply the composition in such a way as not to make potholes in the loose mass and not damage the structure of the “pie”. Any defect at this stage will be very noticeable later and will still have to be corrected.
- The laitance will compact the top ball and squeeze air out of the voids between the elements. A dense monolithic ball is formed that does not allow water to pass through. The insulating properties of the coating will deteriorate slightly, but you can walk on it without fear of crumbling the granules.
- Wait until the layer is completely dry. The cement screed will harden in a week, but the design strength is achieved in a month.
Technology of ceiling insulation with expanded clay
Insulation with expanded clay
Insulating an attic with expanded clay begins with laying moisture-proofing material. Any type of film or roofing felt must be spread in such a way that there is an overlap with the wood of the beams and walls along the perimeter of the attic. Its height should be greater than the thickness of the expanded clay layer. The edge of the vapor barrier is secured using a construction stapler.
When laying each subsequent membrane strip, you need to make an overlap of 10 cm on the already laid material. Depending on the type of vapor barrier at the joints of the tapes, the connection is made as follows:
- Special materials (Izospan, etc.) are glued along the edge of the overlap with a special tape from the same manufacturer.
- Glue the seams between the sheets of roofing material with mastic or fill them with molten bitumen resin.
- Polyethylene can be connected with packing tape about 5 cm wide.
When laying vapor barrier tapes, you need to place them across the attic beams, covering them at the top and sides. On the bottom of all vertical elements in the attic, overlap to a height slightly higher than the level of the granule backfill. Secure the edge with a stapler.
The vapor barrier film should be covered with dry clay powder. To make it, the mineral must be dug up and dried in advance. Before laying, crush the clay to a lump size of about 1 cm. Spread the resulting mass over the vapor barrier in a layer of 2-5 cm and level it.
When leveling, it is better to use a painter's rule or a wooden mop so as not to damage the thin membrane.
How to fill expanded clay?
Before filling the granules, you need to mix the material of different fractions. This is done so that the expanded clay balls fit as tightly as possible, and the cavities between them are smaller. Bulk material in this state will lie flat. Small gaps between the granules will be closed, and the layer of air in them will provide additional thermal insulation.
Pour the prepared expanded clay into the space between the ceiling beams. Level the layer with a garden (fan) rake. Lay a new layer of vapor barrier film or roofing felt on top of the expanded clay backfill.
When filling the ceiling, which will serve as the floor in the attic, you should not pour too thick a layer of expanded clay. There is no need for thermal insulation between the heated space of the attic and the living rooms: expanded clay is poured for soundproofing purposes. In this case, expanded clay is poured so that the granules do not touch the flooring boards. If they touch the material, the hard granules rubbing against each other will begin to creak loudly. To eliminate the possibility of such an effect, another method is used.
Pros and cons, material characteristics
Expanded clay is a loose type of insulation. It is produced by firing low-melting clays or shale in a rotating drum. At the exit from the furnace, several fractions of ceramic pellets are obtained.
Types of expanded clay.
Depending on the size and shape of the granules, expanded clay is divided into:
- sand - grain diameter does not exceed 5 mm;
- gravel (not to be confused with quarry gravel) - round granules from 0.5 to 4 cm;
- crushed stone - irregularly shaped pellets measuring 5-10 mm.
In turn, gravel is divided into fractions:
- fine - granule size 5-10 mm;
- average - 10-20 mm;
- large - 20-40 mm.
Advantages and disadvantages
The steady popularity of expanded clay among consumers is explained by its many advantages. Among the advantages :
- relatively low price per m3;
- long service life - 40-60 years;
- fire resistance (class NG);
- resistance to temperature changes;
- high frost resistance;
- light weight of granules;
- Possibility of use in cement mortars;
- environmental Safety;
- biological resistance - does not serve as a basis for the proliferation of fungus and mold;
- is not a rodent habitat;
- simple and convenient installation - all work can be done with your own hands.
The disadvantages include :
- high level of water absorption - 15-25% of weight;
- large thickness of the thermal insulation layer;
- dust formation during insulation work.
When insulating the ceiling with expanded clay, the pros and cons require additional comments and explanations. All this was done in the work “Expanded clay as insulation.”
Characteristics of expanded clay
The physical and technical characteristics of expanded clay depend on the size of the granules. Moreover, they differ greatly from each other in different sources, which is caused by the measurement technique and the type of expanded clay taken for analysis: immediately after firing (absolutely dry) or lying in a warehouse for some time (absorbing moisture from the air). Average data can be viewed here.
Table 1, for comparison purposes, shows the results of testing expanded clay granules of the JSC Expanded Clay Gravel Plant Novolukoml immediately after firing.
Table 1.
IndicatorsGranule size10-20 mm5-10 mm0.5 mm
| Density, kg/m3 | 289-370 | 300-400 | 500-700 |
| Compressive strength mPa | 1,0-1,8 | 1,2-2,0 | 3,0-4,0 |
| Number of granules with a different size, % | 4 | 8 | |
| Weight loss after 20 freezing cycles, % | 0,4-2,0 | 0,2-1,2 | Not regulated |
| Percentage of crushed granules, % | 3-10 | 3-10 | No |
| Thermal conductivity, W/(m×°K). | 0.0912 | 0.0912 | 0.11 |
Expanded clay insulation: pros and cons of the solution
Modern thermal insulation materials are very effective. But this efficiency is often compensated by serious disadvantages: some insulation materials are very fire hazardous and flare up like a match; others only smolder, but release toxic substances that cause serious harm to the human body without any fire; still others are extremely hygroscopic and lose their heat-insulating properties when wet. Unlike synthetic insulation, expanded clay:
- Does not burn or smolder . Expanded clay is porous granules of fired clay, so it is absolutely fireproof.
- Environmentally friendly material . To produce expanded clay, you only need clay, high temperature and rotating drum containers. No environmentally hazardous production by-products or additives.
- It's inexpensive . You can buy expanded clay at a price of 3000-3500 rubles per m3. Of the insulation materials, only polystyrene foam and glass wool are cheaper in terms of the thickness of the required insulation layer. But keep in mind that this price for expanded clay only applies when purchasing it in bulk or in large packages like big bags.
- Durable . The service life of baked clay products is calculated not in tens or hundreds, but in thousands of years. The pottery from the times of Ancient Greece, which is filled with museums, is the best confirmation.
- Resistant to fungus and mold, rodents . There is no mold or mildew on dry expanded clay.
- Resistant to freezing and temperature changes . Expanded clay can withstand 150-300 freezing/thawing cycles and significant temperature increases up to 700-800 °C.
- Durable . Expanded clay poured onto a roof or ceiling can easily support the weight of a person, even without boards laid on top of it.
- Fills cavities . The main fraction of expanded clay for insulation is 10-20 mm, but it is usually mixed with smaller material. The resulting granular mixture perfectly fills any cavities and cracks, preventing the formation of cold bridges near boards and walls.
In addition, insulating the ceiling with expanded clay leads to two useful side effects. The first of them is good sound insulation with a large layer thickness. This is especially true for houses that are covered with metal roofing materials: corrugated sheets, metal tiles, seam roofing. The second side effect is the uniform shrinkage of houses made of timber and logs due to the fact that the weight of expanded clay puts equal pressure on all building structures.
To complete the picture, we list the disadvantages of expanded clay insulation:
- Layer thickness . An effective layer of expanded clay for insulation is at least 200 mm with an open backfill, otherwise the material simply does not work - warm air escapes through the cavities between the granules.
- Heavy weight . Although the density of expanded clay is low - material with a density of 250-350 kg/m3 is used to insulate roofs - it still heavily loads the structure of the house due to its thick layer.
- A lot of dust . When filling in expanded clay, you need to wear a respirator and goggles because of the large amount of fine dust that is generated when laying it.
- Hygroscopicity . Expanded clay absorbs moisture very well - water absorption of whole granules reaches 25%. This increases the weight of the material and worsens its thermal insulation properties.
- Fragility . Fired clay granules are a strong but brittle material. Expanded clay is easy to break, and damaged granules perform their function worse.
- Difficult to use on pitched roofs . Like any bulk material, expanded clay is difficult to pour onto any inclined planes.
Although the hygroscopicity of expanded clay is very high and can become a problem if there is a leak in the roof, it does not need to be compared with the hygroscopicity of stone wool. Yes, if moisture gets into a thick layer of expanded clay for insulating the ceiling, then the porous clay will release it for a long time and reluctantly. But over time it will dry out. But it is almost impossible to dry wet mineral wool.
In general, laying expanded clay as insulation on floors and flat roofs is almost an ideal option if there are no restrictions on the thickness of the thermal insulation layer, and the supporting structures and foundation are strong enough to withstand additional weight.
Classification of heat insulator by fractions
The variety of material is determined by the size of the fraction, i.e. size of granulates:
- Small. According to the parameters, it is 0.1-5.0 mm. Used as a bulk mixture for backfill. Also used in the production of concrete blocks.
- Average. Reaches sizes of 10-20 mm, called gravel. Construction experts consider this fraction of expanded clay to be better for insulating ceilings, floors and floors of buildings.
- Big. Sizes vary in the range of 20-40 mm. Expanded clay of this fraction is used to insulate roofs, basements and semi-basements, as well as floors in garages and cellars.
Today, the building materials market offers about ten varieties of expanded clay. The distribution of types of material is carried out due to the density of the filling level. Thus, expanded clay of a large fraction has a lower density. Thus, the lower the grade and density of the granulate, the higher the quality.
Which expanded clay to choose for ceiling insulation
Insulating the attic may require reinforcement of the structures.
Which expanded clay is best for ceiling insulation? To reduce the load on the attic floor, it is better to choose large granules of 10-20 mm with less weight, with an additional backfill of fine fractions of 0-3 mm. The result is reliable protection for your home from the cold. When purchasing, be sure to pay attention to the storage conditions and quality of the granules: the material must be of the required humidity, not dusty, free from sand, and there should be no chips on the granules.
How to lay vapor barrier material
- Cut the material into strips, the width of which should exceed the distance between the ceiling beams by 10 cm.
The roofing material is attached to a rigid flooring. A gap should be left under the flooring for ventilation. - If the ceiling area is larger than average, then it is better to lay the material in separate strips, overlapping them on top of each other. The overlap width should be approximately 10 cm.
- It is better to glue the roofing material in the seams with mastic.
- “Izospan” is glued with a special tape, which you must purchase in the store along with the material.
- The chimney pipe, rafter beams - all this is also “wrapped” with a vapor barrier.
- The material must be fixed one level higher than the planned height of the expanded clay backfill.
- For fastening, use a construction stapler or masking tape.
Checking the quality of the coating
After the insulation of the ceiling with expanded clay in a bathhouse or house has been completed, you need to wait a few days and find out whether all the work was done correctly. To do this, the heating on the floor below is turned on at full power for a couple of hours, after which the temperature in the attic is measured. If it is strikingly different from the one without heating, then you need to carefully examine the thermal insulation layer. If necessary, the lining is opened and installed where the heat passes. This cannot be ignored, otherwise there is no point in installing insulation.
Thus, doing all the work yourself is not as difficult as it might seem. Before insulating the ceiling with expanded clay, it is enough to calculate how many materials are needed and purchase everything you need. If you follow simple instructions, the repair will take a few days and will not cause any difficulties.
Pros and cons of thermal insulation with expanded clay
Ceiling insulation with expanded clay has a number of advantages:
- The heat insulator has a long service life.
- Fire safety, because the material is not subject to combustion and when heated does not emit toxic substances that are dangerous to humans, animals and nature.
- Due to the porous structure of the insulator, the weight of the insulation is significantly less than its analogues.
- Does not attract insects, rodents and bacteria that contribute to the formation of mold and mildew.
- The low price tag allows you to use expanded clay on any construction sites.
- High-level thermal insulation coupled with sound insulation ensures an optimal microclimate in a private home.
- Absorbs moisture without increasing its own weight and without loss of performance.
- Expanded clay crumbs or crushed stones are not allergens. This is due to the natural origin of the material.
- Easy to use bulk heat insulator.
- The fractional shape of the material creates a barrier to air escape, which further increases heat insulation and provides natural convection.
Along with the positive features, the material has disadvantages:
- The effectiveness of expanded clay as a heat insulator depends on the thickness of the layer, i.e. backfilling to a depth of 20-40 cm is pointless.
- It is necessary to protect the material from exposure to precipitation.
- The optimal application is considered to be application to concrete floors. This is due to the fact that monolithic beams are able to withstand high loads and prevent granules from spilling onto the second floor.
- When planning work on insulating the ceiling in a wooden house, you should ensure that the expanded clay is protected with a vapor barrier film. In this case, PVC film is placed at the bottom of the heat insulator and at the top. This creates protection from the effects of precipitation.
Construction industry experts do not recommend using expanded clay insulation on a suspended ceiling lined with beams on the lower side (ground floor).
Considering the weight load, volume of material and structure, the probability of a breakthrough of such a structure is high. In this case, the collapse occurs inside the room.
House with concrete floors
The course of action in this case is as follows:
- A vapor barrier film is laid on the floor slab. It can be polyethylene, foil, roofing felt or glassine. Lay it over the walls at a level above the insulation layer;
- A small layer of crushed clay is carefully placed on the film;
- a layer of different-sized and well-mixed expanded clay is poured onto the clay and evenly distributed;
- a reinforcing mesh is installed around the perimeter of the floor, which is filled with liquid cement mortar;
- A concrete screed is made on top of it, after which the finishing layer of the floor is laid.
Wooden house
In this case, the sequence of actions is slightly different. Due to the relatively large weight of expanded clay, an insulation layer exceeding 10 cm is not recommended for houses with wooden floors. Don’t worry, even this thickness can withstand 40-degree frost.
In addition, for your safety, it is better to use expanded clay only for insulating ceilings made of thick, strong beams with a continuous roll. Or make an additional layer of subfloor.
In this case, the sequence is:
- check the insulation along the end perimeter of the attic, otherwise cold air will penetrate under the floor on which the insulation lies, and your work simply will not make any sense;
- make sure that the subfloor does not contain rotten or broken boards;
- if you have floor beams on the floor, they can be used for “pools” into which expanded clay will be poured. For strength, you can add 20-25 cm thick boards of the desired height and place them perpendicular to the supporting beams. If there are load-bearing beams only on the roof, then the beams on the floor should be a slightly wider extension of them;
- To prevent the expanded clay backfill from spilling into smaller cracks, foam them;
- then the pools are covered with glassine (or other vapor barrier). This is done with an overlap, 2-3 cm above the insulation layer. To attach the film to the beams, a stapler and long staples are used - short ones can come out because the floors will move as you move. Non-standard and very wide spans will require additional glassine paper with an overlap of sheet to sheet of at least 10 cm. The seams are tacked with a stapler;
- pre-mixed expanded clay is poured into the resulting niches and leveled;
- A screed (a mixture of cement and sand) is made on top of the expanded clay. Its thickness depends on what kind of floor you will lay in the attic. For example, for laminate or linoleum, the screed must cover the beams.
Additional recommendations for home insulation:
- the rafter beams and chimney pipe must be wrapped in a vapor barrier film;
- backfilling should begin from the wall farthest from the entrance;
- do not pour everything out at once, but in parts, helping with your hands, add more and level it with your hands or a wide spatula;
- Do not pour sand on top of the insulation. Seeping through larger expanded clay granules, it can rain down on you from the ceiling;
- It is more profitable for owners of spacious attics to buy expanded clay from manufacturers who will also provide delivery. Don't know who to contact? Ask friends who have insulated their homes, read reviews, the Internet is full of them. And rest assured, you will be immediately informed about poor quality;
- We recommend purchasing only certified products with markings.
We hope that our article will help you stay warm even in the harshest winters!
Precautions when working with expanded clay
Expanded clay is a completely safe material, but failure to follow the rules for handling it can still cause trouble.
Firstly, expanded clay pebbles themselves are fragile. When storing and carrying bags or boxes with expanded clay, they should not be tilted or thrown. When pouring expanded clay, it is strictly forbidden to walk on it. The crushing of pebbles leads, firstly, to a decrease in the thermal insulation properties of expanded clay, and secondly, to the formation of dust that pollutes the house.
Secondly, expanded clay should not be stored in damp places. This will cause it to take on water. This will also negatively affect its thermal insulation properties and make it significantly heavier than it should be.
For the same reason, when you insulate the roof with expanded clay, pay special attention to the protection of the expanded clay layer from water. If it becomes heavy under the influence of rain, it can destroy the entire integrity of the roof!
More on this topic on our website:
- Insulating ceilings with expanded clay To keep your home warm, you should insulate the ceiling. Also, insulating the ceiling will help save on gas and electricity, which are used for heating...
- How is a roof insulated with polyurethane foam? Anyone who has ever seen the principle of operation of polyurethane foam will understand the specifics of PPU thermal insulation. According to many experts, polyurethane foam is…
- Expanded clay has long and firmly taken its place among the effective and popular building materials used as insulation….
- Insulating the attic with polyurethane foam does not require an additional layer of vapor barrier, and installation work is carried out extremely quickly and efficiently. To insulate the attic, polyurethane foam must be applied to the surface...