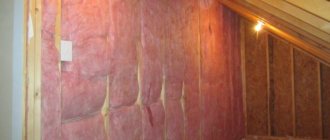
Features of insulation with stone wool
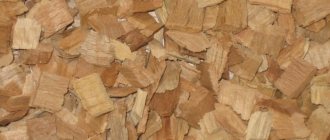
Cotton wool is made from molten glass, slag, and rocks. Special processing helps to obtain elongated fibers, which are removed from the centrifuge under the influence of centrifugal force when the threads are stretched. All elements are deposited in a closed volume. Subsequently, they are woven and additionally bonded with polymers, making up a single fabric. The resulting cotton wool is porous, its inner side is loose.
According to the type of the main component of cotton wool, it is:
- stone (or basalt);
- glass wool;
- slag.
The raw materials differ in structure:
- corrugated;
- layered;
- spatial.
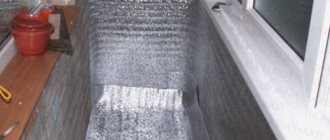
Floor wool is sold in rolls. It is suitable for insulation. To do this, you need to unwind the roll, cut it into the necessary pieces to fit the size of the room.
In accordance with the conditions of use, the thickness of the wool is 50 - 200 mm, less often - a little more. When material of the required thickness is not commercially available, it is possible to lay several layers. For example, in the climate of central Russia, usually the insulation layer should be 150 mm - so you can use 3 layers of wool of 50 mm each.
Before purchasing basalt wool, you need to pay attention to the following recommendations:
- inspect the packaging - if there are signs of damage on it, when a piece of the material itself is visible, it is better not to buy it, as the cotton wool could get wet and lose its characteristics;
- for a cold first floor or basement, you should choose a material with a thickness of more than 150 mm;
- in harsh climates, you need to install two layers of insulation or immediately purchase a two-layer material.
The thickness and density of the product is selected taking into account the climate and purpose of the room. For relatively warm conditions, 50 mm is enough, and for year-round living, preference is given to a thickness of 200 mm.
The need for floor insulation
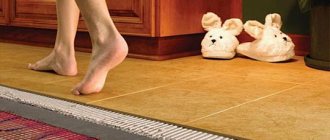
Mineral wool will effectively insulate floors.
A little heat leaves the room through the floors, compared to windows and entrance doors. However, if heat loss occurs through the floor in a living space, then it is impossible to call such a home comfortable.
Cold floors bring much more discomfort than cold walls or ceilings. The fact is that a significant part of the time that a person spends in a room, he is in direct contact with the floors, so the cold coming from the floors is felt much stronger than the cold coming from other structural elements of the room.
This is especially true for rooms located above unheated rooms - basements, cold basement floors, etc.
Insulation of attic floors is necessary for the same reason: the thermal insulation layer in this case does not allow heat to escape through the ceiling of the room below.
Advantages and disadvantages of insulation
Insulation with cotton wool is an excellent option for residential and non-residential premises. It's profitable and convenient. Vata allows you to:
- save on materials when building a house;
- save on work - construction is easier;
- increase usable space in the room.
The advantages of the material also include:
- fire resistance – the coating can withstand heating temperatures up to 1000 degrees without losing its qualities;
- mineral wool is a good sound insulator;
- affordable cost compared to other insulation materials;
- there is no need to change the material during operation;
- ease of installation process.
Characteristics of the material
But mineral wool also has some disadvantages as insulation. One of the most significant is good absorbency. Because of this, the product should not be placed in rooms with high humidity, and to prevent swelling, additional installation of vapor barrier on the bottom and waterproofing on top is required.
Among the main disadvantages are the following:
- Despite the fact that the material is environmentally friendly for the human body, dust clouds may appear when shaken; it is not advisable for them to enter the respiratory system. For this reason, the use of respiratory masks is mandatory during the installation process. Allergy sufferers and asthmatics should be especially careful about this issue.
- It is prohibited to use cotton wool in catering establishments, but many owners of such establishments neglect this condition.
- Insulation increases the load on the overall structure.
- Cold bridges may form at the joints of the coating. It is better to seal them additionally to avoid heat leakage from the room.
Another important drawback of the material is the appearance of mice and rats. For them, cotton wool is an excellent material for building burrows and raising offspring. To prevent the appearance of uninvited guests, cotton wool is treated with boric acid and dry mint. But such methods are only suitable for small spaces. To protect a large country house, the base of the building is surrounded by a metal mesh with small cells so that rodents cannot get inside. Special ultrasonic devices help in the fight against rodents.
The remaining shortcomings of the material are associated only with the acquisition of a low-quality type or after improper storage.
Thermal insulation technology
Let's look at two main methods of how to insulate floors in a private house under a screed.
Insulation on the ground
This method is used at the construction stage of a house if a basement is not provided. The order of work should be as follows:
- The bottom of the pit must be leveled. Then the first layer is crushed stone, gravel or slag. This layer should be 20–25 cm.
- Then a layer of sand (10–15 cm) is poured, it must be thoroughly compacted.
- A layer of reliable waterproofing is the most important component when insulating any floors. Thick polyethylene film laid in several layers is excellent. The seams need to be taped.
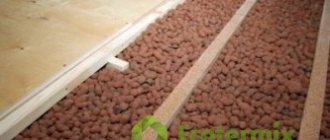
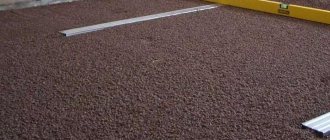
- Now you can directly fill in the insulation – expanded clay. The thickness of this layer may vary depending on the climate of the region. The minimum thickness of the thermal insulation pad must be at least 15 cm. In order for the insulation to fit more tightly, it also needs to be compacted.
- Next, the reinforcing mesh is laid on the floor. The cross-section of the squares should not be too large; the optimal size is 5×5 cm.
Now you need to prepare the cement mortar and make a screed. As already noted, foam granules can be added to the solution and additional insulation of the floor can be made. The only thing worth noting is that it is better to fill the top layer (1–2 cm) with a clean solution. It will be easier to level, rub and control the horizontal position.
Insulation on a concrete base
This method is used in already built private houses and in city apartments. This method is less labor intensive and faster, but still requires a carefully thought out approach. Let's figure out the sequence in which floor insulation is carried out using this method:
- First of all, you need to dismantle the old flooring (if any). In city apartments, it is also recommended to remove the old cement screed.
- Then you need to inspect the base and, if necessary, make repairs: seal cracks and crevices.
- Now the waterproofing is installed - thick polyethylene. Installation is carried out with an overlap, the seams must be sealed with tape.
- Insulation can be laid on the waterproofing layer. You can use any insulation: filling with fine-grained expanded clay or laying sheets of extruded polystyrene foam.
- The top of the polystyrene foam must be covered with another layer of waterproofing to prevent moisture from the cement mortar from getting into it. It is recommended to pour expanded clay with cement laitance: this will increase the strength of the top layer.
- After installing the reinforcing mesh, you can directly screed the floor.
After the screed has completely dried (usually this takes from two weeks to one month), you can begin installing the finished floor covering. Any material is suitable for this: laminate, linoleum or ceramic tile.
If you have some skill and follow the given technology, it will not be difficult to insulate floors in a private house or city apartment. When doing such work with your own hands, you need to follow the sequence and technology of the installation process, and then the result will not disappoint you.
Insulation technology
Thermal insulation of the base is carried out in a clear sequence. Even small deviations from the installation steps can cause heat leakage and lead to the mineral wool losing its characteristics. The stages of installing a floor insulated with basalt wool are as follows:
- Preliminary preparation.
- Installation of waterproofing.
- Installation of thermal insulation.
- Installation of vapor barrier.
- Rough finishing for finishing coat, reinforcement.
- Finish coating.
Rules and features of installation
Masters recommend adhering to certain rules:
- You can use rolled wool, as well as mats or slabs. The plates will make the work much easier and minimize possible gaps.
- Expanded clay is suitable for leveling floors and screeding. It not only makes the surface smoother, but also provides additional thermal insulation.
- There is no need to try to save on thermal insulation by purchasing cheap material from dubious stores. This provokes many problems in the future - too much shrinkage, loss of quality, the formation of mold and fungi. It is better to choose mineral wool from reputable manufacturers.
- To achieve maximum heat retention results, you should carefully study the installation rules and the specifics of the material. This helps to choose the right product taking into account the characteristics of the room. A good solution is to get advice on choosing from a professional.
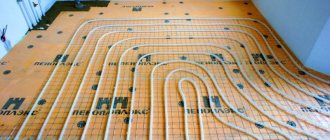
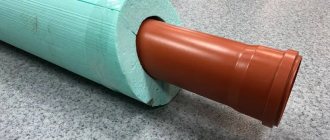
Insulation with Penoplex
This material was first manufactured about 50 years ago. Strong with excellent thermal insulation, it has become widely used for insulation. In addition, Penoplex has a number of characteristics that make it a leader in the class of insulation:
Does not absorb moisture, does not allow steam to pass through; Resistant to mechanical damage, in particular compression, which is very important for floor insulation; Easy to install and process; Does not react with chemicals; It does not emit harmful, toxic fumes and is absolutely safe for human health.
The strength of Penoplex is legendary; they say that it can even withstand an airplane. And indeed it is. This material is used to insulate runways and highways, which is the best proof of reliability.
The process of insulation with Penoplex is quite simple. It is necessary to lay out sheets of material on the floor surface and fix them with an adhesive mixture. There should be no gaps between the Penoplex slabs; installation is carried out joint to joint at the same level. It was already mentioned above that to create a smooth surface, you can use quartz sand, which eliminates minor unevenness.
After installation, the next layer of material can be applied. In the case of Penoplex, it is possible to do without waterproofing. since it has fairly good indicators of this parameter, and proceed to laying the finishing screed.
Floor insulation process
Floor insulation with mineral wool occurs in several stages:
- Preparing the subfloor surface.
- Directly laying the insulation.
- Installation of pre-finishing coating.
Let's look at the whole process step by step.
Preparing the rough foundation
It is very important to repair the sub-base and install waterproofing.
If you are going to insulate old floors, then before doing this you will have to completely remove all the floor covering from them, exposing the floors right down to the concrete floor slabs or rough wooden floors.
Then we carefully examine their surface for cracks, holes, crevices, etc. All discovered holes and problem areas should be sealed using putty, plaster or sealant.
Next, you should check the load-bearing surface for horizontal slope, dips and bumps. If the defects are not so significant, they can be corrected using putty or plaster.
If the height differences are too large, then you will have to resort to a more radical method - pouring a leveling concrete screed. To do this, you can use ready-made dry mixtures sold in construction stores, or prepare a sand-concrete solution with your own hands.
If the maximum thickness of the screed is expected to be less than 3 cm, then coarse sand should be used as a solution filler.
To add strength, you can add gravel to the mixture.
If the leveling layer of the concrete screed is more than 3 cm, then it is recommended to use fine gravel or crushed stone to increase strength.
The table shows the proportions that should be observed when mixing M-100 grade concrete mortar, which is most often used for floor screed.
M100 concrete proportions:
| Brand of cement used | Mass composition*, kg | Volume composition*, l |
| M400 | 1 : 4,6 : 7,0 | 1 : 4,1 : 6,1 |
| M500 | 1 : 5,8 : 8,1 | 1 : 5,3 : 7,1 |
*Values are given in order - cement : sand : crushed stone
Waterproofing
Roofing felt and its analogues are glued with special mastics.
The installation of a moisture-vapor barrier layer is a very important stage of work. The fact is that mineral wool is extremely afraid of moisture. When wet, it loses its thermal insulation properties and no longer restores them. Moreover, moisture that gets inside remains inside for a long time, causing the proliferation of mold and fungi that spread to the floors and walls.
Coating waterproofing is applied with a brush or roller
To do this, you can use rolled waterproofing - roofing felt or its modern analogues. Sheets of roofing felt are glued to the floor surface using polymer or bitumen mastics.
There are also self-adhesive types of waterproofing on the modern market, for example, TechnoNIKOL. The canvases are laid with an overlap of at least 10 cm, and the seams are carefully coated with mastic. For greater reliability, you can lay waterproofing in two or three layers, so that the joints of the sheets of different layers do not coincide.
For concrete subfloors, coating waterproofing can be used. It is a polymer or bitumen mastic with increased fluidity. To apply them, paint rollers or brushes are used. For more information about the materials, watch this video:
Mastics fill all the smallest cracks and pores of concrete, blocking access to moisture particles from the lower room.
Installation of logs
Mineral wool must be laid between wooden logs, which will protect the material from creasing.
Since mineral wool cannot be crumpled, care should be taken to create a protective barrier between it and the finishing coating.
To prevent the floor covering from putting pressure on the insulation, we install wooden logs over the entire surface of the subfloors, which will serve as support for the finishing flooring.
To do this, we take blocks with a cross-section of 5 x 6 cm and fasten them to the concrete base using dowel nails, and to the wooden base with nails or self-tapping screws.
The pitch between the joists depends on what material you are going to use for laying the top floor covering.
For a plank floor made of “fives” or “forties”, a distance between the logs of 80 cm will be sufficient.
For plywood, OSB or inch boards, the distance should be reduced to 40 - 60 cm.
Mineral wool flooring
After installing the waterproofing, you can proceed directly to laying the mineral insulation. We fill all the gaps between the joists with it, so that there are no gaps or holes left between the insulation and the joists. For detailed instructions on mineral wool insulation, see this video:
When laying the mineral wool, it is permissible to slightly crush it so that it does not rise too much above the level of the log, but it is not recommended to compact it excessively - this will not give a special increase in thermal conductivity, but will significantly increase the consumption of material.
A vapor barrier will protect the insulation from moisture penetration.
After all the cavities between the joists are filled with insulation, a vapor barrier should be laid over it. This may be isospan or similar materials.
It will allow moisture particles to escape, while at the same time preventing moisture from entering the insulation from the outside.
The joints of the vapor barrier sheets should be carefully taped after installation. The last stage of all work will be laying a finishing flooring made of the material of your choice on top of the insulated floor. The material of the top flooring (boards, sheets of chipboard, OSB, plywood) is attached from above to the joists, finally covering the insulation from the influence of the external environment.