Pneumatic heating test
Pneumatic heating test
In some cases, it is impossible to meet the basic conditions for conducting a hydraulic test of a heating system. A similar situation may arise after repair work is carried out in winter, when the ambient temperature is below +5°C. Then you should draw up a pneumatic test report for the heating system.
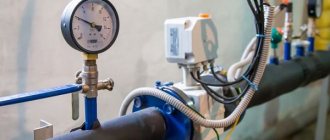
Its essence is to create a pressure of 100 kPa in the heating lines. Moreover, within 10 minutes the level of its decrease should not exceed 10 kPa. To check this, you should use pressure gauges with an accuracy class of 2.5 and a division value of no more than 5 kPa. All characteristics of the equipment may be present in the pneumatic test report of the heating system.
It is not recommended to carry out such checks for polymer pipelines. However, the standards allow testing of air heating systems made of polypropylene or metal-plastic in the following cases:
- Technical conditions do not allow filling with liquid. Most often this is due to the use of antifreeze;
- Ambient temperature below 0;
- Temporarily there is no coolant in the required volume.
The main problem when testing a system by air is finding places where tightness is lost. If a sharp decrease in pressure was noticed during the procedure, it is recommended to perform a zonal check of the areas. This is the only way to determine the location of a possible leak. Therefore, they prefer the hydraulic method as it is more convenient.
Upon completion, a pneumatic test report of the heating system is drawn up, in which the results are entered.
Pneumatic test
Pneumatic test diagram.
The pneumatic method is tested if the ambient temperature drops below 5°C. In this case, the pressure in the pipes should not drop below 10 kPa. This method is excellent for a system of polymer pipes where there are plastic connecting parts.
Article on the topic: Cross-stitched paintings: large cross stitch, photo, how quickly, video and gallery, drawing on canvas, flowers and frame
The conditions for conducting a pneumatic test of the heating system are:
- in the absence of liquid in the volume required for testing;
- at ambient temperatures below plus five degrees (some experts indicate below zero);
- if for technical reasons it is impossible to use the working fluid.
This method is rarely used. This is due to the fact that it is more difficult to find leaks and leaky connections than during hydraulic tests.
Test pressure
According to SNIP 3-05-01-85, which was replaced in 2003, pressure testing must be carried out according to the rules. When carrying out work in apartment buildings, it is necessary to:
- The pressure was more than 1 mPa (that's 10 bar) - for hot water supply systems and heating circuits with heaters.
- At least 10 bar for panel and convector heating systems.
- At least 6 bar for circuits in which radiators made of stamped steel or cast iron are installed.
- The pressure for hot water supply must be greater than the working one and another 5 bar on top (but cannot exceed 10 bar).
If panel heating and heat exchangers are used, the pressure should not have a pressure greater than the maximum permissible for the devices. If you are testing air in a steam or panel heating system, you need to check the pipes that fit into the ventilation equipment. The air should have a pressure of 1 bar.
Pressure test
Pressure test diagram.
What is a heating system pressure test? This is a test for tightness, that is, the absence of leaks during the operation of the heating pipeline during the heating season. For different systems, this process may differ in small details, but the general scheme of the test remains the same.
The test is carried out with an initial pressure approximately 1.5 times higher than the operating level. For example, if the working level is 1 atm, that is, 0.1 MPa, then the level for testing should already be 1.5 atm. For other values, the pressure at the test time is determined in exactly the same way, that is, the working pressure must be multiplied by 1.5 times.
Experts advise taking into account that the general system with couplings in pipes can withstand even greater pressure; for many heating devices it can be increased even to 2.5 MPa without damage to the equipment.
Carrying out such work is only possible if all the elements of the heating system are not built into the wall surface; a strong increase in pressure is only used for the open heating system of the house.
Pressure is supplied to the pipes using a special pump, usually a manual one. In this case, air must be completely removed from the pipes, since even its small presence can signal a depressurization of the pipe. We repeat, the heating installation must be completely filled with water; air pockets are not allowed.
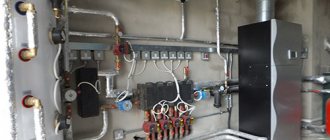
For manifold installations, air vent valves should be installed. In the section of pipes where the pressure is the highest, it is necessary to install a special pressure gauge. This is usually the lowest point for the entire heating installation. Next, the process is divided into 2 stages; we will consider them in more detail. What should a heating test be like: stages of testing Testing heating systems consists of 2 stages that allow you to maximally check the condition of the equipment and its readiness for operation. The first stage of verification is to perform the so-called cold process. The heating installation is filled with water, after which it is necessary to increase the pressure to the initial position within 30 minutes (at intervals of 10-15 minutes).
Related article: How to properly place a bed in the bedroom: rules of Feng Shui and ergonomics
After every 30 minutes, the pressure should not drop below 0.06 MPa. After 120 minutes of testing, it should not decrease by more than 0.02 MPa. After the check is completed, it is necessary to carefully inspect the condition of all connections in order to fully ensure that there are no possible leaks.
The second stage of pressure testing is carried out in the so-called hot form. In the first case, the water was cold, now hot water is poured in, its temperature should be close to the working temperature. The test begins with the boiler, that is, a heat source, being connected to the heating system. This can be any equipment that is used as a source of coolant. After this, all parameters in the system are set at the maximum operating level, but care must be taken to ensure that the pressure does not exceed these permissible values.
Before starting testing work, the house should be heated for 3 days - this is one of the mandatory conditions for testing. If no leaks are observed during filling with hot water, then we can assume that the heating system test went well.
Heating system testing equipment
Most often, a pressure tester is used to perform a hydraulic test. It is connected to the circuit to regulate the pressure in the pipes.
A huge number of local heating networks in private buildings do not require high pressure, so a manual pressure tester will be sufficient. In other cases, it is better to use an electric pump.
Hand-held devices for testing heating systems develop a force of up to 60 bar or more. Moreover, this is enough to check the integrity of the system even in a five-story building.
The main advantages of hand pumps:
- Reasonable cost, which makes them accessible to many consumers;
- Light weight and dimensions of hand presses. Such devices are convenient to use not only for personal purposes, but also for professional use;
- Long service life without failures or breakdowns. The device is so simply designed that there is nothing to break in it;
- Suitable for medium and small heating equipment.
Branched and large circuits on large areas, multi-story buildings and production facilities are checked only with electrical devices. They are capable of pumping water under very high pressure, which is unattainable for manual devices. They are equipped with a self-priming pump.
Electric pumps develop a force of up to 500 bar. These units are usually built into the main line or connected to any opening. Basically, the hose is connected to a tap through which the pipe is filled with coolant.
Performing heating pressure testing is a very complex technological procedure. That’s why you shouldn’t do it yourself; it’s better to use the services of professional teams.
(2 votes, average: 5 out of 5)
Brief excerpts from regulatory documentation, rules and SNiP for heating pressure testing.
Analyzing the statistics of the questions you ask and understanding that many questions regarding pressure testing of the heating system for the majority of our audience remain incomprehensible to you, we decided to make a selection from the necessary points and Rules for pressure testing, approved by the Ministry of Fuel and Energy of the Russian Federation and SNiP.
All SNiPs and rules contain more than 100 pages of information, which are sometimes difficult to understand, so in order to make the task easier for you, so that you can look at and, if necessary, refer to the desired paragraph of a specific regulatory document, we have processed the applicable regulatory documents and in a brief form posted on the site. Explanations to the Rules and SNiP can be found in the article: “Norms and rules for performing pressure testing of a heating system”
Diagnostic methods
- Water testing is the main method by which all circuits are tested. In this case, water should be pumped into the lower part of the pipes through a tap. It is possible to pump liquid using both automatic and manual pressure testing pumps. The advantage of this method is that it is very simple to complete all the work, and the efficiency of leak detection is high. The fact is that traces of liquid will immediately appear on the pipes.
- Testing with air is not a very effective method, since it is quite difficult to detect leaks. But it is permissible to use this technique at subzero temperatures – the air will not freeze. A compressor is used to force air into the system. It is connected using an adapter to the pipeline. In order to find the leak, you need to listen. Once you find the approximate location of the leak, use a soap solution.
How to pressurize a heating system
There are two main methods of pressure testing of systems:
- Pressure testing with water. The main method for testing heat-transfer circuits, water is pumped into the lower part of the pipeline through the shut-off valve of the drain pipe using an automatic or manual pressure test pump. The advantage of the method is the ease of detecting leaks using water prints.
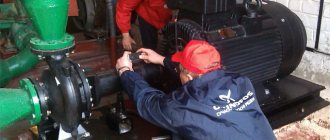
- Air pressure testing. Not a very effective method due to the difficulty of detecting leaks, it can be used to check the heating circuit in the cold season, when the use of water is difficult due to the possibility of freezing. To pump air, a compressor is used, which is connected to the pipeline through a special adapter. To detect the location of a leak, auditory methods are used; to accurately localize the air-permeable connection, a soap solution is used, similar to checking gas pipes.
Rice. 5 Pressure testing of pipes with a special flushing compressor
Test pressure
The rules for pressure testing of heating systems are regulated by the PTE for heating installations from the Ministry of Energy (clause 9.2.13) in force since October 1, 2003, according to them the test pressure in an apartment building should not be less than:
- 1 mPa (10 bar, atm.) in home hot water supply and heating systems with water heaters;
- 10 bar (atm.) for panel and convector heating circuits;
- 6 bar (atm.) in a circuit with radiators made of cast iron or stamped steel;
- pressure equal to the working pressure with the addition of 5 bar (atm.) but not more than 10 bar for hot water supply;
- pressure, which must exceed the operating pressure (set by the manufacturer and indicated in the technical parameters of the devices) by 1.5 - 2 times for heating air heaters and heating ventilation.
What testing tool is needed?
Now let's talk about what crimping equipment is used during the work. To perform hydraulic tests, you need to use specially designed pumps (they are called pressure testers). You can find two modifications - electric and manual.
Hand pumps are a cuvette in the shape of a rectangle; water is poured into it, which is then pumped into the heating system. A plunger-type pump is placed on its side, with a handle on top of it. It is with its help that the pump plunger is driven. There are pressure gauges on the body, with their help the pressure of the liquid pumped into the system is controlled. One shut-off valve allows water to be shut off after pumping into the pipes is completed. The second valve allows liquid to be drained from the tank.
Plunger pumps operate on the same principle as simple piston pumps, which are used to inflate bicycle or car inner tubes. But there is also a difference - the plunger pump design has a cylindrical steel piston that moves in the housing with minimal clearance. It is with this that it is possible to pump liquid into the heating system at a pressure of up to 60 bar.
The main disadvantage of manual mechanisms is that it takes a long time to carry out crimping work. Moreover, the test time depends on the length of the heating circuits. Sometimes it takes several hours to completely fill. Imagine how much strength you will expend to pull the handle.
It is with the aim of reducing costs and automating the process that electric pumps are used by specialists. They work on the same principle as manual ones, only muscle power is replaced by an electric drive. Automatic systems are good because you can set the required level of discharge pressure. Once it is reached, all equipment is turned off.
Automatic devices can pump liquid at a pressure of 40-100 bar. But there are also industrial designs that are capable of creating pressure up to 1000 bar.
Please note that the Ministry of Energy sets requirements according to which it is necessary to use only spring-type pressure gauges for control; their accuracy class must be 1.5. The circumference of the body must be more than 160 mm
The scale must be designed to measure pressure, the value of which is at least 4/3 of the minimum, the division value is less than 0.1 bar.
How hydraulic tests of a heating system are carried out:
1. If the system is running, it needs to be stopped. The tested section of the pipeline is divided into conditional components, which are subject to preliminary external inspection. During the inspection, all technical documentation and compliance with standards are checked, and special plugs are installed in order to isolate the inspected area from the main pipeline system. It is unacceptable to use pre-installed locking mechanisms provided by the manufacturer during installation for this purpose.
2. The equipment necessary for testing is installed - this can be a hydraulic press or a pump, a compressor: something that creates the pressure necessary during the testing process. Additional equipment is also connected, including valves, pressure gauges, and measuring instruments. Once the preparation is complete, the verification process begins.
3. Using hydraulic equipment, pressure is created in the system , the value of which is calculated earlier and depends on operating conditions and operating parameters. In most cases, the tested pressure exceeds the working pressure by 20-50%, but not less than the certain values specified in SNiP. The pressure is built up gradually in order to maintain safety and avoid water hammer, and is monitored by at least 2 independent measuring instruments. In this case, an acceptable deviation corridor is established due to changes in coolant temperature.
4. Simultaneously with the increase in pressure, measures are taken to prevent the accumulation of gases in pipeline elements filled with liquid. After the required pressure is achieved, it is maintained for a certain period - the holding time established by technical standards, but not less than 5 minutes. The system is kept under pressure by observing the pressure gauge readings. Personnel should be kept in a safe location, isolated from the test area. At the end of the holding time, the pressure drops to the operating level.
5. Analysis of results, inspection of the system. If the pressure does not decrease, there are no leaks, the system is working properly. A drop in pressure indicates depressurization of the system and the need to find and eliminate the leak. After a systematic increase in holding time and a gradual decrease in pressure inside the test area, a test is carried out for the tightness and strength of the seams . All pipe sections in sight are inspected. If the pipes are made of non-ferrous metals, the welds are tapped with a wooden hammer weighing up to 800 g; if they are made of steel, a hammer weighing up to 1.5 kg is allowed.
In this way, all sections of the pipeline or heating network are checked. If the system uses combined vessels with different operating pressures in sections, separate checks must be carried out for each of them.
This diagram can be called “approximate”, since the pressure drop values are different in each specific case and at a specific facility. More precisely, they are calculated on the spot, when planning the work.
Established hydraulic test standards:
— Hydraulic tests are carried out in accordance with the established standards SNiP III-G.9-62 and NiTUKhP-62 . — The procedure is carried out under the supervision of a supervisor, this can be a foreman or an authorized representative of the manufacturer. The inspection must be carried out in accordance with the requirements of Gosgortekhnadzor and safety regulations, taking into account the instructions in the technical documentation of the facility. — Measuring instruments and pressure gauges used during testing must undergo preliminary testing. Only sealed pressure gauges with an accuracy class of 1.5 and higher are used. According to the GOST 2405-63 standard, devices must have a diameter of at least 150 mm and a scale designed for a maximum value of 1.33 of the pressure measured during the test.
Hydraulic test evaluation
During testing, pipeline sections are checked for joint strength and density. The success of the tests is checked according to 3 main parameters:
• Stable pressure inside the pipes, without uncontrolled decrease • Absence of signs indicating a violation of integrity - leaks, ruptures, broken seams, fogging • Absence of deformations identified during a visual inspection
If one or more violations are present, the results of the inspection are considered unsatisfactory. The system must be repaired and then checked until the parameters are satisfactory.
SNiP crimping rules
The norms for pressure testing of the heating system are described in documents such as SNiP 41–01-2003, and also 3.05.01–85.
Air conditioning, ventilation and heating - SNiP 41-01-2003
Hydraulic checks of water heating systems can only be carried out at above-zero temperatures in the premises of the house. In addition, they must withstand water pressure of at least 0.6 MPa without damage to the seal and destruction.
During the test, the pressure value should not exceed the limit for the heating devices, pipelines and fittings installed in the system.
Internal sanitary systems - 3.05.01–85
According to this SNiP rule, it is necessary to check water heat supply and heating systems with the expansion vessels and boilers turned off using a hydrostatic pressure equal to 1.5 working pressure, but not less than 0.2 MPa in the lower part of the system.
The heating network is considered to have passed the test if it holds the test pressure for 5 minutes and does not drop by more than 0.02 MPa. In addition, there should be no leaks in heating equipment, welds, fittings, threaded connections and pipes.
Checking the tightness of the heating system
To ensure efficient and reliable operation of the heating system, they not only check the coolant pressure, but also test the equipment for leaks. How this happens can be seen in the photo. As a result, you can monitor the presence of leaks and prevent equipment breakdown at the most crucial moment.
The tightness test is carried out in two stages:
- cold water test. Pipelines and batteries in a multi-story building are filled with coolant without heating it, and pressure readings are measured. Moreover, its value during the first 30 minutes cannot be less than the standard 0.06 MPa. After 2 hours, losses cannot be more than 0.02 MPa. In the absence of gusts, the heating system of the high-rise building will continue to function without problems;
- test using hot coolant. The heating system is tested before the start of the heating period. Water is supplied under a certain compression, its value should be the highest for the equipment.
To achieve the optimal pressure value in the heating system, it is best to entrust the calculation of its arrangement to specialist heating engineers. Employees of such companies can not only carry out the appropriate tests, but also wash all its elements.
Testing is carried out before starting up the heating equipment, otherwise the cost of an error can be too expensive, and, as is known, it is quite difficult to eliminate an accident at sub-zero temperatures.
But residents of multi-storey buildings, if desired, can install such measuring instruments as pressure gauges in the basement and, in case of the slightest deviations in pressure from the norm, report this to the relevant utility services. If, after all the steps taken, consumers are still unhappy with the temperature in the apartment, perhaps they should consider organizing alternative heating.
As a rule, the pressure in the pipelines of domestic multi-story buildings does not exceed the maximum standards, but still, installing an individual pressure gauge will not be superfluous.
Source
Test procedure
According to the rules for the technical operation of thermal appliances, tests should be carried out in the following sequence:
- The circuit is filled with water using a pressure tester. The temperature of the liquid should be about 45 degrees. The air must be vented through special vents.
- Next, water is pumped under pressure for at least 10 minutes. During this time, you need to visually inspect all seams, pipe joints, connections of all equipment, and fittings.
- Afterwards, the pressure can be brought to maximum pressure and maintained for 10 minutes. If the pipes are made of polymer materials, then the tests should be carried out for at least half an hour.
- If the pressure does not change during the tests, then we can judge that there are completely no defects.
You can complete the tests and begin directly operating the equipment.
Heating system pressure test certificate
This document displays the following information:
- What type of crimping method was used?
- The project in accordance with which the circuit was installed;
- The date of the inspection, the address where it was carried out, as well as the names of the citizens who sign the act. This is mainly the owner of the house, representatives of the repair and maintenance organization and heating networks;
- How the identified faults were eliminated;
- Test results;
- Are there any signs of leakage or reliability of threaded and welded connections? In addition, it is indicated whether there are drops on the surface of the fittings and pipes.
Crimping procedure
This method of checking the heating system involves performing hydraulic tests:
- Heat exchangers;
- Boilers;
- Pipe
This makes it possible to identify leaks that indicate depressurization of the network.
Before testing the heating system with plugs, you should isolate the heating system from the water supply, visually assess the reliability of all connections, and also check the functionality and condition of the shut-off valves.
After this, the expansion tank and boiler are turned off to flush the radiators and pipelines from various deposits, debris and dust.
During the hydraulic test, the heating system is filled with water, but during air tests this is not done, but simply a compressor is connected to the drain valve. Then the pressure is increased to the required value, and its indicators are monitored with a pressure gauge. If there are no changes, then the tightness is good, therefore the system can be put into operation.
When the pressure begins to decrease beyond the permissible value, it means that defects are present. Leaks in a filled system are not difficult to find. But in order to identify damage during an air test, a soap solution should be applied to all joints and joints.
Air pressure testing takes at least 20 hours, and hydraulic testing takes 1 hour.
Having corrected the identified defects, the procedure is repeated again, and this must be done until a good seal is achieved. After carrying out this work, pressure testing certificates for heating systems are filled out.
Checking the heating network with air is usually carried out if it is impossible to fill it with water, or when working in low temperature conditions, because the liquid can simply freeze.
What is the purpose of pressure testing heating systems?
Pressure testing is a technique for monitoring the proper operation of the in-house heating system. In this case, pipeline circuits, shut-off equipment, connecting elements and other components of the heating network of the building are tested. The essence of the procedure is to artificially create high pressure inside the system, using air or liquid. The main purpose of its implementation is to test pipelines for strength and tightness. It allows you to determine:
- are the walls of the pipes and housings of auxiliary devices strong enough to withstand the pressure of the coolant during its circulation through the system;
- reliability of seals at the junctions of shut-off valves, fittings and other elements of the heating network;
- whether control and measuring devices, valves, and other engineering equipment are operational.
An air or hydraulic test of heating networks is considered passed if, after increasing the pressure in the system, no leaks are detected. If defects are detected, they must be eliminated - replacing rotten pipes, sealing connections.
Where to start installing the system
An important parameter in heating design and self-installation is the pressure under which the coolant is supplied. A lot depends on this indicator. For example, how warm the room will be directly depends on this characteristic, as well as the force of supply and movement of the coolant in the pipes.
Heating system pressure measurement
The more floors in the house, the higher the pressure should be. Also, during the movement of the coolant along the route, various hydraulic processes can occur, which it is also advisable to take into account. The result of these processes can be water hammer in the system. Their blood pressure may increase. It is for this reason that hydraulic tests of heating system pipelines are carried out at elevated pressure. The pressure is increased by approximately forty percent.
When carrying out preparatory work, take into account the following:
- They check all the valves of the heating system, conduct an inventory of fittings;
- If necessary, add various silicone insulation;
- Check the integrity and, if damaged, restore the pipe insulation;
- They check the functionality of the blind plug in order to cut off the building from the heating network at the right time.
There must be a tap on the return line for draining. Before starting the heating, it must be tested, since all components are filled with it.
Plastic parts inspection process
When testing, it is necessary to consider whether there are plastic parts. This is explained by the fact that the thermal expansion of plastic has high rates, which means that the temperature of the water in the system and the surrounding temperature must be constant. If the temperature changes and the seal is not maintained, the pressure in the heating system will still increase.
When testing equipment, the pressure should be increased to a value that is approximately 1.5 times higher than the working pressure, then hold it for 30 minutes. If expansion is observed in the pipes, then it is necessary to slightly pump up the pressure level, and then continue checking, maintaining constant values. After 30 minutes, you can sharply lower the value to a level that is half the working level, keeping it in this way for 90 minutes.
Related article: Sliding doors with photo printing for dressing rooms
If a slight increase is observed, this does not indicate expansion in the pipes, but the tightness of the entire system. When carrying out checks, many experts recommend repeatedly reducing and increasing the pressure level so that you can accurately say about the performance of the entire heating system and the ability to accept any load (limited by the values specified by the manufacturer).
Checking the heating installation is carried out using various methods, including increasing/decreasing pressure in the pipes. When performing such work, it is necessary to follow the instructions exactly to avoid ruptures or leaks. In this case, certain factors should be taken into account that have a strong influence on the inspection process, for example, the material of pipes. Only after making sure that everything is in perfect order can you begin operation without worrying about sudden leaks.
The best posts
- Designs for burning on a cutting board for beginners with photos
- Openwork jackets with knitting needles: diagrams and descriptions with photos and videos
- Solar panels for a private home. Pros and cons of solar panels
- Mop for washing the floor. Which one to choose
- Flowers from foamiran. Instructions and templates
- Christmas tree star made of threads and satin ribbon with photos and videos
- How to make a coffee table with your own hands?
- Flat slate - characteristics, scope, installation
Conditions for performing crimping
Test work is carried out correctly if all necessary requirements have been met. For example, outside work cannot be carried out on the tested object, and the testing must be supervised by the shift supervisor.
Pressure testing is carried out only according to a program approved by the company’s chief engineer. It defines: the procedure for employees and the technological sequence of verification. They also outline safety measures for ongoing and current work performed at adjacent facilities.
There should be no strangers during pressure testing of the heating system; there should be no turning on or off of testing devices; only employees taking part in the test remain on site.
When work is carried out in adjacent areas, it is imperative to provide reliable fencing and turn off the testing equipment.
Inspection of heating appliances and pipes is permitted only at operating pressure values. When the heating system is pressure tested, reports are filled out to confirm the tightness.
Preparation for hydrotesting
4.1.1. Products and their elements subject to hydrotesting must be accepted by the quality control service based on the results of external inspection and non-destructive testing.
The test pressure value for the product should not exceed the maximum permissible pressure value for which the hydraulic stand is designed.
4.1.2. Fasteners and seals used during hydrotesting must be made of materials specified in the working drawings for the product.
4.1.3. Instrumentation, safety devices, fittings, plugs, fasteners, gaskets, etc. must be selected according to the marking for a pressure not lower than the test pressure.
4.1.4. When installing the test product on a hydraulic stand on standard or technological supports, its stable position, free access for inspection and the location of drainage holes (“air vents”) must be ensured at its highest point.
The hydraulic testing scheme, technological process and equipment must ensure complete removal of air when the test product is filled with working fluid.
4.1.5. Installation of communications, installation of the required fittings, instrumentation must be carried out in full accordance with the approved hydrotesting scheme.
All free openings of the product under test must be plugged.
Installation, equipment and inspection of the product at a height of more than 1.5 m should be carried out from special platforms (scaffolding).
4.1.6. When installing flange connections, the threaded elements must be tightened evenly, alternately tightening diametrically opposite ones (“crosswise”), maintaining parallelism of the flanges.
It is prohibited to use wrenches that do not match the size of the nut, non-standard ones and/or with an extension of the handle, as well as a hammer or sledgehammer.
4.1.7. When preparing a working fluid using phosphors, preservatives, as well as when applying indicator coatings to the controlled surfaces of the test product, a general supply and exhaust ventilation system must be turned on at the hydrotesting site.