Here you will learn:
- Design and types of fan heaters
- The use of homemade fan heaters
- General recommendations for creating devices
- DIY water fan heater
- Homemade gas heater
- Directional heat gun
- DIY fan heater made from trash + video
- Fan heater made of asbestos cement pipe
Household fan heaters are compact devices that can easily be installed in almost any suitable place. To operate the device, you need electricity: both for the fan and for the heating element.
Such devices are often used in apartments, garages, and even for heating workshops, greenhouses and other premises. It all depends on the power of the device.
Any fan heater model has three components:
- fan;
- a heating element;
- frame.
The fan drives a stream of air through the body, the spiral heats this air, and the warm air flows throughout the room.
If you add automatic control elements to the device, you can set an acceptable air temperature. The device will turn on and off without human intervention, which will save energy.
To make a homemade fan heater, a regular household fan, the dimensions of which correspond to the body of the device, is suitable. Sometimes the housing is made based on the size of the fan
When operating the fan heater, you must adhere to safety rules. Do not place any objects or materials directly on the fan heater body or too close to the protective grille.
If the device is equipped with an overheat protection system, it will simply turn off. But if this module was not installed during assembly, the device may overheat, break down, or even catch fire.
A self-made fan heater can be of almost any suitable size and power. As a housing, you can use a piece of asbestos-cement pipe, a metal pipe, a rolled sheet of metal, or even a housing from an old system unit.
Usually, a fan is first selected and a heating coil is made, and then the type of device housing is determined depending on its filling.
The most important point when creating this heating device is safety: fire and electrical.
The heating coil in homemade devices is most often of the open type; it is simply twisted from suitable wire. Direct contact with a heated coil can lead to fires, burns, etc.
To make a fan heater with your own hands, you will need the most common tools, as well as basic knowledge of installing household electrical equipment
Therefore, the spiral must be properly secured inside the case, and the outside of the device must be covered with a reliable grille. The installation of the device's power supply also requires attention.
- All contacts must be insulated; the base below is usually made of materials that do not conduct current: rubber, plywood, etc.;
- As a basis for the construction of a fan heater, it is worth taking an industrial model, the design of which will serve as a template;
- To assemble a fan heater, you will need a motor, a centrifugal or axial fan, wires and a housing; the components can be assembled from literal trash;
- At the stage of selecting suitable available means, it is worth immediately deciding on the type of heating element and the method of its fastening;
Design and types of fan heaters
To preliminarily estimate the amount of work and select the materials necessary for assembly, it is worth familiarizing yourself with the design of a factory-assembled fan heater. The elements present in the design of all models are:
- Protective housing made of plastic or metal.
- Electric motor.
- Impeller with blades.
- A heating element.
- Protective grille.
- Adjustment and control elements.
Depending on the chosen design and purpose of the device, additional components are selected. You can make almost all types of electric heaters with your own hands. For domestic needs, you can make a mini heat gun with your own hands to warm up and dry the room, a do-it-yourself electric fireplace will allow you to realize your own design ideas and give the room a cozy atmosphere, and a ducted air heater is built into the supply ventilation or air conditioning system.
Types of heaters
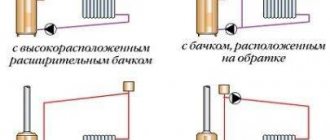
Depending on the method of heat transfer, electric and water heaters are distinguished.
Electric heater
The design of such a device implies the presence of steel filaments or spirals of metal wire. When current passes, metal elements offer a certain resistance to it, which leads to the conversion of electrical energy into thermal energy.
Among the advantages of electric heaters we note:
- Ease of calculating the required power of the device.
- Availability and relatively low cost.
- Easy to install and connect.
- Small pressure drops.
There are also a number of disadvantages. Thus, a large inertia is created in hot metal threads. This can lead to overheating of the device and even its failure. Improper handling of the device often causes a fire. To counter this phenomenon, electric heaters are equipped with additional protection against overheating.
Another negative point is low efficiency. The operating costs of electric heaters are an order of magnitude higher than those for water devices, in which electricity consumption is minimized.
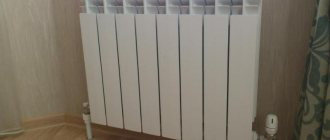
Water heater
Due to numerous advantages, heaters of this type have become much more widespread than electric ones.
The obvious advantages of water heaters include:
- Fast heating of room air.
- Availability of structural elements.
- Possibility of assembling and installing the device on your own.
- Ease of repair and maintenance.
- Environmental friendliness of the device.
- Long service life.
- Economical.
It is important! If there is a possibility that the ambient temperature will drop towards negative values, the heater must be provided with an additional frost protection system. Otherwise, there is a high probability that frozen water will rupture metal pipes.
Water heaters include the following parts and components:
- fan;
- heat exchanger;
- circulation pump (not required when connected to a central heating system);
- three-way valve;
- Control block.
A mandatory element of the design of a water heater is the piping unit, which is responsible for supplying hot water to the heat exchanger.
In addition, air heaters differ in form factor. The shape of the duct can be round or rectangular. This does not have any serious impact on the performance and cost of the device. The main condition is that the heater must be optimally integrated into the system.
The use of homemade fan heaters
Electric models can heat small areas, while their water counterpart is used to heat large spaces, but you may need several devices to distribute the heat evenly.
Homemade devices can be used for drying things, which is important in winter, as well as car seats after washing a car or small rugs.
If, upon arrival at the dacha, you need to immediately heat one of its rooms, then fan heaters will cope with this task faster than other heating devices. It can also be used for heating basements and ground floors, those rooms where there is high humidity. Homemade devices can significantly reduce its level and maintain a stable temperature in the room for the required period of time.
How does a fan heater work?
To make the right choice, you should first familiarize yourself with the structure of the fan heater. Understand the basic operating principle of the device.
Any fan heater includes: a housing made of high-strength plastic or metal, a heating element and, of course, a fan, the blades of which can also be plastic or metal. More expensive models also have a rotating mechanism.
The fan itself can be of two types: tangential or axial. When operating the first one, less noise is generated.
Heating of the room occurs due to the movement of air currents. Cold air enters the device, and after instant heating, it is distributed throughout the room using a fan. This heating method remains the fastest to this day.
General recommendations for creating devices
In an effort to save on expenses, many owners, when choosing among heater options, are in no hurry to purchase ready-made factory models.
After all, if you have the desire and the appropriate skills, you can always construct a heating device on your own.
When choosing a DIY garage heater, many are guided by two parameters:
- The heating device should be easy to activate, quickly warming up the room.
- The device must have a simple design, devoid of complex parts and elements.
- Operation of the device must be carried out with minimal financial costs.
An original and at the same time safe heater can be constructed even from improvised means used on the farm
The safety of the device is also important. Therefore, regardless of the heating method in the garage, it is necessary to equip a ventilation system. After all, a decrease in the amount of oxygen and the accumulation of combustion products poses a risk to human life.
DIY water fan heater
Before assembling it, you should study the device and principle of operation. The step-by-step assembly instructions consist of 4 stages: manufacturing the housing, heat exchanger, assembly and installation.
Material required to create a fan heater
To create a fan heater with a water heat source with your own hands, you will need:
- A sheet of galvanized metal, or preferably stainless steel, about 1 mm thick. The body will be made from it, so the thickness of the material ensures the strength of the body.
- Copper tube for heat exchanger. It's easiest if it's half an inch in diameter. You can also use a thin-walled metal pipe, but copper has much better heat transfer. The ideal heat exchanger option is a radiator from any small car. It can be purchased at car dismantling yards and scrap metal collection points.
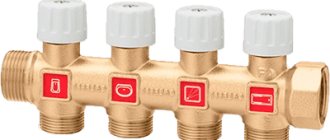
- Two end valves with couplings for connecting the heat exchanger to the central heating system. Some experts recommend connecting the device and the heating system with flange connections. It is believed that such fastening is much more reliable than couplings.
- A fan, preferably a duct one, but you can use any model of suitable size. The main thing is that it generates sufficient power and is powered from a 220 V household power supply.
- Four springs for fan mounting. The springs should not be very stiff. They are vibration absorbers for the fan. Thanks to the spring mounting, your water heater will operate almost silently.
It would be very nice to purchase a Mayevsky tap to bleed air pockets, which the central heating system is so “rich in”.
Tools needed to create a heater
- A jigsaw with a metal file or a grinder with a cutting disc. The ideal option is both.
- Drill, set of metal drills, pliers, Phillips screwdriver, set of hardware (nuts, bolts, washers, etc.).
- Die for cutting threads on copper pipe. If the choice fell on a flange connection, then in this case you need a powerful soldering iron, flux for soldering copper and the metal flanges themselves, with a hole equal to the cross-section of the copper tube.
- Ruler, pencil, metal scissors.
Tip: It is much easier to couple the central heating system and your heat exchanger with half-inch couplings.
Build process
Creating a water fan heater with your own hands should be roughly divided into four stages: creating a housing, depending on the span of the fan blades, creating a heat exchanger, the dimensions of which will depend on the size of the housing, installation in the chosen location and connection to the heating system.
Stage 1
- We make markings. Using a jigsaw, grinder or metal snips, he cuts out a strip of metal to make an impromptu frame. The width of the strip will be equal to the width of the body of your device. The length of the strip will be equal to the length of the four sides of the device.
- Marks fold lines on the strip. The process of bending metal is quite labor-intensive and requires skills.
- We connect the opposite ends of the strip with bolts or rivets. To do this, you need to make a flange at the opposite ends of the strip, about 1-2 cm.
- The leftover material is used to make a front panel, in which many large holes should be made to allow hot air to escape.
- We attach it firmly to the front side of the frame.
Stage 2
- We fill the copper tube with clean and dry sand, plug one end and bend the heat exchanger. Sand is needed so that there are no creases in the bend areas. After that, we free the heat exchanger from sand and thoroughly blow it out.
- We drill two holes in the side of the housing to bring out the ends of the heat exchanger.
- At the ends of the heat exchanger we cut threads for connection to the couplings.
- We solder the Mayevsky tap into the top point of the heat exchanger.
Stage 3
- We assemble the device. First, a heat exchanger is installed in the finished housing. On both sides its ends are attached to the body with nuts. The remaining thread will be for screwing on the couplings.
- After this, a fan is installed behind the heat exchanger. To do this, small holes should be drilled in the corners of the body to attach the springs. The other side of each spring should be placed on the fan so that it is in the center of the device, like on guy wires.
Stage 4
- We mount the device on the wall so that there is a gap of at least 10 cm between the wall and the heater.
- We connect taps to the central heating pipes.
- Then, through couplings, we connect it to our fan.
Our water fan heater is ready. It is recommended to bleed air using a Mayevsky valve before starting
Self-installation of a fan heater
Before self-assembly, you must carefully study the design of the fan heater. It consists of three main parts:
- separate case (metal or plastic);
- fan;
ceramic, spiral or tubular heating element.
The size, power and design of modern fan heaters allow them to be used in rooms for a wide variety of purposes - from a simple garage to a living room in a house
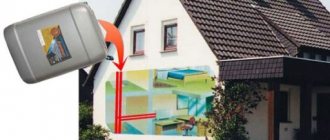
The installation method, dimensions and power of heaters vary. The principle of operation is quite simple: a fan directs a flow of cold air to a heating element, where its temperature rises by a certain number of degrees, and then, already heated, it spreads throughout the room. The main advantage of a stationary heating device is efficient, fast heating of air in a limited area. In addition, the small device is convenient to carry from place to place and use only when necessary.
Blue arrows indicate cold air that enters the device body and, under the action of the fan, rushes to the heating elements. Red - heated air with a certain direction
Today the market offers a huge amount of heating equipment for rooms of different sizes. Thermal curtains were often used. You can read more about this unit in our article:
Many models, including self-made ones, can be used in hot weather by turning off the heating elements, thereby turning the device into a regular fan.
Fan heaters with low power are sold at prices ranging from 500 to 700 rubles. For the same money you can build a more powerful device, spending only on a controller, fan or power supply
After studying the device diagram, you need to select the parts that will be useful for assembly. Most of them don’t even have to be purchased: in any home there will be faulty devices, suitable materials, wires, fasteners, and tools. You can choose one of the proposed options or design your own. Let's tell you in more detail how to make a fan heater with your own hands from a duct fan and a power supply.
Homemade gas heater
The main advantage of this model is that its production requires a minimum of parts, which can always be found in the household of any craftsman.
This economical source of heating is not too expensive; the costs of its production and maintenance are completely absorbed during operation
The only disadvantage of a gas heater is the need to provide sufficient ventilation.
Preparation of materials and components
To make a gas heater for the garage, you need to prepare in advance:
- burner with valve;
- tin sheet;
- metal scissors;
- drill with a thin drill bit;
- rivets;
- riveter.
To make the grille, you will need a piece of fine-mesh metal mesh. It’s great if you have a regular wire colander sieve on hand, it will act as a protective grid.
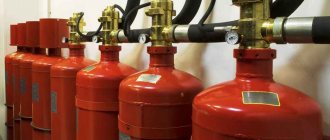
The main element of the device is a gas-filled collet cartridge with a capacity of 450 milliliters, used for refilling lighters
Collet cylinders are convenient because when using them, you don’t have to use up all the contents at once. The presence of shut-off valves allows the devices to be used repeatedly.
If desired, the heating structure can be made using not only disposable cans used for refilling lighters, but also using a small refilled cylinder.
Cutting blanks and assembling the structure
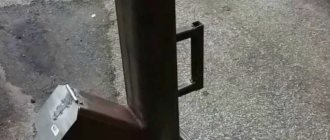
When making the structure, the first thing to do is fix the heater to the burner.
The selected household sieve of the appropriate diameter is applied to the galvanized sheet and outlined along the contour with a marker
Four rectangular ears are added in the direction of the four sides of the workpiece applied to the galvanized sheet. One of the ears should be made twice as long as the others. The blanks are cut along the intended contour, trying to make smooth, burr-free cuts.
The burner is screwed to the cut-out tin blank using bolts. The ears located on four sides of the workpiece are bent in the opposite direction and used to fix the strainer.
The strainer attached using the ears of a tin circle has a dome shape, thanks to which it will perfectly dissipate heat to the sides
To attach the second protective mesh, take another piece of sheet metal and cut out a circle of exactly the same size from it. Elongated ears are added to the workpiece, necessary for attaching the mesh.
Stepping back half a centimeter from the edge of the circle, drill 10 through holes along the circumference. A strip is cut from a piece of fine-mesh metal mesh, the length of which corresponds to the diameter of the cut tin blank.
The ears located on four sides are bent and used to fix the wide side of the fine mesh strip, the second piece is fixed on the opposite side
The bent ears of round tin blanks are fixed to opposite sides of the mesh strip using a riveter and rivets. When assembled, you should get a cylinder with mesh walls and tin ends.
The design, which includes two meshes, is advantageous in that it has an increased heating surface and is equipped with additional protection.
At the final stage, all that remains is to turn on the gas water heater and check its performance. The heat produced by this small device is enough to heat a small room or garage.
Directional heat gun
Our own heat gun has enough power to easily heat a garage, utility room or office in the house
For assembly you will need:
- a piece of plywood 16 mm thick;
- fan (duct);
- temperature and speed controllers;
- PBEC heating element (2.2 kW);
- fasteners (clamp, bracket, studs, nuts, washers);
- wheels.
We cut out a rectangle of approximately 47 cm x 67 cm from plywood, sand the rough edges and corners.
The plywood base was not chosen in vain: it is light, flat, and most importantly, it does not conduct electric current, which is important in the event of force majeure circumstances
We connect two central parts with a coupling - the fan and the heating element. We fix the resulting structure on a plywood base using a bracket and a plumbing clamp.
We select fasteners in such a way that they firmly fix the elements of the device and do not cause them harm. For example, self-tapping screws are perfect - they do not destroy plywood
Self-tapping screws (16 mm) are suitable for fastening. We install a temperature sensor (for example, TG-K 330), which is necessary to control the temperature, next to it there are two more devices - for adjusting the speed and temperature.
When connecting the parts of the fan heater to each other, do not forget about the safety of the device: the connection points of wires and cables must be insulated
Pulsar 3.6 is suitable as a thermal regulator. After installing all the necessary devices and parts, we connect them according to the diagram.
Device control circuits can be found in specialized literature, instructions for devices such as an electric fan, or on specialized websites
For ease of use, we screw wheels to the plywood base.
Small rollers screwed on the bottom side make the homemade fan heater more convenient to move around the room, especially if it is heavy.
Well, that’s all - the homemade heat gun is ready.
Try to place the device parts in such a way that, if necessary, it is easy to disassemble each of them and replace failed elements
Like any homemade fan heater, this device has disadvantages. For example, when the device is stopped, the voltage on the heating element remains, and this is quite dangerous, since overheating occurs and an emergency situation is possible. The situation can be corrected by installing a relay to timely turn off the power supply to the temperature controller. Another disadvantage is inadequate heating of the room, but this is a disadvantage of almost all stationary fan heaters.
DIY fan heater made from trash + video
In the video you will clearly see how a fan heater is made from various elements that may remain from components of household appliances that are no longer working.
For the fan heater model in question you will need:
- Cover with cooler from the power supply;
- Broken hair dryer;
- Plastic grille for ventilation;
- Iron cord with plug;
- Textolite;
- Pieces of plywood.
Step by step guide:
- Installation of the heating element. A frame is made from narrow strips of textolite, and a spiral, which was removed from a hair dryer, is wound onto it in a zigzag. Holes are prepared in the textolite structure and wire is inserted into them. A spiral is attached to it so that it does not touch the frame material. As a result, the spiral plays the role of a large variable resistor.
- Fan connection. On the created frame with a spiral, using a voltage meter, find the area with the lowest alternating voltage. You need to solder the diode to the plus, and connect the wiring from the cooler to the minus. This circuit completely replaces the power supply.
- Execution of the body. The side walls are screwed to the cooler lid, and a grille is inserted into the remaining empty wall and fixed with glue from a hot-melt gun.
The resulting device consumes little electricity, operates silently and can easily heat certain places in the room. For example, if your feet get cold while working in the workshop, you can install a fan heater under the table and it will warm them.
If you need to ensure high-quality heating of the room before turning on the central heating or after its completion, during a period when there are particularly cold days, then you can’t imagine a better homemade fan heater. It is compact, economical and productive, it can be created from available materials
Work on connecting fan heaters
So, we lay two cable lines for the fan heater control circuit. We take into account the sufficient length of the cable ends to make connections conveniently.
In each room where the fan heater is installed, you need to install a remote temperature sensor.
The sensor must be installed in a place where it will not fall under the direct flow of air heated by the fan heater. In this case, it will respond to the temperature of the air in the room, and not the flow of heated air.
The connection diagram for temperature sensors is not complicated. All sensors are connected in series into one circuit.
The electric motor speed control circuit is connected, unlike temperature sensors, in parallel. This makes it possible to control the speed of all fans through the command controller.
The power supply to the fan heaters themselves, as well as to the controller, is supplied directly to each device separately.
So, I think there is no point in describing how to lay an electrical cable, so I’ll go straight to connecting the devices.
The used fan heater models (Veher EC-30) have a type of motor (electronically commutated fans with Green Tech technology), which allows you to adjust the speed without using transformers. In addition, they are much more economical. Let me explain so that there are no questions about why this or that equipment is not used.
Since there were differences in the connection diagram specified in the instructions and in fact, it was decided to first assemble a test circuit, connecting one fan heater and a command controller.
As you can see in the photo above, the cable for connecting the power supply to the fan heater has a slightly larger number of wires than shown in the diagram in the instructions. Fortunately, the colors of the wires still corresponded to the instructions.
We connect to the black and blue wires, two wires from a 220 V power supply. If there is a ground line, then connect the two-color wire to it.
We connect the wire to the blue and yellow wires, the fan heater control circuit, as shown in the photo below.
Now you need to connect the necessary wires to the controller
To do this, you need to carefully (using a flat screwdriver, for example), pry the latches of the controller case and carefully, slowly open the cover
You need to open it carefully so as not to damage the cable connecting the control buttons to the board. We connect the wires as indicated in the instructions for connecting the command controller
We connect power, a remote temperature sensor (not necessary for one fan heater, since the controller has its own built-in), control circuit to the appropriate terminals
We connect the wires as indicated in the instructions for connecting the command controller. We connect power, a remote temperature sensor (not necessarily for one fan heater, since the controller has its own built-in), and a control circuit to the appropriate terminals.
Above, in the photo, you can see how the remote temperature sensor is connected.
We connect the fan heater and controller to the network.
And, it’s done! The controller displays the parameters, the fan heater starts and starts supplying air.
All that remains to be done now is, according to the already proven scheme, to connect, instead of the temporary hut, the wiring of the control circuit and remote sensors throughout the premises. Carefully securing the wires, we connect them to the controller, which we first fix on the wall, in a convenient place we selected earlier.
It is best to connect the automation at the last stage. When the heating system has already been assembled, tested and checked for functionality. So, we immediately adjust the necessary parameters of the controller, and we are sure that water (coolant) will not get into the automation.
In our case this was the case. The only thing I swapped the description of the boiler piping with the connection of the fan heaters.
As you understand, the final material on this topic will be a description of the piping of a long-burning solid fuel boiler.
All the best, see you in new material. Vladimir Voinarovsky was with you.
The fan heater can be used as additional electric heating for home and garden. If your system cannot cope or the central heating in the apartment has not yet been turned on, such heaters can come to the rescue. But what should you do if after summer the fan heater does not turn on or blows but does not heat? In this case, you can try to repair it yourself, which is actually not very difficult. Next, we will provide the most common causes of breakdowns and DIY repair methods.